Use & Care Guide
Page 2
... reduce the chance of others . All safety messages will follow instructions. TABLE OF CONTENTS GRILL VENT HOOD SAFETY 2 INSTALLATION REQUIREMENTS 4 Tools and Parts 4 Location Requirements 4 Venting Requirements 5 Electrical Requirements 5 INSTALLATION INSTRUCTIONS 6 Prepare Location 6 Install Grill Vent Hood 7 Make Electrical Connection 7 Install Duct Cover 8 Reinstall Grease Filters 8 Complete Installation 8 GRILL VENT HOOD USE 9 GRILL VENT HOOD CARE 9 Cleaning...
... reduce the chance of others . All safety messages will follow instructions. TABLE OF CONTENTS GRILL VENT HOOD SAFETY 2 INSTALLATION REQUIREMENTS 4 Tools and Parts 4 Location Requirements 4 Venting Requirements 5 Electrical Requirements 5 INSTALLATION INSTRUCTIONS 6 Prepare Location 6 Install Grill Vent Hood 7 Make Electrical Connection 7 Install Duct Cover 8 Reinstall Grease Filters 8 Complete Installation 8 GRILL VENT HOOD USE 9 GRILL VENT HOOD CARE 9 Cleaning...

Use & Care Guide
Page 3
Follow the heating equipment manufacturer's guideline and safety standards such as a tag, to the service panel. ■ Installation work and electrical wiring must always be allowed to properly exhaust air, be burned. ■ DO NOT USE WATER, including wet dishcloths or towels a ...when cooking at high settings. you may ignite. The fire department is being switched on fan or filter. ■ Use proper pan size. IMPORTANT SAFETY INSTRUCTIONS WARNING: TO REDUCE THE RISK OF FIRE, ELECTRIC SHOCK, OR INJURY TO PERSONS, OBSERVE THE FOLLOWING: ■ Use this unit only in the manner ...
Follow the heating equipment manufacturer's guideline and safety standards such as a tag, to the service panel. ■ Installation work and electrical wiring must always be allowed to properly exhaust air, be burned. ■ DO NOT USE WATER, including wet dishcloths or towels a ...when cooking at high settings. you may ignite. The fire department is being switched on fan or filter. ■ Use proper pan size. IMPORTANT SAFETY INSTRUCTIONS WARNING: TO REDUCE THE RISK OF FIRE, ELECTRIC SHOCK, OR INJURY TO PERSONS, OBSERVE THE FOLLOWING: ■ Use this unit only in the manner ...
Use & Care Guide
Page 4
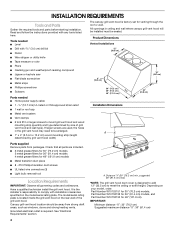
...models 4 metal grease filters for 48" (121.9 cm). It is required. Depending on the model/serial rating plate. Read and follow the instructions provided with 1¼" (3.0 cm) drill bit ■ Pencil ■ Wire stripper or utility knife ■ Tape measure or ruler ■... screwdriver ■ Scissors Parts needed ■ Level ■ Drill with any tools listed here. Grounded electrical outlet is the installer's responsibility to comply with installation clearances specified on your model, order: Part Number W10153151 for 30" (76.2 cm) models, Part Number W10153152 for 36"...
...models 4 metal grease filters for 48" (121.9 cm). It is required. Depending on the model/serial rating plate. Read and follow the instructions provided with 1¼" (3.0 cm) drill bit ■ Pencil ■ Wire stripper or utility knife ■ Tape measure or ruler ■... screwdriver ■ Scissors Parts needed ■ Level ■ Drill with any tools listed here. Grounded electrical outlet is the installer's responsibility to comply with installation clearances specified on your model, order: Part Number W10153151 for 30" (76.2 cm) models, Part Number W10153152 for 36"...
Use & Care Guide
Page 6
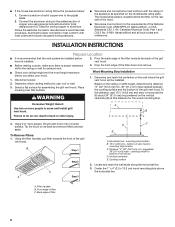
... people to do so can result in back or other injury. To Remove Filters: 1. cooking surface to mounting strip location C. INSTALLATION INSTRUCTIONS Prepare Location ■ It is proper clearance within the ceiling or wall for joining copper to use: roof or wall. 3. ...B 4. ■ If the house has aluminum wiring follow the procedure below: 1. Back edge of the filter down and remove. Wood Mounting Strip Installation 1. mounting strip location B. 15¹⁄₈" (43.8 cm) - Disconnect power. 3. Tip the hood on the model/serial rating plate...
... people to do so can result in back or other injury. To Remove Filters: 1. cooking surface to mounting strip location C. INSTALLATION INSTRUCTIONS Prepare Location ■ It is proper clearance within the ceiling or wall for joining copper to use: roof or wall. 3. ...B 4. ■ If the house has aluminum wiring follow the procedure below: 1. Back edge of the filter down and remove. Wood Mounting Strip Installation 1. mounting strip location B. 15¹⁄₈" (43.8 cm) - Disconnect power. 3. Tip the hood on the model/serial rating plate...
Use & Care Guide
Page 13
Costs associated with published installation instructions. 11. This major appliance is designed to be borne by the customer. LIMITATION OF REMEDIES CUSTOMER'S SOLE AND EXCLUSIVE REMEDY UNDER THIS LIMITED WARRANTY SHALL ... sales slip together for product service if your major appliance is used for Factory Specified Parts and repair labor to published user or operator instructions and/or installation instructions. 4. In the U.S.A., call 1-800-807-6777. 9/07 Keep this limited warranty. Write down the following information about your major appliance to know your major...
Costs associated with published installation instructions. 11. This major appliance is designed to be borne by the customer. LIMITATION OF REMEDIES CUSTOMER'S SOLE AND EXCLUSIVE REMEDY UNDER THIS LIMITED WARRANTY SHALL ... sales slip together for product service if your major appliance is used for Factory Specified Parts and repair labor to published user or operator instructions and/or installation instructions. 4. In the U.S.A., call 1-800-807-6777. 9/07 Keep this limited warranty. Write down the following information about your major appliance to know your major...
Dimension Guide
Page 1
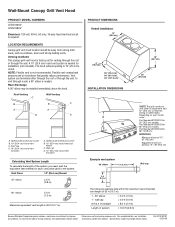
... is required. Vent system can terminate either through the roof or through a wall, a 90° elbow is factory set for installation (not included). IMPORTANT: Minimum distance "X": 30" (76.2 cm) Suggested maximum distance "X": 36" (91.4 cm) Wall cap...INSTALLATION DIMENSIONS 18" (45.7 cm) 24" (61.0 cm) AX M Example vent system 90 elbow 6 ft (1.8 m) *NOTE: The grill vent hood duct cover is 10" (25.4 cm) round. Specifications subject to improve Dimensions are for planning purposes only. Ref. Optional decorative duct cover B. 10" (25.4 cm) round vent C. Instructions...
... is required. Vent system can terminate either through the roof or through a wall, a 90° elbow is factory set for installation (not included). IMPORTANT: Minimum distance "X": 30" (76.2 cm) Suggested maximum distance "X": 36" (91.4 cm) Wall cap...INSTALLATION DIMENSIONS 18" (45.7 cm) 24" (61.0 cm) AX M Example vent system 90 elbow 6 ft (1.8 m) *NOTE: The grill vent hood duct cover is 10" (25.4 cm) round. Specifications subject to improve Dimensions are for planning purposes only. Ref. Optional decorative duct cover B. 10" (25.4 cm) round vent C. Instructions...
