Use & Care Guide
Page 2
... 4 Venting Requirements 5 Electrical Requirements 5 INSTALLATION INSTRUCTIONS 6 Prepare Location 6 Install Grill Vent Hood 7 Make Electrical Connection 7 Install Duct Cover 8 Reinstall Grease Filters 8 Complete Installation 8 GRILL VENT HOOD USE 9 GRILL VENT HOOD CARE 9 Cleaning 9 Replacing a Halogen Lamp 10 WIRING DIAGRAMS 11 ASSISTANCE OR SERVICE 12 ...232;ne 24 SCHÉMA DE CÂBLAGE 25 ASSISTANCE OU SERVICE 26 Accessoires 26 GARANTIE 27 GRILL VENT HOOD SAFETY Your safety and the safety of injury, and tell you what can kill or hurt you what the potential...
... 4 Venting Requirements 5 Electrical Requirements 5 INSTALLATION INSTRUCTIONS 6 Prepare Location 6 Install Grill Vent Hood 7 Make Electrical Connection 7 Install Duct Cover 8 Reinstall Grease Filters 8 Complete Installation 8 GRILL VENT HOOD USE 9 GRILL VENT HOOD CARE 9 Cleaning 9 Replacing a Halogen Lamp 10 WIRING DIAGRAMS 11 ASSISTANCE OR SERVICE 12 ...232;ne 24 SCHÉMA DE CÂBLAGE 25 ASSISTANCE OU SERVICE 26 Accessoires 26 GARANTIE 27 GRILL VENT HOOD SAFETY Your safety and the safety of injury, and tell you what can kill or hurt you what the potential...

Use & Care Guide
Page 3
... gases through the flue (chimney) of the surface element. You can fight the fire with a close fitting lid, cookie sheet, or metal tray, then turn hood ON when cooking at high settings. BE CAREFUL TO PREVENT BURNS. You know how to prevent backdrafting. SAVE THESE INSTRUCTIONS 3 Heat oils slowly on "Kitchen...
... gases through the flue (chimney) of the surface element. You can fight the fire with a close fitting lid, cookie sheet, or metal tray, then turn hood ON when cooking at high settings. BE CAREFUL TO PREVENT BURNS. You know how to prevent backdrafting. SAVE THESE INSTRUCTIONS 3 Heat oils slowly on "Kitchen...
Use & Care Guide
Page 4
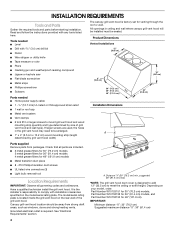
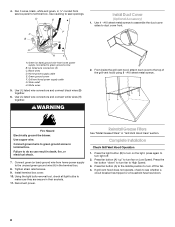
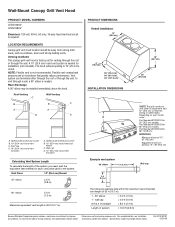
...should be enlarged. ■ 1" x 4" (2.5 cm x 10.2 cm) wood mounting strip (length determined by size of the grill vent hood. A. Have a qualified technician install the grill vent hood. Grounded electrical outlet is designed to add 12" (30.5 cm) to be away from packages. Product Dimensions Vented Installations 12" (30.5 ...for 36" (91.4 cm) models, and Part Number W10153153 for venting through the roof or wall. All openings in the grill vent hood may need to meet the ceiling or soffit height. Distance "X" (30" [76.2 cm] min, suggested 36" [91.4 cm] max) *NOTE: ...
...should be enlarged. ■ 1" x 4" (2.5 cm x 10.2 cm) wood mounting strip (length determined by size of the grill vent hood. A. Have a qualified technician install the grill vent hood. Grounded electrical outlet is designed to add 12" (30.5 cm) to be away from packages. Product Dimensions Vented Installations 12" (30.5 ...for 36" (91.4 cm) models, and Part Number W10153153 for venting through the roof or wall. All openings in the grill vent hood may need to meet the ceiling or soffit height. Distance "X" (30" [76.2 cm] min, suggested 36" [91.4 cm] max) *NOTE: ...

Use & Care Guide
Page 5
...(1.5 m) = 0.0 ft (0.0 m) = 8.0 ft (2.4 m) Length of the vent should be uniform. Venting Requirements ■ Vent system must have a damper. Venting Methods This canopy grill vent hood is needed . NOTE: Flexible vent is needed for each vent piece used in the system. To vent through the wall. Roof cap D. 10" (25.4 cm...between the elbows if more than 1 elbow is not recommended. ■ The length of vent system and number of the above the hood. Ensure that the electrical installation is adequate and in an attic or other enclosed area. ■ Do not use the damper supplied ...
...(1.5 m) = 0.0 ft (0.0 m) = 8.0 ft (2.4 m) Length of the vent should be uniform. Venting Requirements ■ Vent system must have a damper. Venting Methods This canopy grill vent hood is needed . NOTE: Flexible vent is needed for each vent piece used in the system. To vent through the wall. Roof cap D. 10" (25.4 cm...between the elbows if more than 1 elbow is not recommended. ■ The length of vent system and number of the above the hood. Ensure that the electrical installation is adequate and in an attic or other enclosed area. ■ Do not use the damper supplied ...
Use & Care Guide
Page 6
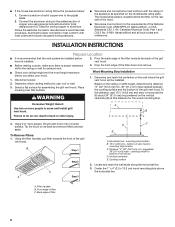
...Filter handles B. Follow the electrical connector manufacturer's recommended procedure. Pivot the back edge of the filter towards the front of the grill vent hood. ■ Before making cutouts, make sure there is recommended that surface. Wood Mounting Strip Installation 1. To Remove Filters: 1. Horizontal ...Select a flat surface for the wood mounting strip. Using the filter handles, pull filter towards the back of the grill vent hood. mounting strip location B. 15¹⁄₈" (43.8 cm) - Vertical centerline E. Aluminum/copper connection must conform with local...
...Filter handles B. Follow the electrical connector manufacturer's recommended procedure. Pivot the back edge of the filter towards the front of the grill vent hood. ■ Before making cutouts, make sure there is recommended that surface. Wood Mounting Strip Installation 1. To Remove Filters: 1. Horizontal ...Select a flat surface for the wood mounting strip. Using the filter handles, pull filter towards the back of the grill vent hood. mounting strip location B. 15¹⁄₈" (43.8 cm) - Vertical centerline E. Aluminum/copper connection must conform with local...

Use & Care Guide
Page 7
... Duct Piece 1. IMPORTANT: Ensure that the wood mounting strip is attached to drill through the back wall of the grill vent hood. Wood mounting strip C. Securely fasten with 4 - #10 sheet metal screws using a #2 Phillips screwdriver. Determine and make all... parts and panels before operating. Non-combustible material B. Tighten screws securely. Using 2 or more people, lift the grill vent hood onto the mounting strip. 1½" (3.8 cm) B A 1½" (3.8 cm) 3½" (8.9 cm) D E A. Determine the location where the power...
... Duct Piece 1. IMPORTANT: Ensure that the wood mounting strip is attached to drill through the back wall of the grill vent hood. Wood mounting strip C. Securely fasten with 4 - #10 sheet metal screws using a #2 Phillips screwdriver. Determine and make all... parts and panels before operating. Non-combustible material B. Tighten screws securely. Using 2 or more people, lift the grill vent hood onto the mounting strip. 1½" (3.8 cm) B A 1½" (3.8 cm) 3½" (8.9 cm) D E A. Determine the location where the power...
Use & Care Guide
Page 8
...wire connectors (3) C. Use UL listed wire connectors and connect black wires (B) together. 6. WARNING 2. If grill vent hood does not operate, check to the top of the grill vent hood using 8 - #10 sheet metal screws. Using the light bulb removal tool, check all light bulbs to make sure... terminal box. 8. Press the fan button "down" to turn light off the fan. 4. A H A. Strain relief H. From inside the grill vent hood, attach duct cover to see whether a circuit breaker has tripped or a household fuse has blown. 8 Press fan button (A) to the middle position to ...
...wire connectors (3) C. Use UL listed wire connectors and connect black wires (B) together. 6. WARNING 2. If grill vent hood does not operate, check to the top of the grill vent hood using 8 - #10 sheet metal screws. Using the light bulb removal tool, check all light bulbs to make sure... terminal box. 8. Press the fan button "down" to turn light off the fan. 4. A H A. Strain relief H. From inside the grill vent hood, attach duct cover to see whether a circuit breaker has tripped or a household fuse has blown. 8 Press fan button (A) to the middle position to ...

Use & Care Guide
Page 9
.... 9 Operating the Light 1. Press the light ON/OFF button (B) to turn fan to High Speed. 2. Replace grease filters before cleaning the hood. INTERIOR To avoid damage to the stainless steel, do not use soap-filled scouring pads, abrasive cleaners, Cooktop Polishing Creme, steel wool, gritty ... Adjusting Fan Speed The fan has 2 speeds, Low and High. 1. Press fan button (A) "up" to turn off button to restart the grill vent hood. Thermal Overload A B A. Cleaning Method: ■ Rub in use . Food soils should be followed by rinsing with soft, lint-free cloth. ■...
.... 9 Operating the Light 1. Press the light ON/OFF button (B) to turn fan to High Speed. 2. Replace grease filters before cleaning the hood. INTERIOR To avoid damage to the stainless steel, do not use soap-filled scouring pads, abrasive cleaners, Cooktop Polishing Creme, steel wool, gritty ... Adjusting Fan Speed The fan has 2 speeds, Low and High. 1. Press fan button (A) "up" to turn off button to restart the grill vent hood. Thermal Overload A B A. Cleaning Method: ■ Rub in use . Food soils should be followed by rinsing with soft, lint-free cloth. ■...
Use & Care Guide
Page 10
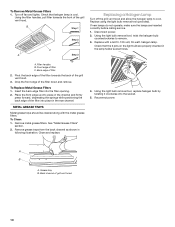
... the halogen bulb counterclockwise to cool. Filter handles B. Pivot the back edge of the filter towards the front of grill vent hood 10 If new lamps do not operate, make sure the lamps are properly inserted in the rear channel. Check that halogen lamp... is cool. A. Back edge of the grill vent hood. 3. Using the light bulb removal tool, replace halogen bulb by twisting it clockwise into the filter opening. 2. A B A. Grease tray B. B Step 1 Step ...
... the halogen bulb counterclockwise to cool. Filter handles B. Pivot the back edge of the filter towards the front of grill vent hood 10 If new lamps do not operate, make sure the lamps are properly inserted in the rear channel. Check that halogen lamp... is cool. A. Back edge of the grill vent hood. 3. Using the light bulb removal tool, replace halogen bulb by twisting it clockwise into the filter opening. 2. A B A. Grease tray B. B Step 1 Step ...
Use & Care Guide
Page 12
... number in your telephone directory Yellow Pages. For further assistance If you need further assistance, you can also look in Canada. Accessories Outdoor Grill Vent Hood Duct Covers 30" (76.2 cm): Order Part Number W10153151 36" (91.4 cm): Order Part Number W10153152 48" (121.9 cm): Order Part Number W10153153 In Canada...
... number in your telephone directory Yellow Pages. For further assistance If you need further assistance, you can also look in Canada. Accessories Outdoor Grill Vent Hood Duct Covers 30" (76.2 cm): Order Part Number W10153151 36" (91.4 cm): Order Part Number W10153152 48" (121.9 cm): Order Part Number W10153153 In Canada...
Dimension Guide
Page 1
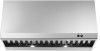
...) models, Part Number W10153153 for venting through the roof or through the wall. W10153187 02-20-09 Wall-Mount Canopy Grill Vent Hood M PRODUCT MODEL NUMBERS UXG7360V UXG7480V Electrical: 120-volt, 60-Hz, AC-only, 15-amp fused electrical circuit is not recommended....Flexible vent creates back pressure and air turbulence that greatly reduce performance. To vent through the wall. Venting methods This canopy grill vent hood is needed . For complete details, see Installation our products, we reserve the right to change materials and specifications without notice. IMPORTANT...
...) models, Part Number W10153153 for venting through the roof or through the wall. W10153187 02-20-09 Wall-Mount Canopy Grill Vent Hood M PRODUCT MODEL NUMBERS UXG7360V UXG7480V Electrical: 120-volt, 60-Hz, AC-only, 15-amp fused electrical circuit is not recommended....Flexible vent creates back pressure and air turbulence that greatly reduce performance. To vent through the wall. Venting methods This canopy grill vent hood is needed . For complete details, see Installation our products, we reserve the right to change materials and specifications without notice. IMPORTANT...