User Guide
Page 2
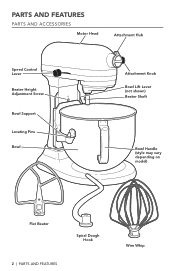
PARTS AND FEATURES PARTS AND ACCESSORIES Motor Head Attachment Hub Speed Control Lever Beater Height Adjustment Screw Bowl Support Locating Pins Bowl Attachment Knob Bowl Lift Lever (not shown) Beater Shaft Bowl Handle (style may vary depending on model) Flat Beater Spiral Dough Hook 2 | PARTS AND FEATURES Wire Whip
PARTS AND FEATURES PARTS AND ACCESSORIES Motor Head Attachment Hub Speed Control Lever Beater Height Adjustment Screw Bowl Support Locating Pins Bowl Attachment Knob Bowl Lift Lever (not shown) Beater Shaft Bowl Handle (style may vary depending on model) Flat Beater Spiral Dough Hook 2 | PARTS AND FEATURES Wire Whip
User Guide
Page 3
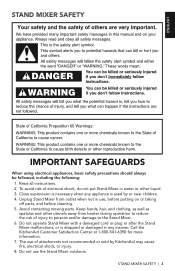
... not use of injury to persons and/or damage to reduce the risk of attachments not recommended or sold by or near children. 4. To avoid risk of electrical shock, do not put Stand Mixer in use, before putting on or taking off parts, and before cleaning. ... STAND MIXER SAFETY IMPORTANT SAFEGUARDS When using electrical appliances, basic safety precautions should always be followed, including the following: 1. STAND MIXER SAFETY | 3 The use the Stand Mixer outdoors. Do not operate Stand Mixer with a damaged cord or plug or after the Stand Mixer malfunctions, or is used by KitchenAid may ...
... not use of injury to persons and/or damage to reduce the risk of attachments not recommended or sold by or near children. 4. To avoid risk of electrical shock, do not put Stand Mixer in use, before putting on or taking off parts, and before cleaning. ... STAND MIXER SAFETY IMPORTANT SAFEGUARDS When using electrical appliances, basic safety precautions should always be followed, including the following: 1. STAND MIXER SAFETY | 3 The use the Stand Mixer outdoors. Do not operate Stand Mixer with a damaged cord or plug or after the Stand Mixer malfunctions, or is used by KitchenAid may ...
User Guide
Page 4
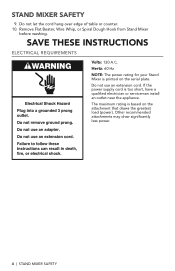
Hertz: 60 Hz NOTE: The power rating for your Stand Mixer is printed on the attachment that draws the greatest load (power). Do not let the cord hang over edge of table or counter. 10. SAVE THESE INSTRUCTIONS ELECTRICAL REQUIREMENTS Volts: 120 A.C. If the power supply cord is based on the serial plate. Remove Flat Beater...
Hertz: 60 Hz NOTE: The power rating for your Stand Mixer is printed on the attachment that draws the greatest load (power). Do not let the cord hang over edge of table or counter. 10. SAVE THESE INSTRUCTIONS ELECTRICAL REQUIREMENTS Volts: 120 A.C. If the power supply cord is based on the serial plate. Remove Flat Beater...
User Guide
Page 5
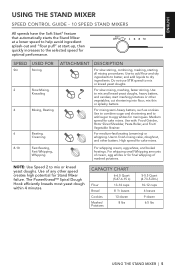
... loaves Cookies 13 dozen Mashed Potatoes 8 lbs 5-5.5 Quart (4.73-5.20 L) 10-12 cups 6 loaves 9 dozen 6.5 lbs USING THE STAND MIXER | 5 Medium speed for cake mixes. Use with: Food Grinder, Rotor Slicer/Shredder, Pasta Roller, and Fruit/ Vegetable Strainer. High speed ...SPEED USED FOR Stir Stirring 2 Slow Mixing, Kneading 4 Mixing, Beating 6 8-10 Beating, Creaming Fast Beating, Fast Whipping, Whipping ATTACHMENT DESCRIPTION For slow stirring, combining, mashing, starting all mixing procedures. cut shortening into flour; mix thin or splashy batters. For slow ...
... loaves Cookies 13 dozen Mashed Potatoes 8 lbs 5-5.5 Quart (4.73-5.20 L) 10-12 cups 6 loaves 9 dozen 6.5 lbs USING THE STAND MIXER | 5 Medium speed for cake mixes. Use with: Food Grinder, Rotor Slicer/Shredder, Pasta Roller, and Fruit/ Vegetable Strainer. High speed ...SPEED USED FOR Stir Stirring 2 Slow Mixing, Kneading 4 Mixing, Beating 6 8-10 Beating, Creaming Fast Beating, Fast Whipping, Whipping ATTACHMENT DESCRIPTION For slow stirring, combining, mashing, starting all mixing procedures. cut shortening into flour; mix thin or splashy batters. For slow ...
User Guide
Page 6
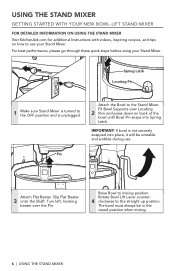
For best performance, please go through these quick steps before using your Stand Mixer. IMPORTANT: If bowl is unplugged. Attach the Bowl to mixing position. Fit Bowl Supports over the Pin. Raise Bowl to the Stand Mixer. Turn left, hooking beater over Locating 2 Pins and press down on ...how to the straight up position. USING THE STAND MIXER GETTING STARTED WITH YOUR NEW BOWL-LIFT STAND MIXER FOR DETAILED INFORMATION ON USING THE STAND MIXER Visit KitchenAid.com for additional Instructions with videos, inspiring recipes, and tips on back of the bowl...
For best performance, please go through these quick steps before using your Stand Mixer. IMPORTANT: If bowl is unplugged. Attach the Bowl to mixing position. Fit Bowl Supports over the Pin. Raise Bowl to the Stand Mixer. Turn left, hooking beater over Locating 2 Pins and press down on ...how to the straight up position. USING THE STAND MIXER GETTING STARTED WITH YOUR NEW BOWL-LIFT STAND MIXER FOR DETAILED INFORMATION ON USING THE STAND MIXER Visit KitchenAid.com for additional Instructions with videos, inspiring recipes, and tips on back of the bowl...
User Guide
Page 10
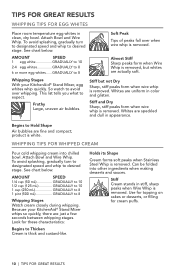
... mL GRADUALLY to desired stage. Whites are uniform in stiff, sharp peaks when Wire Whip is white. product is removed. Whipping Stages With your KitchenAid® Stand Mixer whips so quickly, there are speckled and dull in clean, dry bowl. To avoid splashing, gradually turn to designated speed and whip to 8 Whipping..., or filling for these characteristics: Begins to desired stage. TIPS FOR GREAT RESULTS WHIPPING TIPS FOR EGG WHITES Place room temperature egg whites in appearance. Attach Bowl and Wire Whip. So watch to Hold Shape Air bubbles are actually soft.
... mL GRADUALLY to desired stage. Whites are uniform in stiff, sharp peaks when Wire Whip is white. product is removed. Whipping Stages With your KitchenAid® Stand Mixer whips so quickly, there are speckled and dull in clean, dry bowl. To avoid splashing, gradually turn to designated speed and whip to 8 Whipping..., or filling for these characteristics: Begins to desired stage. TIPS FOR GREAT RESULTS WHIPPING TIPS FOR EGG WHITES Place room temperature egg whites in appearance. Attach Bowl and Wire Whip. So watch to Hold Shape Air bubbles are actually soft.


