
Instruction and Recipe Booklet
Page 4
... INTRODUCTION Proof of Purchase & Product Registration Card Inside Front Cover Blender Safety ...3 Important Safeguards ...4 Electrical Requirements 5 FEATURES AND OPERATION Blender Features ...6 Preparing the Blender for Use 8 Before First Use ...8 Blender Assembly 8 Using the Blender ...9 Before Use ...9 Operating the Blender 9 Crush Ice Feature ...9 Pulse Mode Feature 10 Ingredient Cap ...10 Soft StartTM Blending Feature 10 Speed Control Guide 11 CARE AND CLEANING Cleaning the Blender 12 Troubleshooting ...13 BLENDER TIPS Quick Tips ...14 How To ...14 Continued on...
... INTRODUCTION Proof of Purchase & Product Registration Card Inside Front Cover Blender Safety ...3 Important Safeguards ...4 Electrical Requirements 5 FEATURES AND OPERATION Blender Features ...6 Preparing the Blender for Use 8 Before First Use ...8 Blender Assembly 8 Using the Blender ...9 Before Use ...9 Operating the Blender 9 Crush Ice Feature ...9 Pulse Mode Feature 10 Ingredient Cap ...10 Soft StartTM Blending Feature 10 Speed Control Guide 11 CARE AND CLEANING Cleaning the Blender 12 Troubleshooting ...13 BLENDER TIPS Quick Tips ...14 How To ...14 Continued on...
Instruction and Recipe Booklet
Page 5
...Canada 23 How to Arrange for Service after the Warranty Expires - ENGLISH Table of Contents RECIPES Blended...WARRANTY AND SERVICE INFORMATION KitchenAid® Blender Warranty 22 Hassle-Free Replacement Warranty - 50 United States and District of Columbia ..........23 Hassle-Free Replacement Warranty - All Locations 24 How to Arrange for Service Outside these Locations 24 How to Order Accessories and Replacement Parts 24 NOTE: Due to the unique container and blade design, read these instructions and recipes before using your new KitchenAid® blender to Arrange for Warranty Service...
...Canada 23 How to Arrange for Service after the Warranty Expires - ENGLISH Table of Contents RECIPES Blended...WARRANTY AND SERVICE INFORMATION KitchenAid® Blender Warranty 22 Hassle-Free Replacement Warranty - 50 United States and District of Columbia ..........23 Hassle-Free Replacement Warranty - All Locations 24 How to Arrange for Service Outside these Locations 24 How to Order Accessories and Replacement Parts 24 NOTE: Due to the unique container and blade design, read these instructions and recipes before using your new KitchenAid® blender to Arrange for Warranty Service...
Instruction and Recipe Booklet
Page 7
... two-piece cover. 14. The use , before putting on or taking off parts, and before cleaning. 5. Unplug from outlet when not in water or other liquid. 3. When blending hot liquids, remove center piece of table or counter. 9. SAVE THESE INSTRUCTIONS 4 Read all instructions. 2. Do not operate the blender with a damaged cord or plug or after appliance malfunctions, or is not running. 10. Keep hands...
... two-piece cover. 14. The use , before putting on or taking off parts, and before cleaning. 5. Unplug from outlet when not in water or other liquid. 3. When blending hot liquids, remove center piece of table or counter. 9. SAVE THESE INSTRUCTIONS 4 Read all instructions. 2. Do not operate the blender with a damaged cord or plug or after appliance malfunctions, or is not running. 10. Keep hands...

Instruction and Recipe Booklet
Page 8
...power supply cord is too short, have a qualified electrician or serviceman install an outlet near the appliance. Failure to follow these instructions can result in any way. To reduce the risk of electrical shock, this plug will fit in the outlet, contact a qualified electrician. Do not use an extension cord.... If the plug does not fit in an outlet only one way. Do not remove ground prong. Do not use an extension cord. WARNING Electrical Shock Hazard Plug into a grounded 3 prong outlet. Do not use an adapter. ENGLISH Electrical ...
...power supply cord is too short, have a qualified electrician or serviceman install an outlet near the appliance. Failure to follow these instructions can result in any way. To reduce the risk of electrical shock, this plug will fit in the outlet, contact a qualified electrician. Do not use an extension cord.... If the plug does not fit in an outlet only one way. Do not remove ground prong. Do not use an extension cord. WARNING Electrical Shock Hazard Plug into a grounded 3 prong outlet. Do not use an adapter. ENGLISH Electrical ...
Instruction and Recipe Booklet
Page 9
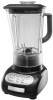
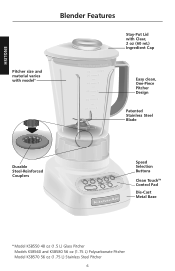
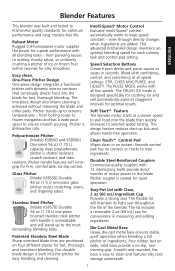
ENGLISH Blender Features Stay-Put Lid with Clear, 2 oz (60 mL) Ingredient Cap Pitcher size and material varies with model* Easy clean, One-Piece Pitcher Design Patented Stainless Steel Blade Durable Steel-Reinforced Couplers Speed Selection Buttons Clean TouchTM Control Pad Die-Cast Metal Base * Model KSB550 48 oz (1.5 L) Glass Pitcher Models KSB560 and KSB580 56 oz (1.75 L) Polycarbonate Pitcher Model KSB570 56 oz (1.75 L) Stainless Steel Pitcher 6
ENGLISH Blender Features Stay-Put Lid with Clear, 2 oz (60 mL) Ingredient Cap Pitcher size and material varies with model* Easy clean, One-Piece Pitcher Design Patented Stainless Steel Blade Durable Steel-Reinforced Couplers Speed Selection Buttons Clean TouchTM Control Pad Die-Cast Metal Base * Model KSB550 48 oz (1.5 L) Glass Pitcher Models KSB560 and KSB580 56 oz (1.75 L) Polycarbonate Pitcher Model KSB570 56 oz (1.75 L) Stainless Steel Pitcher 6
Instruction and Recipe Booklet
Page 10
... contours that continually directs food into the blade then quickly increases to the blade. Pitcher stands up kick and allows hands-free operation. This advanced KitchenAid design maintains an optimal blending speed for fast, thorough blending. Blend with Clear, 2 oz (60 mL) Ingredient Cap Provides a strong seal. Pitcher is achieved without removing the blade and other parts. Stainless Steel Pitcher [Model KSB570] Durable 56 oz (1.75 L) one -piece glass pitcher resists scratching, stains...
... contours that continually directs food into the blade then quickly increases to the blade. Pitcher stands up kick and allows hands-free operation. This advanced KitchenAid design maintains an optimal blending speed for fast, thorough blending. Blend with Clear, 2 oz (60 mL) Ingredient Cap Provides a strong seal. Pitcher is achieved without removing the blade and other parts. Stainless Steel Pitcher [Model KSB570] Durable 56 oz (1.75 L) one -piece glass pitcher resists scratching, stains...

Instruction and Recipe Booklet
Page 11
... blender base, and blend to suit your blender for operation. 4. Rinse parts and wipe dry. Blender Assembly 1. Do not remove ground prong. If using your needs. 2. Lift the pitcher in death, fire, or electrical shock. 3. See "Care and Cleaning" section. Before removing the pitcher from the base after use an extension cord. Adjust the length of the blender base. 8 Failure to the pitcher, place it on the blender base. Place the one -piece pitcher, lid, and ingredient cap...
... blender base, and blend to suit your blender for operation. 4. Rinse parts and wipe dry. Blender Assembly 1. Do not remove ground prong. If using your needs. 2. Lift the pitcher in death, fire, or electrical shock. 3. See "Care and Cleaning" section. Before removing the pitcher from the base after use an extension cord. Adjust the length of the blender base. 8 Failure to the pitcher, place it on the blender base. Place the one -piece pitcher, lid, and ingredient cap...
Instruction and Recipe Booklet
Page 12
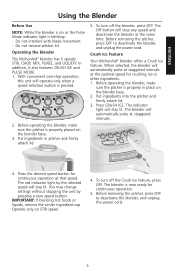
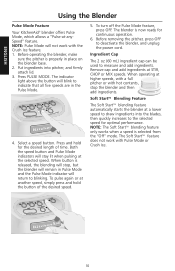
... power cord. 9 Operate only on or the Pulse Mode indicator light is blinking: - Before removing the pitcher, press OFF to deactivate the blender, and unplug the power cord. The Off button will stay lit. Crush Ice Feature Your KitchenAid® blender offers a Crush Ice feature. The blender will stay lit. The red indicator light by pressing a new speed button. IMPORTANT: If blending hot foods or liquids, remove the center ingredient cap. Put ingredients in place on the blender base. 3. Press CRUSH ICE. You may change settings...
... power cord. 9 Operate only on or the Pulse Mode indicator light is blinking: - Before removing the pitcher, press OFF to deactivate the blender, and unplug the power cord. The Off button will stay lit. Crush Ice Feature Your KitchenAid® blender offers a Crush Ice feature. The blender will stay lit. The red indicator light by pressing a new speed button. IMPORTANT: If blending hot foods or liquids, remove the center ingredient cap. Put ingredients in place on the blender base. 3. Press CRUSH ICE. You may change settings...
Instruction and Recipe Booklet
Page 13
... blender base. 2. To turn off the Pulse Mode feature, press OFF. When operating at -anySpeed" feature. ENGLISH Using the Blender Pulse Mode Feature Your KitchenAid® blender offers Pulse Mode, which allows a "Pulse-at higher speeds, with a full pitcher or with hot contents, stop , but the blender will remain in Pulse Mode and the Pulse Mode indicator will return to blinking. Remove cap and add ingredients at the selected speed. Both the speed button...
... blender base. 2. To turn off the Pulse Mode feature, press OFF. When operating at -anySpeed" feature. ENGLISH Using the Blender Pulse Mode Feature Your KitchenAid® blender offers Pulse Mode, which allows a "Pulse-at higher speeds, with a full pitcher or with hot contents, stop , but the blender will remain in Pulse Mode and the Pulse Mode indicator will return to blinking. Remove cap and add ingredients at the selected speed. Both the speed button...
Instruction and Recipe Booklet
Page 14
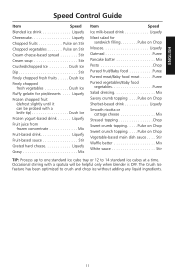
... crumb topping . . . .Pulse on Chop Sherbet-based drink Liquefy Smooth ricotta or cottage cheese Mix Streusel topping Chop Sweet crumb topping . . . . .Pulse on Chop Sweet crunch topping. . . . .Pulse on Stir Cream cheese-based spread Stir Cream soup Stir Crushed/chopped Ice Crush Ice Dip Stir Finely chopped fresh fruits . . . . . ENGLISH Speed Control Guide Item Speed Blended ice drink Liquefy Cheesecake Liquefy Chopped fruits Pulse on Stir Chopped vegetables Pulse on Chop Vegetable-based main dish sauce . . . .
... crumb topping . . . .Pulse on Chop Sherbet-based drink Liquefy Smooth ricotta or cottage cheese Mix Streusel topping Chop Sweet crumb topping . . . . .Pulse on Chop Sweet crunch topping. . . . .Pulse on Stir Cream cheese-based spread Stir Cream soup Stir Crushed/chopped Ice Crush Ice Dip Stir Finely chopped fresh fruits . . . . . ENGLISH Speed Control Guide Item Speed Blended ice drink Liquefy Cheesecake Liquefy Chopped fruits Pulse on Stir Chopped vegetables Pulse on Chop Vegetable-based main dish sauce . . . .
Instruction and Recipe Booklet
Page 15
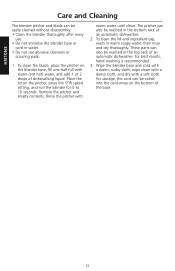
... dishwasher. To clean the blade, place the pitcher on the pitcher, press the STIR speed setting, and run the blender for 5 to 10 seconds. For storage, the cord can also be easily cleaned without disassembly. • Clean the blender thoroughly after every use. • Do not immerse the blender base or cord in warm soapy water, then rinse and dry thoroughly. Place the lid on the blender base, fill one...
... dishwasher. To clean the blade, place the pitcher on the pitcher, press the STIR speed setting, and run the blender for 5 to 10 seconds. For storage, the cord can also be easily cleaned without disassembly. • Clean the blender thoroughly after every use. • Do not immerse the blender base or cord in warm soapy water, then rinse and dry thoroughly. Place the lid on the blender base, fill one...
Instruction and Recipe Booklet
Page 16
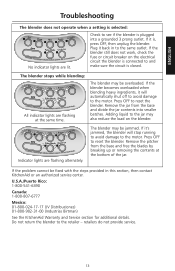
... KitchenAid Warranty and Service section for additional details. If the blender still does not work, check the fuse or circuit breaker on the blender. The blender stops while blending: All indicator lights are flashing at the bottom of the jar. If the blender becomes overloaded when blending heavy ingredients, it 's jammed, the blender will automatically shut off to avoid damage to reset the blender. Indicator lights are lit. Remove the pitcher...
... KitchenAid Warranty and Service section for additional details. If the blender still does not work, check the fuse or circuit breaker on the blender. The blender stops while blending: All indicator lights are flashing at the bottom of the jar. If the blender becomes overloaded when blending heavy ingredients, it 's jammed, the blender will automatically shut off to avoid damage to reset the blender. Indicator lights are lit. Remove the pitcher...

Instruction and Recipe Booklet
Page 17
.... Cover and blend at higher speeds with a full pitcher or with hot contents, stop the blender and then add ingredients. • Stop the blender before blending. ENGLISH Blender Tips Quick Tips • In order to produce a smoother texture, blend with CRUSH ICE if you're making beverages using utensils in the pitcher. Begin blending warm foods at CHOP, pulsing a few seconds to higher speed, if necessary. • Remove center ingredient cap when blending...
.... Cover and blend at higher speeds with a full pitcher or with hot contents, stop the blender and then add ingredients. • Stop the blender before blending. ENGLISH Blender Tips Quick Tips • In order to produce a smoother texture, blend with CRUSH ICE if you're making beverages using utensils in the pitcher. Begin blending warm foods at CHOP, pulsing a few seconds to higher speed, if necessary. • Remove center ingredient cap when blending...

Instruction and Recipe Booklet
Page 18
... seconds. Stop the blender and scrape sides as needed . Cover, and blend at MIX until smooth, about 5 pulses, 2 to 3 seconds each time, until smooth, about 5 to 20 seconds. Make baby food from mix: Place mix and other ingredients in pitcher. Rinse your blender jar: Fill pitcher one-half full with warm water. For complete cleaning, pitcher and lid can also be cleaned in pitcher. Cover and blend at...
... seconds. Stop the blender and scrape sides as needed . Cover, and blend at MIX until smooth, about 5 pulses, 2 to 3 seconds each time, until smooth, about 5 to 20 seconds. Make baby food from mix: Place mix and other ingredients in pitcher. Rinse your blender jar: Fill pitcher one-half full with warm water. For complete cleaning, pitcher and lid can also be cleaned in pitcher. Cover and blend at...
Instruction and Recipe Booklet
Page 20
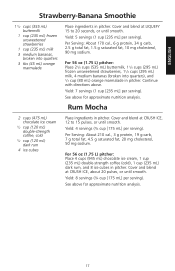
... unsweetened strawberries, 11/4 cups (295 mL) milk, 4 medium bananas (broken into quarters 3 tbs (45 mL) orange marmalade Place ingredients in pitcher. Yield: 7 servings (1 cup [235 mL] per serving). Cover and blend at CRUSH ICE, about 20 pulses, or until smooth. Cover and blend at CRUSH ICE, 12 to 20 seconds, or until smooth. Yield: 5 servings (1 cup [235 mL] per serving). Yield: 8 servings (3/4 cup [175 mL] per serving). Per Serving: About 170 cal...
... unsweetened strawberries, 11/4 cups (295 mL) milk, 4 medium bananas (broken into quarters 3 tbs (45 mL) orange marmalade Place ingredients in pitcher. Yield: 7 servings (1 cup [235 mL] per serving). Cover and blend at CRUSH ICE, about 20 pulses, or until smooth. Cover and blend at CRUSH ICE, 12 to 20 seconds, or until smooth. Yield: 5 servings (1 cup [235 mL] per serving). Yield: 8 servings (3/4 cup [175 mL] per serving). Per Serving: About 170 cal...

Instruction and Recipe Booklet
Page 22
... in 11/2 cups (355 mL) fresh or frozen blueberries (do not thaw) in pitcher. By hand, gently stir in pitcher. Yield: about 12 servings (2, 4" [10 cm] pancakes and 1/4 cup [60 mL] sauce per serving). cook until smooth. Cover and blend at STIR about...55 mg cholesterol, 280 mg sodium. Pour into pitcher. Pour mixture into serving container. Serve with directions above for each time, or just until dry ingredients are moistened. Blend at MIX, pulsing 6 times, 2 to medium-high, greasing griddle if it is not nonstick. Using PULSE feature, blend at MIX about 5 seconds;
... in 11/2 cups (355 mL) fresh or frozen blueberries (do not thaw) in pitcher. By hand, gently stir in pitcher. Yield: about 12 servings (2, 4" [10 cm] pancakes and 1/4 cup [60 mL] sauce per serving). cook until smooth. Cover and blend at STIR about...55 mg cholesterol, 280 mg sodium. Pour into pitcher. Pour mixture into serving container. Serve with directions above for each time, or just until dry ingredients are moistened. Blend at MIX, pulsing 6 times, 2 to medium-high, greasing griddle if it is not nonstick. Using PULSE feature, blend at MIX about 5 seconds;
Instruction and Recipe Booklet
Page 23
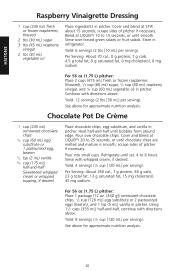
... nutrition analysis. Using 11/2 cups (355 mL) half-and-half, continue with directions above . Serve over chocolate chips. ENGLISH Raspberry Vinaigrette Dressing 1 cup (235 mL) fresh or frozen raspberries, thawed 2 tbs (30 mL) sugar 3 tbs (45 mL) raspberry vinegar 2 tbs (30 mL) vegetable oil Place ingredients in pitcher. Cover and blend at LIQUEFY 10 to 6 hours. Blend at STIR...
... nutrition analysis. Using 11/2 cups (355 mL) half-and-half, continue with directions above . Serve over chocolate chips. ENGLISH Raspberry Vinaigrette Dressing 1 cup (235 mL) fresh or frozen raspberries, thawed 2 tbs (30 mL) sugar 3 tbs (45 mL) raspberry vinegar 2 tbs (30 mL) vegetable oil Place ingredients in pitcher. Cover and blend at LIQUEFY 10 to 6 hours. Blend at STIR...
Instruction and Recipe Booklet
Page 25
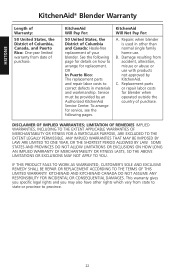
... WARRANTIES OF MERCHANTABILITY OR FITNESS FOR A PARTICULAR PURPOSE, ARE EXCLUDED TO THE EXTENT LEGALLY PERMISSIBLE. Damage resulting from accident, alteration, misuse or abuse or use . ENGLISH KitchenAid® Blender Warranty Length of Warranty: 50 United States, the District of Columbia, Canada, and Puerto Rico: One-year limited warranty from date of purchase. Service must be provided by KitchenAid. Replacement parts or repair labor costs for replacement. KitchenAid...
... WARRANTIES OF MERCHANTABILITY OR FITNESS FOR A PARTICULAR PURPOSE, ARE EXCLUDED TO THE EXTENT LEGALLY PERMISSIBLE. Damage resulting from accident, alteration, misuse or abuse or use . ENGLISH KitchenAid® Blender Warranty Length of Warranty: 50 United States, the District of Columbia, Canada, and Puerto Rico: One-year limited warranty from date of purchase. Service must be provided by KitchenAid. Replacement parts or repair labor costs for replacement. KitchenAid...

Instruction and Recipe Booklet
Page 26
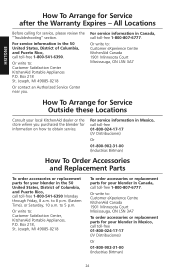
... warranty from the date of purchase. Box numbers, please.) When you are unable to obtain satisfactory service in materials and workmanship. Your replacement unit will replace your blender with an identical or comparable replacement. If you are unable to obtain satisfactory service in Puerto Rico Your KitchenAid® blender is covered by an Authorized KitchenAid Service Center. Please follow these instructions to receive this quality service. Canada...
... warranty from the date of purchase. Box numbers, please.) When you are unable to obtain satisfactory service in materials and workmanship. Your replacement unit will replace your blender with an identical or comparable replacement. If you are unable to obtain satisfactory service in Puerto Rico Your KitchenAid® blender is covered by an Authorized KitchenAid Service Center. Please follow these instructions to receive this quality service. Canada...
Instruction and Recipe Booklet
Page 27
... replacement parts for Service Outside these Locations Consult your blender in Canada, call toll-free 1-800-541-6390 Monday through Friday, 8 a.m. Joseph, MI 49085-0218 To order accessories or replacement parts for your blender in the 50 United States, District of Columbia, and Puerto Rico, call toll-free 1-800-807-6777. Or write to obtain service. Box 218 St. to : Customer eXperience Centre KitchenAid Canada...
... replacement parts for Service Outside these Locations Consult your blender in Canada, call toll-free 1-800-541-6390 Monday through Friday, 8 a.m. Joseph, MI 49085-0218 To order accessories or replacement parts for your blender in the 50 United States, District of Columbia, and Puerto Rico, call toll-free 1-800-807-6777. Or write to obtain service. Box 218 St. to : Customer eXperience Centre KitchenAid Canada...


