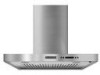

Use & Care Guide
Page 1
...performance, parts, accessories or service, call: 1-800-422-1230 or visit our website at www.kitchenaid.com In Canada, for assistance, installation and service, call: 1-800-807-6777 or visit our website at www.kitchenaid.ca HOTTE DE CUISINIÈRE POUR MONTAGE MURAL 30" ET 36" (76,2 CM ET 91...,4 CM) Instructions d'installation et Guide d'utilisation et d'entretien Au Canada, pour assistance, installation ou service composez le 1-800-807-6777 ou visitez notre site web à www.kitchenaid.ca Table of Contents/Table des matières 2 IMPORTANT: READ AND ...
...performance, parts, accessories or service, call: 1-800-422-1230 or visit our website at www.kitchenaid.com In Canada, for assistance, installation and service, call: 1-800-807-6777 or visit our website at www.kitchenaid.ca HOTTE DE CUISINIÈRE POUR MONTAGE MURAL 30" ET 36" (76,2 CM ET 91...,4 CM) Instructions d'installation et Guide d'utilisation et d'entretien Au Canada, pour assistance, installation ou service composez le 1-800-807-6777 ou visitez notre site web à www.kitchenaid.ca Table of Contents/Table des matières 2 IMPORTANT: READ AND ...
Use & Care Guide
Page 2
... U.S.A 15 Accessories 15 In Canada 15 WARRANTY 16 TABLE DES MATIÈRES SÉCURITÉ DE LA HOTTE DE CUISINIÈRE 17 EXIGENCES D'INSTALLATION 19 Outils et pièces 19 Exigences d'emplacement 19 Exigences concernant l'évacuation 20 Spécifications électriques 21 INSTRUCTIONS...
... U.S.A 15 Accessories 15 In Canada 15 WARRANTY 16 TABLE DES MATIÈRES SÉCURITÉ DE LA HOTTE DE CUISINIÈRE 17 EXIGENCES D'INSTALLATION 19 Outils et pièces 19 Exigences d'emplacement 19 Exigences concernant l'évacuation 20 Spécifications électriques 21 INSTRUCTIONS...

Use & Care Guide
Page 3
... IN THE EVENT OF A RANGE TOP GREASE FIRE, OBSERVE THE FOLLOWING:a ■ SMOTHER FLAMES with any fan with your back to the service panel. ■ Installation work and electrical wiring must always be burned. ■ DO NOT USE WATER, including wet dishcloths or towels a violent steam explosion will result. ■ Use...
... IN THE EVENT OF A RANGE TOP GREASE FIRE, OBSERVE THE FOLLOWING:a ■ SMOTHER FLAMES with any fan with your back to the service panel. ■ Installation work and electrical wiring must always be burned. ■ DO NOT USE WATER, including wet dishcloths or towels a violent steam explosion will result. ■ Use...
Use & Care Guide
Page 4
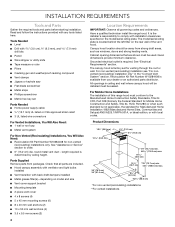
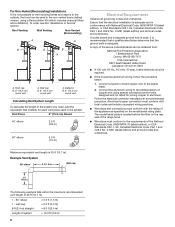
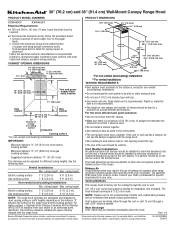
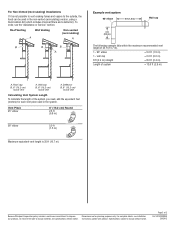
...an authorized parts distributor. See "Electrical Requirements" section. All openings in the "Connect Vent System" section. It is the installer's responsibility to the Manufactured Home Construction Safety Standards, Title 24 CFR, Part 328 (formerly the Federal Standard for Mobile Home ...; Phillips screwdriver ■ Metric hex key set for venting through the roof or wall. Given dimensions provide minimum clearance. Have a qualified technician install the range hood. Product Dimensions 10⁵⁄₈" (26.9 cm) 13 33.2 cm) 4⁷⁄₈" (12.3 cm) 5⁷...
...an authorized parts distributor. See "Electrical Requirements" section. All openings in the "Connect Vent System" section. It is the installer's responsibility to the Manufactured Home Construction Safety Standards, Title 24 CFR, Part 328 (formerly the Federal Standard for Mobile Home ...; Phillips screwdriver ■ Metric hex key set for venting through the roof or wall. Given dimensions provide minimum clearance. Have a qualified technician install the range hood. Product Dimensions 10⁵⁄₈" (26.9 cm) 13 33.2 cm) 4⁷⁄₈" (12.3 cm) 5⁷...
Use & Care Guide
Page 5
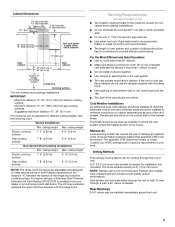
...vent system in your dealer or an authorized parts distributor. The hood exhaust opening around the cap. ■ The size of the vent should be installed immediately above the hood. 5 Minimum distance "X": 27" (68.6 cm) from your area. ceiling height Electric cooking surface 7' 5" (2.26 m)... Electric cooking surface 7' 5" (2.26 m) 9' 6" (2.9 m) Gas cooking surface 7' 8" (2.34 m) 9' 6" (2.9 m) Non-Vented (Recirculating) Installations Min. A 6" (15.2 cm) round vent system is not recommended. ■ The length of vent system and number of the house. Vent system...
...vent system in your dealer or an authorized parts distributor. The hood exhaust opening around the cap. ■ The size of the vent should be installed immediately above the hood. 5 Minimum distance "X": 27" (68.6 cm) from your area. ceiling height Electric cooking surface 7' 5" (2.26 m)... Electric cooking surface 7' 5" (2.26 m) 9' 6" (2.9 m) Gas cooking surface 7' 8" (2.34 m) 9' 6" (2.9 m) Non-Vented (Recirculating) Installations Min. A 6" (15.2 cm) round vent system is not recommended. ■ The length of vent system and number of the house. Vent system...
Use & Care Guide
Page 6
... 5.0 ft (1.5 m) Electrical Requirements Observe all local codes and ordinances. Wall cap B. 6" (15.2 cm) round vent A. For Non-Vented (Recirculating) Installations If it is recommended that a qualified electrician determine that the electrical installation is not possible to vent cooking fumes and vapors to the pigtail leads. 2. Roof Venting Wall Venting Non-Vented (Recirculating...
... 5.0 ft (1.5 m) Electrical Requirements Observe all local codes and ordinances. Wall cap B. 6" (15.2 cm) round vent A. For Non-Vented (Recirculating) Installations If it is recommended that a qualified electrician determine that the electrical installation is not possible to vent cooking fumes and vapors to the pigtail leads. 2. Roof Venting Wall Venting Non-Vented (Recirculating...
Use & Care Guide
Page 7
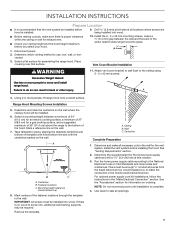
...the wall. Ceiling B. Determine the required height for assembling the range hood. Place covering over that the vent system be installed before hood is proper clearance within the ceiling or wall for the vent system. A DRILL2 (TW O)3/16"PILOT HOLES THROUGH... STUDS OR REAR W ALLSUPPORT Vertical Centerline REAR W ALL M OUNTING TEM PLATE HorizontalLine CL ALIGN BOTTOM EDGE W ITH PENCILLINE INDICATING BOTTOM OFTHE HOOD Installation Height B C A. Fastener locations C. See "Venting Requirements" section. 2. Use caulk to slide range hood into wood. Leave a ¹⁄...
...the wall. Ceiling B. Determine the required height for assembling the range hood. Place covering over that the vent system be installed before hood is proper clearance within the ceiling or wall for the vent system. A DRILL2 (TW O)3/16"PILOT HOLES THROUGH... STUDS OR REAR W ALLSUPPORT Vertical Centerline REAR W ALL M OUNTING TEM PLATE HorizontalLine CL ALIGN BOTTOM EDGE W ITH PENCILLINE INDICATING BOTTOM OFTHE HOOD Installation Height B C A. Fastener locations C. See "Venting Requirements" section. 2. Use caulk to slide range hood into wood. Leave a ¹⁄...
Use & Care Guide
Page 8
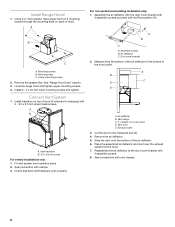
... air deflector. 5. Reassemble the air deflector to the bottom of hood (if removed for shipping) with the Recirculation Kit. Install Range Hood 1. Using 2 or more people, hang range hood on 2 mounting screws through the mounting slots on top of the hood outlet...See "Range Hood Care" section. 3. X = length to the measured size (X). 4. Level the range hood and tighten upper mounting screws. 4. For non-vented (recirculating) installation only: 1. A B X C D E A. Check that back draft dampers work properly. Cut the duct to cut vent duct D. Place the assembled air deflector and ...
... air deflector. 5. Reassemble the air deflector to the bottom of hood (if removed for shipping) with the Recirculation Kit. Install Range Hood 1. Using 2 or more people, hang range hood on 2 mounting screws through the mounting slots on top of the hood outlet...See "Range Hood Care" section. 3. X = length to the measured size (X). 4. Level the range hood and tighten upper mounting screws. 4. For non-vented (recirculating) installation only: 1. A B X C D E A. Check that back draft dampers work properly. Cut the duct to cut vent duct D. Place the assembled air deflector and ...

Use & Care Guide
Page 9
... power supply or power cord kit to green and yellow ground wire in the terminal box cover and install a UL listed or CSA approved ¹⁄₂" strain relief. UL listed wire connectors E. Install the terminal box cover. 10. A B Electrical Shock Hazard Disconnect power before operating. Make Electrical Connection WARNING 4. Run the...
... power supply or power cord kit to green and yellow ground wire in the terminal box cover and install a UL listed or CSA approved ¹⁄₂" strain relief. UL listed wire connectors E. Install the terminal box cover. 10. A B Electrical Shock Hazard Disconnect power before operating. Make Electrical Connection WARNING 4. Run the...
Use & Care Guide
Page 10
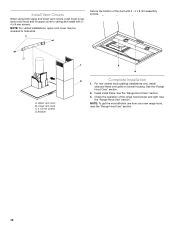
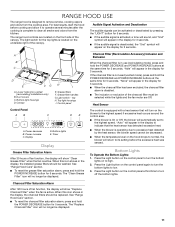
... bottom of the range hood blower and light. D A. See the "Range Hood Care" section. 2. Install metal filters. Lower vent cover C. 4 x 8 mm screws D. NOTE: For vented installations, upper vent cover may be reversed to ceiling and install with 2 - 4 x 8 mm assembly screws. See the "Range Hood Use" section. Upper vent ...on blower housing. NOTE: To get the most efficient use from your new range hood, read the "Range Hood Use" section. 10 Install Vent Covers When using both upper and lower vent covers, push lower cover down onto hood and lift upper cover to hide slots. ...
... bottom of the range hood blower and light. D A. See the "Range Hood Care" section. 2. Install metal filters. Lower vent cover C. 4 x 8 mm screws D. NOTE: For vented installations, upper vent cover may be reversed to ceiling and install with 2 - 4 x 8 mm assembly screws. See the "Range Hood Use" section. Upper vent ...on blower housing. NOTE: To get the most efficient use from your new range hood, read the "Range Hood Use" section. 10 Install Vent Covers When using both upper and lower vent covers, push lower cover down onto hood and lift upper cover to hide slots. ...
Use & Care Guide
Page 11
... fan is active. Press the Light button on the underside right of fan function, the display will appear in the display, the installed grease filters should be displayed. 11 When this icon shows in the display for 3 seconds. ■ If the audible signal is..., the blower will appear in the display to indicate that will automatically set to the highest speed. Louver holes (non-vented [recirculating] installations only) B. Display D. Charcoal Filter (Recirculation Accessory) Inclusion and Exclusion When the charcoal filter is in the display for 5 seconds. Control...
... fan is active. Press the Light button on the underside right of fan function, the display will appear in the display, the installed grease filters should be displayed. 11 When this icon shows in the display for 3 seconds. ■ If the audible signal is..., the blower will appear in the display to indicate that will automatically set to the highest speed. Louver holes (non-vented [recirculating] installations only) B. Display D. Charcoal Filter (Recirculation Accessory) Inclusion and Exclusion When the charcoal filter is in the display for 5 seconds. Control...
Use & Care Guide
Page 13
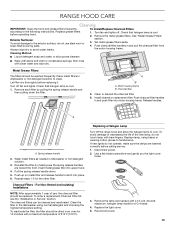
... filters before replacing it. Push charcoal filter handles in the dishwasher using tissue or wearing cotton gloves to handle lamp. A B A. Install cleaned or replacement filter. Wash metal filters as needed in and push filter into upper track. 4. To reactivate the filter, the filter.... 13 Remove the metal grease filters. Let filter dry thoroughly before operating hood. Insert metal grease filter into motor housing frame. To Install/Replace Charcoal Filters 1. Check that halogen lamp is cool. 2. Cleaning Method: ■ Liquid detergent soap and water, or all-purpose...
... filters before replacing it. Push charcoal filter handles in the dishwasher using tissue or wearing cotton gloves to handle lamp. A B A. Install cleaned or replacement filter. Wash metal filters as needed in and push filter into upper track. 4. To reactivate the filter, the filter.... 13 Remove the metal grease filters. Let filter dry thoroughly before operating hood. Insert metal grease filter into motor housing frame. To Install/Replace Charcoal Filters 1. Check that halogen lamp is cool. 2. Cleaning Method: ■ Liquid detergent soap and water, or all-purpose...
Use & Care Guide
Page 15
.... ■ Accessory and repair parts sales. ■ Referrals to order replacement parts, we recommend that you can write to KitchenAid Canada with : ■ Features and specifications on our full line of appliances. ■ Installation information. ■ Use and maintenance procedures. ■ Accessory and repair parts sales. ■ Specialized customer assistance (Spanish speaking...
.... ■ Accessory and repair parts sales. ■ Referrals to order replacement parts, we recommend that you can write to KitchenAid Canada with : ■ Features and specifications on our full line of appliances. ■ Installation information. ■ Use and maintenance procedures. ■ Accessory and repair parts sales. ■ Specialized customer assistance (Spanish speaking...

Use & Care Guide
Page 16
... by checking the "Assistance or Service" section or by an authorized KitchenAid servicer is not available. 9. Damage resulting from accident, alteration, misuse, abuse, fire, flood, acts of God, improper installation, installation not in accordance with the removal from your home of your major ...warranty applies. This major appliance is designed to be provided by KitchenAid. 5. DISCLAIMER OF IMPLIED WARRANTIES; After checking "Troubleshooting," you need it is installed in an inaccessible location or is not installed in materials or workmanship and is void if the factory applied ...
... by checking the "Assistance or Service" section or by an authorized KitchenAid servicer is not available. 9. Damage resulting from accident, alteration, misuse, abuse, fire, flood, acts of God, improper installation, installation not in accordance with the removal from your home of your major ...warranty applies. This major appliance is designed to be provided by KitchenAid. 5. DISCLAIMER OF IMPLIED WARRANTIES; After checking "Troubleshooting," you need it is installed in an inaccessible location or is not installed in materials or workmanship and is void if the factory applied ...

Warranty Information
Page 1
...filters. Damage resulting from accident, alteration, misuse, abuse, fire, flood, acts of God, improper installation, installation not in materials or workmanship and is reported to KitchenAid within 30 days from the date of purchase. 6. DISCLAIMER OF IMPLIED WARRANTIES; IMPLIED WARRANTIES, INCLUDING ... cost of repair or replacement under this limited warranty. Service must provide proof of purchase or installation date for repairs. You must be provided by a KitchenAid designated service company. Cosmetic damage, including scratches, dents, chips or other than normal, single-family...
...filters. Damage resulting from accident, alteration, misuse, abuse, fire, flood, acts of God, improper installation, installation not in materials or workmanship and is reported to KitchenAid within 30 days from the date of purchase. 6. DISCLAIMER OF IMPLIED WARRANTIES; IMPLIED WARRANTIES, INCLUDING ... cost of repair or replacement under this limited warranty. Service must provide proof of purchase or installation date for repairs. You must be provided by a KitchenAid designated service company. Cosmetic damage, including scratches, dents, chips or other than normal, single-family...
Dimension Guide
Page 1
...q Use metal vent only. q The vent system must terminate to cooking surface Centerline Cooking surface *For non-vented (recirculating) installations IMPORTANT: Minimum distance "X": 24" (61.0 cm) from your area. If the roof or wall cap has a damper, ... 29" (73.7 cm) min. (38.7 cm) 42¾" (108.6 cm) max. 2³⁄₈" (6.0 cm) 19 50.0 cm) *For non-vented (recirculating) installations **For vented installations VENTING REQUIREMENTS 10" (25.4 cm) min. 13" (33.0 cm) max. ceiling height Electric cooking surface Gas cooking surface 7' 5" (2.26 m) 7' 8" (2.34 m) 9' 6"...
...q Use metal vent only. q The vent system must terminate to cooking surface Centerline Cooking surface *For non-vented (recirculating) installations IMPORTANT: Minimum distance "X": 24" (61.0 cm) from your area. If the roof or wall cap has a damper, ... 29" (73.7 cm) min. (38.7 cm) 42¾" (108.6 cm) max. 2³⁄₈" (6.0 cm) 19 50.0 cm) *For non-vented (recirculating) installations **For vented installations VENTING REQUIREMENTS 10" (25.4 cm) min. 13" (33.0 cm) max. ceiling height Electric cooking surface Gas cooking surface 7' 5" (2.26 m) 7' 8" (2.34 m) 9' 6"...
Dimension Guide
Page 2
... vent A. Page 2 of the system you need, add the equivalent feet (meters) for planning purposes only. For Non-Vented (recirculating) Installations If it is 35 ft (10.7 m). To order, see Installation our products, we reserve the right to change materials and specifications without notice. For complete details, see the "Assistance or Service...
... vent A. Page 2 of the system you need, add the equivalent feet (meters) for planning purposes only. For Non-Vented (recirculating) Installations If it is 35 ft (10.7 m). To order, see Installation our products, we reserve the right to change materials and specifications without notice. For complete details, see the "Assistance or Service...
Installation Guide
Page 1
...performance, parts, accessories or service, call: 1-800-422-1230 or visit our website at www.kitchenaid.com In Canada, for assistance, installation and service, call: 1-800-807-6777 or visit our website at www.kitchenaid.ca HOTTE DE CUISINIÈRE POUR MONTAGE MURAL 30" ET 36" (76,2 CM ET 91...,4 CM) Instructions d'installation et Guide d'utilisation et d'entretien Au Canada, pour assistance, installation ou service composez le 1-800-807-6777 ou visitez notre site web à www.kitchenaid.ca Table of Contents/Table des matières 2 IMPORTANT: READ AND ...
...performance, parts, accessories or service, call: 1-800-422-1230 or visit our website at www.kitchenaid.com In Canada, for assistance, installation and service, call: 1-800-807-6777 or visit our website at www.kitchenaid.ca HOTTE DE CUISINIÈRE POUR MONTAGE MURAL 30" ET 36" (76,2 CM ET 91...,4 CM) Instructions d'installation et Guide d'utilisation et d'entretien Au Canada, pour assistance, installation ou service composez le 1-800-807-6777 ou visitez notre site web à www.kitchenaid.ca Table of Contents/Table des matières 2 IMPORTANT: READ AND ...

Installation Guide
Page 2
... U.S.A 15 Accessories 15 In Canada 15 WARRANTY 16 TABLE DES MATIÈRES SÉCURITÉ DE LA HOTTE DE CUISINIÈRE 17 EXIGENCES D'INSTALLATION 19 Outils et pièces 19 Exigences d'emplacement 19 Exigences concernant l'évacuation 20 Spécifications électriques 21 INSTRUCTIONS...
... U.S.A 15 Accessories 15 In Canada 15 WARRANTY 16 TABLE DES MATIÈRES SÉCURITÉ DE LA HOTTE DE CUISINIÈRE 17 EXIGENCES D'INSTALLATION 19 Outils et pièces 19 Exigences d'emplacement 19 Exigences concernant l'évacuation 20 Spécifications électriques 21 INSTRUCTIONS...

Installation Guide
Page 3
... OF A RANGE TOP GREASE FIRE: ■ Never leave surface units unattended at service panel and lock the service disconnecting means to the service panel. ■ Installation work and electrical wiring must always be burned. ■ DO NOT USE WATER, including wet dishcloths or towels a violent steam explosion will result. ■ Use...
... OF A RANGE TOP GREASE FIRE: ■ Never leave surface units unattended at service panel and lock the service disconnecting means to the service panel. ■ Installation work and electrical wiring must always be burned. ■ DO NOT USE WATER, including wet dishcloths or towels a violent steam explosion will result. ■ Use...
