Dimension Guide
Page 1
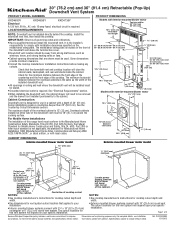
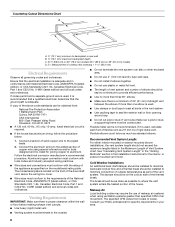
... downdraft vent will depend on the model/serial rating plate. q Downdraft vent location should be sealed. q Consult the cooktop manufacturer installation instructions before making any cutouts. q All openings in a cabinet with exterior-mounted blower motor 4³⁄₄" (12.1 cm) ... cm) rectangular or 6" (15.2 cm) round vent system. Page 1 of cooktop cutout q See cooktop manufacturer's instructions for Manufactured Home Installation 1982 (Manufactured Home Sites, Communities and Setups) ANSI A225.1/NFPA 501A*, or latest edition, or with product. For complete details, see...
... downdraft vent will depend on the model/serial rating plate. q Downdraft vent location should be sealed. q Consult the cooktop manufacturer installation instructions before making any cutouts. q All openings in a cabinet with exterior-mounted blower motor 4³⁄₄" (12.1 cm) ... cm) rectangular or 6" (15.2 cm) round vent system. Page 1 of cooktop cutout q See cooktop manufacturer's instructions for Manufactured Home Installation 1982 (Manufactured Home Sites, Communities and Setups) ANSI A225.1/NFPA 501A*, or latest edition, or with product. For complete details, see...

Dimension Guide
Page 2
... C A A A A. Right vent Because Whirlpool Corporation policy includes a continuous commitment to change materials and specifications without notice. q See Cooktop Installation Instructions for planning purposes only. q Make sure there is a minimum of 24" (61 cm) of cooktop rear overhang + 1 46.2 mm)... vent C. q Some models require a countertop deeper than three 90° elbows. q Do not terminate the vent system in the Installation Instructions for specific requirements in the Maximum Length of cooktop rear overhang. q Do not use 4" (10.2 cm) laundry-type wall caps....
... C A A A A. Right vent Because Whirlpool Corporation policy includes a continuous commitment to change materials and specifications without notice. q See Cooktop Installation Instructions for planning purposes only. q Make sure there is a minimum of 24" (61 cm) of cooktop rear overhang + 1 46.2 mm)... vent C. q Some models require a countertop deeper than three 90° elbows. q Do not terminate the vent system in the Installation Instructions for specific requirements in the Maximum Length of cooktop rear overhang. q Do not use 4" (10.2 cm) laundry-type wall caps....

Dimension Guide
Page 3
...System Length 3¹⁄₄" x 10" (8.3 x 25.4 cm) rectangular vent is required from the blower motor box. Blower motor B. Instructions packed with damper (supplied) F. 6" (15.2 cm) round PVC coupling G. Maximum Length of Vent System Vent 6" (15.2 cm) ...of 35 ft (8.9 m). 2 - 90° elbow = 10.0 ft (3 m) 1 - Concrete slab H. 6" (15.2 cm) round PVC sewer pipe I A. For complete details, see Installation our products, we reserve the right to 3¹⁄₄" x 10" (8.3 cm x 25.4 cm) 90° elbow transition Example vent system C A B D 5.0 ft (1.5 m) ...
...System Length 3¹⁄₄" x 10" (8.3 x 25.4 cm) rectangular vent is required from the blower motor box. Blower motor B. Instructions packed with damper (supplied) F. 6" (15.2 cm) round PVC coupling G. Maximum Length of Vent System Vent 6" (15.2 cm) ...of 35 ft (8.9 m). 2 - 90° elbow = 10.0 ft (3 m) 1 - Concrete slab H. 6" (15.2 cm) round PVC sewer pipe I A. For complete details, see Installation our products, we reserve the right to 3¹⁄₄" x 10" (8.3 cm x 25.4 cm) 90° elbow transition Example vent system C A B D 5.0 ft (1.5 m) ...
Use & Care Guide
Page 4
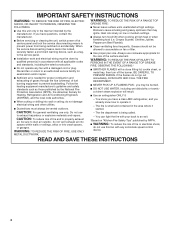
...Engineers (ASHRAE), and the local code authorities. ■ When cutting or drilling into crawl spaces, or garages. READ AND SAVE THESE INSTRUCTIONS 4 When the service disconnecting means cannot be locked, securely fasten a prominent warning device, such as those published by the manufacturer. do... TO PREVENT BURNS. Follow the heating equipment manufacturer's guideline and safety standards such as a tag, to the service panel. ■ Installation work and electrical wiring must always be done by NFPA. ■ WARNING: To reduce the risk of fuel burning equipment to operate ...
...Engineers (ASHRAE), and the local code authorities. ■ When cutting or drilling into crawl spaces, or garages. READ AND SAVE THESE INSTRUCTIONS 4 When the service disconnecting means cannot be locked, securely fasten a prominent warning device, such as those published by the manufacturer. do... TO PREVENT BURNS. Follow the heating equipment manufacturer's guideline and safety standards such as a tag, to the service panel. ■ Installation work and electrical wiring must always be done by NFPA. ■ WARNING: To reduce the risk of fuel burning equipment to operate ...
Use & Care Guide
Page 5
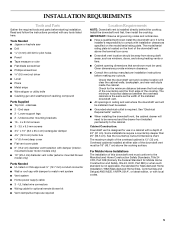
..." (33 cm). Given dimensions provide minimum clearance. ■ Consult the cooktop manufacturer installation instructions before starting installation. Cabinet Construction: Downdraft vent is located on the model/serial rating plate. Read and follow the instructions provided with local codes. 5 For Mobile Home Installations The installation of the cooktop. Check for the minimum distance between the overhead cabinets...
..." (33 cm). Given dimensions provide minimum clearance. ■ Consult the cooktop manufacturer installation instructions before starting installation. Cabinet Construction: Downdraft vent is located on the model/serial rating plate. Read and follow the instructions provided with local codes. 5 For Mobile Home Installations The installation of the cooktop. Check for the minimum distance between the overhead cabinets...

Use & Care Guide
Page 7
... cooktop cutout depth and width. ■ Use dimensions for this vent system will depend on the countertop before making any cutouts. See Cooktop Installation Instructions for 3¹⁄₄" x 10" (8.3 x 25.4 cm) rectangular or 6" (15.2 cm) round vent system. Countertop and backsplash I A. To avoid mistakes, it is recommended that applies ...
... cooktop cutout depth and width. ■ Use dimensions for this vent system will depend on the countertop before making any cutouts. See Cooktop Installation Instructions for 3¹⁄₄" x 10" (8.3 x 25.4 cm) rectangular or 6" (15.2 cm) round vent system. Countertop and backsplash I A. To avoid mistakes, it is recommended that applies ...
Use & Care Guide
Page 8
...specified on 36" (91.4 cm) models D. See "Calculating Vent System Length" in the "Venting Methods" section in the Installation Instructions for specific requirements in conformance with the rating of the thermal break. The break should be as close as standard elbows. Ensure...= Measurement of solid copper wire to the pigtail leads. 2. If it is recommended that a qualified electrician determine that the electrical installation is not recommended. Aluminum/copper connection must conform with local codes and industry accepted wiring practices. ■ Wire sizes and connections...
...specified on 36" (91.4 cm) models D. See "Calculating Vent System Length" in the "Venting Methods" section in the Installation Instructions for specific requirements in conformance with the rating of the thermal break. The break should be as close as standard elbows. Ensure...= Measurement of solid copper wire to the pigtail leads. 2. If it is recommended that a qualified electrician determine that the electrical installation is not recommended. Aluminum/copper connection must conform with local codes and industry accepted wiring practices. ■ Wire sizes and connections...

Use & Care Guide
Page 9
INSTALLATION INSTRUCTIONS INTERIOR-MOUNTED VENT MOTOR Venting Methods Determine which venting method is best for your application. Down vent NOTE: For island locations, a front or rear ....2 cm) round metal vent transition with damper (supplied) F. 6" (15.2 cm) round PVC coupling G. Tightly pack gravel or sand completely around pipe. Island Location-Vent System Installed Under a Concrete Slab Using PVC Sewer Pipe Island Location Front (Standard)-Mounted Blower Motor Rear-Mounted Blower Motor Front (Standard)-Mounted Blower Motor B A D M C E F G A A L H K J I A. Vent...
INSTALLATION INSTRUCTIONS INTERIOR-MOUNTED VENT MOTOR Venting Methods Determine which venting method is best for your application. Down vent NOTE: For island locations, a front or rear ....2 cm) round metal vent transition with damper (supplied) F. 6" (15.2 cm) round PVC coupling G. Tightly pack gravel or sand completely around pipe. Island Location-Vent System Installed Under a Concrete Slab Using PVC Sewer Pipe Island Location Front (Standard)-Mounted Blower Motor Rear-Mounted Blower Motor Front (Standard)-Mounted Blower Motor B A D M C E F G A A L H K J I A. Vent...

Use & Care Guide
Page 15
Failure to manufacturer's instructions. FC D E Check Operation 1. Position the top trim over the retractable section and snap trim into the terminal box. Trim kits for a few seconds. B A C E D A. End cap E. If the blower does not operate: ■ Check that filter or filters are available from your dealer. Install cooktop according to do so can...
Failure to manufacturer's instructions. FC D E Check Operation 1. Position the top trim over the retractable section and snap trim into the terminal box. Trim kits for a few seconds. B A C E D A. End cap E. If the blower does not operate: ■ Check that filter or filters are available from your dealer. Install cooktop according to do so can...
Use & Care Guide
Page 16
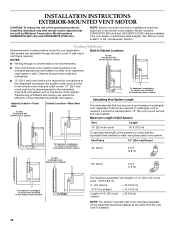
.... To basement, crawlspace or utility room installed in-line blower motor system Calculating Vent System Length Island Location-Front Vent To attic installed in-line blower motor system Island Location-Rear Vent It is required. INSTALLATION INSTRUCTIONS EXTERIOR-MOUNTED VENT MOTOR CAUTION: To reduce... the risk of fire and electrical shock, install the downdraft only with in-line blower ...
.... To basement, crawlspace or utility room installed in-line blower motor system Calculating Vent System Length Island Location-Front Vent To attic installed in-line blower motor system Island Location-Rear Vent It is required. INSTALLATION INSTRUCTIONS EXTERIOR-MOUNTED VENT MOTOR CAUTION: To reduce... the risk of fire and electrical shock, install the downdraft only with in-line blower ...
Use & Care Guide
Page 27
... look in your telephone directory Yellow Pages. In Canada Call the KitchenAid Canada Customer eXperience Centre toll free: 1-800-807-6777 or visit our website at www.kitchenaid.com. Accessories NOTE: Instructions are made with the same precision used to local dealers, repair parts...phone number in your area, call us to better respond to your area, you can write to KitchenAid Canada with : ■ Features and specifications on our full line of appliances. ■ Installation information. ■ Use and maintenance procedures. ■ Accessory and repair parts sales. ■...
... look in your telephone directory Yellow Pages. In Canada Call the KitchenAid Canada Customer eXperience Centre toll free: 1-800-807-6777 or visit our website at www.kitchenaid.com. Accessories NOTE: Instructions are made with the same precision used to local dealers, repair parts...phone number in your area, call us to better respond to your area, you can write to KitchenAid Canada with : ■ Features and specifications on our full line of appliances. ■ Installation information. ■ Use and maintenance procedures. ■ Accessory and repair parts sales. ■...

Use & Care Guide
Page 28
... contrary to published user or operator instructions and/or installation instructions. 4. DISCLAIMER OF IMPLIED WARRANTIES; In the U.S.A., call 1-800-807-6777. 9/07 Keep this book and your sales slip together for repairs. Repairs when your major appliance is used in materials or workmanship and is reported to KitchenAid within 30 days from the date...
... contrary to published user or operator instructions and/or installation instructions. 4. DISCLAIMER OF IMPLIED WARRANTIES; In the U.S.A., call 1-800-807-6777. 9/07 Keep this book and your sales slip together for repairs. Repairs when your major appliance is used in materials or workmanship and is reported to KitchenAid within 30 days from the date...

Installation Guide
Page 4
... return to prevent backdrafting. Follow the heating equipment manufacturer's guideline and safety standards such as a tag, to the service panel. ■ Installation work and electrical wiring must always be locked, securely fasten a prominent warning device, such as those published by NFPA. ■ WARNING: ... the risk of the surface element. WARNING: TO REDUCE THE RISK OF FIRE, USE ONLY METAL DUCTWORK. Always use only. IMPORTANT SAFETY INSTRUCTIONS WARNING: TO REDUCE THE RISK OF FIRE, ELECTRIC SHOCK, OR INJURY TO PERSONS, OBSERVE THE FOLLOWING: ■ Use this fan with ...
... return to prevent backdrafting. Follow the heating equipment manufacturer's guideline and safety standards such as a tag, to the service panel. ■ Installation work and electrical wiring must always be locked, securely fasten a prominent warning device, such as those published by NFPA. ■ WARNING: ... the risk of the surface element. WARNING: TO REDUCE THE RISK OF FIRE, USE ONLY METAL DUCTWORK. Always use only. IMPORTANT SAFETY INSTRUCTIONS WARNING: TO REDUCE THE RISK OF FIRE, ELECTRIC SHOCK, OR INJURY TO PERSONS, OBSERVE THE FOLLOWING: ■ Use this fan with ...

Installation Guide
Page 5
... with damper (interior- stainless ■ 2 - End caps ■ 2 - Install the downdraft vent first, then install the cooktop. Given dimensions provide minimum clearance. ■ Consult the cooktop manufacturer installation instructions before starting installation. Check that are shown must be removed and the drawer front installed permanently to match vent system ■ Vent system ■ Home power supply...
... with damper (interior- stainless ■ 2 - End caps ■ 2 - Install the downdraft vent first, then install the cooktop. Given dimensions provide minimum clearance. ■ Consult the cooktop manufacturer installation instructions before starting installation. Check that are shown must be removed and the drawer front installed permanently to match vent system ■ Vent system ■ Home power supply...

Installation Guide
Page 7
... vent system cutout location that the cooktop and vent cutouts be drawn on your specific installation. Centerline of cooktop cutout NOTES: ■ See cooktop manufacturer's instructions for cooktop cutout depth and width. ■ Use dimensions for cooktop cutout depth and ...;⁄₂" (12.7 mm) minimum 21 54.1 cm) 21 54.1 cm) Cutouts are not recommended for these installations. see the following Countertop Cutout Dimensions Chart. See Cooktop Installation Instructions for 3¹⁄₄" x 10" (8.3 x 25.4 cm) rectangular or 6" (15.2 cm) round vent...
... vent system cutout location that the cooktop and vent cutouts be drawn on your specific installation. Centerline of cooktop cutout NOTES: ■ See cooktop manufacturer's instructions for cooktop cutout depth and width. ■ Use dimensions for cooktop cutout depth and ...;⁄₂" (12.7 mm) minimum 21 54.1 cm) 21 54.1 cm) Cutouts are not recommended for these installations. see the following Countertop Cutout Dimensions Chart. See Cooktop Installation Instructions for 3¹⁄₄" x 10" (8.3 x 25.4 cm) rectangular or 6" (15.2 cm) round vent...

Installation Guide
Page 8
...Standards C22.1-94, Canadian Electrical Code, Part 1 and C22.2 No. 0-M91 (latest edition) and all joints in the Installation Instructions for the interior- or exterior-mounted vent motor. The damper should not exceed the maximum lengths listed in your HVAC professional for...listed for specific requirements in the Maximum Length of Vent System chart. If it is recommended that a qualified electrician determine that the electrical installation is used , it is adequate and in conformance with the rating of the appliance as standard elbows. Countertop Cutout Dimensions Chart B A...
...Standards C22.1-94, Canadian Electrical Code, Part 1 and C22.2 No. 0-M91 (latest edition) and all joints in the Installation Instructions for the interior- or exterior-mounted vent motor. The damper should not exceed the maximum lengths listed in your HVAC professional for...listed for specific requirements in the Maximum Length of Vent System chart. If it is recommended that a qualified electrician determine that the electrical installation is used , it is adequate and in conformance with the rating of the appliance as standard elbows. Countertop Cutout Dimensions Chart B A...

Installation Guide
Page 9
... floor. Down vent NOTE: For island locations, a front or rear mounted blower motor can terminate either through the floor. Island Location-Vent System Installed Under a Concrete Slab Using PVC Sewer Pipe Island Location Front (Standard)-Mounted Blower Motor Rear-Mounted Blower Motor Front (Standard)-Mounted Blower Motor B...) round PVC sewer pipe I. 6" (15.2 cm) round 90° PVC sewer pipe elbow J. Down vent B. INSTALLATION INSTRUCTIONS INTERIOR-MOUNTED VENT MOTOR Venting Methods Determine which venting method is best for your application. Most island applications would still require...
... floor. Down vent NOTE: For island locations, a front or rear mounted blower motor can terminate either through the floor. Island Location-Vent System Installed Under a Concrete Slab Using PVC Sewer Pipe Island Location Front (Standard)-Mounted Blower Motor Rear-Mounted Blower Motor Front (Standard)-Mounted Blower Motor B...) round PVC sewer pipe I. 6" (15.2 cm) round 90° PVC sewer pipe elbow J. Down vent B. INSTALLATION INSTRUCTIONS INTERIOR-MOUNTED VENT MOTOR Venting Methods Determine which venting method is best for your application. Most island applications would still require...

Installation Guide
Page 16
...for each vent piece used in a utility room, basement, crawl space or attic. NOTES: Built-In Cabinet Locations To attic installed in-line blower motor system ■ Venting through the wall or roof. Transitioning to the retractable downdraft vent system outlet cover and...retractable downdraft vent system. NOTE: Exterior-mounted vent motor installations require an approved in-line blower motor system. INSTALLATION INSTRUCTIONS EXTERIOR-MOUNTED VENT MOTOR CAUTION: To reduce the risk of fire and electrical shock, install the downdraft only with in -line blower motor system ...
...for each vent piece used in a utility room, basement, crawl space or attic. NOTES: Built-In Cabinet Locations To attic installed in-line blower motor system ■ Venting through the wall or roof. Transitioning to the retractable downdraft vent system outlet cover and...retractable downdraft vent system. NOTE: Exterior-mounted vent motor installations require an approved in-line blower motor system. INSTALLATION INSTRUCTIONS EXTERIOR-MOUNTED VENT MOTOR CAUTION: To reduce the risk of fire and electrical shock, install the downdraft only with in -line blower motor system ...

Installation Guide
Page 28
...Canada, this warranty. 7. Service calls to KitchenAid within 30 days from the date of purchase. 6. Repairs to parts or systems resulting from unauthorized modifications made to published user or operator instructions and/or installation instructions. 4. This warranty is used for other damage... not apply. Major appliances with published installation instructions. 10. IMPLIED WARRANTIES, INCLUDING WARRANTIES OF MERCHANTABILITY OR FITNESS FOR A PARTICULAR PURPOSE, ARE LIMITED TO ONE YEAR OR THE SHORTEST PERIOD ALLOWED BY LAW. KITCHENAID SHALL NOT BE LIABLE FOR INCIDENTAL OR...
...Canada, this warranty. 7. Service calls to KitchenAid within 30 days from the date of purchase. 6. Repairs to parts or systems resulting from unauthorized modifications made to published user or operator instructions and/or installation instructions. 4. This warranty is used for other damage... not apply. Major appliances with published installation instructions. 10. IMPLIED WARRANTIES, INCLUDING WARRANTIES OF MERCHANTABILITY OR FITNESS FOR A PARTICULAR PURPOSE, ARE LIMITED TO ONE YEAR OR THE SHORTEST PERIOD ALLOWED BY LAW. KITCHENAID SHALL NOT BE LIABLE FOR INCIDENTAL OR...

Warranty Information
Page 1
... be repaired in the home and only in-home service is reported to KitchenAid within 30 days from your home of your major appliance for in accordance with published installation instructions. 10. If outside the 50 United States and Canada, contact your major...consumables or cleaning products not approved by an authorized KitchenAid servicer is not installed in -warranty service. Major appliances with the removal from the date of your major appliance, to published user or operator instructions and/or installation instructions. 4. Write down the following information about your...
... be repaired in the home and only in-home service is reported to KitchenAid within 30 days from your home of your major appliance for in accordance with published installation instructions. 10. If outside the 50 United States and Canada, contact your major...consumables or cleaning products not approved by an authorized KitchenAid servicer is not installed in -warranty service. Major appliances with the removal from the date of your major appliance, to published user or operator instructions and/or installation instructions. 4. Write down the following information about your...
