KitchenAid KXI4336YSS Support and Manuals
Get Help and Manuals for this KitchenAid item
View All Support Options Below
Free KitchenAid KXI4336YSS manuals!
Problems with KitchenAid KXI4336YSS?
Ask a Question
Free KitchenAid KXI4336YSS manuals!
Problems with KitchenAid KXI4336YSS?
Ask a Question
KitchenAid KXI4336YSS Videos

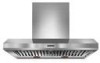
KitchenAid KXI4336YSS Chimney Island Hood
Duration: :58
Total Views: 30
Duration: :58
Total Views: 30
Popular KitchenAid KXI4336YSS Manual Pages
Warranty Information - Page 1

... "Assistance or Service" section or by a KitchenAid designated service company. Service calls to be borne by this information on the model and serial number label located on how to instruct you need service, first see the "Troubleshooting" section of the Use & Care Guide. This major appliance is designed to correct the installation of your major appliance. Repairs to parts or systems...
Use & Care Guide - Page 2
... in this manual and on your appliance. All safety messages will tell you what can be killed or seriously injured if you don't follow the safety alert symbol and either the word "DANGER" or "WARNING." TABLE OF CONTENTS
RANGE HOOD SAFETY 2
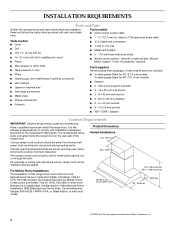
INSTALLATION REQUIREMENTS 4 Tools and Parts 4 Location Requirements 4 Venting Requirements 5 Electrical Requirements 6
INSTALLATION INSTRUCTIONS...
Use & Care Guide - Page 3
... INSTRUCTIONS
3 Follow the heating equipment manufacturer's guideline and safety standards such as a tag, to an exit. Do not use cookware appropriate...Refrigeration and Air Conditioning Engineers (ASHRAE), and the local code authorities.
■ When cutting or drilling into crawl spaces, or garages.
Discard fan or return to an authorized service facility for examination and/or repair...
Use & Care Guide - Page 4
... ceiling and wall where canopy range hood will be installed must be used.
It is factory set for Mobile Home Construction and Safety, Title 24, HUD, Part 280) or when such standard is located inside the range hood on the model/serial rating plate.
Vent cover support brackets ■ 2 - 10 x 50 mm wall anchor ■...
Use & Care Guide - Page 6
...Code, Part 1 and C22.2 No. 0-M91 (latest edition) and all governing codes and ordinances.
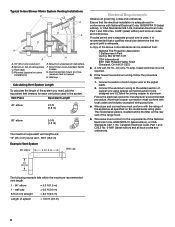
A copy of the appliance as specified on top of system
= 13.0 ft (3.9 m)
6
The model... determine that the electrical installation is required.
■ If the house has aluminum wiring, follow the procedure below:
1.
C. Typical In-line Blower Motor System Venting Installations C A
E D
...
Use & Care Guide - Page 7
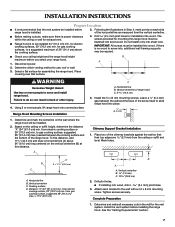
...install range hood. A
Chimney Support Bracket Installation
1. from electric cooking surface or 30" [76.2 cm] min. Drill pilot holes. ■ If installing into place.
¹⁄₄" (6.4 mm)
1.
Install...(24" [61.0 cm] min. INSTALLATION INSTRUCTIONS
Prepare Location
■ It is recommended that the vent system be installed before installing the range hood. Do not fasten ...
Use & Care Guide - Page 8

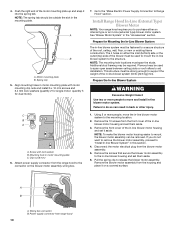
...set of the range hood at this location. 4.
Motor support bracket
D. Lower mounting screws
8 Install motor spring clip using three 4.2 x 8 mm screws. Use the inside top or back (alternate location on some models...assembly location)
E. See the "Install Range Hood Internal Blower Motor" section and the instructions supplied with damper to the inside set of the range hood.
3....
Use & Care Guide - Page 10
...
WARNING
Excessive Weight Hazard
Use two or more people, move and install in -line blower motor housing and set it aside.
Push the right end of the blower must be... must be removed. A
B
A. Motor mounting plate B. Spring clip
5.
Using 2 or more people to support the weight of the roof, ceiling, wall, floor, or new or existing frame construction. Remove the 10 screws...
Use & Care Guide - Page 11
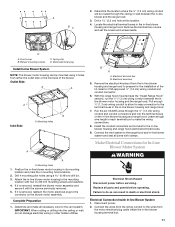
... electrical plug to make all parts and panels before servicing. Electrical terminal box B. With the range hood mounted (see the "Install Range Hood" section), run the... damage electrical wiring or other hidden utilities. Replace all necessary cuts for the installation of the blower. Connect the wires from the...set the covers and screws aside.
Blower mounting screws
C.
Use & Care Guide - Page 13
... supply
to do so can result in death or electrical shock.
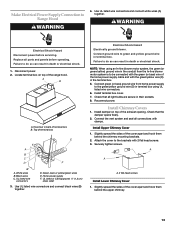
1. Replace all parts and panels before servicing. Disconnect power. 2. Connect green (or bare) ground wire from the...power supply
F. Connect ground wire to Range Hood
WARNING
4.
Check that the damper opens freely.
2. Install Upper Chimney Cover
1. Attach the cover to the brackets with clamps. White wires
B. UL listed or...
Use & Care Guide - Page 14

...light
1. Move the light switch to the "1" position to turn the fan to night light setting.
2.
Move the fan speed switch to 15" (38.1 cm).
14
The optimum distance...detected in use from the cooktop area. Range hood canopy C. 4 - 4.2 x 8 mm screws
Complete Installation and Check Operation
1. A. Blower control switches C. Heat lamps F.
Light control B. Move the fan switch ...
Use & Care Guide - Page 15
Install heat lamp bulbs into the front track to secure. 3.
Use 2 hands to handle lamp. Grasp filter
handles, push toward the rear of the range hood and pull down on the front handle to lock it counterclockwise.
3. Push down on the rear handle and set... heat lamps, move the switch to the following instructions. Remove the lamp and replace it in its socket. 3. To turn it ...
Use & Care Guide - Page 17
... and provide afterwarranty service, anywhere in your appliance. If you need replacement parts
If you need further assistance, you can write to build every new appliance.
Our consultants provide assistance with the same precision used to KitchenAid Canada with : ■ Features and specifications on our full line of appliances. ■ Installation information.
This information...
Use & Care Guide - Page 18
...information on the model and serial number label located on how to use of repair or replacement under this limited warranty. This limited warranty is valid only in accordance with published installation instructions.
10. Proof of your authorized KitchenAid dealer to repair or replace appliance light bulbs, air filters or water filters. THIS WARRANTY GIVES YOU SPECIFIC LEGAL RIGHTS...
Dimension Guide - Page 1

...Instructions...parts distributor. See the following chart. The range hood exhaust opening is not recommended. For complete details, see Installation
our products, we reserve the right to countertop
36" (91.4 cm) countertop height
See Note*
VENTING REQUIREMENTS
q Vent system must have a damper. Specifications...chimney extension replaces the upper chimney shipped with local codes and industry ...
KitchenAid KXI4336YSS Reviews
We have not received any reviews for KitchenAid yet.