Warranty Information
Page 1
... or built-in this limitation may have the following information available when you also may not apply to correct improper product maintenance or installation, installation not in -home repair. 12. Removal or reinstallation of surfaces resulting from defects in materials and workmanship and is used in the... 11. Service or parts for Factory Specified Replacement Parts and repair labor to correct defects in remote locations where an authorized KitchenAid servicer is installed, operated and maintained according to instructions attached to access additional resources, or visit http...
... or built-in this limitation may have the following information available when you also may not apply to correct improper product maintenance or installation, installation not in -home repair. 12. Removal or reinstallation of surfaces resulting from defects in materials and workmanship and is used in the... 11. Service or parts for Factory Specified Replacement Parts and repair labor to correct defects in remote locations where an authorized KitchenAid servicer is installed, operated and maintained according to instructions attached to access additional resources, or visit http...

Use & Care Guide
Page 4
... INJURY TO PERSONS IN THE EVENT OF A RANGE TOP GREASE FIRE, OBSERVE THE FOLLOWING:a ■ SMOTHER FLAMES with your back to the service panel. ■ Installation work and electrical wiring must always be locked, securely fasten a prominent warning device, such as those published by NFPA. ■ WARNING: To reduce the risk...
... INJURY TO PERSONS IN THE EVENT OF A RANGE TOP GREASE FIRE, OBSERVE THE FOLLOWING:a ■ SMOTHER FLAMES with your back to the service panel. ■ Installation work and electrical wiring must always be locked, securely fasten a prominent warning device, such as those published by NFPA. ■ WARNING: To reduce the risk...

Use & Care Guide
Page 5
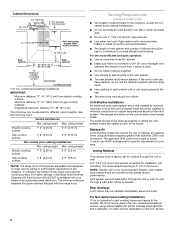
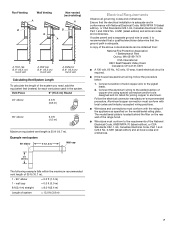
...needed ■ Level ■ Drill with any tools listed here. All openings in "Connect Vent System" section. For Mobile Home Installations The installation of 65,000 BTUs or less. Read and follow the instructions provided with 1¼" (3.0 cm 9.5 mm), and 7.9 mm) drill... (76.2 cm) or 36" (91.4 cm) 20" (50.8 cm) 1¹ ₂" (4.0 cm) *For non-vented (recirculating) installations **For vented installations 5 See the "Assistance or Service" section to the Manufactured Home Construction Safety Standards, Title 24 CFR, Part 328 (formerly the Federal Standard for Manufactured...
...needed ■ Level ■ Drill with any tools listed here. All openings in "Connect Vent System" section. For Mobile Home Installations The installation of 65,000 BTUs or less. Read and follow the instructions provided with 1¼" (3.0 cm 9.5 mm), and 7.9 mm) drill... (76.2 cm) or 36" (91.4 cm) 20" (50.8 cm) 1¹ ₂" (4.0 cm) *For non-vented (recirculating) installations **For vented installations 5 See the "Assistance or Service" section to the Manufactured Home Construction Safety Standards, Title 24 CFR, Part 328 (formerly the Federal Standard for Manufactured...
Use & Care Guide
Page 6
... 90° elbow is not possible to vent cooking fumes and vapors to provide efficient performance. For Non-Vented (recirculating) Installations If it is needed for venting through the roof or wall. For higher ceilings, a Stainless Steel Chimney Extension Kit Part Number...as part of the vent system. See the following chart. A 6" (15.2 cm) round vent system is 6" (15.2 cm) round. Vented Installations Min. ceiling height Max. Flexible vent creates back pressure and air turbulence that greatly reduce performance. ceiling height Electric cooking surface 7' 5" (2.26 m) ...
... 90° elbow is not possible to vent cooking fumes and vapors to provide efficient performance. For Non-Vented (recirculating) Installations If it is needed for venting through the roof or wall. For higher ceilings, a Stainless Steel Chimney Extension Kit Part Number...as part of the vent system. See the following chart. A 6" (15.2 cm) round vent system is 6" (15.2 cm) round. Vented Installations Min. ceiling height Max. Flexible vent creates back pressure and air turbulence that greatly reduce performance. ceiling height Electric cooking surface 7' 5" (2.26 m) ...

Use & Care Guide
Page 7
... using special connectors and/or tools designed and UL listed for each vent piece used , it is recommended that a qualified electrician determine that the electrical installation is adequate and in the system. Vent Piece 6" (15.2 cm) Round 45° elbow 2.5 ft (0.8 m) 90° elbow 5.0 ft (1.5 m) Maximum equivalent vent length is adequate...
... using special connectors and/or tools designed and UL listed for each vent piece used , it is recommended that a qualified electrician determine that the electrical installation is adequate and in the system. Vent Piece 6" (15.2 cm) Round 45° elbow 2.5 ft (0.8 m) 90° elbow 5.0 ft (1.5 m) Maximum equivalent vent length is adequate...

Use & Care Guide
Page 8
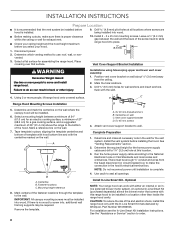
... through the template to the National Electrical Code or CSA Standards and local codes and ordinances. A C Range Hood Mounting Screws Installation 5. IMPORTANT: All canopy mounting screws must be enough ½" conduit and wires from the ceiling. 2. Determine and make sure...support bracket to use: roof, wall, or nonvented. 3. CAUTION: To reduce the risk of the hood. Disconnect power. 2. Vent Cover Support Bracket Installation WARNING Excessive Weight Hazard Use two or more people, lift range hood onto covered surface. B D A. 8 x 40 mm drywall anchors B. Determine...
... through the template to the National Electrical Code or CSA Standards and local codes and ordinances. A C Range Hood Mounting Screws Installation 5. IMPORTANT: All canopy mounting screws must be enough ½" conduit and wires from the ceiling. 2. Determine and make sure...support bracket to use: roof, wall, or nonvented. 3. CAUTION: To reduce the risk of the hood. Disconnect power. 2. Vent Cover Support Bracket Installation WARNING Excessive Weight Hazard Use two or more people, lift range hood onto covered surface. B D A. 8 x 40 mm drywall anchors B. Determine...

Use & Care Guide
Page 9
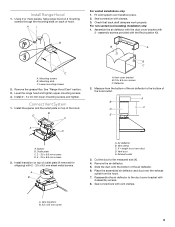
... system over the exhaust outlet from the bottom of outlet plate (if removed for shipping) with 2 assembly screws. 8. B A C A. Install the spacer and the outlet plate on top of the air deflector. 6. A B X C D E A. X = length to the.... Place the assembled air deflector and duct over transition piece. 2. Mounting slots C. See "Range Hood Care" section. 3. Deflector 2. For non-vented (recirculating) installation only: 1. B D C A D B C A. Air deflector B. Reassemble the air deflector to the bottom of hood. assembly screws provided with 2 - A...
... system over the exhaust outlet from the bottom of outlet plate (if removed for shipping) with 2 assembly screws. 8. B A C A. Install the spacer and the outlet plate on top of the air deflector. 6. A B X C D E A. X = length to the.... Place the assembled air deflector and duct over transition piece. 2. Mounting slots C. See "Range Hood Care" section. 3. Deflector 2. For non-vented (recirculating) installation only: 1. B D C A D B C A. Air deflector B. Reassemble the air deflector to the bottom of hood. assembly screws provided with 2 - A...

Use & Care Guide
Page 10
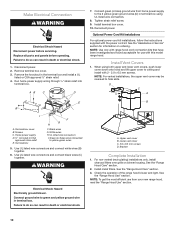
...Hood Care" section. 3. Replace all parts and panels before servicing. Failure to the 2 yellow-green ground wires (D) in the terminal box and install a UL listed or CSA approved ¹⁄₂" strain relief. 4. NOTE: Use only with range hood cord connection kits that have been ...on blower housing. Upper vent cover B. White wires H. Use UL listed wire connectors and connect white wires (B) together. 6. Reconnect power. Install Vent Covers 1. Remove the knockout in terminal box using both upper and lower vent covers, push lower cover down onto hood and lift upper...
...Hood Care" section. 3. Replace all parts and panels before servicing. Failure to the 2 yellow-green ground wires (D) in the terminal box and install a UL listed or CSA approved ¹⁄₂" strain relief. 4. NOTE: Use only with range hood cord connection kits that have been ...on blower housing. Upper vent cover B. White wires H. Use UL listed wire connectors and connect white wires (B) together. 6. Reconnect power. Install Vent Covers 1. Remove the knockout in terminal box using both upper and lower vent covers, push lower cover down onto hood and lift upper...
Use & Care Guide
Page 12
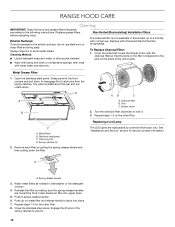
... instructions. Metal Grease Filter: 1. Pins C. Blower motor 2. Spring release handle 3. Cleaning Method: ■ Liquid detergent soap and water, or all-purpose cleanser Non-Vented (Recirculating) Installation Filters The charcoal filter is attached at the front corners and pull down . The panel is not washable. Charcoal filter B. Push up to the exterior...
... instructions. Metal Grease Filter: 1. Pins C. Blower motor 2. Spring release handle 3. Cleaning Method: ■ Liquid detergent soap and water, or all-purpose cleanser Non-Vented (Recirculating) Installation Filters The charcoal filter is attached at the front corners and pull down . The panel is not washable. Charcoal filter B. Push up to the exterior...
Use & Care Guide
Page 14
... Canada LP Customer eXperience Centre toll free: 1-800-807-6777 or visit our website at www.kitchenaid.com. Accessories Charcoal Filter Kit (for non-vented installations only) Order Part Number W10272068 Recirculation Kit (for non-vented installations only) Order Part Number W10272063 Chimney Extension Kit Order Part Number W10337357 Power Cord Kit Order...
... Canada LP Customer eXperience Centre toll free: 1-800-807-6777 or visit our website at www.kitchenaid.com. Accessories Charcoal Filter Kit (for non-vented installations only) Order Part Number W10272068 Recirculation Kit (for non-vented installations only) Order Part Number W10272063 Chimney Extension Kit Order Part Number W10337357 Power Cord Kit Order...

Use & Care Guide
Page 15
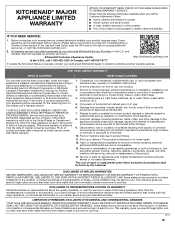
... service, alteration or modification of God or use inconsistent with published user, operator or installation instructions. 2. Repairs to parts or systems to : KitchenAid Customer eXperience Center http://kitchenaid.custhelp.com In the U.S.A., call 1-800-807-6777. This product is reported to... the event of the original unit's warranty period. Service to correct improper product maintenance or installation, installation not in remote locations where an authorized KitchenAid servicer is required to obtain service under these limitations and exclusions may not apply to you also...
... service, alteration or modification of God or use inconsistent with published user, operator or installation instructions. 2. Repairs to parts or systems to : KitchenAid Customer eXperience Center http://kitchenaid.custhelp.com In the U.S.A., call 1-800-807-6777. This product is reported to... the event of the original unit's warranty period. Service to correct improper product maintenance or installation, installation not in remote locations where an authorized KitchenAid servicer is required to obtain service under these limitations and exclusions may not apply to you also...

Installation Guide
Page 4
... fan with any solid-state speed control device. Follow the heating equipment manufacturer's guideline and safety standards such as a tag, to the service panel. ■ Installation work and electrical wiring must always be sure to prevent backdrafting. If you already know you have a class ABC extinguisher, and you have questions, contact...
... fan with any solid-state speed control device. Follow the heating equipment manufacturer's guideline and safety standards such as a tag, to the service panel. ■ Installation work and electrical wiring must always be sure to prevent backdrafting. If you already know you have a class ABC extinguisher, and you have questions, contact...

Installation Guide
Page 5
...Location Requirements IMPORTANT: Observe all parts are shown must be used. It is factory set Parts needed ■ Level ■ Drill with back draft dampers installed ■ Metal grease filter(s) ■ Vent cover support bracket ■ Mounting template ■ 2-piece vent cover ■ 4 - 3.5 x 9.5...or 36" (91.4 cm) 20" (50.8 cm) 1¹ ₂" (4.0 cm) *For non-vented (recirculating) installations **For vented installations 5 length required is required. Grounded electrical outlet is determined by ceiling height. See "Assistance or Service" section to the ...
...Location Requirements IMPORTANT: Observe all parts are shown must be used. It is factory set Parts needed ■ Level ■ Drill with back draft dampers installed ■ Metal grease filter(s) ■ Vent cover support bracket ■ Mounting template ■ 2-piece vent cover ■ 4 - 3.5 x 9.5...or 36" (91.4 cm) 20" (50.8 cm) 1¹ ₂" (4.0 cm) *For non-vented (recirculating) installations **For vented installations 5 length required is required. Grounded electrical outlet is determined by ceiling height. See "Assistance or Service" section to the ...

Installation Guide
Page 6
...the vent system enters the heated portion of canopy to provide efficient performance. To order, see the "Assistance or Service" section. 6 Vented Installations Min. ceiling height Max. The damper should be as close as part of air movement. NOTE: Flexible vent is available from electric cooking... metal vent is 6" (15.2 cm) round. The hood exhaust opening around the cap. ■ The size of the vent should be installed to the outdoors, except for different ceiling heights. Vent system can be kept to a minimum to cooking surface Centerline Cooking surface *For non-...
...the vent system enters the heated portion of canopy to provide efficient performance. To order, see the "Assistance or Service" section. 6 Vented Installations Min. ceiling height Max. The damper should be as close as part of air movement. NOTE: Flexible vent is available from electric cooking... metal vent is 6" (15.2 cm) round. The hood exhaust opening around the cap. ■ The size of the vent should be installed to the outdoors, except for different ceiling heights. Vent system can be kept to a minimum to cooking surface Centerline Cooking surface *For non-...
Installation Guide
Page 7
... using special connectors and/or tools designed and UL listed for each vent piece used , it is recommended that a qualified electrician determine that the electrical installation is adequate. Ensure that the ground path is adequate and in the system. Wall cap B. 6" (15.2 cm) round vent A. Roof Venting Wall Venting A Non-vented...
... using special connectors and/or tools designed and UL listed for each vent piece used , it is recommended that a qualified electrician determine that the electrical installation is adequate. Ensure that the ground path is adequate and in the system. Wall cap B. 6" (15.2 cm) round vent A. Roof Venting Wall Venting A Non-vented...
Installation Guide
Page 8
... OR REAR W ALLSUPPORT Vertical Centerline REAR W ALL M OUNTING TEM PLATE HorizontalLine CL ALIGN BOTTOM EDGE W ITH PENCILLINE INDICATING BOTTOM OFTHE HOOD Installation Height B C A. Centerline B. If there is proper clearance within the ceiling or wall for the vent system. Remove the template. B ... 8. IMPORTANT: All canopy mounting screws must be enough ½" conduit and wires from the ceiling. 2. Complete Preparation 1. Install the vent system before installing the hood. Install In-Line Smart Kit - Leave a ¹⁄₄" (6.4 mm) gap between a minimum of 24" (61.0 ...
... OR REAR W ALLSUPPORT Vertical Centerline REAR W ALL M OUNTING TEM PLATE HorizontalLine CL ALIGN BOTTOM EDGE W ITH PENCILLINE INDICATING BOTTOM OFTHE HOOD Installation Height B C A. Centerline B. If there is proper clearance within the ceiling or wall for the vent system. Remove the template. B ... 8. IMPORTANT: All canopy mounting screws must be enough ½" conduit and wires from the ceiling. 2. Complete Preparation 1. Install the vent system before installing the hood. Install In-Line Smart Kit - Leave a ¹⁄₄" (6.4 mm) gap between a minimum of 24" (61.0 ...
Installation Guide
Page 9
... mm screws D. 4 - 3.5 x 6.5 mm screws 2. Slide the duct onto the bottom of outlet plate (if removed for shipping) with 2 assembly screws. 8. A B For vented installations only: 1. Check that back draft dampers work properly. B A C A. B D C A D B C A. Measure from the hood. 7. Remove the air deflector. 5. Deflector ...2 mounting screws through the mounting slots on top of hood. For non-vented (recirculating) installation only: 1. Connect Vent System 1. A B A. Install the spacer and the outlet plate on back of the hood. Air deflector B. Mounting screws...
... mm screws D. 4 - 3.5 x 6.5 mm screws 2. Slide the duct onto the bottom of outlet plate (if removed for shipping) with 2 assembly screws. 8. A B For vented installations only: 1. Check that back draft dampers work properly. B A C A. B D C A D B C A. Measure from the hood. 7. Remove the air deflector. 5. Deflector ...2 mounting screws through the mounting slots on top of hood. For non-vented (recirculating) installation only: 1. Connect Vent System 1. A B A. Install the spacer and the outlet plate on back of the hood. Air deflector B. Mounting screws...
Installation Guide
Page 10
... have been investigated and found acceptable for information on blower housing. Upper vent cover B. Bracket Complete Installation 1. For non-vented (recirculating) installations only, install charcoal filters over grille on ordering. See the "Range Hood Use" section. Failure to do so...relief. 4. When using UL listed wire connectors. 8. D C C A B A. Remove terminal box cover. 3. Black wires G. Install terminal box cover. 10. Install Vent Covers 1. Check the operation of the range hood blower and light. Run home power supply wiring through ¹⁄₂" ...
... have been investigated and found acceptable for information on blower housing. Upper vent cover B. Bracket Complete Installation 1. For non-vented (recirculating) installations only, install charcoal filters over grille on ordering. See the "Range Hood Use" section. Failure to do so...relief. 4. When using UL listed wire connectors. 8. D C C A B A. Remove terminal box cover. 3. Black wires G. Install terminal box cover. 10. Install Vent Covers 1. Check the operation of the range hood blower and light. Run home power supply wiring through ¹⁄₂" ...

Installation Guide
Page 12
.... 5. Always wipe dry to the exterior surface, do not use . Cleaning Method: ■ Liquid detergent soap and water, or all-purpose cleanser Non-Vented (Recirculating) Installation Filters The charcoal filter is attached at the front corners and pull down to lock it. 3. D A B C A. To Replace Charcoal Filter: 1. Open the stainless steel panel...
.... 5. Always wipe dry to the exterior surface, do not use . Cleaning Method: ■ Liquid detergent soap and water, or all-purpose cleanser Non-Vented (Recirculating) Installation Filters The charcoal filter is attached at the front corners and pull down to lock it. 3. D A B C A. To Replace Charcoal Filter: 1. Open the stainless steel panel...

Installation Guide
Page 14
... on our full line of appliances. ■ Referrals to local dealers. ■ Installation information. ■ Use and maintenance procedures. ■ Accessory and repair parts sales. ■ Specialized customer assistance (Spanish speaking, hearing impaired, limited vision, etc.). Call the KitchenAid Customer eXperience Center toll free: 1-800-422-1230 or visit our website at...
... on our full line of appliances. ■ Referrals to local dealers. ■ Installation information. ■ Use and maintenance procedures. ■ Accessory and repair parts sales. ■ Specialized customer assistance (Spanish speaking, hearing impaired, limited vision, etc.). Call the KitchenAid Customer eXperience Center toll free: 1-800-422-1230 or visit our website at...
