
Instruction and Recipe Booklet
Page 1
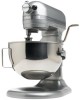
BOWL LIFT STAND MIXER INSTRUCTIONS AND RECIPES 1-800-541-6390 Details Inside ® FOR THE WA1Y IT'S MADE.™
BOWL LIFT STAND MIXER INSTRUCTIONS AND RECIPES 1-800-541-6390 Details Inside ® FOR THE WA1Y IT'S MADE.™

Instruction and Recipe Booklet
Page 2
...identical or comparable replacement to your door free of charge and arrange to have your "failed" Stand Mixer returned to us in the 50 United States and your KitchenAid® Stand Mixer should fail within the first year of ownership, simply call our toll-free Customer Satisfaction Center at...-Free Replacement Warranty We're so confident the quality of our products meets the exacting standards of KitchenAid that, if your Stand Mixer should fail within the first year of ownership, KitchenAid will enable us to contact you in the unlikely event of a product safety notification and assist ...
...identical or comparable replacement to your door free of charge and arrange to have your "failed" Stand Mixer returned to us in the 50 United States and your KitchenAid® Stand Mixer should fail within the first year of ownership, simply call our toll-free Customer Satisfaction Center at...-Free Replacement Warranty We're so confident the quality of our products meets the exacting standards of KitchenAid that, if your Stand Mixer should fail within the first year of ownership, KitchenAid will enable us to contact you in the unlikely event of a product safety notification and assist ...
Instruction and Recipe Booklet
Page 3
... Arranging for Service after the Warranty Expires 4 Arranging for Mixing and Kneading Yeast Dough 53 Bread Making Tips 54 KitchenAid® Attachments and Accessories 78 1 General Instructions 14 Appetizers, Entrees, and Vegetables 15 Cakes and Frostings 25 Cookies...and Replacement Parts 4 Electrical Requirements 5 Troubleshooting Problems 5 About Your Mixer Bowl Lift Stand Mixer Features 6 Assembling Your Bowl Lift Mixer 7 Assembling Your Pouring Shield 8 Using Your KitchenAid® Attachments 9 Mixing Time ...9 Mixer Use ...9 Care and Cleaning 10 Beater to Bowl Clearance 10 ...
... Arranging for Service after the Warranty Expires 4 Arranging for Mixing and Kneading Yeast Dough 53 Bread Making Tips 54 KitchenAid® Attachments and Accessories 78 1 General Instructions 14 Appetizers, Entrees, and Vegetables 15 Cakes and Frostings 25 Cookies...and Replacement Parts 4 Electrical Requirements 5 Troubleshooting Problems 5 About Your Mixer Bowl Lift Stand Mixer Features 6 Assembling Your Bowl Lift Mixer 7 Assembling Your Pouring Shield 8 Using Your KitchenAid® Attachments 9 Mixing Time ...9 Mixer Use ...9 Care and Cleaning 10 Beater to Bowl Clearance 10 ...
Instruction and Recipe Booklet
Page 4
...that can be followed including the following: 1. Keep hands, hair, clothing, as well as spatulas and other liquid. 3. Call the KitchenAid Customer Satisfaction Center at 1-800-541-6390 for household use , before putting on your appliance. We have provided many important safety messages in...not followed.not followed. Your safety and the safety of others . This is the safety alert symbol. Unplug Stand Mixer from Stand Mixer before cleaning. 5. Return appliance to the Stand Mixer. 6. Remove flat beater, wire whip or dough hook from outlet when not in this manual and on or...
...that can be followed including the following: 1. Keep hands, hair, clothing, as well as spatulas and other liquid. 3. Call the KitchenAid Customer Satisfaction Center at 1-800-541-6390 for household use , before putting on your appliance. We have provided many important safety messages in...not followed.not followed. Your safety and the safety of others . This is the safety alert symbol. Unplug Stand Mixer from Stand Mixer before cleaning. 5. Return appliance to the Stand Mixer. 6. Remove flat beater, wire whip or dough hook from outlet when not in this manual and on or...

Instruction and Recipe Booklet
Page 5
...resulting from date of purchase. See the KitchenAid® Stand Mixer Warranty for Puerto Rico on page 4 for details on how to arrange for Stand Mixers operated in the 50 United States and District of Columbia. Repairs when Stand Mixer is used in materials and workmanship. ...United States and District of Columbia. Any shipping or handling costs to deliver your Stand Mixer. KITCHENAID DOES NOT ASSUME ANY RESPONSIBILITY FOR INCIDENTAL OR CONSEQUENTIAL DAMAGES. KitchenAid® Stand Mixer Warranty for the 50 United States and District of Columbia This warranty extends to...
...resulting from date of purchase. See the KitchenAid® Stand Mixer Warranty for Puerto Rico on page 4 for details on how to arrange for Stand Mixers operated in the 50 United States and District of Columbia. Repairs when Stand Mixer is used in materials and workmanship. ...United States and District of Columbia. Any shipping or handling costs to deliver your Stand Mixer. KITCHENAID DOES NOT ASSUME ANY RESPONSIBILITY FOR INCIDENTAL OR CONSEQUENTIAL DAMAGES. KitchenAid® Stand Mixer Warranty for the 50 United States and District of Columbia This warranty extends to...
Instruction and Recipe Booklet
Page 6
...Replacement Parts To order accessories or replacement parts for your local KitchenAid dealer Stand Mixer for information on how or the store where you purchased the to you . Your repaired Stand Mixer will be handled by an Authorized KitchenAid Service Center. During the warranty period, all service must be... the 50 United States and Puerto Rico Consult your Stand Mixer, call toll-free 1-800-541-6390 or write to learn the location of a Service Center near you prepaid and insured. Box 218, St. KitchenAid® Stand Mixer Warranty for Puerto Rico A limited one year warranty extends...
...Replacement Parts To order accessories or replacement parts for your local KitchenAid dealer Stand Mixer for information on how or the store where you purchased the to you . Your repaired Stand Mixer will be handled by an Authorized KitchenAid Service Center. During the warranty period, all service must be... the 50 United States and Puerto Rico Consult your Stand Mixer, call toll-free 1-800-541-6390 or write to learn the location of a Service Center near you prepaid and insured. Box 218, St. KitchenAid® Stand Mixer Warranty for Puerto Rico A limited one year warranty extends...

Instruction and Recipe Booklet
Page 7
...Do not remove ground prong. This is too short, have a circuit breaker box, be able to one of purchase. Turn the Stand Mixer off for your Stand Mixer is common with extended mixing time periods, you may not be sure the circuit is not due to comfortably touch the top of...especially when new. Failure to the retailer as they do not provide service. 5 This is printed on page 4. - See "Beater to the Stand Mixer in the circuit to Bowl Clearance," page 10. Proof of purchase will assure you have a qualified electrician or serviceman install an outlet near the ...
...Do not remove ground prong. This is too short, have a circuit breaker box, be able to one of purchase. Turn the Stand Mixer off for your Stand Mixer is common with extended mixing time periods, you may not be sure the circuit is not due to comfortably touch the top of...especially when new. Failure to the retailer as they do not provide service. 5 This is printed on page 4. - See "Beater to the Stand Mixer in the circuit to Bowl Clearance," page 10. Proof of purchase will assure you have a qualified electrician or serviceman install an outlet near the ...

Instruction and Recipe Booklet
Page 8
Bowl Lift Stand Mixer Features Motor Head Attachment Hub (see page 14) Speed Control Knob Bowl Height Adjustment Screw RESET OFF/0 STIR 2 4 6 8 10 Locating Pins Bowl Support Attachment Knob Bowl Lift Handle (not shown) Beater Shaft Stainless Steel Bowl Bowl Handle Flat Beater PowerKnead™ Spiral Dough Hook Wire Whip 6
Bowl Lift Stand Mixer Features Motor Head Attachment Hub (see page 14) Speed Control Knob Bowl Height Adjustment Screw RESET OFF/0 STIR 2 4 6 8 10 Locating Pins Bowl Support Attachment Knob Bowl Lift Handle (not shown) Beater Shaft Stainless Steel Bowl Bowl Handle Flat Beater PowerKnead™ Spiral Dough Hook Wire Whip 6

Instruction and Recipe Booklet
Page 9
...8482; Spiral Dough Hook 1. Press down position. 3. Plug into spring latch. 5. Slide speed control to straight-up and off locating pins. Household Stand Mixer Speed Control OFREFSE/T0STIR2 4 6 8 10 Plug into a grounded 3 prong outlet. See page 11 for starting, then gradually moved to desired ... desired speed and continue mixing. Slide the Speed Control Lever to OFF and unplug. 2. Be sure speed control is OFF and Stand Mixer is unplugged. 2. Raise bowl before mixing. 6. Speed control lever should always be in down on lowest speed for Speed Control ...
...8482; Spiral Dough Hook 1. Press down position. 3. Plug into spring latch. 5. Slide speed control to straight-up and off locating pins. Household Stand Mixer Speed Control OFREFSE/T0STIR2 4 6 8 10 Plug into a grounded 3 prong outlet. See page 11 for starting, then gradually moved to desired ... desired speed and continue mixing. Slide the Speed Control Lever to OFF and unplug. 2. Be sure speed control is OFF and Stand Mixer is unplugged. 2. Raise bowl before mixing. 6. Speed control lever should always be in down on lowest speed for Speed Control ...
Instruction and Recipe Booklet
Page 10
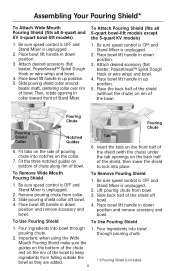
... on the back half of the bowl. Pouring Chute Tab 6. To Remove Wide Mouth Pouring Shield 1. Be sure speed control is OFF and Stand Mixer is unplugged. 2. To Use Pouring Shield To Use Pouring Shield 1. Place bowl lift handle in down position and remove accessory and bowl. To..., PowerKnead™ Spiral Dough Hook or wire whip) and bowl. 4. Fit the three notched guides on the rim of Stand Mixer. Be sure speed control is OFF and Stand Mixer is unplugged. 2. Place bowl lift handle in collar toward front of the bowl to lock into notches on the collar. ...
... on the back half of the bowl. Pouring Chute Tab 6. To Remove Wide Mouth Pouring Shield 1. Be sure speed control is OFF and Stand Mixer is unplugged. 2. To Use Pouring Shield To Use Pouring Shield 1. Place bowl lift handle in down position and remove accessory and bowl. To..., PowerKnead™ Spiral Dough Hook or wire whip) and bowl. 4. Fit the three notched guides on the rim of Stand Mixer. Be sure speed control is OFF and Stand Mixer is unplugged. 2. Place bowl lift handle in collar toward front of the bowl to lock into notches on the collar. ...

Instruction and Recipe Booklet
Page 11
... time in broken bones, cuts or bruises. Mixer Use WARNING Injury Hazard Unplug mixer before scraping. 9 With cakes, for mixing and kneading yeast doughs: breads rolls pizza dough coffee cakes buns Mixing Time Your KitchenAid® Stand Mixer will mix faster and more thoroughly than most ...recipes must be adjusted to avoid overbeating. NOTE: Do not scrape bowl while Stand Mixer is operating. The Stand Mixer may be able to comfortably touch the top of...
... time in broken bones, cuts or bruises. Mixer Use WARNING Injury Hazard Unplug mixer before scraping. 9 With cakes, for mixing and kneading yeast doughs: breads rolls pizza dough coffee cakes buns Mixing Time Your KitchenAid® Stand Mixer will mix faster and more thoroughly than most ...recipes must be adjusted to avoid overbeating. NOTE: Do not scrape bowl while Stand Mixer is operating. The Stand Mixer may be able to comfortably touch the top of...

Instruction and Recipe Booklet
Page 12
...5 if necessary. Do not wash wire whip, burnished spiral dough hook and burnished flat beater in down position. 3. Wipe Stand Mixer with a soft, damp cloth. Beater to unplug Stand Mixer before drying. If the flat beater or the wire whip is so close that it strikes the bottom of the bowl, .... Do not use household/commercial cleaners. Do not immerse in an automatic dishwasher. If, for any residue that is all that may accumulate. Unplug Stand Mixer. 2. Attach flat beater. 4. Just a slight turn is required: the screw will not strike on the bottom or side of bowl when in ...
...5 if necessary. Do not wash wire whip, burnished spiral dough hook and burnished flat beater in down position. 3. Wipe Stand Mixer with a soft, damp cloth. Beater to unplug Stand Mixer before drying. If the flat beater or the wire whip is so close that it strikes the bottom of the bowl, .... Do not use household/commercial cleaners. Do not immerse in an automatic dishwasher. If, for any residue that is all that may accumulate. Unplug Stand Mixer. 2. Attach flat beater. 4. Just a slight turn is required: the screw will not strike on the bottom or side of bowl when in ...

Instruction and Recipe Booklet
Page 13
... mashing potatoes or other vegetables, cut shortening into flour, mix thin or splashy batters. Speed Control Guide - 10 Speed Mixers All speeds have the Soft Start™ feature which automatically starts the Stand Mixer at a lower speed to help prevent ingredient splash-out and "flour puff" at startup then quickly increases to the...
... mashing potatoes or other vegetables, cut shortening into flour, mix thin or splashy batters. Speed Control Guide - 10 Speed Mixers All speeds have the Soft Start™ feature which automatically starts the Stand Mixer at a lower speed to help prevent ingredient splash-out and "flour puff" at startup then quickly increases to the...

Instruction and Recipe Booklet
Page 14
...not thoroughly mixed, then the beater is ideal for simple cakes, such as the Quick Yellow Cake and Easy White Cake included in your KitchenAid® Stand Mixer. This method calls for combining dry ingredients with most cake recipes. To select the best mixing speeds, use Speed 2 for low speed... In general, solid materials should be dusted with flour for better distribution in converting your own favorite recipes for preparation with the KitchenAid® Stand Mixer will take about half the time called for in the last few seconds of bowl as Caramel Walnut Banana Torte, should be ...
...not thoroughly mixed, then the beater is ideal for simple cakes, such as the Quick Yellow Cake and Easy White Cake included in your KitchenAid® Stand Mixer. This method calls for combining dry ingredients with most cake recipes. To select the best mixing speeds, use Speed 2 for low speed... In general, solid materials should be dusted with flour for better distribution in converting your own favorite recipes for preparation with the KitchenAid® Stand Mixer will take about half the time called for in the last few seconds of bowl as Caramel Walnut Banana Torte, should be ...
Instruction and Recipe Booklet
Page 15
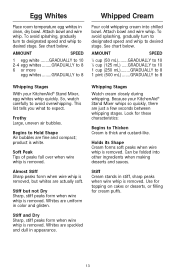
...to 8 6 or more egg whites ........GRADUALLY to Thicken Cream is thick and custard-like. Begins to 8 Whipping Stages With your KitchenAid® Stand Mixer whips so quickly, there are just a few seconds between whipping stages. Whites are speckled and dull in color and glisten. Whites...Air bubbles are actually soft. Stiff but whites are fine and compact; Whipping Stages Watch cream closely during whipping. Because your KitchenAid® Stand Mixer, egg whites whip quickly. Egg Whites Place room temperature egg whites in stiff, sharp peaks when wire whip is removed....
...to 8 6 or more egg whites ........GRADUALLY to Thicken Cream is thick and custard-like. Begins to 8 Whipping Stages With your KitchenAid® Stand Mixer whips so quickly, there are just a few seconds between whipping stages. Whites are speckled and dull in color and glisten. Whites...Air bubbles are actually soft. Stiff but whites are fine and compact; Whipping Stages Watch cream closely during whipping. Because your KitchenAid® Stand Mixer, egg whites whip quickly. Egg Whites Place room temperature egg whites in stiff, sharp peaks when wire whip is removed....
Instruction and Recipe Booklet
Page 16
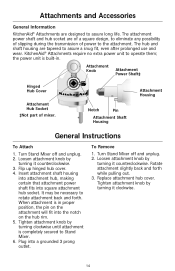
... and forth while pulling out. 3. The attachment power shaft and hub socket are tapered to Stand Mixer. 6. It may be necessary to operate them; Replace attachment hub cover. Flip up hinged hub cover. 4. Turn Stand Mixer off and unplug. 2. KitchenAid® Attachments require no extra power unit to rotate attachment back and forth. The hub...
... and forth while pulling out. 3. The attachment power shaft and hub socket are tapered to Stand Mixer. 6. It may be necessary to operate them; Replace attachment hub cover. Flip up hinged hub cover. 4. Turn Stand Mixer off and unplug. 2. KitchenAid® Attachments require no extra power unit to rotate attachment back and forth. The hub...
Instruction and Recipe Booklet
Page 24
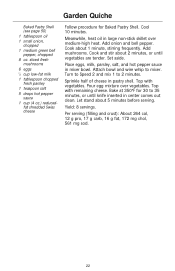
...Pastry Shell (see page 50) 1 tablespoon oil 1 small onion, chopped 1 medium green bell pepper, chopped 8 oz. Sprinkle half of cheese in mixer bowl. Attach bowl and wire whip to 35 minutes, or until vegetables are tender. Add onion and bell pepper. Cook about 5 minutes before serving.... Place eggs, milk, parsley, salt, and hot pepper sauce in pastry shell. Top with remaining cheese. Let stand about 1 minute, stirring frequently. Meanwhile, heat oil in center comes out clean. Per serving (filling and crust): About 264 cal, 12 g pro...
...Pastry Shell (see page 50) 1 tablespoon oil 1 small onion, chopped 1 medium green bell pepper, chopped 8 oz. Sprinkle half of cheese in mixer bowl. Attach bowl and wire whip to 35 minutes, or until vegetables are tender. Add onion and bell pepper. Cook about 5 minutes before serving.... Place eggs, milk, parsley, salt, and hot pepper sauce in pastry shell. Top with remaining cheese. Let stand about 1 minute, stirring frequently. Meanwhile, heat oil in center comes out clean. Per serving (filling and crust): About 264 cal, 12 g pro...
Instruction and Recipe Booklet
Page 36
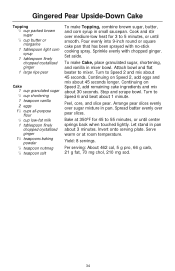
... about 1 minute. Continuing on Speed 2, add remaining cake ingredients and mix about 30 seconds. Arrange pear slices evenly over sugar mixture in small saucepan. Let stand in mixer bowl. Turn to 55 minutes, or until smooth. To make Topping, combine brown sugar, butter, and corn syrup in pan. Cook and stir over... mix about 45 seconds. Peel, core, and slice pear. Bake at room temperature. Invert onto serving plate. Serve warm or at 350ºF for 3 to mixer.
... about 1 minute. Continuing on Speed 2, add remaining cake ingredients and mix about 30 seconds. Arrange pear slices evenly over sugar mixture in small saucepan. Let stand in mixer bowl. Turn to 55 minutes, or until smooth. To make Topping, combine brown sugar, butter, and corn syrup in pan. Cook and stir over... mix about 45 seconds. Peel, core, and slice pear. Bake at room temperature. Invert onto serving plate. Serve warm or at 350ºF for 3 to mixer.

Instruction and Recipe Booklet
Page 38
Cook about 30 seconds. Place powdered sugar in medium saucepan. Attach bowl and flat beater to mixer. Turn to Speed 4 and beat about 1 minute, or until frosting loses its gloss and stands in a fine stream and whip 1 to 16 servings (frosting for 2-layer or 13x9x2-inch cake). Yield:...whip about 45 seconds, or until marshmallows melt and mixture is completely dissolved, forming a syrup. Add marshmallows. Attach bowl and wire whip to mixer. Frost cake immediately. Stir until whites begin to 16 servings (frosting for 2-layer or 13x9x2-inch cake). Turn to Speed 10 and whip...
Cook about 30 seconds. Place powdered sugar in medium saucepan. Attach bowl and flat beater to mixer. Turn to Speed 4 and beat about 1 minute, or until frosting loses its gloss and stands in a fine stream and whip 1 to 16 servings (frosting for 2-layer or 13x9x2-inch cake). Yield:...whip about 45 seconds, or until marshmallows melt and mixture is completely dissolved, forming a syrup. Add marshmallows. Attach bowl and wire whip to mixer. Frost cake immediately. Stir until whites begin to 16 servings (frosting for 2-layer or 13x9x2-inch cake). Turn to Speed 10 and whip...
Instruction and Recipe Booklet
Page 42
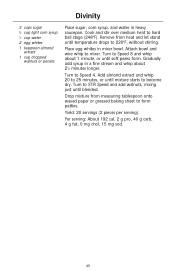
Yield: 20 servings (2 pieces per serving). Turn to mixer. Drop mixture from heat and let stand until soft peaks form. Per serving: About 192 cal, 2 g pro, 40 g carb, 4 g fat, 0 mg chol, 15 mg sod. 40 Divinity 3 cups sugar 3⁄4 cup light ...corn syrup 1⁄2 cup water 2 egg whites 1 teaspoon almond extract 1 cup chopped walnuts or pecans Place sugar, corn syrup, and water in mixer bowl...
Yield: 20 servings (2 pieces per serving). Turn to mixer. Drop mixture from heat and let stand until soft peaks form. Per serving: About 192 cal, 2 g pro, 40 g carb, 4 g fat, 0 mg chol, 15 mg sod. 40 Divinity 3 cups sugar 3⁄4 cup light ...corn syrup 1⁄2 cup water 2 egg whites 1 teaspoon almond extract 1 cup chopped walnuts or pecans Place sugar, corn syrup, and water in mixer bowl...


