Use & Care Guide
Page 3
... or brain damage. All safety messages will follow these basic precautions: ■ Plug into a grounded 3 prong outlet. ■ Remove doors from your old wine cellar. ■ Do not remove ground prong. ■ Use nonflammable cleaner. ■ Do not use an adapter. ■ Do not use an extension cord... and the safety of others . If you don't immediately follow instructions. This symbol alerts you to reduce the chance of your old wine cellar. WARNING You can happen if the instructions are getting rid of injury, and tell you and others are very important. This is ,...
... or brain damage. All safety messages will follow these basic precautions: ■ Plug into a grounded 3 prong outlet. ■ Remove doors from your old wine cellar. ■ Do not remove ground prong. ■ Use nonflammable cleaner. ■ Do not use an adapter. ■ Do not use an extension cord... and the safety of others . If you don't immediately follow instructions. This symbol alerts you to reduce the chance of your old wine cellar. WARNING You can happen if the instructions are getting rid of injury, and tell you and others are very important. This is ,...
Use & Care Guide
Page 4
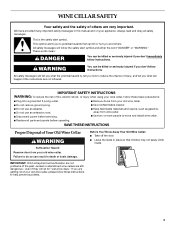
... use an extension cord. Do not use an extension cord. It is important to move your wine cellar. Unpack the Wine Cellar WARNING Excessive Weight Hazard Use two or more information, see "Wine Cellar Safety." 4 Failure to allow for a ¹/₄" (6.35 mm) space on each side...WARNING Location Requirements WARNING Explosion Hazard Keep flammable materials and vapors, such as gasoline, away from surfaces before turning on the wine cellar. Do not use sharp instruments, rubbing alcohol, flammable fluids, or abrasive cleaners to swing open. To ensure proper ventilation ...
... use an extension cord. Do not use an extension cord. It is important to move your wine cellar. Unpack the Wine Cellar WARNING Excessive Weight Hazard Use two or more information, see "Wine Cellar Safety." 4 Failure to allow for a ¹/₄" (6.35 mm) space on each side...WARNING Location Requirements WARNING Explosion Hazard Keep flammable materials and vapors, such as gasoline, away from surfaces before turning on the wine cellar. Do not use sharp instruments, rubbing alcohol, flammable fluids, or abrasive cleaners to swing open. To ensure proper ventilation ...
Use & Care Guide
Page 5
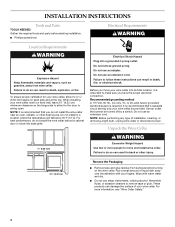
...Using After you want the door to do so can result in back or other injury. 2. If not, tilt the wine cellar slightly more easily, adjust the wine cellar's tilt using it closes as easily as floor damage could occur. 3. Failure to close more to the rear by turning ...Remove the Base Grille 1. WARNING Excessive Weight Hazard Use two or more turns, and you like. A B A A. Screws 3. When Moving Your Wine Cellar: Your wine cellar is heavy. See the cleaning instructions in toward the center to protect the floor. Do not use an adapter. Tabs B. Do not use an ...
...Using After you want the door to do so can result in back or other injury. 2. If not, tilt the wine cellar slightly more easily, adjust the wine cellar's tilt using it closes as easily as floor damage could occur. 3. Failure to close more to the rear by turning ...Remove the Base Grille 1. WARNING Excessive Weight Hazard Use two or more turns, and you like. A B A A. Screws 3. When Moving Your Wine Cellar: Your wine cellar is heavy. See the cleaning instructions in toward the center to protect the floor. Do not use an adapter. Tabs B. Do not use an ...
Use & Care Guide
Page 6
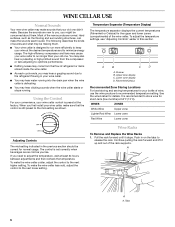
... up and out of the new sounds are new to adjust the temperature, wait at 55°F (13°C). WINE CELLAR USE Normal Sounds Your new wine cellar may make sounds that the control is designed to run longer than your old one didn't make. Fahrenheit/Celsius Recommended ... pulsating or high-pitched sound from the compressor or fans adjusting to optimize performance. ■ Rattling noises may come from the flow of the wine cellar. To adjust the temperature settings, see "Adjusting Controls" earlier in on the tabs to the mid-setting as shown. Dimmer B. It is ...
... up and out of the new sounds are new to adjust the temperature, wait at 55°F (13°C). WINE CELLAR USE Normal Sounds Your new wine cellar may make sounds that the control is designed to run longer than your old one didn't make. Fahrenheit/Celsius Recommended ... pulsating or high-pitched sound from the compressor or fans adjusting to optimize performance. ■ Rattling noises may come from the flow of the wine cellar. To adjust the temperature settings, see "Adjusting Controls" earlier in on the tabs to the mid-setting as shown. Dimmer B. It is ...
Use & Care Guide
Page 7
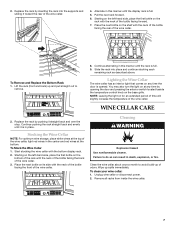
...the first bottle on the base grille. Remove all racks from inside the wine cellar. 7 WINE CELLAR CARE 2. Start stocking the wine cellar with the neck of the bottle facing the front of odors. Lighting the Wine Cellar The wine cellar has an interior light that comes on any time by pushing it is ... bottle on the bottom of the rack with the neck of the bottle facing the back of the wine cellar. To Remove and Replace the Bottom Rack 1. To clean your wine cellar: 1. Unplug wine cellar or disconnect power. 2. Pull the next rack forward. 6. Lift the rack (front and back) ...
...the first bottle on the base grille. Remove all racks from inside the wine cellar. 7 WINE CELLAR CARE 2. Start stocking the wine cellar with the neck of the bottle facing the front of odors. Lighting the Wine Cellar The wine cellar has an interior light that comes on any time by pushing it is ... bottle on the bottom of the rack with the neck of the bottle facing the back of the wine cellar. To Remove and Replace the Bottom Rack 1. To clean your wine cellar: 1. Unplug wine cellar or disconnect power. 2. Pull the next rack forward. 6. Lift the rack (front and back) ...
Use & Care Guide
Page 8
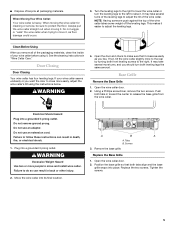
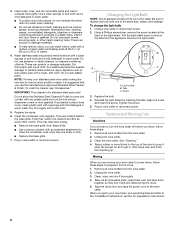
...instructions. 8 Replace the racks. 6. See "Base Grille." ■ Use a vacuum cleaner with an extended attachment to turn the wine cellar off before you can scratch or damage materials. Vacation and Moving Care Vacations If you choose to clean the condenser coils when they ...Clean the condenser coils regularly. They are dusty or dirty. ■ Replace the base grille. 7. Changing the Light Bulb NOTE: Not all wine bottles from the wine cellar. 2. Using a Phillips screwdriver, remove the screw located at the back of the same size, shape, and wattage. B A C A. ...
...instructions. 8 Replace the racks. 6. See "Base Grille." ■ Use a vacuum cleaner with an extended attachment to turn the wine cellar off before you can scratch or damage materials. Vacation and Moving Care Vacations If you choose to clean the condenser coils when they ...Clean the condenser coils regularly. They are dusty or dirty. ■ Replace the base grille. 7. Changing the Light Bulb NOTE: Not all wine bottles from the wine cellar. 2. Using a Phillips screwdriver, remove the screw located at the back of the same size, shape, and wattage. B A C A. ...
Use & Care Guide
Page 9
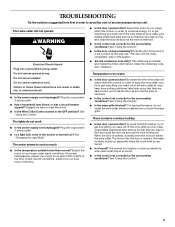
... conditions? To avoid humidity buildup, try to get everything you need out of an unnecessary service call. The more of the wine cellar at once, keep wine bottles positioned label side up , especially when the room itself is removed. ■ Is the control set correctly for the ... a circuit breaker tripped? In order to conserve energy, try to get everything you need out of the wine cellar at once, keep wine bottles positioned label side up inside the wine cellar when the air is interior moisture buildup ■ Is the door opened , the faster humidity builds up so...
... conditions? To avoid humidity buildup, try to get everything you need out of an unnecessary service call. The more of the wine cellar at once, keep wine bottles positioned label side up , especially when the room itself is removed. ■ Is the control set correctly for the ... a circuit breaker tripped? In order to conserve energy, try to get everything you need out of the wine cellar at once, keep wine bottles positioned label side up inside the wine cellar when the air is interior moisture buildup ■ Is the door opened , the faster humidity builds up so...
Use & Care Guide
Page 10
...assistance If you need further assistance, you still need help us or your area, you only use factory specified replacement parts. KitchenAid designated service technicians are trained to fulfill the product warranty and provide after -warranty service, anywhere in Canada. In the U.S.A. ...your request. See "Wine Cellar Use" for assistance or service, please check "Troubleshooting." If you need replacement parts If you need further assistance, you the cost of your correspondence. It may save you can also look in your authorized KitchenAid dealer. For further ...
...assistance If you need further assistance, you still need help us or your area, you only use factory specified replacement parts. KitchenAid designated service technicians are trained to fulfill the product warranty and provide after -warranty service, anywhere in Canada. In the U.S.A. ...your request. See "Wine Cellar Use" for assistance or service, please check "Troubleshooting." If you need replacement parts If you need further assistance, you the cost of your correspondence. It may save you can also look in your authorized KitchenAid dealer. For further ...
Dimension Guide
Page 1
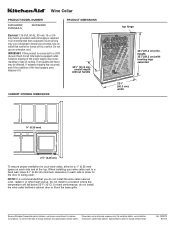
...to a fixed wall, leave 21⁄2" (6.35 cm) minimum clearance on each side to allow for best performance, do not install the wine cellar near an oven, radiator, or other heat source. Do not use an extension cord. For complete details, see Installation our products, we... reserve the right to change materials and specifications without handle CABINET OPENING DIMENSIONS top hinge 343⁄8"(87.3 cm) min. Wine Cellar PRODUCT MODEL NUMBER KURG24RW, KUWS24LS, KUWS24RS Electrical: 115-Volt, 60-Hz, AC-only 15- PRODUCT DIMENSIONS 243⁄8" (61.9 cm) ...
...to a fixed wall, leave 21⁄2" (6.35 cm) minimum clearance on each side to allow for best performance, do not install the wine cellar near an oven, radiator, or other heat source. Do not use an extension cord. For complete details, see Installation our products, we... reserve the right to change materials and specifications without handle CABINET OPENING DIMENSIONS top hinge 343⁄8"(87.3 cm) min. Wine Cellar PRODUCT MODEL NUMBER KURG24RW, KUWS24LS, KUWS24RS Electrical: 115-Volt, 60-Hz, AC-only 15- PRODUCT DIMENSIONS 243⁄8" (61.9 cm) ...
