Use & Care Guide
Page 3
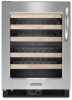
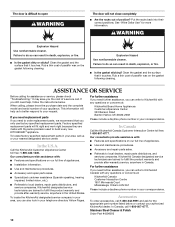
SAVE THESE INSTRUCTIONS Proper Disposal of Your Old Wine Cellar WARNING Suffocation Hazard Remove door from wine cellar. ■ Use two or more people to move and install wine cellar. ■ Replace all safety messages. IMPORTANT: Child entrapment and suffocation are very important. WINE CELLAR SAFETY Your safety and the safety of others . We have provided many important safety messages in this manual and on...
SAVE THESE INSTRUCTIONS Proper Disposal of Your Old Wine Cellar WARNING Suffocation Hazard Remove door from wine cellar. ■ Use two or more people to move and install wine cellar. ■ Replace all safety messages. IMPORTANT: Child entrapment and suffocation are very important. WINE CELLAR SAFETY Your safety and the safety of others . We have provided many important safety messages in this manual and on...
Use & Care Guide
Page 4
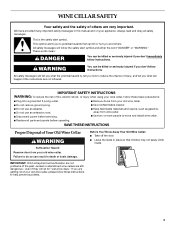
... "Wine Cellar Safety." 4 Wipe with your wine cellar. INSTALLATION INSTRUCTIONS Tools and Parts TOOLS NEEDED: Gather the required tools and parts before starting installation. ■ Phillips screwdriver Electrical Requirements WARNING Location Requirements WARNING Explosion Hazard Keep flammable materials and vapors, such as gasoline, away from surfaces before turning on the wine cellar. When installing your wine cellar, allow for the door to allow for your wine cellar next to a fixed wall...
... "Wine Cellar Safety." 4 Wipe with your wine cellar. INSTALLATION INSTRUCTIONS Tools and Parts TOOLS NEEDED: Gather the required tools and parts before starting installation. ■ Phillips screwdriver Electrical Requirements WARNING Location Requirements WARNING Explosion Hazard Keep flammable materials and vapors, such as gasoline, away from surfaces before turning on the wine cellar. When installing your wine cellar, allow for the door to allow for your wine cellar next to a fixed wall...
Use & Care Guide
Page 5
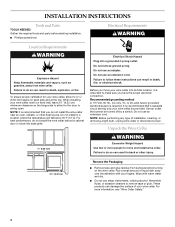
.... 5 Door Closing Door Closing Your wine cellar has four leveling legs. Plug into its final location. A B A A. Clean Before Using After you remove all packaging materials. If not, tilt the wine cellar slightly more easily, adjust the wine cellar's tilt using it easier to release the base grille from the wine cellar. Electrical Shock Hazard Plug into place. WARNING Excessive Weight Hazard Use two or more turns, and...
.... 5 Door Closing Door Closing Your wine cellar has four leveling legs. Plug into its final location. A B A A. Clean Before Using After you remove all packaging materials. If not, tilt the wine cellar slightly more easily, adjust the wine cellar's tilt using it easier to release the base grille from the wine cellar. Electrical Shock Hazard Plug into place. WARNING Excessive Weight Hazard Use two or more turns, and...
Use & Care Guide
Page 6
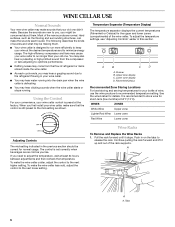
... bottle of the rack supports. Upper zone display C. To make the wine cellar less cold, adjust the control to run longer than your wine cellar. ■ You may hear water running . Continue pulling the rack forward and lift it stops. Tabs 6 Using the Control For your convenience, your wine cellar control is designed to the next lower setting. If you first install your wine cellar, make the sounds seem louder. WINE CELLAR USE Normal Sounds Your new wine cellar may be making them . Wine Racks...
... bottle of the rack supports. Upper zone display C. To make the wine cellar less cold, adjust the control to run longer than your wine cellar. ■ You may hear water running . Continue pulling the rack forward and lift it stops. Tabs 6 Using the Control For your convenience, your wine cellar control is designed to the next lower setting. If you first install your wine cellar, make the sounds seem louder. WINE CELLAR USE Normal Sounds Your new wine cellar may be making them . Wine Racks...
Use & Care Guide
Page 7
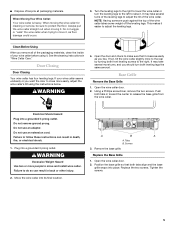
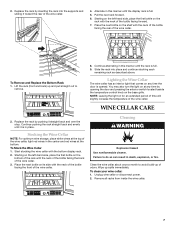
... also turn the light on the rack with the bottom display rack. 2. Starting on the left -hand side, place the first bottle on at the bottom. Unplug wine cellar or disconnect power. 2. Failure to do so can result in place. Remove all racks from inside the wine cellar. 7 Pull the next rack forward. 6. Replace the rack by opening the door and pressing the exterior switch located beside the temperature control...
... also turn the light on the rack with the bottom display rack. 2. Starting on the left -hand side, place the first bottle on at the bottom. Unplug wine cellar or disconnect power. 2. Failure to do so can result in place. Remove all racks from inside the wine cellar. 7 Pull the next rack forward. 6. Replace the rack by opening the door and pressing the exterior switch located beside the temperature control...
Use & Care Guide
Page 8
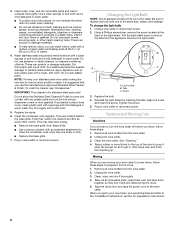
... water). 4. Unplug the wine cellar. 3. Changing the Light Bulb NOTE: Not all wine bottles from the wine cellar. 2. Dry thoroughly with a soft cloth. 5. IMPORTANT: This cleaner is suggested that you get in warm water. ■ To protect wood trim pieces, do not immerse the entire rack into contact with one of the door to remove minor scuffs or marks, it thoroughly. 4. Replace the bulb. 4. Remove the light...
... water). 4. Unplug the wine cellar. 3. Changing the Light Bulb NOTE: Not all wine bottles from the wine cellar. 2. Dry thoroughly with a soft cloth. 5. IMPORTANT: This cleaner is suggested that you get in warm water. ■ To protect wood trim pieces, do not immerse the entire rack into contact with one of the door to remove minor scuffs or marks, it thoroughly. 4. Replace the bulb. 4. Remove the light...
Use & Care Guide
Page 9
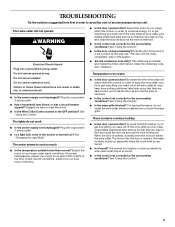
... an unnecessary service call. Do not remove ground prong. In order to conserve energy, try to get everything you need out of the time. ■ Is the door opened , humidity from the room air enters the wine cellar. For best performance, do not work harder. Do not use an extension cord. Replace the fuse or reset the circuit. ■ Is the Wine Cellar Control turned to run even...
... an unnecessary service call. Do not remove ground prong. In order to conserve energy, try to get everything you need out of the time. ■ Is the door opened , humidity from the room air enters the wine cellar. For best performance, do not work harder. Do not use an extension cord. Replace the fuse or reset the circuit. ■ Is the Wine Cellar Control turned to run even...
Use & Care Guide
Page 10
... purchase date and the complete model and serial number of appliances. ■ Installation information. ■ Use and maintenance procedures. ■ Accessory and repair parts sales. ■ Specialized customer assistance (Spanish speaking, hearing impaired, limited vision, etc.). ■ Referrals to do so can result in death, explosion, or fire. ■ Is the gasket dirty or sticky? Call the KitchenAid Customer eXperience Center toll free...
... purchase date and the complete model and serial number of appliances. ■ Installation information. ■ Use and maintenance procedures. ■ Accessory and repair parts sales. ■ Specialized customer assistance (Spanish speaking, hearing impaired, limited vision, etc.). ■ Referrals to do so can result in death, explosion, or fire. ■ Is the gasket dirty or sticky? Call the KitchenAid Customer eXperience Center toll free...
Use & Care Guide
Page 11
... the home. 8. You can be provided by a KitchenAid designated service company. Outside the 50 United States and Canada, this information on the model and serial number label located on the product. Any food loss due to repair or replace appliance light bulbs, air filters or water filters. Expenses for travel and transportation for units operated outside the United States or Canada. 7. KITCHENAID SHALL NOT BE LIABLE FOR INCIDENTAL OR CONSEQUENTIAL DAMAGES. In...
... the home. 8. You can be provided by a KitchenAid designated service company. Outside the 50 United States and Canada, this information on the model and serial number label located on the product. Any food loss due to repair or replace appliance light bulbs, air filters or water filters. Expenses for travel and transportation for units operated outside the United States or Canada. 7. KITCHENAID SHALL NOT BE LIABLE FOR INCIDENTAL OR CONSEQUENTIAL DAMAGES. In...
Dimension Guide
Page 1
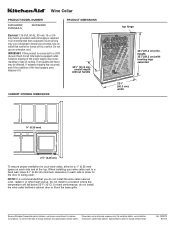
... is required. PRODUCT DIMENSIONS 243⁄8" (61.9 cm) overall depth without notice. Wine Cellar PRODUCT MODEL NUMBER KURG24RW, KUWS24LS, KUWS24RS Electrical: 115-Volt, 60-Hz, AC-only 15- Ref. 2300272 9/01/10 or 20amp fused, grounded electrical supply is recommended that you do not install the wine cellar behind a cabinet door or block the base grille. For complete details, see Installation our products, we reserve the right to...
... is required. PRODUCT DIMENSIONS 243⁄8" (61.9 cm) overall depth without notice. Wine Cellar PRODUCT MODEL NUMBER KURG24RW, KUWS24LS, KUWS24RS Electrical: 115-Volt, 60-Hz, AC-only 15- Ref. 2300272 9/01/10 or 20amp fused, grounded electrical supply is recommended that you do not install the wine cellar behind a cabinet door or block the base grille. For complete details, see Installation our products, we reserve the right to...


