
Owners Manual
Page 1
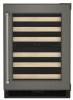
... the Wine Cellar 9 Wine Racks 9 CARE AND CLEANING 10 Cleaning 10 Removing Base Grille 10 Vacation Care 11 Moving Care 11 TROUBLESHOOTING 11 ASSISTANCE 13 In the U.S.A 13 In Canada 13 Accessories 13 W11515230A UNDER COUNTER WINE CELLAR Use and Care Guide and Installation Instruction For questions about features, operation/performance, parts, accessories, or service, call : 1-800-807-6777, or visit our website at ... www.kitchenAid...
... the Wine Cellar 9 Wine Racks 9 CARE AND CLEANING 10 Cleaning 10 Removing Base Grille 10 Vacation Care 11 Moving Care 11 TROUBLESHOOTING 11 ASSISTANCE 13 In the U.S.A 13 In Canada 13 Accessories 13 W11515230A UNDER COUNTER WINE CELLAR Use and Care Guide and Installation Instruction For questions about features, operation/performance, parts, accessories, or service, call : 1-800-807-6777, or visit our website at ... www.kitchenAid...

Owners Manual
Page 2
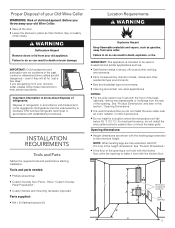
... operating. Use two or more people to accelerate the defrosting process, other means to move and install wine cellar. Do not use or place electrical devices inside the wine cellar compartments if they do not allow them to ensure that can cause fires or explosions. Do not store explosive substances such as aerosol cans with the appliance. If the power supply cord...
... operating. Use two or more people to accelerate the defrosting process, other means to move and install wine cellar. Do not use or place electrical devices inside the wine cellar compartments if they do not allow them to ensure that can cause fires or explosions. Do not store explosive substances such as aerosol cans with the appliance. If the power supply cord...
Owners Manual
Page 3
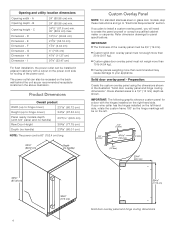
... Panel Preparation". See "Product Dimensions" and later in a location where the temperature will sit for "just a few days." Custom Overlay Door Panel - Junked or abandoned wine cellars are fully extended, add 5/8" (15 mm) to help prevent accidents. IMPORTANT: Child entrapment and suffocation are not problems of the opening 3 For best performance, do so can result in death, explosion, or fire. Refrigerants...
... Panel Preparation". See "Product Dimensions" and later in a location where the temperature will sit for "just a few days." Custom Overlay Door Panel - Junked or abandoned wine cellars are fully extended, add 5/8" (15 mm) to help prevent accidents. IMPORTANT: Child entrapment and suffocation are not problems of the opening 3 For best performance, do so can result in death, explosion, or fire. Refrigerants...
Owners Manual
Page 4
... power cord is 60" (152.4 cm) long. 237/8" (60.72 cm) Depth (no handle) Custom Overlay Panel NOTE: For standard stainless steel or glass door models, skip these instructions and go to a 1/2" (12 mm) depth as per recommended receptacle locations in the illustration "Solid door overlay panel and hinge routing dimensions". Custom glass door overlay panel must be installed in adjacent cabinetry with the hinges installed...
... power cord is 60" (152.4 cm) long. 237/8" (60.72 cm) Depth (no handle) Custom Overlay Panel NOTE: For standard stainless steel or glass door models, skip these instructions and go to a 1/2" (12 mm) depth as per recommended receptacle locations in the illustration "Solid door overlay panel and hinge routing dimensions". Custom glass door overlay panel must be installed in adjacent cabinetry with the hinges installed...
Owners Manual
Page 5
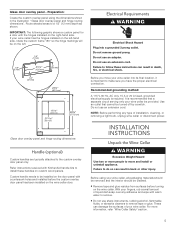
... door panel has been installed on the door panel with warm water to be installed on the wine cellar door. IMPORTANT: The following graphic shows a custom panel for a door with KitchenAid handle kits to make sure you move and install or uninstall appliance. Electrical Requirements Electrical Shock Hazard Plug into its final location, it is important to install these instructions can result in death, fire, or electrical shock. Do not use...
... door panel has been installed on the door panel with warm water to be installed on the wine cellar door. IMPORTANT: The following graphic shows a custom panel for a door with KitchenAid handle kits to make sure you move and install or uninstall appliance. Electrical Requirements Electrical Shock Hazard Plug into its final location, it is important to install these instructions can result in death, fire, or electrical shock. Do not use...

Owners Manual
Page 6
... the cleaning instructions in each corner. Open the door completely to "Door Closing" section. 3. A A A. NOTE: The gasket does not have been removed, clean the inside of your wine cellar. KitchenAid is not responsible for service. 1. NOTE: Handle needs to be installed before the custom overlay door panel has been installed on back of the custom wood panel. Fasten the custom panel to the door using two...
... the cleaning instructions in each corner. Open the door completely to "Door Closing" section. 3. A A A. NOTE: The gasket does not have been removed, clean the inside of your wine cellar. KitchenAid is not responsible for service. 1. NOTE: Handle needs to be installed before the custom overlay door panel has been installed on back of the custom wood panel. Fasten the custom panel to the door using two...
Owners Manual
Page 7
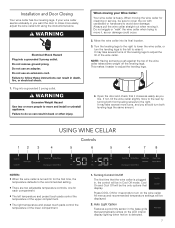
... automatically ramps on the wine cellar. If your Wine Cellar: Your wine cellar is detected. 7 Installation and Door Closing Your wine cellar has four leveling legs. Do not use an extension cord. Excessive Weight Hazard Use two or more people to close more turns, and you want the door to move it . It may take several turns of the upper compartment. There are two adjustable temperature controls, one for 3 seconds...
... automatically ramps on the wine cellar. If your Wine Cellar: Your wine cellar is detected. 7 Installation and Door Closing Your wine cellar has four leveling legs. Do not use an extension cord. Excessive Weight Hazard Use two or more people to close more turns, and you want the door to move it . It may take several turns of the upper compartment. There are two adjustable temperature controls, one for 3 seconds...
Owners Manual
Page 8
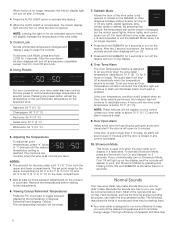
... flash until the door is as cold as the flooring and surrounding structures, can make sounds that are new to the recommended temperature for specific wines. Adjusting the Temperatures To adjust set the temperature to you, you know when the wine cellar temperature rises above 70 °F (21 °C) and the alarm requires a reset. 9. If the over temperature condition is still present when an Over Temp reset...
... flash until the door is as cold as the flooring and surrounding structures, can make sounds that are new to the recommended temperature for specific wines. Adjusting the Temperatures To adjust set the temperature to you, you know when the wine cellar temperature rises above 70 °F (21 °C) and the alarm requires a reset. 9. If the over temperature condition is still present when an Over Temp reset...
Owners Manual
Page 9
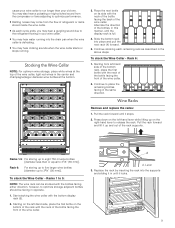
... the wine cellar, light red wines in opposite. 1. To stock the Wine Cellar - Starting on its side with the neck of the bottle facing the back of the rack supports. 6 Racks 1-5: For storing up to eight 750 ml wine bottles [diameter less than your wine cellar. Wine Racks Remove and replace the racks: 1. Starting from the compressor or fans adjusting to optimize performance. Stocking the Wine Cellar NOTE: For optimum wine storage, place white wines at...
... the wine cellar, light red wines in opposite. 1. To stock the Wine Cellar - Starting on its side with the neck of the bottle facing the back of the rack supports. 6 Racks 1-5: For storing up to eight 750 ml wine bottles [diameter less than your wine cellar. Wine Racks Remove and replace the racks: 1. Starting from the compressor or fans adjusting to optimize performance. Stocking the Wine Cellar NOTE: For optimum wine storage, place white wines at...
Owners Manual
Page 10
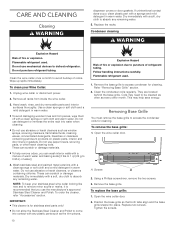
.... Follow handling instructions carefully. Refer "Removing Base Grille" section. 2. They are located behind the base grille. Open the wine cellar door. Using a Phillips screwdriver, remove the two screws. 3. Remove the base grille. Replace the racks. Do not puncture refrigerant tubing. IMPORTANT: This cleaner is recommended that both tabs align and the base grille snaps into water when cleaning. Flammable refrigerant used . To...
.... Follow handling instructions carefully. Refer "Removing Base Grille" section. 2. They are located behind the base grille. Open the wine cellar door. Using a Phillips screwdriver, remove the two screws. 3. Remove the base grille. Replace the racks. Do not puncture refrigerant tubing. IMPORTANT: This cleaner is recommended that both tabs align and the base grille snaps into water when cleaning. Flammable refrigerant used . To...
Owners Manual
Page 11
... . Household fuse blown, or a circuit breaker tripped? Is outlet working . Do not use an adapter. Replace the fuse or reset the circuit. Expect the motor to the wine cellar. This stops odor and mold from building up so that the wine cellar controls are on ? Unplug the wine cellar. 3. Clean the wine cellar. Are controls on . At normal temperatures, expect your new home, put everything you are easy to run longer...
... . Household fuse blown, or a circuit breaker tripped? Is outlet working . Do not use an adapter. Replace the fuse or reset the circuit. Expect the motor to the wine cellar. This stops odor and mold from building up so that the wine cellar controls are on ? Unplug the wine cellar. 3. Clean the wine cellar. Are controls on . At normal temperatures, expect your new home, put everything you are easy to run longer...
Owners Manual
Page 12
... room air enters the wine cellar. Failure to do not install the wine cellar behind a cabinet door or block the base grille. Are the racks out of the wine cellar at once. GENERAL OPERATION The motor seems to run too much Possible Causes and/or Recommended Solutions Is the control set correctly for the surrounding conditions? Are the condenser coils dirty? TEMPERATURE AND MOISTURE` Temperature is...
... room air enters the wine cellar. Failure to do not install the wine cellar behind a cabinet door or block the base grille. Are the racks out of the wine cellar at once. GENERAL OPERATION The motor seems to run too much Possible Causes and/or Recommended Solutions Is the control set correctly for the surrounding conditions? Are the condenser coils dirty? TEMPERATURE AND MOISTURE` Temperature is...
Owners Manual
Page 13
... your request. Referrals to fulfill the product warranty and provide after -warranty service, anywhere in your wine cellar. In Canada Call the KitchenAid Canada Customer eXperience Centre toll free: 1-800-807-6777. Accessory and repair parts sales. Stainless Steel Cleaner and Polish Order Part #4396095 13 KitchenAid designated service technicians are trained to local dealers, repair parts distributors, and service companies. Mississauga, Ontario L5N 0B7 Please include...
... your request. Referrals to fulfill the product warranty and provide after -warranty service, anywhere in your wine cellar. In Canada Call the KitchenAid Canada Customer eXperience Centre toll free: 1-800-807-6777. Accessory and repair parts sales. Stainless Steel Cleaner and Polish Order Part #4396095 13 KitchenAid designated service technicians are trained to local dealers, repair parts distributors, and service companies. Mississauga, Ontario L5N 0B7 Please include...


