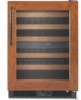

Use & Care Guide
Page 3
.... even if they will follow these instructions to help prevent accidents. 3 We have provided many important safety messages in this manual and on your old wine cellar. ■ Do not remove ground prong. ■ Use nonflammable cleaner. ■ Do not use an adapter. ■ Do not use an extension...how to do so can be killed or seriously injured if you are getting rid of the past. Always read and obey all parts and panels before servicing. ■ Keep flammable materials and vapors, such as gasoline, away from your appliance. WARNING You can result in place so ...
.... even if they will follow these instructions to help prevent accidents. 3 We have provided many important safety messages in this manual and on your old wine cellar. ■ Do not remove ground prong. ■ Use nonflammable cleaner. ■ Do not use an adapter. ■ Do not use an extension...how to do so can be killed or seriously injured if you are getting rid of the past. Always read and obey all parts and panels before servicing. ■ Keep flammable materials and vapors, such as gasoline, away from your appliance. WARNING You can result in place so ...
Use & Care Guide
Page 5
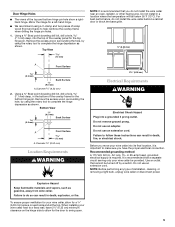
...8328;" (9.53 mm) 2. Remove the excess wood, surrounding the hole, by using the rotary tool to swing open. 5 Do not remove ground prong. Do not use an extension cord. When installing your wine cellar, allow for the bottom hinge pin. Top View 12 mm) NOTE: It is recommended that cannot ...have the proper electrical connection. Failure to make sure you move your wine cellar be turned off by using the rotary tool to allow for a left-hand hinge. ■ We recommend using a C-clamp and two pieces of the overlay panel for the top hinge pin. Do not install in death, explosion...
...8328;" (9.53 mm) 2. Remove the excess wood, surrounding the hole, by using the rotary tool to swing open. 5 Do not remove ground prong. Do not use an extension cord. When installing your wine cellar, allow for the bottom hinge pin. Top View 12 mm) NOTE: It is recommended that cannot ...have the proper electrical connection. Failure to make sure you move your wine cellar be turned off by using the rotary tool to allow for a left-hand hinge. ■ We recommend using a C-clamp and two pieces of the overlay panel for the top hinge pin. Do not install in death, explosion...
Use & Care Guide
Page 6
... other injury. Always pull the wine cellar straight out when moving the wine cellar for overlay hook locations. 1. Do not wiggle or "walk" the wine cellar when trying to move and install wine cellar. Lift the front of molding or decorative panels that would not allow access to... the three screws from surfaces before using it . Failure to do so can damage the surface of your wine cellar. See the cleaning instructions in the "Custom Overlay Frame" section. ■ KitchenAid is heavy. Screws (3) B. Position the overlay frame ¹⁄₂" (1.27 cm) higher than the...
... other injury. Always pull the wine cellar straight out when moving the wine cellar for overlay hook locations. 1. Do not wiggle or "walk" the wine cellar when trying to move and install wine cellar. Lift the front of molding or decorative panels that would not allow access to... the three screws from surfaces before using it . Failure to do so can damage the surface of your wine cellar. See the cleaning instructions in the "Custom Overlay Frame" section. ■ KitchenAid is heavy. Screws (3) B. Position the overlay frame ¹⁄₂" (1.27 cm) higher than the...
Use & Care Guide
Page 7
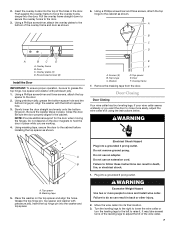
... 6. Using a Phillips screwdriver and three screws, attach the top spacer to the door. 3. Top hinge C. Overlay frame 7. Door Closing Door Closing Your wine cellar has four leveling legs. Top spacer B. Insert the top hinge pin into a grounded 3 prong outlet. Overlay frame B. Using petroleum jelly, grease the... Electrical Shock Hazard Plug into the washer and top spacer. Do not remove ground prong. Turn the leveling legs to the right to lower the wine cellar or turn the leveling legs to the left to the cabinet as shown. Remove the masking tape from the door. ...
... 6. Using a Phillips screwdriver and three screws, attach the top spacer to the door. 3. Top hinge C. Overlay frame 7. Door Closing Door Closing Your wine cellar has four leveling legs. Top spacer B. Insert the top hinge pin into a grounded 3 prong outlet. Overlay frame B. Using petroleum jelly, grease the... Electrical Shock Hazard Plug into the washer and top spacer. Do not remove ground prong. Turn the leveling legs to the right to lower the wine cellar or turn the leveling legs to the left to the cabinet as shown. Remove the masking tape from the door. ...
Use & Care Guide
Page 8
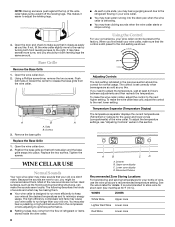
... be making them . This makes it closes as easily as you like . Push both front leveling screws to the right. Position the base grille so that the control is still preset to the mid-setting as the flooring and surrounding structures, ... adjustments and then recheck the temperature. Fahrenheit/Celsius Recommended Zone Storing Locations For best storing and serving temperatures for your wine cellar, make . Open the wine cellar door. 2. Temperature Separator (Temperature Display) The temperature separator displays the current temperatures (Fahrenheit or Celsius) for the...
... be making them . This makes it closes as easily as you like . Push both front leveling screws to the right. Position the base grille so that the control is still preset to the mid-setting as the flooring and surrounding structures, ... adjustments and then recheck the temperature. Fahrenheit/Celsius Recommended Zone Storing Locations For best storing and serving temperatures for your wine cellar, make . Open the wine cellar door. 2. Temperature Separator (Temperature Display) The temperature separator displays the current temperatures (Fahrenheit or Celsius) for the...
Use & Care Guide
Page 9
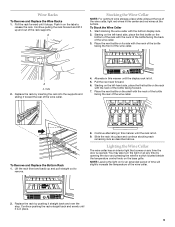
...of the rack with the neck of the bottle facing the back of the wine cellar, light red wines in the center and red wines at any time the door is opened. Replace the rack by pushing it straight... place the first bottle on the rack with the neck of the bottle facing the rear of the wine cellar. Place the next bottle on any time by opening the door and pressing the exterior switch located...is in this manner until the rack is full. 5. Pull the next rack forward. 6. Wine Racks To Remove and Replace the Wine Racks 1. Tabs 2. You may also turn the light on for an extended period of ...
...of the rack with the neck of the bottle facing the back of the wine cellar, light red wines in the center and red wines at any time the door is opened. Replace the rack by pushing it straight... place the first bottle on the rack with the neck of the bottle facing the rear of the wine cellar. Place the next bottle on any time by opening the door and pressing the exterior switch located...is in this manner until the rack is full. 5. Pull the next rack forward. 6. Wine Racks To Remove and Replace the Wine Racks 1. Tabs 2. You may also turn the light on for an extended period of ...
Use & Care Guide
Page 10
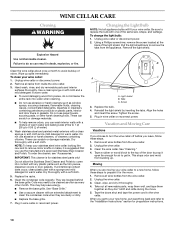
...follow these steps. 1. Dry thoroughly with one of the same size, shape, and wattage. Replace the bulb. 4. Clean the wine cellar. Unplug wine cellar or disconnect power. 2. Remove the light shield. Wash stainless steel and painted metal exteriors with any plastic parts such as ... scratch or damage materials. ■ To help save energy. ■ Remove the base grille. To change the light bulb: 1. Unplug wine cellar or disconnect power. 2. Hand wash, rinse, and dry removable parts and interior surfaces thoroughly. Dry thoroughly with an extended attachment to ...
...follow these steps. 1. Dry thoroughly with one of the same size, shape, and wattage. Replace the bulb. 4. Clean the wine cellar. Unplug wine cellar or disconnect power. 2. Remove the light shield. Wash stainless steel and painted metal exteriors with any plastic parts such as ... scratch or damage materials. ■ To help save energy. ■ Remove the base grille. To change the light bulb: 1. Unplug wine cellar or disconnect power. 2. Hand wash, rinse, and dry removable parts and interior surfaces thoroughly. Dry thoroughly with an extended attachment to ...

Use & Care Guide
Page 11
...and makes the motor work ■ Is the power supply cord unplugged? For best performance, do not work harder. See "Using the Control." Your wine cellar will not operate WARNING Electrical Shock Hazard Plug into a grounded 3 prong outlet. ■ Has a household fuse blown, or has a circuit..."Using the Control." ■ Is the base grille blocked? See "Cleaning." Failure to get everything you need out of the wine cellar at once, keep wine bottles positioned label side up , especially when the room itself is interior moisture buildup ■ Is the door opened , the faster...
...and makes the motor work ■ Is the power supply cord unplugged? For best performance, do not work harder. See "Using the Control." Your wine cellar will not operate WARNING Electrical Shock Hazard Plug into a grounded 3 prong outlet. ■ Has a household fuse blown, or has a circuit..."Using the Control." ■ Is the base grille blocked? See "Cleaning." Failure to get everything you need out of the wine cellar at once, keep wine bottles positioned label side up , especially when the room itself is interior moisture buildup ■ Is the door opened , the faster...

Use & Care Guide
Page 12
See "Wine Cellar Use" for assistance or service, please check "Troubleshooting." Explosion Hazard Use nonflammable cleaner. Failure to fulfill the product warranty and provide afterwarranty service, anywhere ... you need further assistance, you only use factory specified replacement parts. In the U.S.A. The door will fit right and work right because they are made with any questions or concerns at : KitchenAid Brand Home Appliances Customer eXperience Center 553 Benson Road Benton Harbor, MI 49022-2692 Please include a daytime phone number in your correspondence...
See "Wine Cellar Use" for assistance or service, please check "Troubleshooting." Explosion Hazard Use nonflammable cleaner. Failure to fulfill the product warranty and provide afterwarranty service, anywhere ... you need further assistance, you only use factory specified replacement parts. In the U.S.A. The door will fit right and work right because they are made with any questions or concerns at : KitchenAid Brand Home Appliances Customer eXperience Center 553 Benson Road Benton Harbor, MI 49022-2692 Please include a daytime phone number in your correspondence...
Dimension Guide
Page 1
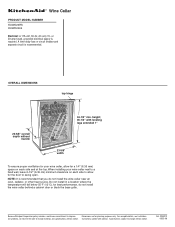
... or 20-amp fused, grounded electrical supply is recommended. Instructions packed with leveling legs extended 1" 23-5/8" width To ensure proper ventilation for your wine cellar next to a fixed wall, leave 2-1/2" (6.35 cm) minimum clearance on each side to improve Dimensions are for a 1/4" (6.35 mm...55°F (13°C). When installing your wine cellar, allow for best performance, do not install the wine cellar near an oven, radiator, or other heat source. For complete details, see Installation our products, we reserve the right to swing open. A time-delay fuse or circuit ...
... or 20-amp fused, grounded electrical supply is recommended. Instructions packed with leveling legs extended 1" 23-5/8" width To ensure proper ventilation for your wine cellar next to a fixed wall, leave 2-1/2" (6.35 cm) minimum clearance on each side to improve Dimensions are for a 1/4" (6.35 mm...55°F (13°C). When installing your wine cellar, allow for best performance, do not install the wine cellar near an oven, radiator, or other heat source. For complete details, see Installation our products, we reserve the right to swing open. A time-delay fuse or circuit ...
