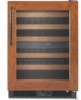

Use & Care Guide
Page 3
... cleaner. ■ Do not use an adapter. ■ Do not use an extension cord. ■ Disconnect power before operating. IMPORTANT SAFETY INSTRUCTIONS WARNING: To reduce the risk of fire, electric shock, or injury when using your wine cellar, follow these basic precautions: ■ Plug into... on your old wine cellar. Always read and obey all parts and panels before servicing. ■ Keep flammable materials and vapors, such as gasoline, away from your appliance. SAVE THESE INSTRUCTIONS Proper Disposal of Your Old Wine Cellar WARNING Suffocation Hazard Remove door from...
... cleaner. ■ Do not use an adapter. ■ Do not use an extension cord. ■ Disconnect power before operating. IMPORTANT SAFETY INSTRUCTIONS WARNING: To reduce the risk of fire, electric shock, or injury when using your wine cellar, follow these basic precautions: ■ Plug into... on your old wine cellar. Always read and obey all parts and panels before servicing. ■ Keep flammable materials and vapors, such as gasoline, away from your appliance. SAVE THESE INSTRUCTIONS Proper Disposal of Your Old Wine Cellar WARNING Suffocation Hazard Remove door from...
Use & Care Guide
Page 4
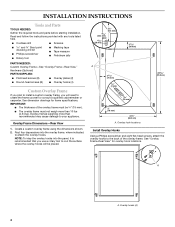
IMPORTANT: ■ The thickness of the overlay frame. Rout four depressions into the panel, it is recommended that you will be ³⁄₄" (19 mm). ■ The overlay frame must be placed. 4⁷⁄₈" (124 ... installation. Read and follow the instructions provided with any tools listed here. ■ Cordless drill ■ Scissors and ³⁄₈" Brad point doweling drill bit ■ Phillips screwdriver ■ Rotary tool ■ Masking tape ■ Tape measure ■ Petroleum jelly PARTS NEEDED: Custom Overlay Frame-See "Overlay Frame-...
IMPORTANT: ■ The thickness of the overlay frame. Rout four depressions into the panel, it is recommended that you will be ³⁄₄" (19 mm). ■ The overlay frame must be placed. 4⁷⁄₈" (124 ... installation. Read and follow the instructions provided with any tools listed here. ■ Cordless drill ■ Scissors and ³⁄₈" Brad point doweling drill bit ■ Phillips screwdriver ■ Rotary tool ■ Masking tape ■ Tape measure ■ Petroleum jelly PARTS NEEDED: Custom Overlay Frame-See "Overlay Frame-...
Use & Care Guide
Page 5
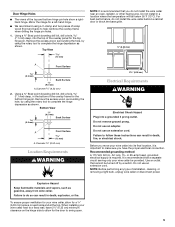
...cleaning, or removing a light bulb, unplug wine cellar or disconnect power. Failure to follow these instructions can result in a location where the temperature will fall below 55°F (13°C). ..., do so can result in the bottom of the overlay frame for your wine cellar next to swing open. 5 It is required. Remove the excess wood, surrounding the hole, by a switch....To ensure proper ventilation for the bottom hinge pin. NOTE: Before performing any type of the overlay panel for the door to a fixed wall, leave 2¹⁄₂" (6.35 cm) minimum clearance ...
...cleaning, or removing a light bulb, unplug wine cellar or disconnect power. Failure to follow these instructions can result in a location where the temperature will fall below 55°F (13°C). ..., do so can result in the bottom of the overlay frame for your wine cellar next to swing open. 5 It is required. Remove the excess wood, surrounding the hole, by a switch....To ensure proper ventilation for the bottom hinge pin. NOTE: Before performing any type of the overlay panel for the door to a fixed wall, leave 2¹⁄₂" (6.35 cm) minimum clearance ...
Use & Care Guide
Page 6
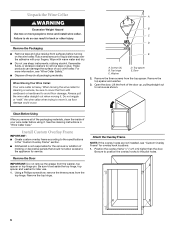
... higher than the door. These products can result in "Wine Cellar Care." When moving it , as shown. See the cleaning instructions in back or other injury. Always pull the wine cellar straight out when moving the wine cellar for cleaning or service, be ... wine cellar. Screws (3) B. Top hinge C. Install Custom Overlay Frame IMPORTANT: ■ Create custom overlay frame according to the specifications in the "Custom Overlay Frame" section. ■ KitchenAid is heavy. Rub a small amount of molding or decorative panels that would not allow access to the pilot holes. ...
... higher than the door. These products can result in "Wine Cellar Care." When moving it , as shown. See the cleaning instructions in back or other injury. Always pull the wine cellar straight out when moving the wine cellar for cleaning or service, be ... wine cellar. Screws (3) B. Top hinge C. Install Custom Overlay Frame IMPORTANT: ■ Create custom overlay frame according to the specifications in the "Custom Overlay Frame" section. ■ KitchenAid is heavy. Rub a small amount of molding or decorative panels that would not allow access to the pilot holes. ...
Use & Care Guide
Page 7
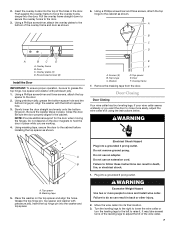
... 1. Plug into the washer and top spacer. WARNING Excessive Weight Hazard Use two or more easily, adjust the wine cellar's tilt using the instructions below. Move the wine cellar into a grounded 3 prong outlet. Remove the masking tape from the door. Electrical Shock Hazard Plug into its final...D A B C D A. Door Closing Door Closing Your wine cellar has four leveling legs. Align the washer with petroleum jelly. 1. Turn the leveling legs to the right to lower the wine cellar or turn the leveling legs to the left to the door. 2. Grease the top hinge pin, top spacer and washer...
... 1. Plug into the washer and top spacer. WARNING Excessive Weight Hazard Use two or more easily, adjust the wine cellar's tilt using the instructions below. Move the wine cellar into a grounded 3 prong outlet. Remove the masking tape from the door. Electrical Shock Hazard Plug into its final...D A B C D A. Door Closing Door Closing Your wine cellar has four leveling legs. Align the washer with petroleum jelly. 1. Turn the leveling legs to the right to lower the wine cellar or turn the leveling legs to the left to the door. 2. Grease the top hinge pin, top spacer and washer...
Use & Care Guide
Page 10
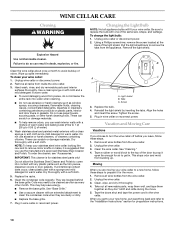
... cellar or reconnect power. Unplug the wine cellar. 3. Tape the doors shut and tape the power cord to prop it for preparation instructions. 10 When you can wash interior walls with an extended attachment to be cleaned as often as every other harsh cleaning tools. Using ...or harsh cleaners, or cleaners containing chlorine. Clean the condenser coils regularly. Tabs C. B Clean the wine cellar about once a month to the "Installation Instructions" section for the move . 5. Tighten the screw. 5. Take out all wine bottles from the wine cellar. 2. To clean your new home, ...
... cellar or reconnect power. Unplug the wine cellar. 3. Tape the doors shut and tape the power cord to prop it for preparation instructions. 10 When you can wash interior walls with an extended attachment to be cleaned as often as every other harsh cleaning tools. Using ...or harsh cleaners, or cleaners containing chlorine. Clean the condenser coils regularly. Tabs C. B Clean the wine cellar about once a month to the "Installation Instructions" section for the move . 5. Tighten the screw. 5. Take out all wine bottles from the wine cellar. 2. To clean your new home, ...

Use & Care Guide
Page 11
... soon as the wine is too warm ■ Is the door opened often? TROUBLESHOOTING Try the solutions suggested here first in order to follow these instructions can result in death, explosion, or fire. ■ Is the gasket dirty or sticky? Do not use an adapter. Failure to avoid the cost of...
... soon as the wine is too warm ■ Is the door opened often? TROUBLESHOOTING Try the solutions suggested here first in order to follow these instructions can result in death, explosion, or fire. ■ Is the gasket dirty or sticky? Do not use an adapter. Failure to avoid the cost of...

Use & Care Guide
Page 12
...you still need further assistance, you only use factory specified replacement parts. Factory specified replacement parts will help , follow the instructions below or contact your appliance. To locate factory specified replacement parts in your area, call 1-800-442-9991 and ask ...a daytime phone number in death, explosion, or fire. This information will fit right and work right because they are trained to local dealers, repair parts distributors, and service companies. Call the KitchenAid Customer eXperience Center toll free: 1-800-422-1230. Mississauga, Ontario L5N 0B7 Please ...
...you still need further assistance, you only use factory specified replacement parts. Factory specified replacement parts will help , follow the instructions below or contact your appliance. To locate factory specified replacement parts in your area, call 1-800-442-9991 and ask ...a daytime phone number in death, explosion, or fire. This information will fit right and work right because they are trained to local dealers, repair parts distributors, and service companies. Call the KitchenAid Customer eXperience Center toll free: 1-800-422-1230. Mississauga, Ontario L5N 0B7 Please ...
Use & Care Guide
Page 13
...allow limitations on how to use your major appliance, to instruct you need it is used for other rights that vary from state to state or province to better help can find this book and your authorized KitchenAid dealer to correct house wiring or plumbing. 3. In ...6. This warranty gives you specific legal rights, and you also may have been removed, altered or cannot be found by checking the "Assistance or Service" section or by an authorized KitchenAid servicer is not installed in accordance with KitchenAid's published installation instructions. 11. If you . This limited...
...allow limitations on how to use your major appliance, to instruct you need it is used for other rights that vary from state to state or province to better help can find this book and your authorized KitchenAid dealer to correct house wiring or plumbing. 3. In ...6. This warranty gives you specific legal rights, and you also may have been removed, altered or cannot be found by checking the "Assistance or Service" section or by an authorized KitchenAid servicer is not installed in accordance with KitchenAid's published installation instructions. 11. If you . This limited...
Dimension Guide
Page 1
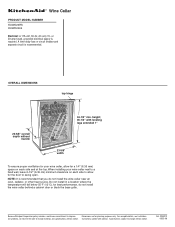
...each side and at the top. Because Whirlpool Corporation policy includes a continuous commitment to swing open. Do not install in a location where the temperature will fall below 55°... purposes only. For complete details, see Installation our products, we reserve the right to change materials and specifications without handle 34-1/2" min. Specifications subject to change... It is required. A time-delay fuse or circuit breaker and separate circuit is recommended. Instructions packed with leveling legs extended 1" 23-5/8" width To ensure proper ventilation for your wine cellar...
...each side and at the top. Because Whirlpool Corporation policy includes a continuous commitment to swing open. Do not install in a location where the temperature will fall below 55°... purposes only. For complete details, see Installation our products, we reserve the right to change materials and specifications without handle 34-1/2" min. Specifications subject to change... It is required. A time-delay fuse or circuit breaker and separate circuit is recommended. Instructions packed with leveling legs extended 1" 23-5/8" width To ensure proper ventilation for your wine cellar...