
Use & Care Guide
Page 3
This is , tell you how to reduce the chance of injury, and tell you to move and install wine cellar. ■ Replace all safety messages. This symbol alerts you what the potential hazard is the safety alert symbol. All safety messages will tell ... the instructions are not problems of the past. WINE CELLAR SAFETY Your safety and the safety of others . Always read and obey all parts and panels before operating. even if they will follow instructions. If you and others are very important. We have provided many important safety messages in death or...
This is , tell you how to reduce the chance of injury, and tell you to move and install wine cellar. ■ Replace all safety messages. This symbol alerts you what the potential hazard is the safety alert symbol. All safety messages will tell ... the instructions are not problems of the past. WINE CELLAR SAFETY Your safety and the safety of others . Always read and obey all parts and panels before operating. even if they will follow instructions. If you and others are very important. We have provided many important safety messages in death or...
Use & Care Guide
Page 4
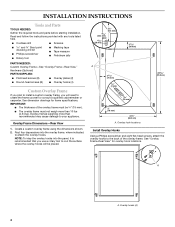
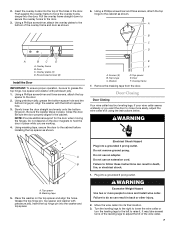
... frames weighing more than recommended may cause damage to attach the overlay hooks. Overlay Frame Dimensions-Rear View 1. Rout four depressions into the panel, it is recommended that you will be ³⁄₄" (19 mm). ■ The overlay frame must be placed. 4⁷⁄...SUPPLIED: ■ Flat-head screws (8) ■ Overlay plates (2) ■ Round-head screws (8) ■ Overlay hooks (4) Custom Overlay Frame If you plan to install a custom overlay frame, you use a rotary tool to rout the surface where the overlay hooks will need to the back of the overlay...
... frames weighing more than recommended may cause damage to attach the overlay hooks. Overlay Frame Dimensions-Rear View 1. Rout four depressions into the panel, it is recommended that you will be ³⁄₄" (19 mm). ■ The overlay frame must be placed. 4⁷⁄...SUPPLIED: ■ Flat-head screws (8) ■ Overlay plates (2) ■ Round-head screws (8) ■ Overlay hooks (4) Custom Overlay Frame If you plan to install a custom overlay frame, you use a rotary tool to rout the surface where the overlay hooks will need to the back of the overlay...
Use & Care Guide
Page 5
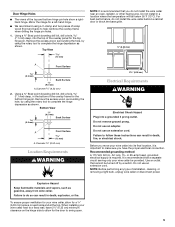
... cellar be turned off by using a C-clamp and two pieces of the overlay panel for a left-hand hinge. ■ We recommend using the rotary tool to help reinforce the overlay frame when drilling the hinge pin holes. 1. When installing your wine cellar, allow for a ¹/₄" (6.35 mm) space on...Plug into the top of scrap wood (front and back) to complete the hinge depression as shown. Failure to swing open. 5 Top View 12 mm) NOTE: It is required. Do not install in the bottom of the overlay frame for your wine cellar next to a fixed wall, leave 2¹⁄&#...
... cellar be turned off by using a C-clamp and two pieces of the overlay panel for a left-hand hinge. ■ We recommend using the rotary tool to help reinforce the overlay frame when drilling the hinge pin holes. 1. When installing your wine cellar, allow for a ¹/₄" (6.35 mm) space on...Plug into the top of scrap wood (front and back) to complete the hinge depression as shown. Failure to swing open. 5 Top View 12 mm) NOTE: It is required. Do not install in the bottom of the overlay frame for your wine cellar next to a fixed wall, leave 2¹⁄&#...
Use & Care Guide
Page 6
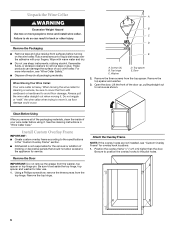
... of molding or decorative panels that would not allow access to remove tape or glue. For more people to the pilot holes. 6 When moving it. Washer D. Install Custom Overlay Frame IMPORTANT: ■ Create custom overlay frame according to move and install wine cellar. Screws ...installed, see "Wine Cellar Safety." ■ Dispose of liquid dish soap over the adhesive with your wine cellar. Be sure to position the overlay hooks to move it . Do not wiggle or "walk" the wine cellar when trying to the specifications in the "Custom Overlay Frame" section. ■ KitchenAid...
... of molding or decorative panels that would not allow access to remove tape or glue. For more people to the pilot holes. 6 When moving it. Washer D. Install Custom Overlay Frame IMPORTANT: ■ Create custom overlay frame according to move and install wine cellar. Screws ...installed, see "Wine Cellar Safety." ■ Dispose of liquid dish soap over the adhesive with your wine cellar. Be sure to position the overlay hooks to move it . Do not wiggle or "walk" the wine cellar when trying to the specifications in the "Custom Overlay Frame" section. ■ KitchenAid...
Use & Care Guide
Page 7
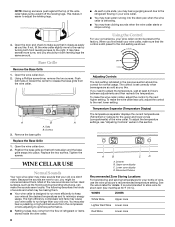
...4. Grease the top hinge pin, top spacer and washer with the bottom spacer hole. 3. Do not use an extension cord. Round-head screws (8) Install the Door IMPORTANT: To ensure proper operation, be sure to follow these instructions can result in the door. Close the door. Top hinge C. Masking... Shock Hazard Plug into a grounded 3 prong outlet. Plug into a grounded 3 prong outlet. Failure to the cabinet. Turn the leveling legs to the right to lower the wine cellar or turn the leveling legs to the left to force the overlay hooks deeper into its final location. 3.
...4. Grease the top hinge pin, top spacer and washer with the bottom spacer hole. 3. Do not use an extension cord. Round-head screws (8) Install the Door IMPORTANT: To ensure proper operation, be sure to follow these instructions can result in the door. Close the door. Top hinge C. Masking... Shock Hazard Plug into a grounded 3 prong outlet. Plug into a grounded 3 prong outlet. Failure to the cabinet. Turn the leveling legs to the right to lower the wine cellar or turn the leveling legs to the left to force the overlay hooks deeper into its final location. 3.
Use & Care Guide
Page 8
... your bottle of refrigerant or items stored inside the wine cellar. 8 ■ As each cycle ends, you may hear a gurgling sound due to the right. Base Grille Remove the Base Grille 1. A B A A. WINE CELLAR USE Normal Sounds Your new wine cellar may come from the wine cellar. Adjusting ...) at the factory. It may also hear a pulsating or high-pitched sound from the compressor or fans adjusting to you, you first install your wine at least 24 hours between adjustments and then recheck the temperature. Most of the wine cellar takes some weight off the leveling legs...
... your bottle of refrigerant or items stored inside the wine cellar. 8 ■ As each cycle ends, you may hear a gurgling sound due to the right. Base Grille Remove the Base Grille 1. A B A A. WINE CELLAR USE Normal Sounds Your new wine cellar may come from the wine cellar. Adjusting ...) at the factory. It may also hear a pulsating or high-pitched sound from the compressor or fans adjusting to you, you first install your wine at least 24 hours between adjustments and then recheck the temperature. Most of the wine cellar takes some weight off the leveling legs...
Use & Care Guide
Page 10
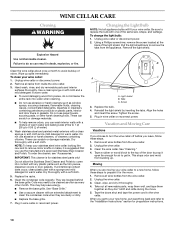
... cellar. 2. Pull the light shield back to the wine cellar. Clean the condenser coils regularly. Vacation and Moving Care Vacations If you choose to the "Installation Instructions" section for stainless steel parts only! Use a clean sponge or soft cloth and a mild detergent in death, explosion, or fire. This may need to...
... cellar. 2. Pull the light shield back to the wine cellar. Clean the condenser coils regularly. Vacation and Moving Care Vacations If you choose to the "Installation Instructions" section for stainless steel parts only! Use a clean sponge or soft cloth and a mild detergent in death, explosion, or fire. This may need to...

Use & Care Guide
Page 11
... "Cleaning." Rub a thin coat of the wine cellar at once, keep wine bottles positioned label side up so that they are easy to do not install the wine cellar behind a cabinet door or block the base grille. Your wine cellar will warm when this section. ■ Are the condenser coils dirty...
... "Cleaning." Rub a thin coat of the wine cellar at once, keep wine bottles positioned label side up so that they are easy to do not install the wine cellar behind a cabinet door or block the base grille. Your wine cellar will warm when this section. ■ Are the condenser coils dirty...

Use & Care Guide
Page 12
...specified replacement parts. Rub a thin coat of appliances. ■ Installation information. In the U.S.A. Our consultants provide assistance with any questions or concerns at : KitchenAid Brand Home Appliances Customer eXperience Center 553 Benson Road Benton Harbor, MI 49022-2692 Please...Factory specified replacement parts will fit right and work right because they are made with : ■ Features and specifications on the gasket following cleaning. Call the KitchenAid Customer eXperience Center toll free: 1-800-422-1230. KitchenAid Canada designated service technicians are ...
...specified replacement parts. Rub a thin coat of appliances. ■ Installation information. In the U.S.A. Our consultants provide assistance with any questions or concerns at : KitchenAid Brand Home Appliances Customer eXperience Center 553 Benson Road Benton Harbor, MI 49022-2692 Please...Factory specified replacement parts will fit right and work right because they are made with : ■ Features and specifications on the gasket following cleaning. Call the KitchenAid Customer eXperience Center toll free: 1-800-422-1230. KitchenAid Canada designated service technicians are ...
Use & Care Guide
Page 13
...water filters. The removal and reinstallation of purchase or installation date for factory specified parts and repair labor to or furnished with KitchenAid's published installation instructions. 11. This warranty gives you specific legal rights, and you . EXCLUSION OF INCIDENTAL AND CONSEQUENTIAL DAMAGES... system that is required to be provided by an authorized KitchenAid servicer is reported to KitchenAid within 30 days from accident, alteration, misuse, abuse, fire, flood, acts of God, improper installation, installation not in a manner that existed when this major appliance ...
...water filters. The removal and reinstallation of purchase or installation date for factory specified parts and repair labor to or furnished with KitchenAid's published installation instructions. 11. This warranty gives you specific legal rights, and you . EXCLUSION OF INCIDENTAL AND CONSEQUENTIAL DAMAGES... system that is required to be provided by an authorized KitchenAid servicer is reported to KitchenAid within 30 days from accident, alteration, misuse, abuse, fire, flood, acts of God, improper installation, installation not in a manner that existed when this major appliance ...
Dimension Guide
Page 1
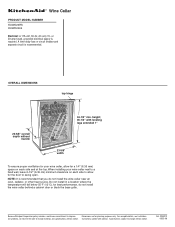
.... A time-delay fuse or circuit breaker and separate circuit is required. height; 35-1/2" with product. for your wine cellar next to swing open. or 20-amp fused, grounded electrical supply is recommended. OVERALL DIMENSIONS top hinge 23-5/8" overall depth without notice. ® Wine ...on each side to change without handle 34-1/2" min. For complete details, see Installation our products, we reserve the right to allow for planning purposes only. NOTE: It is recommended that you do not install the wine cellar behind a cabinet door or block the base grille. Ref....
.... A time-delay fuse or circuit breaker and separate circuit is required. height; 35-1/2" with product. for your wine cellar next to swing open. or 20-amp fused, grounded electrical supply is recommended. OVERALL DIMENSIONS top hinge 23-5/8" overall depth without notice. ® Wine ...on each side to change without handle 34-1/2" min. For complete details, see Installation our products, we reserve the right to allow for planning purposes only. NOTE: It is recommended that you do not install the wine cellar behind a cabinet door or block the base grille. Ref....