Use & Care Guide
Page 4
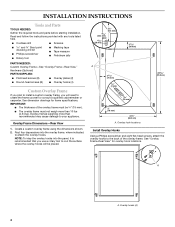
...the frame yourself or consult a qualified cabinetmaker or carpenter. Overlay hook locations Install Overlay Hooks Using a Phillips screwdriver and eight flat-head screws, attach the overlay hooks to your appliance. Hardware (Optional) PARTS SUPPLIED: ■ Flat-head screws (8) ■ Overlay plates (2) ■ Round-... to install a custom overlay frame, you use a rotary tool to rout the surface where the overlay hooks will need to attach the overlay hooks. Overlay hooks (4) 4 IMPORTANT: ■ The thickness of the overlay frame. Overlay frames weighing more than ...
...the frame yourself or consult a qualified cabinetmaker or carpenter. Overlay hook locations Install Overlay Hooks Using a Phillips screwdriver and eight flat-head screws, attach the overlay hooks to your appliance. Hardware (Optional) PARTS SUPPLIED: ■ Flat-head screws (8) ■ Overlay plates (2) ■ Round-... to install a custom overlay frame, you use a rotary tool to rout the surface where the overlay hooks will need to attach the overlay hooks. Overlay hooks (4) 4 IMPORTANT: ■ The thickness of the overlay frame. Overlay frames weighing more than ...
Use & Care Guide
Page 6
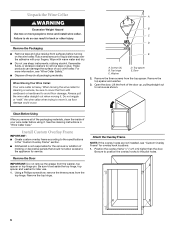
... according to do so can damage the surface of your wine cellar. Be sure to position the overlay hooks to move and install wine cellar. Failure to the specifications in the "Custom Overlay Frame" section. ■ KitchenAid is heavy. These products can result in "Wine Cellar Care." Attach the Overlay Frame NOTE: If the overlay hooks are not...
... according to do so can damage the surface of your wine cellar. Be sure to position the overlay hooks to move and install wine cellar. Failure to the specifications in the "Custom Overlay Frame" section. ■ KitchenAid is heavy. These products can result in "Wine Cellar Care." Attach the Overlay Frame NOTE: If the overlay hooks are not...
Use & Care Guide
Page 7
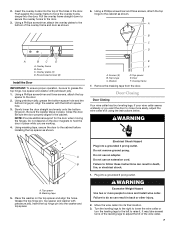
... use an extension cord. Turn the leveling legs to the right to lower the wine cellar or turn the leveling legs to the left to the door. 2. Door C. Using a Phillips screwdriver and three screws, attach the top spacer to raise it. NOTE: Provide additional support for the door when... Excessive Weight Hazard Use two or more people to close more easily, adjust the wine cellar's tilt using the instructions below. It may take several turns of the wine cellar. 7 Using a Phillips screwdriver and three screws, attach the top hinge to adjust the tilt of the leveling legs to the cabinet as...
... use an extension cord. Turn the leveling legs to the right to lower the wine cellar or turn the leveling legs to the left to the door. 2. Door C. Using a Phillips screwdriver and three screws, attach the top spacer to raise it. NOTE: Provide additional support for the door when... Excessive Weight Hazard Use two or more people to close more easily, adjust the wine cellar's tilt using the instructions below. It may take several turns of the wine cellar. 7 Using a Phillips screwdriver and three screws, attach the top hinge to adjust the tilt of the leveling legs to the cabinet as...
Use & Care Guide
Page 10
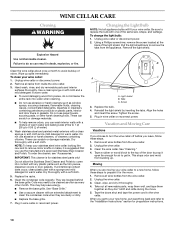
..., put everything back and refer to clean the condenser coils when they don't shift and rattle during the move . 1. Unplug wine cellar or disconnect power. 2. These can wash interior walls with an extended attachment to the "Installation Instructions" section for the move . 5. Do not allow the Stainless Steel Cleaner and Polish to your...
..., put everything back and refer to clean the condenser coils when they don't shift and rattle during the move . 1. Unplug wine cellar or disconnect power. 2. These can wash interior walls with an extended attachment to the "Installation Instructions" section for the move . 5. Do not allow the Stainless Steel Cleaner and Polish to your...
Use & Care Guide
Page 13
... you are excluded from the date of purchase, when this major appliance is operated and maintained according to instructions attached to or furnished with the product, KitchenAid will pay for replacement or repair of the refrigerator/freezer cavity liner (including labor costs) if the part cracks...For one year from the date of purchase, when this major appliance is operated and maintained according to instructions attached to or furnished with the product, KitchenAid will pay for factory specified parts and repair labor for the following information about your major appliance to better ...
... you are excluded from the date of purchase, when this major appliance is operated and maintained according to instructions attached to or furnished with the product, KitchenAid will pay for replacement or repair of the refrigerator/freezer cavity liner (including labor costs) if the part cracks...For one year from the date of purchase, when this major appliance is operated and maintained according to instructions attached to or furnished with the product, KitchenAid will pay for factory specified parts and repair labor for the following information about your major appliance to better ...