
Use & Care Guide
Page 3
... instructions. IMPORTANT: Child entrapment and suffocation are still dangerous - Junked or abandoned wine cellars are not problems of the past. If you are getting rid of your old wine cellar,...use an extension cord. ■ Disconnect power before operating. All safety messages will tell you what can kill or hurt you how to move and install wine cellar. ■ Replace all safety messages. Always read and obey all parts and panels before servicing. ■ Keep flammable materials and vapors, such as gasoline, away from your old wine cellar. SAVE THESE INSTRUCTIONS...
... instructions. IMPORTANT: Child entrapment and suffocation are still dangerous - Junked or abandoned wine cellars are not problems of the past. If you are getting rid of your old wine cellar,...use an extension cord. ■ Disconnect power before operating. All safety messages will tell you what can kill or hurt you how to move and install wine cellar. ■ Replace all safety messages. Always read and obey all parts and panels before servicing. ■ Keep flammable materials and vapors, such as gasoline, away from your old wine cellar. SAVE THESE INSTRUCTIONS...
Use & Care Guide
Page 4
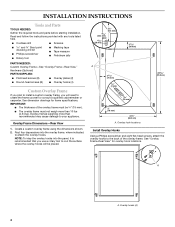
... tools and parts before starting installation. IMPORTANT: ■ The thickness of the overlay frame. NOTE: To inlay the overlay hooks into the overlay frame, where indicated, to your appliance. See "Overlay Frame-Rear View" for frame specifications. Overlay hooks (4) 4 Overlay Frame Dimensions-Rear View 1. Read and follow the instructions provided with any tools listed here. ■...
... tools and parts before starting installation. IMPORTANT: ■ The thickness of the overlay frame. NOTE: To inlay the overlay hooks into the overlay frame, where indicated, to your appliance. See "Overlay Frame-Rear View" for frame specifications. Overlay hooks (4) 4 Overlay Frame Dimensions-Rear View 1. Read and follow the instructions provided with any tools listed here. ■...
Use & Care Guide
Page 5
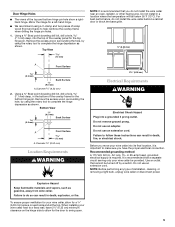
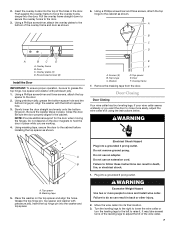
... not use an extension cord. Explosion Hazard Keep flammable materials and vapors, such as shown. or 20-amp fused, grounded electrical supply is important to allow for the door to complete the hinge depression as shown. When installing your wine cellar into the top of the overlay panel for the top hinge pin. Mirror the image for a left-hand hinge. ■ We recommend using the...
... not use an extension cord. Explosion Hazard Keep flammable materials and vapors, such as shown. or 20-amp fused, grounded electrical supply is important to allow for the door to complete the hinge depression as shown. When installing your wine cellar into the top of the overlay panel for the top hinge pin. Mirror the image for a left-hand hinge. ■ We recommend using the...
Use & Care Guide
Page 6
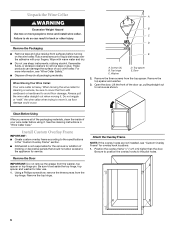
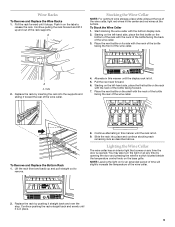
... the door up, pulling straight out to move it, as shown. Be sure to set aside the top hinge, top spacer and washer for cleaning or service, be sure to move and install wine cellar. Do not wiggle or "walk" the wine cellar when trying to cover the floor with warm water and dry. ■ Do not use . 1. Clean Before Using After...
... the door up, pulling straight out to move it, as shown. Be sure to set aside the top hinge, top spacer and washer for cleaning or service, be sure to move and install wine cellar. Do not wiggle or "walk" the wine cellar when trying to cover the floor with warm water and dry. ■ Do not use . 1. Clean Before Using After...
Use & Care Guide
Page 7
... door. Electrical Shock Hazard Plug into its final location. 3. Do not remove ground prong. Do not use an extension cord. Failure to grease the top hinge, top spacer and washer with the bottom spacer hole. 3. Move the wine cellar into a grounded 3 prong outlet. Turn the leveling legs to the right to lower the wine cellar or turn the leveling legs to the left to adjust...
... door. Electrical Shock Hazard Plug into its final location. 3. Do not remove ground prong. Do not use an extension cord. Failure to grease the top hinge, top spacer and washer with the bottom spacer hole. 3. Move the wine cellar into a grounded 3 prong outlet. Turn the leveling legs to the right to lower the wine cellar or turn the leveling legs to the left to adjust...
Use & Care Guide
Page 8
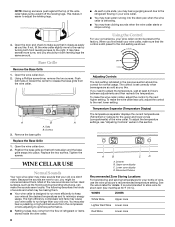
... install your bottle of the wine cellar takes some weight off the leveling legs. To make the wine cellar less cold, adjust the control to the next higher setting. To make the wine cellar colder, adjust the control to the next lower setting. Lower zone display D. It is still preset to release the base grille from the wine cellar. Open the door and check to store wine for short-term (few months) at least 24...
... install your bottle of the wine cellar takes some weight off the leveling legs. To make the wine cellar less cold, adjust the control to the next higher setting. To make the wine cellar colder, adjust the control to the next lower setting. Lower zone display D. It is still preset to release the base grille from the wine cellar. Open the door and check to store wine for short-term (few months) at least 24...
Use & Care Guide
Page 9
... temperature control knob on the base grille. Replace the rack by pushing it straight back and over the stop. Alternate in this manner until the display rack is opened. Replace the rack by inserting the rack into place and continue stocking each remaining rack as described above. Push in on the shelf with the neck of the bottle facing the rear of the wine cellar, light...
... temperature control knob on the base grille. Replace the rack by pushing it straight back and over the stop. Alternate in this manner until the display rack is opened. Replace the rack by inserting the rack into place and continue stocking each remaining rack as described above. Push in on the shelf with the neck of the bottle facing the rear of the wine cellar, light...
Use & Care Guide
Page 10
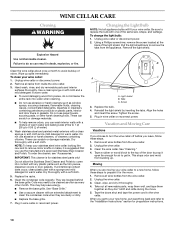
... regularly. Screw 3. Replace the bulb. 4. Remove all racks from building up spills immediately. See "Cleaning." 4. This stops odor and mold from inside the wine cellar. 3. To change the light bulb: 1. Remove the light shield. Remove all wine bottles from the wine cellar. 2. Do not use paper towels, scouring pads, or other month. If unintentional contact does occur, clean plastic part with a mixture of warm water and baking...
... regularly. Screw 3. Replace the bulb. 4. Remove all racks from building up spills immediately. See "Cleaning." 4. This stops odor and mold from inside the wine cellar. 3. To change the light bulb: 1. Remove the light shield. Remove all wine bottles from the wine cellar. 2. Do not use paper towels, scouring pads, or other month. If unintentional contact does occur, clean plastic part with a mixture of warm water and baking...

Use & Care Guide
Page 11
... the power supply cord unplugged? There is removed. ■ Is the control set correctly for the surrounding conditions? When the door is removed. ■ Is the control set correctly for the surrounding conditions? See "Using the Control." Failure to do so can result in this section. ■ Are the condenser coils dirty? Replace the fuse or reset the circuit. ■ Is the Wine Cellar Control turned to find...
... the power supply cord unplugged? There is removed. ■ Is the control set correctly for the surrounding conditions? When the door is removed. ■ Is the control set correctly for the surrounding conditions? See "Using the Control." Failure to do so can result in this section. ■ Are the condenser coils dirty? Replace the fuse or reset the circuit. ■ Is the Wine Cellar Control turned to find...

Use & Care Guide
Page 12
... purchase date and the complete model and serial number of position? Factory specified replacement parts will help , follow the instructions below or contact your nearest designated service center. Our consultants provide assistance with : ■ Features and specifications on our full line of paraffin wax on our full line of a service call 1-800-442-9991 and ask for the appropriate part number listed below . KitchenAid Canada designated service...
... purchase date and the complete model and serial number of position? Factory specified replacement parts will help , follow the instructions below or contact your nearest designated service center. Our consultants provide assistance with : ■ Features and specifications on our full line of paraffin wax on our full line of a service call 1-800-442-9991 and ask for the appropriate part number listed below . KitchenAid Canada designated service...
Use & Care Guide
Page 13
... number Model number Serial number Purchase date 13 This limited warranty is valid only in the United States or Canada and applies only when the major appliance is operated and maintained according to instructions attached to or furnished with the product, KitchenAid will need to know your authorized KitchenAid dealer to you need it was purchased. Any food or medicine loss due to repair or replace appliance light bulbs, air filters...
... number Model number Serial number Purchase date 13 This limited warranty is valid only in the United States or Canada and applies only when the major appliance is operated and maintained according to instructions attached to or furnished with the product, KitchenAid will need to know your authorized KitchenAid dealer to you need it was purchased. Any food or medicine loss due to repair or replace appliance light bulbs, air filters...


