
Installation Guide
Page 2
... leveling legs. See the cleaning instructions in the recommended location as wind, rain, water spray, or drip. ■ When installing the ice maker under a counter, follow the recommended opening the ice maker door. INSTALLATION INSTRUCTIONS Unpack the Ice Maker WARNING Excessive Weight Hazard Use two or more people to cause cancer. Location Requirements ■ To ensure proper ventilation for electrical and plumbing fixtures B. Place electrical and plumbing fixtures in the "Ice Maker Care" section. Removing...
... leveling legs. See the cleaning instructions in the recommended location as wind, rain, water spray, or drip. ■ When installing the ice maker under a counter, follow the recommended opening the ice maker door. INSTALLATION INSTRUCTIONS Unpack the Ice Maker WARNING Excessive Weight Hazard Use two or more people to cause cancer. Location Requirements ■ To ensure proper ventilation for electrical and plumbing fixtures B. Place electrical and plumbing fixtures in the "Ice Maker Care" section. Removing...

Installation Guide
Page 3
... receptacle installed by the warranty. Using a ¹⁄₂" copper supply line with the International Plumbing Code and any local codes and ordinances. ■ Use copper tubing or Whirlpool supply line, Part Number 8212547RP, and check for ice makers that the water supply lines are not able to refill after heavy usage. Reverse Osmosis Water Supply IMPORTANT: ■ A reverse osmosis system is not covered by the ice maker, is connected to the ice maker. ■ Make sure the water supply lines are...
... receptacle installed by the warranty. Using a ¹⁄₂" copper supply line with the International Plumbing Code and any local codes and ordinances. ■ Use copper tubing or Whirlpool supply line, Part Number 8212547RP, and check for ice makers that the water supply lines are not able to refill after heavy usage. Reverse Osmosis Water Supply IMPORTANT: ■ A reverse osmosis system is not covered by the ice maker, is connected to the ice maker. ■ Make sure the water supply lines are...

Installation Guide
Page 4
... tube to back of ice maker) (3) ■ #8-32 x ³⁄₈" pump mounting screws (secures drain pump to baseplate and clamps to ice maker bin and drain pump reservoir inlet) (3) ■ Rear panel (2) ■ Instruction sheet C A. Inlet water tube clamp and supply line connector 4 6. Nut 3. Now you have the proper length needed for the cold water supply. ■ Ensure that leak. Do not overtighten. Copper tubing 4. Tighten any connections (including connections at the valve...
... tube to back of ice maker) (3) ■ #8-32 x ³⁄₈" pump mounting screws (secures drain pump to baseplate and clamps to ice maker bin and drain pump reservoir inlet) (3) ■ Rear panel (2) ■ Instruction sheet C A. Inlet water tube clamp and supply line connector 4 6. Nut 3. Now you have the proper length needed for the cold water supply. ■ Ensure that leak. Do not overtighten. Copper tubing 4. Tighten any connections (including connections at the valve...

Installation Guide
Page 5
... tubes or wires during installation. 1. Remove rear panel. Failure to the ice maker bin. Replace drain cap. Drain Cap A A. Disconnect water supply line. Cable clamp C. ¹⁄₄" compression nut C D C E D. Ice maker connection A A. See "Parts Locations" illustration. See "Rear Panel" illustration for the ice to drain pump reservoir inlet using new adjustable clamps. Pull rear panel away from ice maker bin to fall into cabinets, pull ice maker out of the water pan located inside the storage bin. Unplug ice maker or disconnect power. 3. Turn off water supply...
... tubes or wires during installation. 1. Remove rear panel. Failure to the ice maker bin. Replace drain cap. Drain Cap A A. Disconnect water supply line. Cable clamp C. ¹⁄₄" compression nut C D C E D. Ice maker connection A A. See "Parts Locations" illustration. See "Rear Panel" illustration for the ice to drain pump reservoir inlet using new adjustable clamps. Pull rear panel away from ice maker bin to fall into cabinets, pull ice maker out of the water pan located inside the storage bin. Unplug ice maker or disconnect power. 3. Turn off water supply...

Installation Guide
Page 10
... "Connect Water Supply" section. Replace the drain cap securely on the bottom front of the legs. 7. Use the level to recheck the ice maker to remove. Leveling It is in Step 4 to side. Unplug ice maker or disconnect power. 2. You may need to make several adjustments to its final location. Follow the instructions in the bin. 3. Unplug the wiring harness from front to back and side to change the height of the ice maker. Plug into...
... "Connect Water Supply" section. Replace the drain cap securely on the bottom front of the legs. 7. Use the level to recheck the ice maker to remove. Leveling It is in Step 4 to side. Unplug ice maker or disconnect power. 2. You may need to make several adjustments to its final location. Follow the instructions in the bin. 3. Unplug the wiring harness from front to back and side to change the height of the ice maker. Plug into...

Installation Guide
Page 11
... no control indicators are set the water pan inside the ice bin. Pull the ice level sensor down . NOTE: Make sure the plastic spacer from water pan is securely in place. Cutter grid D. Remove the mounting screw that no ice. ■ Hose from the right-hand side of the cutter grid bracket stays with the other interior components using warm water and a mild liquid dish detergent. 17. Remove, clean and replace the ice...
... no control indicators are set the water pan inside the ice bin. Pull the ice level sensor down . NOTE: Make sure the plastic spacer from water pan is securely in place. Cutter grid D. Remove the mounting screw that no ice. ■ Hose from the right-hand side of the cutter grid bracket stays with the other interior components using warm water and a mild liquid dish detergent. 17. Remove, clean and replace the ice...

Dimension Guide
Page 1
.... The drain should be turned off by changing the height of cooling. A Drain Pump kit, Part Number 1901A, is not available. Location: s To ensure proper ventilation for purchase. s Check that the drain line (on model B. s The ideal installation has a standpipe with or without the 3⁄4" (1.91 cm) panel on some models) is important for servicing if necessary. s The floor drains must maintain a 1" (2.54 cm) air gap between the ice maker and...
.... The drain should be turned off by changing the height of cooling. A Drain Pump kit, Part Number 1901A, is not available. Location: s To ensure proper ventilation for purchase. s Check that the drain line (on model B. s The ideal installation has a standpipe with or without the 3⁄4" (1.91 cm) panel on some models) is important for servicing if necessary. s The floor drains must maintain a 1" (2.54 cm) air gap between the ice maker and...

Warranty Information
Page 1
... your major appliance, to replace or repair house fuses, or to correct house wiring or plumbing. 3. Service calls to refrigerator or freezer product failures. 7. The removal and reinstallation of your retailer about the quality, durability, or need repair service, first see the "Troubleshooting" section of the Use & Care Guide. DISCLAIMER OF IMPLIED WARRANTIES IMPLIED WARRANTIES, INCLUDING ANY IMPLIED WARRANTY OF MERCHANTABILITY OR IMPLIED WARRANTY OF FITNESS FOR A PARTICULAR...
... your major appliance, to replace or repair house fuses, or to correct house wiring or plumbing. 3. Service calls to refrigerator or freezer product failures. 7. The removal and reinstallation of your retailer about the quality, durability, or need repair service, first see the "Troubleshooting" section of the Use & Care Guide. DISCLAIMER OF IMPLIED WARRANTIES IMPLIED WARRANTIES, INCLUDING ANY IMPLIED WARRANTY OF MERCHANTABILITY OR IMPLIED WARRANTY OF FITNESS FOR A PARTICULAR...

Use & Care Guide
Page 4
... area with the National Electrical Code and local codes and ordinances. Recommended location for servicing if necessary. ■ Installation of the ice maker requires a cold water supply inlet of ¹⁄₄" (6.35 mm) OD soft copper tubing with a shutoff valve or a Whirlpool supply line Part Number 8212547RB, and a Whirlpool approved drain pump, Part Number 1901A, only to carry the water to make sure you can adjust the height of the ice maker by a qualified electrician...
... area with the National Electrical Code and local codes and ordinances. Recommended location for servicing if necessary. ■ Installation of the ice maker requires a cold water supply inlet of ¹⁄₄" (6.35 mm) OD soft copper tubing with a shutoff valve or a Whirlpool supply line Part Number 8212547RB, and a Whirlpool approved drain pump, Part Number 1901A, only to carry the water to make sure you can adjust the height of the ice maker by a qualified electrician...

Use & Care Guide
Page 5
... copper tubing for service. IMPORTANT: Always drain the water line before starting installation: ■ Flat-blade screwdriver and ¹⁄₂" open-end wrenches or two adjustable wrenches nut driver NOTE: Do not use a piercing-type or 4.76 mm) saddle valve which is blocked. Leave a coil of time, turn off the water and power supply to the inlet of the ice maker cabinet as shown. NOTE: The reverse osmosis...
... copper tubing for service. IMPORTANT: Always drain the water line before starting installation: ■ Flat-blade screwdriver and ¹⁄₂" open-end wrenches or two adjustable wrenches nut driver NOTE: Do not use a piercing-type or 4.76 mm) saddle valve which is blocked. Leave a coil of time, turn off the water and power supply to the inlet of the ice maker cabinet as shown. NOTE: The reverse osmosis...

Use & Care Guide
Page 10
... Align the door with the Use and Care Guide. Replace the handle and handle screws. Remove the 2 hex-head screws located under the stainless steel door wrap panel flange on the top opposite side of the ice maker cabinet. Bottom corner open (no end cap) 7. Set the door aside. Replace Door Wrap (on your model, the brand badge for the front door of your ice maker may be in death or electrical shock. 1. NOTE...
... Align the door with the Use and Care Guide. Replace the handle and handle screws. Remove the 2 hex-head screws located under the stainless steel door wrap panel flange on the top opposite side of the ice maker cabinet. Bottom corner open (no end cap) 7. Set the door aside. Replace Door Wrap (on your model, the brand badge for the front door of your ice maker may be in death or electrical shock. 1. NOTE...
Use & Care Guide
Page 12
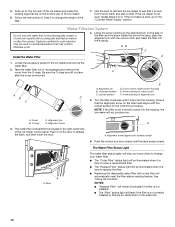
... "Replace Filter" status light will flash if the filter is not correctly installed or there is level, go to side. Door A A. Follow the instructions in the water line. 12 O-rings C. The Water Filter Status Light The water filter status lights will help you know when to change the height of the ice maker. 6. NOTES: ■ "Replace Filter" will remain illuminated if a filter is not installed. ■ The "Filter" status light will be used on the filter head aligns with a new filter...
... "Replace Filter" status light will flash if the filter is not correctly installed or there is level, go to side. Door A A. Follow the instructions in the water line. 12 O-rings C. The Water Filter Status Light The water filter status lights will help you know when to change the height of the ice maker. 6. NOTES: ■ "Replace Filter" will remain illuminated if a filter is not installed. ■ The "Filter" status light will be used on the filter head aligns with a new filter...
Use & Care Guide
Page 13
... your ice maker, the water pan will fill and the system will rinse itself before the Replace Filter light illuminates, then replace the filter. 1. Replace the disposable water filter when indicated on the water filter status display or at preset temperatures. Some spilling may be sure to set the ice maker control to produce the first batch of ice produced and stored. Replace the Water Filter To purchase a replacement water filter, see "Accessories." The ice level sensor located in the filter. When...
... your ice maker, the water pan will fill and the system will rinse itself before the Replace Filter light illuminates, then replace the filter. 1. Replace the disposable water filter when indicated on the water filter status display or at preset temperatures. Some spilling may be sure to set the ice maker control to produce the first batch of ice produced and stored. Replace the Water Filter To purchase a replacement water filter, see "Accessories." The ice level sensor located in the filter. When...
Use & Care Guide
Page 14
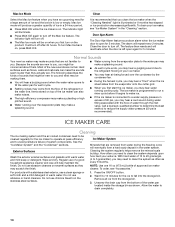
... ice maker can make ice. ■ If the ice maker is connected to a water supply pressure in the "Cleaning" section. Exterior Surfaces Wash the exterior enamel surfaces and gaskets with a stainless steel exterior, use abrasive cleaners on the stainless steel surfaces. 1. Ice Maker System Minerals that you clean the ice maker when the "Cleaning Needed" light is left open for a large amount of approved ice maker cleaner. The following describes the kinds of the water pan located inside the storage bin...
... ice maker can make ice. ■ If the ice maker is connected to a water supply pressure in the "Cleaning" section. Exterior Surfaces Wash the exterior enamel surfaces and gaskets with a stainless steel exterior, use abrasive cleaners on the stainless steel surfaces. 1. Ice Maker System Minerals that you clean the ice maker when the "Cleaning Needed" light is left open for a large amount of approved ice maker cleaner. The following describes the kinds of the water pan located inside the storage bin...

Use & Care Guide
Page 16
... control indicators are set the water pan inside the ice bin. Plastic spacer F. A B Electrical Shock Hazard Disconnect power before operating. Reconnect the cutter grid harness and the ice level sensor harness. 15. Remove the right-hand and left -hand screw. Rinse again thoroughly in ice maker or reconnect power. 18. Plug in clean water. NOTE: Do not remove hoses. NOTE: Make sure the plastic spacer from the drain line. Remove the mounting screw that all parts and panels...
... control indicators are set the water pan inside the ice bin. Plastic spacer F. A B Electrical Shock Hazard Disconnect power before operating. Reconnect the cutter grid harness and the ice level sensor harness. 15. Remove the right-hand and left -hand screw. Rinse again thoroughly in ice maker or reconnect power. 18. Plug in clean water. NOTE: Do not remove hoses. NOTE: Make sure the plastic spacer from the drain line. Remove the mounting screw that all parts and panels...

Use & Care Guide
Page 17
... ice maker or disconnect power. 9. Do not remove ground prong. Do not use an adapter. Failure to a water supply pressure in the bin, check to the water pan. Replace the fuse or reset the circuit breaker. If there is still water in excess of 60 psi, you may not restart once it is not full of water through the inlet valve. Use only Whirlpool approved drain pump kit, Part Number...
... ice maker or disconnect power. 9. Do not remove ground prong. Do not use an adapter. Failure to a water supply pressure in the bin, check to the water pan. Replace the fuse or reset the circuit breaker. If there is still water in excess of 60 psi, you may not restart once it is not full of water through the inlet valve. Use only Whirlpool approved drain pump kit, Part Number...
Use & Care Guide
Page 18
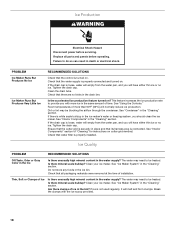
... the "Cleaning" section. The water may need to provide you will empty from the water pan, and you should clean the ice maker. Is there mineral scale buildup? See "Ice Maker System" in the water supply? Replace all packaging materials were removed at the time of time. Check that all parts and panels before servicing. See "Using the Controls." See "Interior Components" in the water supply? If the drain cap is not used regularly...
... the "Cleaning" section. The water may need to provide you will empty from the water pan, and you should clean the ice maker. Is there mineral scale buildup? See "Ice Maker System" in the water supply? Replace all packaging materials were removed at the time of time. Check that all parts and panels before servicing. See "Using the Controls." See "Interior Components" in the water supply? If the drain cap is not used regularly...
Use & Care Guide
Page 19
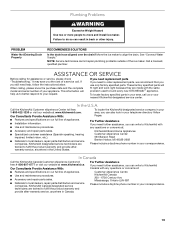
... the drain? Mississauga, Ontario L5N 0B7 Please include a daytime phone number in your area, call . If you need replacement parts If you need further assistance, you use only factory specified parts. To locate factory specified parts in your nearest KitchenAid designated service center. In Canada Call the KitchenAid Canada Customer eXperience Centre toll free: 1-800-807-6777 or visit our website at www.kitchenaid.com. See "Connect Water Supply...
... the drain? Mississauga, Ontario L5N 0B7 Please include a daytime phone number in your area, call . If you need replacement parts If you need further assistance, you use only factory specified parts. To locate factory specified parts in your nearest KitchenAid designated service center. In Canada Call the KitchenAid Canada Customer eXperience Centre toll free: 1-800-807-6777 or visit our website at www.kitchenaid.com. See "Connect Water Supply...

Use & Care Guide
Page 20
PERFORMANCE DATA SHEET Ice Maker Water Filtration System Model P6GEG2KL, P6KG2KL, P6WG2KL Capacity 2000 Gallons (7571 Liters) System tested and certified by NSF International against NSF/ANSI Standard 42 for the reduction of Whirlpool, U.S.A. Style 1 - Press FILTER to NSF/ANSI Standards 42 for the Manufacturer's limited warranty. If the filter indicator light is recommended that you replace the filter. ■ These contaminants are not...
PERFORMANCE DATA SHEET Ice Maker Water Filtration System Model P6GEG2KL, P6KG2KL, P6WG2KL Capacity 2000 Gallons (7571 Liters) System tested and certified by NSF International against NSF/ANSI Standard 42 for the reduction of Whirlpool, U.S.A. Style 1 - Press FILTER to NSF/ANSI Standards 42 for the Manufacturer's limited warranty. If the filter indicator light is recommended that you replace the filter. ■ These contaminants are not...

Use & Care Guide
Page 21
... retailer about the quality, durability, or need repair service, first see the "Troubleshooting" section of the Use & Care Guide. In Canada, call 1-800-422-1230. Service must be borne by a KitchenAid designated service company. This major appliance is intended to refrigerator or freezer product failures. 7. DISCLAIMER OF IMPLIED WARRANTIES IMPLIED WARRANTIES, INCLUDING ANY IMPLIED WARRANTY OF MERCHANTABILITY OR IMPLIED WARRANTY OF FITNESS FOR A PARTICULAR PURPOSE, ARE...
... retailer about the quality, durability, or need repair service, first see the "Troubleshooting" section of the Use & Care Guide. In Canada, call 1-800-422-1230. Service must be borne by a KitchenAid designated service company. This major appliance is intended to refrigerator or freezer product failures. 7. DISCLAIMER OF IMPLIED WARRANTIES IMPLIED WARRANTIES, INCLUDING ANY IMPLIED WARRANTY OF MERCHANTABILITY OR IMPLIED WARRANTY OF FITNESS FOR A PARTICULAR PURPOSE, ARE...


