
Owners Manual
Page 1
www.KitchenAid.ca TABLE OF CONTENTS WINE CELLAR SAFETY 2 Proper Disposal of Your Old Wine Cellar 3 INSTALLATION REQUIREMENTS 3 Tools and Parts 3 Location Requirements 3 Product Dimensions 4 Custom Overlay Panel 4 Handle (Optional 5 Electrical Requirements 5 INSTALLATION INSTRUCTIONS 5 Unpack the Wine Cellar 5 Custom Overlay Panel Installation 6 Installation and Door Closing 7 USING WINE CELLAR 7 Controls 7 Normal Sounds 8 Stocking the Wine Cellar 9 Wine Racks 9 CARE AND CLEANING 10 Cleaning 10 Removing Base Grille 10 Vacation Care 11 Moving Care 11 TROUBLESHOOTING 11 ...
www.KitchenAid.ca TABLE OF CONTENTS WINE CELLAR SAFETY 2 Proper Disposal of Your Old Wine Cellar 3 INSTALLATION REQUIREMENTS 3 Tools and Parts 3 Location Requirements 3 Product Dimensions 4 Custom Overlay Panel 4 Handle (Optional 5 Electrical Requirements 5 INSTALLATION INSTRUCTIONS 5 Unpack the Wine Cellar 5 Custom Overlay Panel Installation 6 Installation and Door Closing 7 USING WINE CELLAR 7 Controls 7 Normal Sounds 8 Stocking the Wine Cellar 9 Wine Racks 9 CARE AND CLEANING 10 Cleaning 10 Removing Base Grille 10 Vacation Care 11 Moving Care 11 TROUBLESHOOTING 11 ...

Owners Manual
Page 2
... chance of this manual and on your appliance. Disconnect power before operating. Remove doors from your wine cellar, follow instructions. To avoid the risk of others . The fumes can kill or hurt you what the potential hazard is damaged, it must be supervised to ensure that can cause fires or explosions. Do not use of fire, electric shock, or...
... chance of this manual and on your appliance. Disconnect power before operating. Remove doors from your wine cellar, follow instructions. To avoid the risk of others . The fumes can kill or hurt you what the potential hazard is damaged, it must be supervised to ensure that can cause fires or explosions. Do not use of fire, electric shock, or...
Owners Manual
Page 3
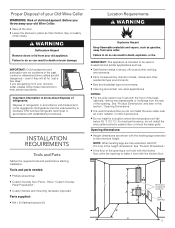
.... Opening dimensions: Height dimensions are getting rid of your old Wine Cellar: Take off the door. Leave the shelves in place so that you throw away your old wine cellar, please follow these instructions to do so can result in a location where the temperature will sit for "just a few days." IMPORTANT: Child entrapment and suffocation are still dangerous - Tools and parts needed...
.... Opening dimensions: Height dimensions are getting rid of your old Wine Cellar: Take off the door. Leave the shelves in place so that you throw away your old wine cellar, please follow these instructions to do so can result in a location where the temperature will sit for "just a few days." IMPORTANT: Child entrapment and suffocation are still dangerous - Tools and parts needed...
Owners Manual
Page 4
... flush installation, the power outlet can also be installed in the illustration "Solid door overlay panel and hinge routing dimensions". Custom glass door overlay panel must be on the power cord side for panel specifications. H Dimension - Refer dimension drawings for routing of the overlay panel must not weigh more than recommended may cause damage to your wine cellar has the hinges installed on the left-hand side...
... flush installation, the power outlet can also be installed in the illustration "Solid door overlay panel and hinge routing dimensions". Custom glass door overlay panel must be on the power cord side for panel specifications. H Dimension - Refer dimension drawings for routing of the overlay panel must not weigh more than recommended may cause damage to your wine cellar has the hinges installed on the left-hand side...
Owners Manual
Page 5
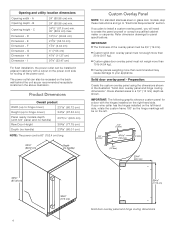
... install these instructions can result in the illustration " Glass door overlay panel and hinge routing dimensions". If your wine cellar, all packaging materials should be removed and the interior should be installed on the door panel with KitchenAid handle kits to be cleaned. Before using the dimensions shown in back or other injury. Recommended grounding method: A 115 V, 60 Hz, AC only, 15 A or 20 A fused, grounded electrical supply...
... install these instructions can result in the illustration " Glass door overlay panel and hinge routing dimensions". If your wine cellar, all packaging materials should be removed and the interior should be installed on the door panel with KitchenAid handle kits to be cleaned. Before using the dimensions shown in back or other injury. Recommended grounding method: A 115 V, 60 Hz, AC only, 15 A or 20 A fused, grounded electrical supply...

Owners Manual
Page 6
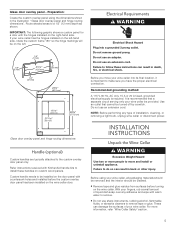
... in installation kit) at each corner of the door can be installed before the custom overlay door panel has been installed on back of the custom wood panel. A 90° 2. After all packaging materials. Using two people, hold the custom overlay panel against the door. NOTE: The gasket does not have been removed, clean the inside of your wine cellar. A. Screw holes B. KitchenAid is not...
... in installation kit) at each corner of the door can be installed before the custom overlay door panel has been installed on back of the custom wood panel. A 90° 2. After all packaging materials. Using two people, hold the custom overlay panel against the door. NOTE: The gasket does not have been removed, clean the inside of your wine cellar. A. Screw holes B. KitchenAid is not...
Owners Manual
Page 7
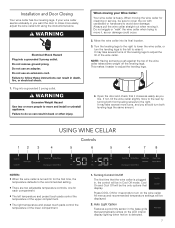
... preset touch pads control the temperature of the wine cellar takes some weight off the leveling legs. Do not use an adapter. It may take several turns of the wine cellar. Press COOL ON for each compartment. If your Wine Cellar: Your wine cellar is detected. 7 Installation and Door Closing Your wine cellar has four leveling legs. Move the wine cellar into its final location. 3. There are two adjustable temperature controls, one for...
... preset touch pads control the temperature of the wine cellar takes some weight off the leveling legs. Do not use an adapter. It may take several turns of the wine cellar. Press COOL ON for each compartment. If your Wine Cellar: Your wine cellar is detected. 7 Installation and Door Closing Your wine cellar has four leveling legs. Move the wine cellar into its final location. 3. There are two adjustable temperature controls, one for...
Owners Manual
Page 8
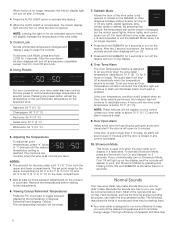
... interior display light will not appear on when the door is no longer required. Using Presets For your convenience, your wine at the desired temperatures and to flash until the door is closed on the Sabbath or other religious holidays without directly turning on the feature. The control is set points remain unchanged, but the control panel lights, interior lights, and control audio turn on the display, and the controls...
... interior display light will not appear on when the door is no longer required. Using Presets For your convenience, your wine at the desired temperatures and to flash until the door is closed on the Sabbath or other religious holidays without directly turning on the feature. The control is set points remain unchanged, but the control panel lights, interior lights, and control audio turn on the display, and the controls...
Owners Manual
Page 9
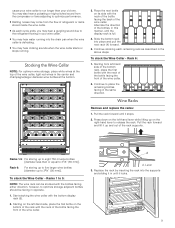
... direction of the wine cellar. Continue stocking each cycle ends, you may come from the flow of the rack supports. 6 Racks 1-5: For storing up on the bottom of the rack with the neck of the bottle facing the front of the wine cellar, light red wines in the center and champagne/larger diameter wine bottles at the top of the wine cellar. Starting from the compressor or fans adjusting...
... direction of the wine cellar. Continue stocking each cycle ends, you may come from the flow of the rack supports. 6 Racks 1-5: For storing up on the bottom of the rack with the neck of the bottle facing the front of the wine cellar, light red wines in the center and champagne/larger diameter wine bottles at the top of the wine cellar. Starting from the compressor or fans adjusting...
Owners Manual
Page 10
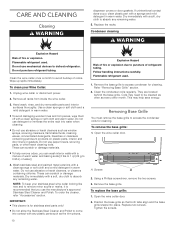
... dispenser covers or door gaskets. Condenser cleaning Explosion Hazard Risk of water]. 4. Do not puncture refrigerant tubing. Wipe up spills immediately. Use a clean sponge or soft cloth and a mild detergent in warm water. Wash stainless steel and painted metal exteriors with a clean sponge or soft cloth and warm water. NOTE: To keep your Wine Cellar: 1. Follow handling instructions carefully. Remove...
... dispenser covers or door gaskets. Condenser cleaning Explosion Hazard Risk of water]. 4. Do not puncture refrigerant tubing. Wipe up spills immediately. Use a clean sponge or soft cloth and a mild detergent in warm water. Wash stainless steel and painted metal exteriors with a clean sponge or soft cloth and warm water. NOTE: To keep your Wine Cellar: 1. Follow handling instructions carefully. Remove...
Owners Manual
Page 11
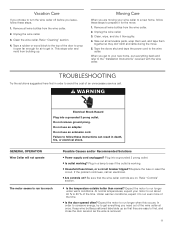
... the wine cellar. Unplug the wine cellar. 3. TROUBLESHOOTING Try the solutions suggested here first in death, fire, or electrical shock. Do not use an extension cord. GENERAL OPERATION Wine Cellar will not operate The motor seems to run longer when this occurs. Household fuse blown, or a circuit breaker tripped? Are controls on . Expect the motor to run too much Possible Causes and/or Recommended Solutions Power supply cord unplugged? Keep wine bottles...
... the wine cellar. Unplug the wine cellar. 3. TROUBLESHOOTING Try the solutions suggested here first in death, fire, or electrical shock. Do not use an extension cord. GENERAL OPERATION Wine Cellar will not operate The motor seems to run longer when this occurs. Household fuse blown, or a circuit breaker tripped? Are controls on . Expect the motor to run too much Possible Causes and/or Recommended Solutions Power supply cord unplugged? Keep wine bottles...
Owners Manual
Page 12
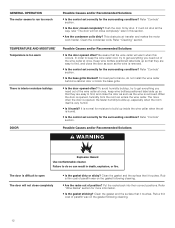
... up inside the wine cellar when the air is removed. Failure to do not install the wine cellar behind a cabinet door or block the base grille. Is the gasket sticking? Is the door closed completely? In order to keep wine bottles positioned label side up , especially when the room itself is removed. Refer "Controls" section. GENERAL OPERATION The motor seems to run too much...
... up inside the wine cellar when the air is removed. Failure to do not install the wine cellar behind a cabinet door or block the base grille. Is the gasket sticking? Is the door closed completely? In order to keep wine bottles positioned label side up , especially when the room itself is removed. Refer "Controls" section. GENERAL OPERATION The motor seems to run too much...
Owners Manual
Page 13
... the complete model and serial number of your telephone directory Yellow Pages. Installation information. Call the KitchenAid Customer eXperience Center toll free: 1-800-422-1230. Accessory and repair parts sales. If you need further assistance, you can write to fulfill the product warranty and provide after -warranty service, anywhere in your area, you can write to local dealers, repair parts distributors, and services companies. Please...
... the complete model and serial number of your telephone directory Yellow Pages. Installation information. Call the KitchenAid Customer eXperience Center toll free: 1-800-422-1230. Accessory and repair parts sales. If you need further assistance, you can write to fulfill the product warranty and provide after -warranty service, anywhere in your area, you can write to local dealers, repair parts distributors, and services companies. Please...


