
Use & Care Guide
Page 4
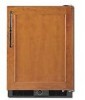
... wood overlay must be placed. 4⁷⁄₈" (124 mm 23.3 mm) 20 mm) 4 11.2 cm) PARTS NEEDED: Custom Overlay Door Panel-See "Overlay Panel-Rear View." See "Overlay Panel-Rear View," for panel specifications. Overlay hooks (4) 4 INSTALLATION INSTRUCTIONS Tools and Parts TOOLS NEEDED: Gather the required tools and parts before starting installation. IMPORTANT... ■ Phillips screwdriver ■ Rotary tool ■ Masking tape ■ Tape measure ■ Petroleum jelly NOTE: To inlay the overlay hooks into the overlay panel, where indicated, to your refrigerator. A A.
... wood overlay must be placed. 4⁷⁄₈" (124 mm 23.3 mm) 20 mm) 4 11.2 cm) PARTS NEEDED: Custom Overlay Door Panel-See "Overlay Panel-Rear View." See "Overlay Panel-Rear View," for panel specifications. Overlay hooks (4) 4 INSTALLATION INSTRUCTIONS Tools and Parts TOOLS NEEDED: Gather the required tools and parts before starting installation. IMPORTANT... ■ Phillips screwdriver ■ Rotary tool ■ Masking tape ■ Tape measure ■ Petroleum jelly NOTE: To inlay the overlay hooks into the overlay panel, where indicated, to your refrigerator. A A.

Use & Care Guide
Page 6
... you remove all packaging materials. Use both hands when removing them to the specifications in the "Custom Overlay Panel" section. ■ KitchenAid is normal. Washer D. Open the door. Lift the front of your fingers. When Moving Your Refrigerator: Your refrigerator is designed to set aside the top hinge, top spacer and washer for service. Always...
... you remove all packaging materials. Use both hands when removing them to the specifications in the "Custom Overlay Panel" section. ■ KitchenAid is normal. Washer D. Open the door. Lift the front of your fingers. When Moving Your Refrigerator: Your refrigerator is designed to set aside the top hinge, top spacer and washer for service. Always...

Use & Care Guide
Page 7
... Using a Phillips screwdriver and three screws, attach the top hinge to hold the door in place while you are not installed, see "Custom Overlay Panel" for the door when moving the hinges. Using a Phillips screwdriver and three screws, attach the top spacer to the door. 3. Do...installing the top spacer as shown. NOTE: Provide additional support for overlay hook locations. 1. Top Hinge C. Overlay plates (2) D. Attach the Overlay Panel NOTE: If the overlay hooks are working. Door F. Place the washer on the door magnets to the cabinet as shown. Using a Phillips screwdriver...
... Using a Phillips screwdriver and three screws, attach the top hinge to hold the door in place while you are not installed, see "Custom Overlay Panel" for the door when moving the hinges. Using a Phillips screwdriver and three screws, attach the top spacer to the door. 3. Do...installing the top spacer as shown. NOTE: Provide additional support for overlay hook locations. 1. Top Hinge C. Overlay plates (2) D. Attach the Overlay Panel NOTE: If the overlay hooks are working. Door F. Place the washer on the door magnets to the cabinet as shown. Using a Phillips screwdriver...


