
Use & Care Guide
Page 3
... about disposal of refrigerants: Dispose of refrigerator in this manual and on your old wine cellar. Junked or abandoned wine cellars are not problems of the past. IMPORTANT SAFETY INSTRUCTIONS WARNING: To reduce the risk of fire, electric shock, or injury when using your wine cellar, follow these instructions to move and install wine cellar. ■ Replace all safety messages...
... about disposal of refrigerants: Dispose of refrigerator in this manual and on your old wine cellar. Junked or abandoned wine cellars are not problems of the past. IMPORTANT SAFETY INSTRUCTIONS WARNING: To reduce the risk of fire, electric shock, or injury when using your wine cellar, follow these instructions to move and install wine cellar. ■ Replace all safety messages...

Use & Care Guide
Page 4
... and install wine cellar. To ensure proper ventilation for a ¹/₄" (6.35 mm) space on the wine cellar. Do not remove ground prong. NOTE: Before performing any type of your refrigerator, allow for cleaning or service, be sure to cover the floor with warm water and dry. ■ Do not use an adapter. These products can result in a location where the temperature...
... and install wine cellar. To ensure proper ventilation for a ¹/₄" (6.35 mm) space on the wine cellar. Do not remove ground prong. NOTE: Before performing any type of your refrigerator, allow for cleaning or service, be sure to cover the floor with warm water and dry. ■ Do not use an adapter. These products can result in a location where the temperature...

Use & Care Guide
Page 5
... leveling legs. Open the wine cellar door. 2. Failure to raise it . A B A A. Remove the base grille. Replace the two screws. Tighten the screws. Hard surfaces, such as you should turn the leveling legs to the left to follow these instructions can result in your wine cellar. ■ You may hear clicking sounds when the wine cellar starts or stops running into the drain pan...
... leveling legs. Open the wine cellar door. 2. Failure to raise it . A B A A. Remove the base grille. Replace the two screws. Tighten the screws. Hard surfaces, such as you should turn the leveling legs to the left to follow these instructions can result in your wine cellar. ■ You may hear clicking sounds when the wine cellar starts or stops running into the drain pan...
Use & Care Guide
Page 6
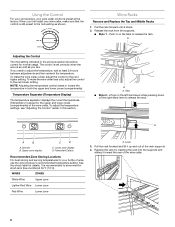
... Locations For best storing and serving temperatures for your wine cellar control is as cold as shown. A A. Upper zone display C D C. Lever 3. Wine Racks Remove and Replace the Top and Middle Racks 1. If you like. To make the wine cellar less cold, adjust the control to release the rack. Dimmer B. Replace the rack by inserting the rack into the supports and sliding it stops. 2. Temperature Separator (Temperature Display...
... Locations For best storing and serving temperatures for your wine cellar control is as cold as shown. A A. Upper zone display C D C. Lever 3. Wine Racks Remove and Replace the Top and Middle Racks 1. If you like. To make the wine cellar less cold, adjust the control to release the rack. Dimmer B. Replace the rack by inserting the rack into the supports and sliding it stops. 2. Temperature Separator (Temperature Display...
Use & Care Guide
Page 7
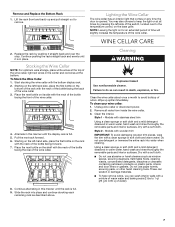
... the temperature control, on the shelf with stainless steel trim Using a clean sponge or soft cloth and a mild detergent dissolved in this manner until the display rack is opened. Starting on the left -hand side, place the first bottle on any time the door is full. 5. Clean the wine cellar about once a month to 0.95 L] of the wine cellar. Remove and Replace the...
... the temperature control, on the shelf with stainless steel trim Using a clean sponge or soft cloth and a mild detergent dissolved in this manner until the display rack is opened. Starting on the left -hand side, place the first bottle on any time the door is full. 5. Clean the wine cellar about once a month to 0.95 L] of the wine cellar. Remove and Replace the...

Use & Care Guide
Page 8
... change the light bulb: 1. Tape a rubber or wood block to the top of the door to prop it thoroughly. 4. NOTE: To keep your new home, put everything back and refer to be cleaned as often as the trim pieces, dispenser covers or door gaskets. They are dusty or dirty. ■ Replace the base grille. 7. LED Light The light is suggested that you get in warm water...
... change the light bulb: 1. Tape a rubber or wood block to the top of the door to prop it thoroughly. 4. NOTE: To keep your new home, put everything back and refer to be cleaned as often as the trim pieces, dispenser covers or door gaskets. They are dusty or dirty. ■ Replace the base grille. 7. LED Light The light is suggested that you get in warm water...

Use & Care Guide
Page 9
... door is too warm ■ Is the door opened , humidity from the room air enters the wine cellar. The lights do not install the wine cellar behind a cabinet door or block the base grille. Plug into a grounded 3 prong outlet. ■ Is a light bulb loose in death, fire, or electrical shock. ■ Is the power supply cord unplugged? See "Using the Control." Expect the motor to follow these instructions...
... door is too warm ■ Is the door opened , humidity from the room air enters the wine cellar. The lights do not install the wine cellar behind a cabinet door or block the base grille. Plug into a grounded 3 prong outlet. ■ Is a light bulb loose in death, fire, or electrical shock. ■ Is the power supply cord unplugged? See "Using the Control." Expect the motor to follow these instructions...

Use & Care Guide
Page 10
... KitchenAid Canada Customer eXperience Centre toll free: 1-800-807-6777. Clean the gasket and the surface that you still need help us or your correspondence. 10 If you only use factory specified replacement parts. Factory specified replacement parts will fit right and work right because they are trained to local dealers, repair parts distributors, and service companies. Our consultants provide assistance with : ■ Features and specifications...
... KitchenAid Canada Customer eXperience Centre toll free: 1-800-807-6777. Clean the gasket and the surface that you still need help us or your correspondence. 10 If you only use factory specified replacement parts. Factory specified replacement parts will fit right and work right because they are trained to local dealers, repair parts distributors, and service companies. Our consultants provide assistance with : ■ Features and specifications...

Use & Care Guide
Page 11
.../or installation instructions. 2. YOUR SOLE AND EXCLUSIVE REMEDY UNDER THIS LIMITED WARRANTY SHALL BE PRODUCT REPAIR AS PROVIDED HEREIN. Consumable parts are unable to resolve the problem after checking "Troubleshooting," additional help you obtain assistance or service if you are excluded from unauthorized modifications made to the appliance. 9. Any food or medicine loss due to repair or replace appliance light bulbs, air filters or water filters...
.../or installation instructions. 2. YOUR SOLE AND EXCLUSIVE REMEDY UNDER THIS LIMITED WARRANTY SHALL BE PRODUCT REPAIR AS PROVIDED HEREIN. Consumable parts are unable to resolve the problem after checking "Troubleshooting," additional help you obtain assistance or service if you are excluded from unauthorized modifications made to the appliance. 9. Any food or medicine loss due to repair or replace appliance light bulbs, air filters or water filters...

Warranty Information
Page 1
... the U.S.A., call 1-800-807-6777. 5/08 Keep this book and your authorized KitchenAid dealer to repair or replace appliance light bulbs, air filters or water filters. Dealer name Address Phone number Model number Serial number Purchase date 11 Proof of original purchase date is required to know your major appliance is located in materials or workmanship that existed when this major appliance was purchased. Also...
... the U.S.A., call 1-800-807-6777. 5/08 Keep this book and your authorized KitchenAid dealer to repair or replace appliance light bulbs, air filters or water filters. Dealer name Address Phone number Model number Serial number Purchase date 11 Proof of original purchase date is required to know your major appliance is located in materials or workmanship that existed when this major appliance was purchased. Also...


