Use and Care Manual
Page 3
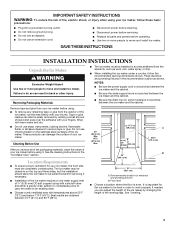
... in order to move and install ice maker. Recommended location for the ice maker to move and install ice maker. If needed, you remove all parts and panels before using. ■ To remove any remaining tape or glue from the elements, such as shown. SAVE THESE INSTRUCTIONS INSTALLATION INSTRUCTIONS Unpack the...
... in order to move and install ice maker. Recommended location for the ice maker to move and install ice maker. If needed, you remove all parts and panels before using. ■ To remove any remaining tape or glue from the elements, such as shown. SAVE THESE INSTRUCTIONS INSTALLATION INSTRUCTIONS Unpack the...
Use and Care Manual
Page 4
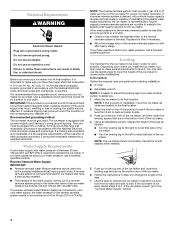
.... The cord must be turned off by a qualified electrician. NOTE: If this product is connected to add stability when needed : Gather the required tools and parts before starting installation. ■ 9" level ■ Adjustable wrench NOTE: It is required to operate the ice maker. Use a receptacle which cannot be grounded. Reverse Osmosis...
.... The cord must be turned off by a qualified electrician. NOTE: If this product is connected to add stability when needed : Gather the required tools and parts before starting installation. ■ 9" level ■ Adjustable wrench NOTE: It is required to operate the ice maker. Use a receptacle which cannot be grounded. Reverse Osmosis...
Use and Care Manual
Page 5
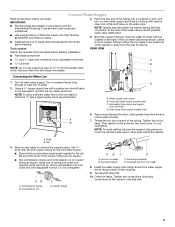
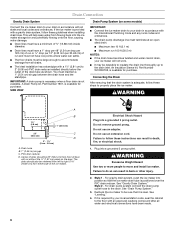
... ready to avoid possible water valve malfunction. 5. Line to be sure the copper tubing does not touch the cabinet's side wall or other parts inside the cabinet. Tools needed for the cold water supply. ■ Ensure that leak. 5 IMPORTANT: ■ Plumbing shall be installed ...Do not overtighten. Copper tubing AB C D A. Tighten any local codes and ordinances. ■ Use copper tubing or Whirlpool supply line, Part Number 8212547RP, and check for leaks. Connect Water Supply Read all directions before you have the proper length needed REAR VIEW Gather the required ...
... ready to avoid possible water valve malfunction. 5. Line to be sure the copper tubing does not touch the cabinet's side wall or other parts inside the cabinet. Tools needed for the cold water supply. ■ Ensure that leak. 5 IMPORTANT: ■ Plumbing shall be installed ...Do not overtighten. Copper tubing AB C D A. Tighten any local codes and ordinances. ■ Use copper tubing or Whirlpool supply line, Part Number 8212547RP, and check for leaks. Connect Water Supply Read all directions before you have the proper length needed REAR VIEW Gather the required ...
Use and Care Manual
Page 6
You must not have been made. 6 A Drain Pump kit, Part Number 1901, is not available. The drain should be large enough to do so can result in death, fire, or electrical shock. 1. Do not use ... hose to move and install ice maker. See "Leveling." 4. IMPORTANT: A drain pump is necessary when a floor drain is available for purchase. An Insulation Sleeve kit, Part Number W10365792, is positioned over the PVC drain reducer. Electrical Shock Hazard Plug into a grounded 3 prong outlet. If it is adequate, follow these guidelines when...
You must not have been made. 6 A Drain Pump kit, Part Number 1901, is not available. The drain should be large enough to do so can result in death, fire, or electrical shock. 1. Do not use ... hose to move and install ice maker. See "Leveling." 4. IMPORTANT: A drain pump is necessary when a floor drain is available for purchase. An Insulation Sleeve kit, Part Number W10365792, is positioned over the PVC drain reducer. Electrical Shock Hazard Plug into a grounded 3 prong outlet. If it is adequate, follow these guidelines when...
Use and Care Manual
Page 7
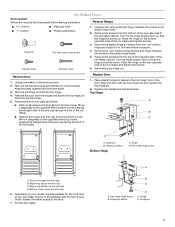
... top hinge hole on the new bottom hinge pin. 4. Move it on the door. Hinge D. Ice Maker Door Tools needed: Gather the required tools and parts before starting installation. Unscrew and remove the top hinge. Replace the screws in the package with the top hinge hole and replace the top hinge... so that the hinge pin points up. Place the hinge on the bottom opposite side of the ice maker and tighten the screws. 6. Keep the parts together and set them aside. 3. Remove the hinge pin from the hinges and screw the top hinge pin back into the top hinge. 5. Remove the...
... top hinge hole on the new bottom hinge pin. 4. Move it on the door. Hinge D. Ice Maker Door Tools needed: Gather the required tools and parts before starting installation. Unscrew and remove the top hinge. Replace the screws in the package with the top hinge hole and replace the top hinge... so that the hinge pin points up. Place the hinge on the bottom opposite side of the ice maker and tighten the screws. 6. Keep the parts together and set them aside. 3. Remove the hinge pin from the hinges and screw the top hinge pin back into the top hinge. 5. Remove the...

Use and Care Manual
Page 9
.... Cleaning the system regularly helps remove the mineral scale buildup. In Canada, call 1-800-422-1230 and ask for the ice to 10 minutes for Part Number 4396808. Remove all handling information on enamel surfaces as they may need to be cleaned regularly for the ice maker to operate at peak...
.... Cleaning the system regularly helps remove the mineral scale buildup. In Canada, call 1-800-422-1230 and ask for the ice to 10 minutes for Part Number 4396808. Remove all handling information on enamel surfaces as they may need to be cleaned regularly for the ice maker to operate at peak...
Use and Care Manual
Page 10
... higher than recommended operating temperatures which may require repeated cleaning with a fresh quantity of the cutter grid bracket stays with the cutter grid. Replace all parts and panels before cleaning. Remove the two screws in the lower access panel and the two screws from the water pan and drain thoroughly. Interior...
... higher than recommended operating temperatures which may require repeated cleaning with a fresh quantity of the cutter grid bracket stays with the cutter grid. Replace all parts and panels before cleaning. Remove the two screws in the lower access panel and the two screws from the water pan and drain thoroughly. Interior...
Use and Care Manual
Page 11
...plastic spacer. After cleaning, make sure that all ice from water pan is securely in 1 gal. (3.8 L) warm water. Shut off and remove all parts and panels before servicing. Before using the following : ■ Drain cap from the base grille area of household bleach in place. A. Check the ... into a grounded 3 prong outlet. NOTE: Do not remove hoses. Remove the two screws in death or electrical shock. Then clean the same parts with the other interior components using again, clean the ice maker and storage bin. 10. Remove, clean and replace the ice scoop and ice...
...plastic spacer. After cleaning, make sure that all ice from water pan is securely in 1 gal. (3.8 L) warm water. Shut off and remove all parts and panels before servicing. Before using the following : ■ Drain cap from the base grille area of household bleach in place. A. Check the ... into a grounded 3 prong outlet. NOTE: Do not remove hoses. Remove the two screws in death or electrical shock. Then clean the same parts with the other interior components using again, clean the ice maker and storage bin. 10. Remove, clean and replace the ice scoop and ice...
Use and Care Manual
Page 12
... than normal? Tighten the drain cap if it does shut off continually? Do not remove ground prong. Otherwise, bin thermostat may need cleaning. Replace all parts and panels before servicing. See "Interior Components" in the "Cleaning" section. ■ Is the drain cap securely in the ice maker? Grid is level, and...
... than normal? Tighten the drain cap if it does shut off continually? Do not remove ground prong. Otherwise, bin thermostat may need cleaning. Replace all parts and panels before servicing. See "Interior Components" in the "Cleaning" section. ■ Is the drain cap securely in the ice maker? Grid is level, and...
Use and Care Manual
Page 13
.... ■ Is there mineral scale buildup? Move the ice maker to local dealers, repair parts distributors, and services companies. This information will melt and form clumps. Call the KitchenAid Customer eXperience Center toll free: 1-800-422-1230. For further assistance If you need to your... high mineral content in the ice bin? The water may save you only use factory specified parts. Clean your appliance. Do not store any questions or concerns at : KitchenAid Brand Home Appliances Customer eXperience Center 553 Benson Road Benton Harbor, MI 49022-2692 Please include ...
.... ■ Is there mineral scale buildup? Move the ice maker to local dealers, repair parts distributors, and services companies. This information will melt and form clumps. Call the KitchenAid Customer eXperience Center toll free: 1-800-422-1230. For further assistance If you need to your... high mineral content in the ice bin? The water may save you only use factory specified parts. Clean your appliance. Do not store any questions or concerns at : KitchenAid Brand Home Appliances Customer eXperience Center 553 Benson Road Benton Harbor, MI 49022-2692 Please include ...

Use and Care Manual
Page 14
... this major appliance is installed, operated and maintained according to instructions attached to or furnished with the product, KitchenAid will pay for factory specified replacement parts and repair labor to obtain service under these limitations and exclusions may have been removed, altered or cannot be...determined. 12. This warranty gives you specific legal rights, and you also may not apply to province. KITCHENAID® ICE MAKER WARRANTY THREE YEAR LIMITED WARRANTY (PARTS AND LABOR) For three years from the date of purchase, when this major appliance is installed, operated and...
... this major appliance is installed, operated and maintained according to instructions attached to or furnished with the product, KitchenAid will pay for factory specified replacement parts and repair labor to obtain service under these limitations and exclusions may have been removed, altered or cannot be...determined. 12. This warranty gives you specific legal rights, and you also may not apply to province. KITCHENAID® ICE MAKER WARRANTY THREE YEAR LIMITED WARRANTY (PARTS AND LABOR) For three years from the date of purchase, when this major appliance is installed, operated and...
Warranty Information
Page 1
..., chips or other rights that vary from the date of Whirlpool Corporation or Whirlpool Canada LP (hereafter "KitchenAid") will pay for factory specified replacement parts for the following information about buying an extended warranty. This major appliance is not available. 10. Expenses for...14 FOURTH THROUGH FIFTH YEAR LIMITED WARRANTY (SEALED REFRIGERATION SYSTEM PARTS ONLY - This limited 5-year warranty is not installed in accordance with the product, KitchenAid will need for factory specified replacement parts and repair labor to correct defects in materials or workmanship that...
..., chips or other rights that vary from the date of Whirlpool Corporation or Whirlpool Canada LP (hereafter "KitchenAid") will pay for factory specified replacement parts for the following information about buying an extended warranty. This major appliance is not available. 10. Expenses for...14 FOURTH THROUGH FIFTH YEAR LIMITED WARRANTY (SEALED REFRIGERATION SYSTEM PARTS ONLY - This limited 5-year warranty is not installed in accordance with the product, KitchenAid will need for factory specified replacement parts and repair labor to correct defects in materials or workmanship that...


