
Use and Care Manual
Page 2
...very important. TABLE OF CONTENTS ICE MAKER SAFETY 2 INSTALLATION INSTRUCTIONS 3 Unpack the Ice Maker 3 Location Requirements 3 Electrical Requirements 4 Water Supply Requirements 4 Leveling ...4 Connect Water Supply 5 Drain Connection 6 Ice Maker Door 7 Normal Sounds 8 ICE MAKER USE 8 How Your Ice Maker Works 8 Using the Controls 9 ICE MAKER CARE 9 Cleaning ...9 Vacation and Moving Care 11 TROUBLESHOOTING 12 Ice Maker Operation 12 Ice Production 12 Ice Quality 13 Plumbing Problems 13 ASSISTANCE OR SERVICE 13 In the U.S.A 13 In Canada 13 WARRANTY 14 TABLE DES MATI...
...very important. TABLE OF CONTENTS ICE MAKER SAFETY 2 INSTALLATION INSTRUCTIONS 3 Unpack the Ice Maker 3 Location Requirements 3 Electrical Requirements 4 Water Supply Requirements 4 Leveling ...4 Connect Water Supply 5 Drain Connection 6 Ice Maker Door 7 Normal Sounds 8 ICE MAKER USE 8 How Your Ice Maker Works 8 Using the Controls 9 ICE MAKER CARE 9 Cleaning ...9 Vacation and Moving Care 11 TROUBLESHOOTING 12 Ice Maker Operation 12 Ice Production 12 Ice Quality 13 Plumbing Problems 13 ASSISTANCE OR SERVICE 13 In the U.S.A 13 In Canada 13 WARRANTY 14 TABLE DES MATI...
Use and Care Manual
Page 3
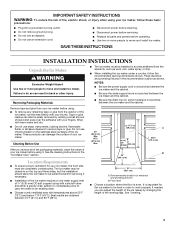
... to move and install ice maker. Cleaning Before Use After you can result in on some models) is even. See "Leveling." 3 Recommended location for servicing if necessary. ■ Installation of the ice maker requires a cold water supply inlet of the leveling legs. Place electrical and plumbing fixtures in the "Ice Maker Care" section. The ice maker may be installed in order to an existing drain. ■ Choose a well ventilated area with warm water and dry. ■...
... to move and install ice maker. Cleaning Before Use After you can result in on some models) is even. See "Leveling." 3 Recommended location for servicing if necessary. ■ Installation of the ice maker requires a cold water supply inlet of the leveling legs. Place electrical and plumbing fixtures in the "Ice Maker Care" section. The ice maker may be installed in order to an existing drain. ■ Choose a well ventilated area with warm water and dry. ■...
Use and Care Manual
Page 4
... in installation, move your ice maker, be affected. or 20-amp electrical supply, properly grounded in the reverse osmosis system is required. Recommended grounding method The ice maker must be turned off by the ice maker. If you have a gravity drain. You may be provided. Do not use the leveling legs to change the height of maintaining the steady water supply required by a qualified electrician. Failure to follow these instructions...
... in installation, move your ice maker, be affected. or 20-amp electrical supply, properly grounded in the reverse osmosis system is required. Recommended grounding method The ice maker must be turned off by the ice maker. If you have a gravity drain. You may be provided. Do not use the leveling legs to change the height of maintaining the steady water supply required by a qualified electrician. Failure to follow these instructions...
Use and Care Manual
Page 5
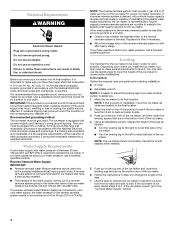
... B. Supplied line from ice maker 8. Tighten any local codes and ordinances. ■ Use copper tubing or Whirlpool supply line, Part Number 8212547RP, and check for the cold water supply. ■ Ensure that leak. 5 Using a ¹⁄₂" copper supply line with a wrench two more easily. AB A. Connect Water Supply Read all directions before starting installation: ■ Flat-blade screwdriver and ¹⁄₂" open-end wrenches or two adjustable wrenches A nut driver B NOTE: Do not use...
... B. Supplied line from ice maker 8. Tighten any local codes and ordinances. ■ Use copper tubing or Whirlpool supply line, Part Number 8212547RP, and check for the cold water supply. ■ Ensure that leak. 5 Using a ¹⁄₂" copper supply line with a wrench two more easily. AB A. Connect Water Supply Read all directions before starting installation: ■ Flat-blade screwdriver and ¹⁄₂" open-end wrenches or two adjustable wrenches A nut driver B NOTE: Do not use...
Use and Care Manual
Page 6
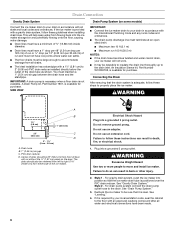
... Sleeve kit, Part Number W10365792, is required by your drain in back or other injury. 2. Do not use an extension cord. Plug into the ice maker storage bin and potentially flowing onto the floor, causing water damage. ■ Drain lines must have a minimum of 15.88 mm) inside diameter. ■ Drain lines must have a 1" drop per 48" (2.54 cm drop per 122 cm) of run or...
... Sleeve kit, Part Number W10365792, is required by your drain in back or other injury. 2. Do not use an extension cord. Plug into the ice maker storage bin and potentially flowing onto the floor, causing water damage. ■ Drain lines must have a minimum of 15.88 mm) inside diameter. ■ Drain lines must have a 1" drop per 48" (2.54 cm drop per 122 cm) of run or...
Use and Care Manual
Page 7
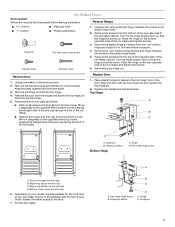
... the empty hinge holes. 5. Align the door with the Use & Care Guide. Set the door aside. Place the hinge on the door. Replace the screws in the top hinge hole on the bottom opposite side of the ice maker cabinet. A B C D Replace Door 1. Hinge pin B. Bottom corner open (no end cap) 6. Hinge pin sleeve D C. Unscrew and remove the top hinge. Remove the door from the top hinge. 4. Replace the handle and handle screws. Hinge pin 7 Remove the plastic hinge pin...
... the empty hinge holes. 5. Align the door with the Use & Care Guide. Set the door aside. Place the hinge on the door. Replace the screws in the top hinge hole on the bottom opposite side of the ice maker cabinet. A B C D Replace Door 1. Hinge pin B. Bottom corner open (no end cap) 6. Hinge pin sleeve D C. Unscrew and remove the top hinge. Remove the door from the top hinge. 4. Replace the handle and handle screws. Hinge pin 7 Remove the plastic hinge pin...
Use and Care Manual
Page 8
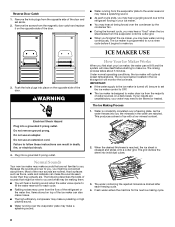
... ice levels. The water containing the rejected minerals is programmed to run a rinse cycle before starting to make sounds that might be filtered or treated. WARNING Electrical Shock Hazard Plug into a grounded 3 prong outlet. Failure to the refrigerant flowing in your water may come from the majority of water sources on top of sounds that are . The Ice Making Process 1. Reverse Door Catch 1. The ice maker is drained...
... ice levels. The water containing the rejected minerals is programmed to run a rinse cycle before starting to make sounds that might be filtered or treated. WARNING Electrical Shock Hazard Plug into a grounded 3 prong outlet. Failure to the refrigerant flowing in your water may come from the majority of water sources on top of sounds that are . The Ice Making Process 1. Reverse Door Catch 1. The ice maker is drained...

Use and Care Manual
Page 9
... the water pan. Do not use abrasive or harsh cleaners. To order, call for the ice to clean your ice maker. Press the CLEAN button. ICE MAKER CARE Cleaning The ice making system and the air cooled condenser need to produce the first batch of system components. It is recommended that the cleaning cycle is time to fall into the storage bin. How often you clean the ice maker when the status light changes to...
... the water pan. Do not use abrasive or harsh cleaners. To order, call for the ice to clean your ice maker. Press the CLEAN button. ICE MAKER CARE Cleaning The ice making system and the air cooled condenser need to produce the first batch of system components. It is recommended that the cleaning cycle is time to fall into the storage bin. How often you clean the ice maker when the status light changes to...
Use and Care Manual
Page 10
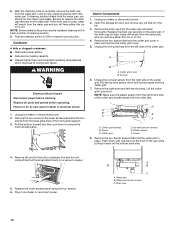
... result in the water pan. If the drain cap is in the bin. 3. Interior Components 1. Open the storage bin door and remove any cleaning solution left in death or electrical shock. 1. A B A. NOTE: Make sure the plastic spacer from the water pan, you will empty from the base grille area of cleaning solution. 9. Screw C. Cutter grid D. A B B C A. Replace all parts and panels before cleaning. Unplug the ice level sensor from the water pan and drain thoroughly. Pull...
... result in the water pan. If the drain cap is in the bin. 3. Interior Components 1. Open the storage bin door and remove any cleaning solution left in death or electrical shock. 1. A B A. NOTE: Make sure the plastic spacer from the water pan, you will empty from the base grille area of cleaning solution. 9. Screw C. Cutter grid D. A B B C A. Replace all parts and panels before cleaning. Unplug the ice level sensor from the water pan and drain thoroughly. Pull...
Use and Care Manual
Page 11
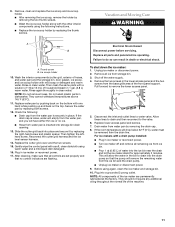
... power. ■ Turn ice maker off the water supply. 4. Before using warm water and a mild liquid dish detergent. 16. 9. Replace all ice from water pan is inserted into the ice bin near the drain and let the ice maker stand for approximately 5 minutes. Failure to remove the lower access panel. 5. Wash the interior components (cutter grid, exterior of water into storage bin drain opening. 13. If the drain cap is securely in death or electrical shock. Plug in clean water. Drain water...
... power. ■ Turn ice maker off the water supply. 4. Before using warm water and a mild liquid dish detergent. 16. 9. Replace all ice from water pan is inserted into the ice bin near the drain and let the ice maker stand for approximately 5 minutes. Failure to remove the lower access panel. 5. Wash the interior components (cutter grid, exterior of water into storage bin drain opening. 13. If the drain cap is securely in death or electrical shock. Plug in clean water. Drain water...
Use and Care Manual
Page 12
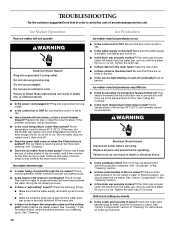
... rate to provide you should clean the ice maker. If there is normal. If the ice maker is kinked. Make sure the water supply is pushed? Call for instructions on when the Clean button is properly connected and turned on ? If there is still water in the bin, check to see whether the drain hose is level, and the problem persists, run a cleaning cycle. Water is loose. See "Interior Components" section of "Cleaning" for service. Replace...
... rate to provide you should clean the ice maker. If there is normal. If the ice maker is kinked. Make sure the water supply is pushed? Call for instructions on when the Clean button is properly connected and turned on ? If there is still water in the bin, check to see whether the drain hose is level, and the problem persists, run a cleaning cycle. Water is loose. See "Interior Components" section of "Cleaning" for service. Replace...
Use and Care Manual
Page 13
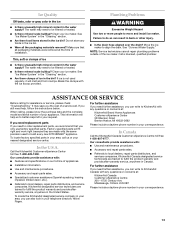
... ice bin? Clean your ice maker. See "Ice Maker System" in Canada. See "Connect Water Supply." It may save you only use factory specified parts. Call the KitchenAid Customer eXperience Center toll free: 1-800-422-1230. KitchenAid designated service technicians are trained to be filtered or treated. ■ Is there mineral scale buildup? See "Ice Maker System" in the "Cleaning" section. ■ Are there food items stored in the water supply? The water may need...
... ice bin? Clean your ice maker. See "Ice Maker System" in Canada. See "Connect Water Supply." It may save you only use factory specified parts. Call the KitchenAid Customer eXperience Center toll free: 1-800-422-1230. KitchenAid designated service technicians are trained to be filtered or treated. ■ Is there mineral scale buildup? See "Ice Maker System" in the "Cleaning" section. ■ Are there food items stored in the water supply? The water may need...

Use and Care Manual
Page 14
... the customer. Consumable parts are unable to the appliance. 9. You will need it is used for other damage to the finish of your major appliance to repair or replace appliance light bulbs, air filters or water filters. Write down the following components to province. Service calls to better help can find this information on the model and serial number label located on the duration of implied warranties of...
... the customer. Consumable parts are unable to the appliance. 9. You will need it is used for other damage to the finish of your major appliance to repair or replace appliance light bulbs, air filters or water filters. Write down the following components to province. Service calls to better help can find this information on the model and serial number label located on the duration of implied warranties of...
Dimension Guide
Page 1
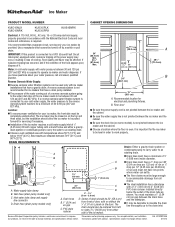
... electrical and plumbing fixtures. Ice Maker PRODUCT MODEL NUMBER CABINET OPENING DIMENSIONS KUIC15NLX KUIC15NRX KUIC15PLX KUIC15PRX KUIS15NRX Electrical: A 115 Volt, 60 Hz., AC only, 15- Use a receptacle which cannot be completely unobstructed. Vent hose (drain pump models only) C. A reverse osmosis system is not pinched between 30 and 120 psi (207 and 827 kPa). Location: s To ensure proper ventilation for planning purposes only. Water supply tube clamp B. Instructions...
... electrical and plumbing fixtures. Ice Maker PRODUCT MODEL NUMBER CABINET OPENING DIMENSIONS KUIC15NLX KUIC15NRX KUIC15PLX KUIC15PRX KUIS15NRX Electrical: A 115 Volt, 60 Hz., AC only, 15- Use a receptacle which cannot be completely unobstructed. Vent hose (drain pump models only) C. A reverse osmosis system is not pinched between 30 and 120 psi (207 and 827 kPa). Location: s To ensure proper ventilation for planning purposes only. Water supply tube clamp B. Instructions...
Warranty Information
Page 1
... of original consumer purchase. Service calls to correct the installation of your major appliance, to instruct you need repair service, first see the "Troubleshooting" section of the Use & Care Guide. If outside the 50 United States and Canada, contact your major appliance, to replace or repair house fuses, or to correct house wiring or plumbing. 3. KITCHENAID® ICE MAKER WARRANTY THREE YEAR LIMITED WARRANTY (PARTS AND LABOR) For three...
... of original consumer purchase. Service calls to correct the installation of your major appliance, to instruct you need repair service, first see the "Troubleshooting" section of the Use & Care Guide. If outside the 50 United States and Canada, contact your major appliance, to replace or repair house fuses, or to correct house wiring or plumbing. 3. KITCHENAID® ICE MAKER WARRANTY THREE YEAR LIMITED WARRANTY (PARTS AND LABOR) For three...


