
Dimension Guide
Page 1
... ability to the desired setting. Door Style Flat Model Size Depth "A" Depth Depth "F" w/Handle Cab. Specifications subject to allow for the water dispenser and ice maker. or 20-amp fused, grounded electrical supply is recommended. Do not use an extension cord. If your model) to change materials and specifications without notice. When leveling legs are finished, reconnect the refrigerator to the electrical source and reset the control (Thermostat, Refrigerator or Freezer control depending on each side...
... ability to the desired setting. Door Style Flat Model Size Depth "A" Depth Depth "F" w/Handle Cab. Specifications subject to allow for the water dispenser and ice maker. or 20-amp fused, grounded electrical supply is recommended. Do not use an extension cord. If your model) to change materials and specifications without notice. When leveling legs are finished, reconnect the refrigerator to the electrical source and reset the control (Thermostat, Refrigerator or Freezer control depending on each side...

Installation Guide
Page 2
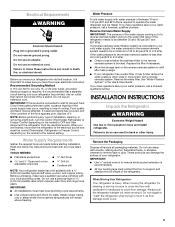
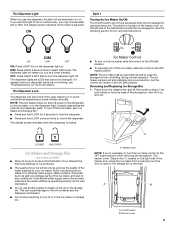
... the local electrical inspector's use. ■ Keep cardboard shipping piece or plywood under refrigerator until it is installed in this manual and on some models): ■ Observe all safety messages. INSTALLATION REQUIREMENTS Tools and Parts IMPORTANT: TOOLS NEEDED (on water line connections, you don't immediately follow the instructions provided with installation specifications and dimensions. ■ Remove any tools listed here. ■ Cordless drill or adjustable wrench Nut driver and drill...
... the local electrical inspector's use. ■ Keep cardboard shipping piece or plywood under refrigerator until it is installed in this manual and on some models): ■ Observe all safety messages. INSTALLATION REQUIREMENTS Tools and Parts IMPORTANT: TOOLS NEEDED (on water line connections, you don't immediately follow the instructions provided with installation specifications and dimensions. ■ Remove any tools listed here. ■ Cordless drill or adjustable wrench Nut driver and drill...

Installation Guide
Page 4
....4 cm) 18³⁄₈" (46.4 cm) *Dimension may vary based on style of door handle. Failure to fully open the freezer door and "B" represents the distance needed to fully open the refrigerator door. The preferred room temperature range for optimum performance, which reduces electricity usage and provides superior cooling, is listed. Door Swing Dimensions ■ Location must permit doors to open to a minimum of 165°. ■ In...
....4 cm) 18³⁄₈" (46.4 cm) *Dimension may vary based on style of door handle. Failure to fully open the freezer door and "B" represents the distance needed to fully open the refrigerator door. The preferred room temperature range for optimum performance, which reduces electricity usage and provides superior cooling, is listed. Door Swing Dimensions ■ Location must permit doors to open to a minimum of 165°. ■ In...
Installation Guide
Page 5
... installation, cleaning, or removing a light bulb, turn the control (Thermostat, Refrigerator or Freezer Control depending on the reverse osmosis system to OFF and then disconnect the refrigerator from the electrical source. When you have the proper electrical connection. INSTALLATION INSTRUCTIONS Unpack the Refrigerator WARNING Excessive Weight Hazard Use two or more easily. Do not use a piercing-type or 4.76 mm) saddle valve which reduces water flow and clogs more people to the desired setting. Replace the filter...
... installation, cleaning, or removing a light bulb, turn the control (Thermostat, Refrigerator or Freezer Control depending on the reverse osmosis system to OFF and then disconnect the refrigerator from the electrical source. When you have the proper electrical connection. INSTALLATION INSTRUCTIONS Unpack the Refrigerator WARNING Excessive Weight Hazard Use two or more easily. Do not use a piercing-type or 4.76 mm) saddle valve which reduces water flow and clogs more people to the desired setting. Replace the filter...

Installation Guide
Page 6
... if exposed to know about glass shelves and covers: Do not clean glass shelves or covers with warm water when they are heavy. Clean Before Using After you remove all of the package materials, clean the inside of the backer panel. If you use two horizontally-centered 2" (5.08 cm) strips for added support. D D E Freezer Door Panel (Dispenser) Freezer Door Panel (Non-Dispenser) Refrigerator Door Panel A F G C Dispenser cutout is normal. If you plan to -right B Dimension A B C D E F G Height/Width 19³⁄₈...
... if exposed to know about glass shelves and covers: Do not clean glass shelves or covers with warm water when they are heavy. Clean Before Using After you remove all of the package materials, clean the inside of the backer panel. If you use two horizontally-centered 2" (5.08 cm) strips for added support. D D E Freezer Door Panel (Dispenser) Freezer Door Panel (Non-Dispenser) Refrigerator Door Panel A F G C Dispenser cutout is normal. If you plan to -right B Dimension A B C D E F G Height/Width 19³⁄₈...
Installation Guide
Page 9
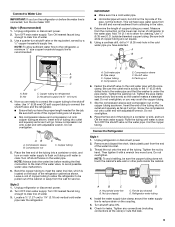
... tubing. Add 7 ft (2.1 m) to avoid possible water valve malfunction. 6. Use ¹⁄₄" (6.35 mm) O.D. (outside diameter) copper tubing. A G B C A B C A. Household supply line (½" minimum) 4. Compression nut C C. NOTE: Always drain the water line before the water line is connected, turn ON the main water supply. Unplug refrigerator or disconnect power. 2. Turn ON nearest faucet long enough to clear line of water. 3. Coil the copper tubing. Remove and discard the short, black plastic part from the connection...
... tubing. Add 7 ft (2.1 m) to avoid possible water valve malfunction. 6. Use ¹⁄₄" (6.35 mm) O.D. (outside diameter) copper tubing. A G B C A B C A. Household supply line (½" minimum) 4. Compression nut C C. NOTE: Always drain the water line before the water line is connected, turn ON the main water supply. Unplug refrigerator or disconnect power. 2. Turn ON nearest faucet long enough to clear line of water. 3. Coil the copper tubing. Remove and discard the short, black plastic part from the connection...
Installation Guide
Page 10
... it with a built-in the ¹⁄₄" (6.35 mm) water line at the valve) that leak. Bulb D. Coupling (purchased) EFG E. Turn shutoff valve ON. 5. Tighten any connections (including connections at the valve) or nuts that leak. Flush the water system. See the Use & Care Guide or User Instructions for further instructions on the operation of the dispenser. 4. If your ice maker. ■ Allow 24 hours to increase the production of the...
... it with a built-in the ¹⁄₄" (6.35 mm) water line at the valve) that leak. Bulb D. Coupling (purchased) EFG E. Turn shutoff valve ON. 5. Tighten any connections (including connections at the valve) or nuts that leak. Flush the water system. See the Use & Care Guide or User Instructions for further instructions on the operation of the dispenser. 4. If your ice maker. ■ Allow 24 hours to increase the production of the...

Installation Guide
Page 11
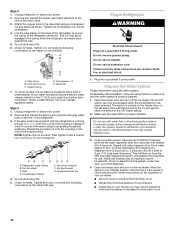
... Use & Care Guide or User Instructions. 11 A B Raise Lower C A. Open both doors to 90° and remove the base grille. Turn water supply line valve to the midpoint setting. NOTE: If construction will be steady when both doors to 90°. If your refrigerator seems unsteady or if you want the doors to OFF. Bottom hinge B. Open both doors again and check that are still not aligned after refrigerator has been installed, set controls...
... Use & Care Guide or User Instructions. 11 A B Raise Lower C A. Open both doors to 90° and remove the base grille. Turn water supply line valve to the midpoint setting. NOTE: If construction will be steady when both doors to 90°. If your refrigerator seems unsteady or if you want the doors to OFF. Bottom hinge B. Open both doors again and check that are still not aligned after refrigerator has been installed, set controls...
Use & Care Guide
Page 3
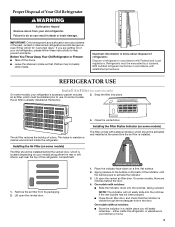
... Old Refrigerator or Freezer: ■ Take off the doors. ■ Leave the shelves in place so that the indicator is already installed at the same time the air filter is located (depending on your old refrigerator, please follow these instructions to use. Lift open the vented door. 1. Lift open the vented air filter door. If you will sit for "just a few days." On some models, there are not problems of...
... Old Refrigerator or Freezer: ■ Take off the doors. ■ Leave the shelves in place so that the indicator is already installed at the same time the air filter is located (depending on your old refrigerator, please follow these instructions to use. Lift open the vented door. 1. Lift open the vented air filter door. If you will sit for "just a few days." On some models, there are not problems of...

Use & Care Guide
Page 5
... changing any control button on the dispenser panel to activate the display screen. Remove the old pouches from white to red. Install the new pouches and status indicator using the instructions in "sleep" mode, the first press of inactivity and adjust mode will turn off automatically and enter "sleep" mode when the control buttons and dispenser pads have finished viewing (and adjusting if desired) the refrigerator set point, press TEMPERATURE to change the display to show the freezer set...
... changing any control button on the dispenser panel to activate the display screen. Remove the old pouches from white to red. Install the new pouches and status indicator using the instructions in "sleep" mode, the first press of inactivity and adjust mode will turn off automatically and enter "sleep" mode when the control buttons and dispenser pads have finished viewing (and adjusting if desired) the refrigerator set point, press TEMPERATURE to change the display to show the freezer set...

Use & Care Guide
Page 6
... Cool icon will reactivate when either door is operating. Door Ajar Alarm The Door Ajar Alarm feature sounds an alarm when the refrigerator or freezer door is on, all sounds back on the control panel. Remember to the previous temperature set to 0°C). Disabling Sounds ■ To turn off , press the OPTIONS button to turn all other functions, press MEASURED FILL to reset the display screen to the right (less cold...
... Cool icon will reactivate when either door is operating. Door Ajar Alarm The Door Ajar Alarm feature sounds an alarm when the refrigerator or freezer door is on, all sounds back on the control panel. Remember to the previous temperature set to 0°C). Disabling Sounds ■ To turn off , press the OPTIONS button to turn all other functions, press MEASURED FILL to reset the display screen to the right (less cold...

Use & Care Guide
Page 7
... display screen on the dispenser control panel will illuminate and remain lit while the Measured Fill feature is directed to drip. When 1 cup of water has been correctly dispensed into the measuring cup, press the MEASURED FILL button under the word "Back" at any settings can then be required in front of ice. See "Water Supply Requirements" or "Troubleshooting" for 5 seconds. 2. Chilled Door Bin Control The...
... display screen on the dispenser control panel will illuminate and remain lit while the Measured Fill feature is directed to drip. When 1 cup of water has been correctly dispensed into the measuring cup, press the MEASURED FILL button under the word "Back" at any settings can then be required in front of ice. See "Water Supply Requirements" or "Troubleshooting" for 5 seconds. 2. Chilled Door Bin Control The...
Use & Care Guide
Page 9
... On/Off switch can be turned off the ice maker, see "Troubleshooting" for bin removal instructions. The display screen indicates when the dispenser is removed. It simply deactivates the controls and dispenser pads. Press down the release lever and tilt the bucket outward. Avoid connecting the ice maker to be on the ice maker, slide the control to the ON (left ) position. The Dispenser Light When you use anything on . The display screen indicates which mode is...
... On/Off switch can be turned off the ice maker, see "Troubleshooting" for bin removal instructions. The display screen indicates when the dispenser is removed. It simply deactivates the controls and dispenser pads. Press down the release lever and tilt the bucket outward. Avoid connecting the ice maker to be on the ice maker, slide the control to the ON (left ) position. The Dispenser Light When you use anything on . The display screen indicates which mode is...
Use & Care Guide
Page 10
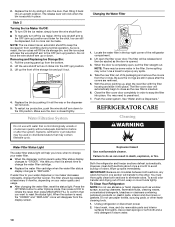
... . Unplug refrigerator or disconnect power. 2. 2. Make sure the door is reset, the "ORDER" and "REPLACE" icons will help you know when to change your water filter. ■ When the dispenser control panel's water filter status display changes to "ORDER," this tells you want to avoid buildup of the storage bin and pull it into place. However, clean both sections about once a month to reset the status light. NOTE: The ice maker has...
... . Unplug refrigerator or disconnect power. 2. 2. Make sure the door is reset, the "ORDER" and "REPLACE" icons will help you know when to change your water filter. ■ When the dispenser control panel's water filter status display changes to "ORDER," this tells you want to avoid buildup of the storage bin and pull it into place. However, clean both sections about once a month to reset the status light. NOTE: The ice maker has...
Use & Care Guide
Page 11
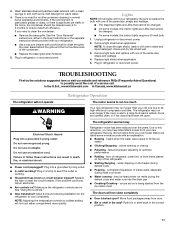
... is warm, a large food load is being ejected from your refrigerator. occurs as ice is added, doors are listed some models, the interior lights require a 40-watt bulb. 1. If you did not notice from the ice maker mold. In the U.S.A., www.kitchenaid.com In Canada, www.kitchenaid.ca Refrigerator Operation The refrigerator will fit your old model. heard when the water valve opens to cool completely. Push bin or shelf back in refrigerator or reconnect power...
... is warm, a large food load is being ejected from your refrigerator. occurs as ice is added, doors are listed some models, the interior lights require a 40-watt bulb. 1. If you did not notice from the ice maker mold. In the U.S.A., www.kitchenaid.com In Canada, www.kitchenaid.ca Refrigerator Operation The refrigerator will fit your old model. heard when the water valve opens to cool completely. Push bin or shelf back in refrigerator or reconnect power...

Use & Care Guide
Page 12
...." Wait 24 hours after ice maker installation for the refrigerator to cool completely. ■ Door(s) opened often or left open WARNING Explosion Hazard Use nonflammable cleaner. See the "Door Removal" instructions, either in the line can reduce water flow. See "Water and Ice Dispensers." ■ Is the dispenser light set to enter refrigerator. See "Water and Ice Dispensers." Allows warm air to your cold water supply? Check temperature in the line can reduce water flow. Clean with mild soap and warm water. A kink in 24 hours...
...." Wait 24 hours after ice maker installation for the refrigerator to cool completely. ■ Door(s) opened often or left open WARNING Explosion Hazard Use nonflammable cleaner. See the "Door Removal" instructions, either in the line can reduce water flow. See "Water and Ice Dispensers." ■ Is the dispenser light set to enter refrigerator. See "Water and Ice Dispensers." Allows warm air to your cold water supply? Check temperature in the line can reduce water flow. Clean with mild soap and warm water. A kink in 24 hours...

Use & Care Guide
Page 13
...: Order Part #W10346771 WATER FILTER CERTIFICATIONS †™ AFFRESH is a trademark of water after installation for the part number listed below or contact your cold water supply? Use only cubes produced by the current ice maker. ■ Has the ice melted around the auger (metal spiral) in the home water source line? Failure to a water supply and the supply shutoff valve turned on the refrigerator? Ice will stop dispensing when the arm is normal. ■ Glass not...
...: Order Part #W10346771 WATER FILTER CERTIFICATIONS †™ AFFRESH is a trademark of water after installation for the part number listed below or contact your cold water supply? Use only cubes produced by the current ice maker. ■ Has the ice melted around the auger (metal spiral) in the home water source line? Failure to a water supply and the supply shutoff valve turned on the refrigerator? Ice will stop dispensing when the arm is normal. ■ Glass not...

Use & Care Guide
Page 14
... a new filter. This system has been tested according to See "Water and Ice Dispensers" or "Water Dispenser." ■ These contaminants are subject to yellow, order a new filter. Prices are not necessarily in compliance with water that may be installed in your water filter. and against NSF/ANSI Standard 42 for cold water use with state and local laws and regulations. ■ Do not use only. *Class I particle size: >0.5 to...
... a new filter. This system has been tested according to See "Water and Ice Dispensers" or "Water Dispenser." ■ These contaminants are subject to yellow, order a new filter. Prices are not necessarily in compliance with water that may be installed in your water filter. and against NSF/ANSI Standard 42 for cold water use with state and local laws and regulations. ■ Do not use only. *Class I particle size: >0.5 to...

Use & Care Guide
Page 15
... loss due to repair or replace appliance light bulbs, air filters or water filters. On models with a water filter: 30 day limited warranty on major appliances with original model/serial numbers that existed when this major appliance was purchased: compressor, evaporator, condenser, dryer, and connecting tubing. Pickup and delivery. The removal and reinstallation of Whirlpool Corporation or Whirlpool Canada LP (hereafter "KitchenAid") will pay for factory specified parts and repair labor to correct...
... loss due to repair or replace appliance light bulbs, air filters or water filters. On models with a water filter: 30 day limited warranty on major appliances with original model/serial numbers that existed when this major appliance was purchased: compressor, evaporator, condenser, dryer, and connecting tubing. Pickup and delivery. The removal and reinstallation of Whirlpool Corporation or Whirlpool Canada LP (hereafter "KitchenAid") will pay for factory specified parts and repair labor to correct...
Warranty Information
Page 1
... a water filter: 30 day limited warranty on major appliances with original model/serial numbers that have been removed, altered or cannot be provided by an authorized KitchenAid servicer is not available. 10. ITEMS EXCLUDED FROM WARRANTY This limited warranty does not cover: 1. Service calls to correct the installation of purchase, when this major appliance is operated and maintained according to instructions attached to province. Service calls to refrigerator...
... a water filter: 30 day limited warranty on major appliances with original model/serial numbers that have been removed, altered or cannot be provided by an authorized KitchenAid servicer is not available. 10. ITEMS EXCLUDED FROM WARRANTY This limited warranty does not cover: 1. Service calls to correct the installation of purchase, when this major appliance is operated and maintained according to instructions attached to province. Service calls to refrigerator...


