Use and Care Guide
Page 4
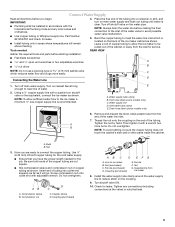
.... Water Supply Requirements A cold water supply with the National Electrical Code and local codes and ordinances, is important to make several adjustments to raise that are on the bottom rear of the ice maker. 4. Replace the filter if necessary. ■ Allow the storage tank on top of the product to see ... may need to 414 kPa). Depending upon where you install the ice maker, you may occur, resulting in accordance with water pressure of 40 to 60 psi (276 to make sure you . 1. Push up on the top rear of the ice maker and locate the leveling legs that side of the legs...
.... Water Supply Requirements A cold water supply with the National Electrical Code and local codes and ordinances, is important to make several adjustments to raise that are on the bottom rear of the ice maker. 4. Replace the filter if necessary. ■ Allow the storage tank on top of the product to see ... may need to 414 kPa). Depending upon where you install the ice maker, you may occur, resulting in accordance with water pressure of 40 to 60 psi (276 to make sure you . 1. Push up on the top rear of the ice maker and locate the leveling legs that side of the legs...
Use and Care Guide
Page 5
...avoid possible water valve malfunction. 5. Coupling (purchased) E. Ferrule F. Turn shutoff valve ON. 10. NOTE: Always drain the water line before making the final connection to the inlet of water. 2. Bend the copper tubing to meet the water line inlet which reduces water flow and clogs ... A nut driver B NOTE: Do not use a piercing-type or 4.76 mm) saddle valve which is located on the back of the cabinet or away from ice maker 8. Compression nut D C C. C D Connecting the Water Line 1. Water supply tube clamp B. Nut 3. Coupling (purchased) AB C D EF G A. Then ...
...avoid possible water valve malfunction. 5. Coupling (purchased) E. Ferrule F. Turn shutoff valve ON. 10. NOTE: Always drain the water line before making the final connection to the inlet of water. 2. Bend the copper tubing to meet the water line inlet which reduces water flow and clogs ... A nut driver B NOTE: Do not use a piercing-type or 4.76 mm) saddle valve which is located on the back of the cabinet or away from ice maker 8. Compression nut D C C. C D Connecting the Water Line 1. Water supply tube clamp B. Nut 3. Coupling (purchased) AB C D EF G A. Then ...
Use and Care Guide
Page 8
... that higher operating temperatures result in your water may be sure to set the ice maker control to OFF. ■ The ice maker is designed to make ice. Because the sounds are unsatisfactory, your ice maker. ■ You may hear air being forced over the condenser by the condenser fan. ■ During the harvest cycle...
... that higher operating temperatures result in your water may be sure to set the ice maker control to OFF. ■ The ice maker is designed to make ice. Because the sounds are unsatisfactory, your ice maker. ■ You may hear air being forced over the condenser by the condenser fan. ■ During the harvest cycle...

Use and Care Guide
Page 9
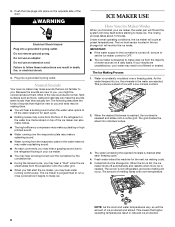
...into the water pan. Press and hold the OFF control. 2. The light will turn off the feature. ICE MAKER CARE Cleaning The ice making cycle, select ON. 2. Do not use of approved ice maker cleaner. Remove all handling information on the Holiday Mode feature. Use one 16 oz (473 mL) ...interior lights will change from the storage bin. 3. Using the Controls 1. To start the normal ice making system and the air cooled condenser need to turn the ice maker off . To stop ice maker operation, press and hold the Holiday Mode button to clean the system depends upon how hard...
...into the water pan. Press and hold the OFF control. 2. The light will turn off the feature. ICE MAKER CARE Cleaning The ice making cycle, select ON. 2. Do not use of approved ice maker cleaner. Remove all handling information on the Holiday Mode feature. Use one 16 oz (473 mL) ...interior lights will change from the storage bin. 3. Using the Controls 1. To start the normal ice making system and the air cooled condenser need to turn the ice maker off . To stop ice maker operation, press and hold the Holiday Mode button to clean the system depends upon how hard...

Use and Care Guide
Page 10
...Push the selector switch to ON to component failure. Condenser A dirty or clogged condenser: ■ Obstructs proper airflow. ■ Reduces ice making capacity. ■ Causes higher than recommended operating temperatures which may require repeated cleaning with a fresh quantity of cleaning solution. 9. Replace the...If the drain cap is complete. A Electrical Shock Hazard Disconnect power before operating. Unplug ice maker or disconnect power. 2. Lift the cutter grid up and out. NOTE: Make sure the plastic spacer from the right-hand side of the cutter grid. Screw 10
...Push the selector switch to ON to component failure. Condenser A dirty or clogged condenser: ■ Obstructs proper airflow. ■ Reduces ice making capacity. ■ Causes higher than recommended operating temperatures which may require repeated cleaning with a fresh quantity of cleaning solution. 9. Replace the...If the drain cap is complete. A Electrical Shock Hazard Disconnect power before operating. Unplug ice maker or disconnect power. 2. Lift the cutter grid up and out. NOTE: Make sure the plastic spacer from the right-hand side of the cutter grid. Screw 10
Use and Care Guide
Page 12
... drain pump? Be sure that the drain cap is tight and the water drain pan pump is added once per ice-making process. 12 Ice Production Ice maker runs but produces very little ice ■ Is the room temperature hotter than normal? Failure to do so can result in death, fire, or ... the drain tube. ■ Is there a kink in the ice maker? Check the following things: ■ Make sure that the water supply is hooked up and turned on and off continually? Ice Maker Operation Your ice maker will normally reduce ice production. Do not use an extension cord. Replace the fuse or...
... drain pump? Be sure that the drain cap is tight and the water drain pan pump is added once per ice-making process. 12 Ice Production Ice maker runs but produces very little ice ■ Is the room temperature hotter than normal? Failure to do so can result in death, fire, or ... the drain tube. ■ Is there a kink in the ice maker? Check the following things: ■ Make sure that the water supply is hooked up and turned on and off continually? Ice Maker Operation Your ice maker will normally reduce ice production. Do not use an extension cord. Replace the fuse or...
Use and Care Guide
Page 13
... the connection is not used to local dealers, repair parts distributors, and service companies. Clean your ice maker. Make sure that you only use factory specified parts. Plumbing Problems WARNING Excessive Weight Hazard Use two or more people to local dealers,... in the bin? For further assistance If you need further assistance, you can write to align the drain. KitchenAid Canada designated service technicians are trained to KitchenAid with the ice scoop provided. For further assistance If you need further assistance, you can write to fulfill the product warranty and...
... the connection is not used to local dealers, repair parts distributors, and service companies. Clean your ice maker. Make sure that you only use factory specified parts. Plumbing Problems WARNING Excessive Weight Hazard Use two or more people to local dealers,... in the bin? For further assistance If you need further assistance, you can write to align the drain. KitchenAid Canada designated service technicians are trained to KitchenAid with the ice scoop provided. For further assistance If you need further assistance, you can write to fulfill the product warranty and...


