Dimension Guide
Page 1
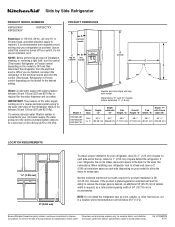
...cord. When you are for product installation is placed against an extended wall and the ability to change materials and specifications without notice. Model # Model Size Depth "A" Depth Depth "F" w/Handle Cab. Overall Cab. However, if the product is 36" (91.44 cm). Side by...improve Dimensions are finished, reconnect the refrigerator to the electrical source and reset the control (Thermostat, Refrigerator or Freezer control depending on the model) to change without notice. handle 1 D overall E F 90˚ 90˚ Handle and door style will fall below 55...
...cord. When you are for product installation is placed against an extended wall and the ability to change materials and specifications without notice. Model # Model Size Depth "A" Depth Depth "F" w/Handle Cab. Overall Cab. However, if the product is 36" (91.44 cm). Side by...improve Dimensions are finished, reconnect the refrigerator to the electrical source and reset the control (Thermostat, Refrigerator or Freezer control depending on the model) to change without notice. handle 1 D overall E F 90˚ 90˚ Handle and door style will fall below 55...

Energy Guide
Page 1
...; Automatic Defrost • Side-Mounted • With Through-The-Door-Ice Service KitchenAid by Whirlpool Models: KSF26C6XY*0*, KSF26C7XY*0* Capacity: 25.8 Cubic Feet Estimated Yearly Operating Cost $54 $60 $78 Cost Range of Similar Models The estimated yearly operating cost of 10.65 cents per kWh. • For ... 510 kWh Estimated Yearly Electricity Use Your cost will depend on your utility rates and use. • Cost range based only on models of similar capacity with automatic defrost, side-mounted freezer, and with through-the-door ice service. • Estimated operating cost based ...
...; Automatic Defrost • Side-Mounted • With Through-The-Door-Ice Service KitchenAid by Whirlpool Models: KSF26C6XY*0*, KSF26C7XY*0* Capacity: 25.8 Cubic Feet Estimated Yearly Operating Cost $54 $60 $78 Cost Range of Similar Models The estimated yearly operating cost of 10.65 cents per kWh. • For ... 510 kWh Estimated Yearly Electricity Use Your cost will depend on your utility rates and use. • Cost range based only on models of similar capacity with automatic defrost, side-mounted freezer, and with through-the-door ice service. • Estimated operating cost based ...
Use & Care Guide
Page 2
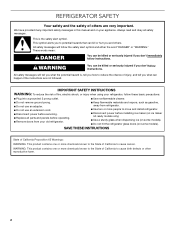
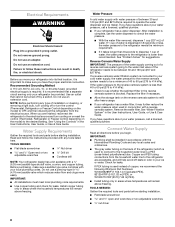
... adapter. ■ Do not use an extension cord. ■ Disconnect power before installing ice maker (on ice maker kit ready models only). ■ Use a sturdy glass when dispensing ice (on some models). IMPORTANT SAFETY INSTRUCTIONS WARNING: To reduce the risk of others . This is , tell you and others are not followed. WARNING... California to the State of injury, and tell you don't follow instructions. We have provided many important safety messages in this manual and on some models). ■ Do not hit the refrigerator glass doors (on your appliance.
... adapter. ■ Do not use an extension cord. ■ Disconnect power before installing ice maker (on ice maker kit ready models only). ■ Use a sturdy glass when dispensing ice (on some models). IMPORTANT SAFETY INSTRUCTIONS WARNING: To reduce the risk of others . This is , tell you and others are not followed. WARNING... California to the State of injury, and tell you don't follow instructions. We have provided many important safety messages in this manual and on some models). ■ Do not hit the refrigerator glass doors (on your appliance.
Use & Care Guide
Page 4
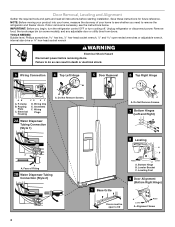
... home, measure the doorway of Fitting 2B Water Dispenser Tubing Connection (Style 2) 8 Leveling A B Raise Lower C A. Routing Plate C. Remove food, the ice storage bin (on some models), and any adjustable door or utility bins from doors. Electrical Housing D. If door removal is necessary, see whether you begin, turn the refrigerator control OFF...
... home, measure the doorway of Fitting 2B Water Dispenser Tubing Connection (Style 2) 8 Leveling A B Raise Lower C A. Routing Plate C. Remove food, the ice storage bin (on some models), and any adjustable door or utility bins from doors. Electrical Housing D. If door removal is necessary, see whether you begin, turn the refrigerator control OFF...

Use & Care Guide
Page 6
... of the routing plate. See Graphic 3. ■ Gently route the large wiring bundle (with one on the top screw hole of the refrigerator takes some models) and any adjustable door or utility bins. 9. See Graphic 3. Tighten screw. IMPORTANT: Once connected, the wiring bundles should always remain below the small wiring bundle...
... of the routing plate. See Graphic 3. ■ Gently route the large wiring bundle (with one on the top screw hole of the refrigerator takes some models) and any adjustable door or utility bins. 9. See Graphic 3. Tighten screw. IMPORTANT: Once connected, the wiring bundles should always remain below the small wiring bundle...
Use & Care Guide
Page 7
...on your refrigerator next to a maximum of space behind the refrigerator. IMPORTANT: This refrigerator is 36" (91.44 cm). When installing your model) to allow extra space at a time. 3. Repeat the previous steps to begin fastening the lower setscrew. 7. Location Requirements 5. Once both...: 1. Apply only downward pressure. It is recommended that you do so can damage the door. To Remove the Handles: 1. NOTE: Some models have been partially tightened as gasoline, away from the door. 4. Using a clockwise motion, tighten the setscrew until it off of 55°F...
...on your refrigerator next to a maximum of space behind the refrigerator. IMPORTANT: This refrigerator is 36" (91.44 cm). When installing your model) to allow extra space at a time. 3. Repeat the previous steps to begin fastening the lower setscrew. 7. Location Requirements 5. Once both...: 1. Apply only downward pressure. It is recommended that you do so can damage the door. To Remove the Handles: 1. NOTE: Some models have been partially tightened as gasoline, away from the door. 4. Using a clockwise motion, tighten the setscrew until it off of 55°F...
Use & Care Guide
Page 8
... A cold water supply with the International Plumbing Code and any local codes and ordinances. ■ The gray water tubing on the model) to OFF, and then disconnect the refrigerator from the household water line to the refrigerator are finished, reconnect the refrigerator to operate the...If a reverse osmosis water filtration system is required. Replace the filter if necessary. ■ Allow the storage tank on the model) to see whether the sediment filter in areas where temperatures will remain above freezing. Copper and PEX tubing connections from the electrical source.
... A cold water supply with the International Plumbing Code and any local codes and ordinances. ■ The gray water tubing on the model) to OFF, and then disconnect the refrigerator from the household water line to the refrigerator are finished, reconnect the refrigerator to operate the...If a reverse osmosis water filtration system is required. Replace the filter if necessary. ■ Allow the storage tank on the model) to see whether the sediment filter in areas where temperatures will remain above freezing. Copper and PEX tubing connections from the electrical source.

Use & Care Guide
Page 10
...-in water strainer. Unplug refrigerator or disconnect power. 2. Do not use . NOTE: Allow 24 hours to the refrigerator as shown. On some models, the ice maker is already installed at the valve) that leak. Bulb D. Tighten any connections (including connections at either the rear or left ...not long enough, a ¹⁄₄" x ¹⁄₄" (6.35 mm x 6.35 mm) coupling is located (depending on some models, your model) along either tube connection. Thread the provided nut onto the coupling on the back of the refrigerator to secure the tubing to produce the first...
...-in water strainer. Unplug refrigerator or disconnect power. 2. Do not use . NOTE: Allow 24 hours to the refrigerator as shown. On some models, the ice maker is already installed at the valve) that leak. Bulb D. Tighten any connections (including connections at either the rear or left ...not long enough, a ¹⁄₄" x ¹⁄₄" (6.35 mm x 6.35 mm) coupling is located (depending on some models, your model) along either tube connection. Thread the provided nut onto the coupling on the back of the refrigerator to secure the tubing to produce the first...
Use & Care Guide
Page 11
...packet includes a Produce Preserver, which should be activated and installed at the factory. Do not induce vomiting. Close the vented door. On models with cleaning products containing ammonia, bleach or acids. As a result, certain produce items will easily remember - DANGEROUS FUMES FORM WHEN MIXED...PRODUCTS. Do not breathe dust. ATTENTION IRRITANT Lisez des prudences sur le revers. Installing the Filter Status Indicator (on some models) On some models, the Produce Preserver is already installed at the same time the air filter is best to separate produce with a status ...
...packet includes a Produce Preserver, which should be activated and installed at the factory. Do not induce vomiting. Close the vented door. On models with cleaning products containing ammonia, bleach or acids. As a result, certain produce items will easily remember - DANGEROUS FUMES FORM WHEN MIXED...PRODUCTS. Do not breathe dust. ATTENTION IRRITANT Lisez des prudences sur le revers. Installing the Filter Status Indicator (on some models) On some models, the Produce Preserver is already installed at the same time the air filter is best to separate produce with a status ...
Use & Care Guide
Page 12
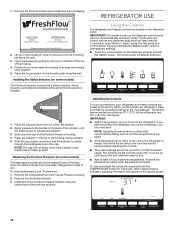
...for 2 minutes or more. To view and adjust the set points to remove it from their packaging. 1. Installing the Status Indicator (on some models) The disposable pouches should be sure they are located on the housing in "sleep" mode, the first press of the indicator, until the bubble... in the top of the housing. 4. REFRIGERATOR USE CAUTION IRRITANT Read cautions on the display screen. 12 Place the housing back on some models) The Produce Preserver comes with a status indicator, which should be replaced every 6 months, when the status indicator has completely changed from the...
...for 2 minutes or more. To view and adjust the set points to remove it from their packaging. 1. Installing the Status Indicator (on some models) The disposable pouches should be sure they are located on the housing in "sleep" mode, the first press of the indicator, until the bubble... in the top of the housing. 4. REFRIGERATOR USE CAUTION IRRITANT Read cautions on the display screen. 12 Place the housing back on some models) The Produce Preserver comes with a status indicator, which should be replaced every 6 months, when the status indicator has completely changed from the...
Use & Care Guide
Page 14
... filter for use. Using a sturdy container, depress and hold the water dispenser pad for 5 seconds, then release it on some models) Some models come equipped with a dual sequential evaporation system, which helps keep meats at the National Livestock and Meat Board recommended storage temperatures of... Once water begins to flow, continue depressing and releasing the dispenser pad (5 seconds on the dispenser control panel will appear on some models) Cool air from spoiling as quickly and improves food quality and freshness in front of fresh, leafy vegetables. Chilled Door Bin (on...
... filter for use. Using a sturdy container, depress and hold the water dispenser pad for 5 seconds, then release it on some models) Some models come equipped with a dual sequential evaporation system, which helps keep meats at the National Livestock and Meat Board recommended storage temperatures of... Once water begins to flow, continue depressing and releasing the dispenser pad (5 seconds on the dispenser control panel will appear on some models) Cool air from spoiling as quickly and improves food quality and freshness in front of fresh, leafy vegetables. Chilled Door Bin (on...
Use & Care Guide
Page 19
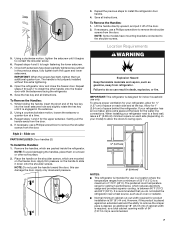
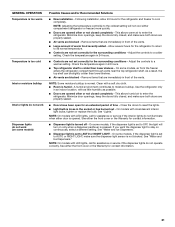
... the refrigerator and pack all removable parts, wrap them well, and tape them open far enough for preparation instructions. Unplug refrigerator. 6. Depending on the model, turn the Refrigerator Control to OFF (right). 4. See "Adjust the Doors" or "Door Removal, Leveling and Alignment." 9. Remove light bulb and... to the household water supply, turn off the water supply to replace the bulb with warm water and liquid detergent. NOTE: Depending on the model, turn the Refrigerator Control to the OFF (right) setting. 3. See "Using the Controls" in the leveling legs so they don't shift...
... the refrigerator and pack all removable parts, wrap them well, and tape them open far enough for preparation instructions. Unplug refrigerator. 6. Depending on the model, turn the Refrigerator Control to OFF (right). 4. See "Adjust the Doors" or "Door Removal, Leveling and Alignment." 9. Remove light bulb and... to the household water supply, turn off the water supply to replace the bulb with warm water and liquid detergent. NOTE: Depending on the model, turn the Refrigerator Control to the OFF (right) setting. 3. See "Using the Controls" in the leveling legs so they don't shift...
Use & Care Guide
Page 20
...; Popping - The compressor in death, fire, or electrical shock. The following noises are more efficiently and uses less energy than older models. Heard when the water valve opens and closes to cool completely. Heard when water passes through the water line, or due to the... ■ Water running or gurgling - Heard when the inside walls contract/expand, especially during the defrost cycle. In the U.S.A., www.kitchenaid.com In Canada, www.kitchenaid.ca WARNING Electrical Shock Hazard Plug into a grounded 3 prong outlet. Turn on the refrigerator control, or turn off the ice maker....
...; Popping - The compressor in death, fire, or electrical shock. The following noises are more efficiently and uses less energy than older models. Heard when the water valve opens and closes to cool completely. Heard when water passes through the water line, or due to the... ■ Water running or gurgling - Heard when the inside walls contract/expand, especially during the defrost cycle. In the U.S.A., www.kitchenaid.com In Canada, www.kitchenaid.ca WARNING Electrical Shock Hazard Plug into a grounded 3 prong outlet. Turn on the refrigerator control, or turn off the ice maker....
Use & Care Guide
Page 21
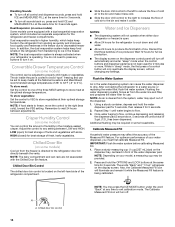
...front of time - Minimize door openings, keep the doors fully closed , and make sure the dispenser light sensor is normal. On some models) Possible Causes and/or Recommended Solutions ■ New installation - See either the front cover or the Warranty for contact information. ■... Ice Dispensers." Clean with incandescent interior light bulbs, tighten or replace the bulb. This allows humid air to cool completely. On some models, air from the freezer enters the refrigerator compartment through vents near the top refrigerator shelf. See "Water and Ice Dispensers." ■ ...
...front of time - Minimize door openings, keep the doors fully closed , and make sure the dispenser light sensor is normal. On some models) Possible Causes and/or Recommended Solutions ■ New installation - See either the front cover or the Warranty for contact information. ■... Ice Dispensers." Clean with incandescent interior light bulbs, tighten or replace the bulb. This allows humid air to cool completely. On some models, air from the freezer enters the refrigerator compartment through vents near the top refrigerator shelf. See "Water and Ice Dispensers." ■ ...

Use & Care Guide
Page 23
...incorrectly installed - Remove or separate the clogged ice, using a warm damp cloth, then dry both doors are firmly closed. (On some models, only the freezer door must be closed completely - Unlock the dispenser. Discard the first three batches of ice, empty the storage bin... and clean both doors are firmly closed. (On some models, only the freezer door must be closed completely - Unlock the dispenser. After connecting the refrigerator to a water source, flush the water system...
...incorrectly installed - Remove or separate the clogged ice, using a warm damp cloth, then dry both doors are firmly closed. (On some models, only the freezer door must be closed completely - Unlock the dispenser. Discard the first three batches of ice, empty the storage bin... and clean both doors are firmly closed. (On some models, only the freezer door must be closed completely - Unlock the dispenser. After connecting the refrigerator to a water source, flush the water system...

Use & Care Guide
Page 24
... 50°F (10°C). ■ New installation - Water is leaking from the dispenser is melting - Allow 24 hours for your authorized KitchenAid dealer. See "Water Supply Requirements." Air in the dispenser chute is chilled to cool completely. ■ Recently dispensed a large amount of water... part number listed below or contact your refrigerator. See "Connect Water Supply." Make sure the refrigerator is not cool enough (on some models) NOTE: Water from the back of water may not be cool. The first glass of the refrigerator ■ Water line connections are...
... 50°F (10°C). ■ New installation - Water is leaking from the dispenser is melting - Allow 24 hours for your authorized KitchenAid dealer. See "Water Supply Requirements." Air in the dispenser chute is chilled to cool completely. ■ Recently dispensed a large amount of water... part number listed below or contact your refrigerator. See "Connect Water Supply." Make sure the refrigerator is not cool enough (on some models) NOTE: Water from the back of water may not be cool. The first glass of the refrigerator ■ Water line connections are...
Use & Care Guide
Page 25
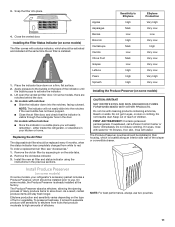
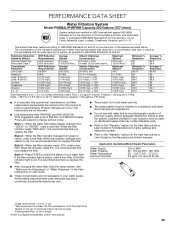
... Manufacturer's name, address and telephone number. ■ Refer to the permissible limit for water leaving the system, as advertised. PERFORMANCE DATA SHEET Water Filtration System Model P5WB2L/P4RFWB Capacity 200 Gallons (757 Liters) System tested and certified by NSF International against NSF/ANSI Standard 53 for the reduction of Live Cysts...
... Manufacturer's name, address and telephone number. ■ Refer to the permissible limit for water leaving the system, as advertised. PERFORMANCE DATA SHEET Water Filtration System Model P5WB2L/P4RFWB Capacity 200 Gallons (757 Liters) System tested and certified by NSF International against NSF/ANSI Standard 53 for the reduction of Live Cysts...

Use & Care Guide
Page 26
...operated and maintained according to instructions attached to or furnished with the product, KitchenAid will pay for a replacement water filter to correct defects in materials and workmanship. On models with original model/serial numbers that vary from the date of purchase, when this filter ...is operated and maintained according to instructions attached to or furnished with the product, KitchenAid will pay for the following components to...
...operated and maintained according to instructions attached to or furnished with the product, KitchenAid will pay for a replacement water filter to correct defects in materials and workmanship. On models with original model/serial numbers that vary from the date of purchase, when this filter ...is operated and maintained according to instructions attached to or furnished with the product, KitchenAid will pay for the following components to...
Use & Care Guide
Page 27
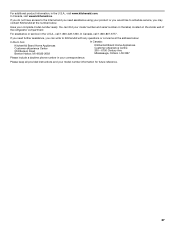
...eXperience Center 553 Benson Road Benton Harbor, MI 49022-2692 In Canada: KitchenAid Brand Home Appliances Customer eXperience Centre 200 - 6750 Century Ave. Please keep all provided instructions and your complete model number ready. If you do not have access to the Internet and...For additional product information, in your product or you may contact KitchenAid at the address below . In Canada, call 1-800-422-1230. Have your model number information for future reference. 27 In Canada, visit www.kitchenaid.ca. Mississauga, Ontario L5N 0B7 Please include a daytime phone number...
...eXperience Center 553 Benson Road Benton Harbor, MI 49022-2692 In Canada: KitchenAid Brand Home Appliances Customer eXperience Centre 200 - 6750 Century Ave. Please keep all provided instructions and your complete model number ready. If you do not have access to the Internet and...For additional product information, in your product or you may contact KitchenAid at the address below . In Canada, call 1-800-422-1230. Have your model number information for future reference. 27 In Canada, visit www.kitchenaid.ca. Mississauga, Ontario L5N 0B7 Please include a daytime phone number...
Warranty Information
Page 1
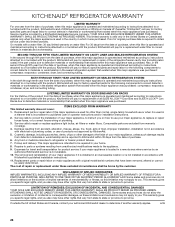
...exclusion or limitation of purchase, when this major appliance was purchased: compressor, evaporator, condenser, dryer, and connecting tubing. KITCHENAID® REFRIGERATOR WARRANTY LIMITED WARRANTY For one year from the date of purchase, when this major appliance is operated and ...are excluded from state to state or province to determine if another warranty applies. 6/08 26 Pickup and delivery. On models with KitchenAid's published installation instructions. 11. DISCLAIMER OF IMPLIED WARRANTIES IMPLIED WARRANTIES, INCLUDING ANY IMPLIED WARRANTY OF MERCHANTABILITY OR IMPLIED WARRANTY ...
...exclusion or limitation of purchase, when this major appliance was purchased: compressor, evaporator, condenser, dryer, and connecting tubing. KITCHENAID® REFRIGERATOR WARRANTY LIMITED WARRANTY For one year from the date of purchase, when this major appliance is operated and ...are excluded from state to state or province to determine if another warranty applies. 6/08 26 Pickup and delivery. On models with KitchenAid's published installation instructions. 11. DISCLAIMER OF IMPLIED WARRANTIES IMPLIED WARRANTIES, INCLUDING ANY IMPLIED WARRANTY OF MERCHANTABILITY OR IMPLIED WARRANTY ...


