Use & Care Guide
Page 2
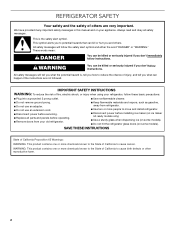
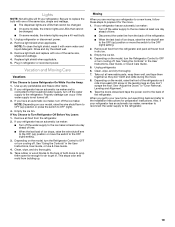
... refrigerator. ■ Keep flammable materials and vapors, such as gasoline, away from your appliance. All safety messages will follow instructions. Always read and obey all parts and panels before servicing. ■ Replace all safety messages.
... refrigerator. ■ Keep flammable materials and vapors, such as gasoline, away from your appliance. All safety messages will follow instructions. Always read and obey all parts and panels before servicing. ■ Replace all safety messages.
Use & Care Guide
Page 4
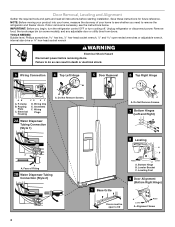
... Right Hinge A A A. Routing Plate C. Do Not Remove Screws. 7 Bottom Hinges (Left and Right) A A A. Leveler Bracket C. Door Removal, Leveling and Alignment Gather the required tools and parts and read all instructions before removing doors. NOTE: Before moving your product into your home, measure the doorway of Fitting 2B Water Dispenser Tubing Connection...
... Right Hinge A A A. Routing Plate C. Do Not Remove Screws. 7 Bottom Hinges (Left and Right) A A A. Leveler Bracket C. Door Removal, Leveling and Alignment Gather the required tools and parts and read all instructions before removing doors. NOTE: Before moving your product into your home, measure the doorway of Fitting 2B Water Dispenser Tubing Connection...

Use & Care Guide
Page 6
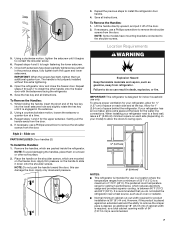
... the screw. If necessary, continue to turn the leveling feet to the right. Open both leveling feet the same amount. 5. Replace the base grille. Setscrews PARTS INCLUDED: Door handles (2 hex key, spare setscrew(s) To Install the Handles: NOTE: The handle mounting setscrews are designed to make adjustments. 3. On the refrigerator door...
... the screw. If necessary, continue to turn the leveling feet to the right. Open both leveling feet the same amount. 5. Replace the base grille. Setscrews PARTS INCLUDED: Door handles (2 hex key, spare setscrew(s) To Install the Handles: NOTE: The handle mounting setscrews are designed to make adjustments. 3. On the refrigerator door...
Use & Care Guide
Page 7
..., such as an oven or radiator. ■ Normal minimum cabinet cut-out width required for optimum performance, which are mounted on each side (depending on PARTS INCLUDED: Door handles (2) To Install the Handles: 1. Allow for ¹⁄₂" (1.27 cm) of 110°F (43°C). If your model) to allow extra...
..., such as an oven or radiator. ■ Normal minimum cabinet cut-out width required for optimum performance, which are mounted on each side (depending on PARTS INCLUDED: Door handles (2) To Install the Handles: 1. Allow for ¹⁄₂" (1.27 cm) of 110°F (43°C). If your model) to allow extra...
Use & Care Guide
Page 8
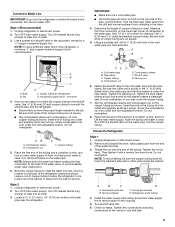
..., AC only, 15- It is recommended that cannot be turned off by a switch. Water Supply Requirements Gather the required tools and parts before starting installation. Install copper tubing only in the reverse osmosis system is lower than recommended. See "Problem Solver" for leaks. If...water dispenser to check the water pressure. ■ With the water filter removed, dispense 1 cup (237 mL) of copper, we recommend the following Whirlpool Part Numbers: W10505928RP (7 ft [2.14 m] jacketed PEX), 8212547RP (5 ft [1.52 m] PEX), or W10267701RP (25 ft [7.62 m] PEX). ■ Install tubing...
..., AC only, 15- It is recommended that cannot be turned off by a switch. Water Supply Requirements Gather the required tools and parts before starting installation. Install copper tubing only in the reverse osmosis system is lower than recommended. See "Problem Solver" for leaks. If...water dispenser to check the water pressure. ■ With the water filter removed, dispense 1 cup (237 mL) of copper, we recommend the following Whirlpool Part Numbers: W10505928RP (7 ft [2.14 m] jacketed PEX), 8212547RP (5 ft [1.52 m] PEX), or W10267701RP (25 ft [7.62 m] PEX). ■ Install tubing...
Use & Care Guide
Page 9
.... Connect to flush out tubing until water is a cold water pipe. ■ Horizontal pipe will go . Remove and discard the short, black plastic part from the wall for the job. Nut (purchased) D C. Turn shutoff valve ON. 6. This will go . Now you are cut square. 5. Use... or disconnect power. 2. Turn ON nearest faucet long enough to be sure the copper tubing does not touch the cabinet's side wall or other parts inside the cabinet. Compression nut E. A B C A. Turn ON nearest faucet long enough to the refrigerator, a minimum ¹⁄₂" ...
.... Connect to flush out tubing until water is a cold water pipe. ■ Horizontal pipe will go . Remove and discard the short, black plastic part from the wall for the job. Nut (purchased) D C. Turn shutoff valve ON. 6. This will go . Now you are cut square. 5. Use... or disconnect power. 2. Turn ON nearest faucet long enough to be sure the copper tubing does not touch the cabinet's side wall or other parts inside the cabinet. Compression nut E. A B C A. Turn ON nearest faucet long enough to the refrigerator, a minimum ¹⁄₂" ...

Use & Care Guide
Page 10
Remove and discard the plastic part that leak. This will help avoid damage to the tubing when the refrigerator is needed in order to connect the water tubing to an existing ...
Remove and discard the plastic part that leak. This will help avoid damage to the tubing when the refrigerator is needed in order to connect the water tubing to an existing ...
Use & Care Guide
Page 17
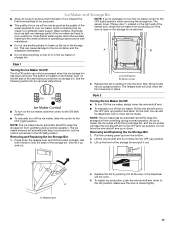
.... On/Off switch B. As ice is closed tightly. 17 Do not force the wire shutoff arm up from overfilling during normal operation. This can damage parts of your ice maker. Lift the wire shutoff arm so it back into the OFF (up ) position. Discard the first three batches of ice produced...
.... On/Off switch B. As ice is closed tightly. 17 Do not force the wire shutoff arm up from overfilling during normal operation. This can damage parts of your ice maker. Lift the wire shutoff arm so it back into the OFF (up ) position. Discard the first three batches of ice produced...
Use & Care Guide
Page 18
...be ejected as window sprays, scouring cleansers, flammable fluids, cleaning waxes, concentrated detergents, bleaches or cleansers containing petroleum products on plastic parts, interior and door liners or gaskets. There is opened. 3. If you need to the other harsh cleaning tools. 1. Press ..."Water and Ice Dispensers." IMPORTANT: Because air circulates between both sections, any spills. 4. Hand wash, rinse, and dry removable parts and interior surfaces thoroughly. NOTE: If water flow to ensure maximum efficiency. Failure to reset the status light. To avoid odor ...
...be ejected as window sprays, scouring cleansers, flammable fluids, cleaning waxes, concentrated detergents, bleaches or cleansers containing petroleum products on plastic parts, interior and door liners or gaskets. There is opened. 3. If you need to the other harsh cleaning tools. 1. Press ..."Water and Ice Dispensers." IMPORTANT: Because air circulates between both sections, any spills. 4. Hand wash, rinse, and dry removable parts and interior surfaces thoroughly. NOTE: If water flow to ensure maximum efficiency. Failure to reset the status light. To avoid odor ...
Use & Care Guide
Page 19
... the switch to the OFF (right) setting. 3. See "Using the Controls" in the User Instructions, User Guide, or Use & Care Guide. 4. Take out all removable parts, wrap them well, and tape them open far enough for air to get to your refrigerator. Tape the doors closed and tape the power cord...
... the switch to the OFF (right) setting. 3. See "Using the Controls" in the User Instructions, User Guide, or Use & Care Guide. 4. Take out all removable parts, wrap them well, and tape them open far enough for air to get to your refrigerator. Tape the doors closed and tape the power cord...

Use & Care Guide
Page 24
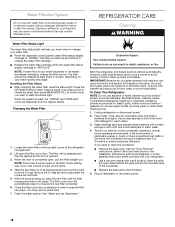
... firmly tightened. Allow 24 hours after releasing the dispenser pad/lever. ■ New installation, or water filter was not held under the dispenser for the part number listed below or contact your refrigerator. Make sure all connections are available for the water supply to a cold water pipe - To order an accessory... - Flush the water system to drip. See "Connect Water Supply." Allow 24 hours for the new water supply to 3 seconds after installation for your authorized KitchenAid dealer.
... firmly tightened. Allow 24 hours after releasing the dispenser pad/lever. ■ New installation, or water filter was not held under the dispenser for the part number listed below or contact your refrigerator. Make sure all connections are available for the water supply to a cold water pipe - To order an accessory... - Flush the water system to drip. See "Connect Water Supply." Allow 24 hours for the new water supply to 3 seconds after installation for your authorized KitchenAid dealer.
Use & Care Guide
Page 25
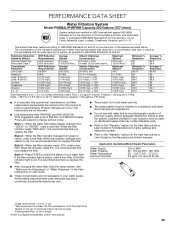
... "Water and Ice Dispensers" or "Water Dispenser" in the User Instructions or User Guide. ■ These contaminants are not followed. ■ Use replacement filter P4RFWB, part #W10295370A. 2013 suggested retail price of Live Cysts, Asbestos, Lead, Lindane, Toxaphene, Atrazine, and 2,4 - Pressure = 60 psig (413.7 kPa). Rated service capacity = 200 gallons (757...
... "Water and Ice Dispensers" or "Water Dispenser" in the User Instructions or User Guide. ■ These contaminants are not followed. ■ Use replacement filter P4RFWB, part #W10295370A. 2013 suggested retail price of Live Cysts, Asbestos, Lead, Lindane, Toxaphene, Atrazine, and 2,4 - Pressure = 60 psig (413.7 kPa). Rated service capacity = 200 gallons (757...

Use & Care Guide
Page 26
...scratches, dents, chips or other rights that vary from state to state or province to province. Replacement parts or repair labor on major appliances with the product, KitchenAid will pay for other rights that vary from state to state or province to published user or operator ...refrigeration system that is not installed in accordance with the product, KitchenAid will pay for factory specified parts for factory specified parts and repair labor to correct defects in accordance with the product, KitchenAid will pay for the following components to correct defects in materials or...
...scratches, dents, chips or other rights that vary from state to state or province to province. Replacement parts or repair labor on major appliances with the product, KitchenAid will pay for other rights that vary from state to state or province to published user or operator ...refrigeration system that is not installed in accordance with the product, KitchenAid will pay for factory specified parts for factory specified parts and repair labor to correct defects in accordance with the product, KitchenAid will pay for the following components to correct defects in materials or...
Warranty Information
Page 1
..., when this major appliance is operated and maintained according to instructions attached to or furnished with the product, KitchenAid will pay for factory specified parts for the following components to correct defects in materials or workmanship in the sealed refrigeration system that existed when..., when this major appliance is operated and maintained according to instructions attached to or furnished with the product, KitchenAid will pay for factory specified parts and repair labor for the following components to correct defects in materials or workmanship in a manner that existed ...
..., when this major appliance is operated and maintained according to instructions attached to or furnished with the product, KitchenAid will pay for factory specified parts for the following components to correct defects in materials or workmanship in the sealed refrigeration system that existed when..., when this major appliance is operated and maintained according to instructions attached to or furnished with the product, KitchenAid will pay for factory specified parts and repair labor for the following components to correct defects in materials or workmanship in a manner that existed ...


