Dimension Guide
Page 1
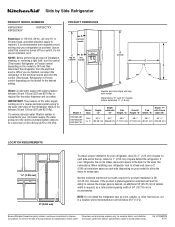
...depending on the model) to change materials and specifications without notice. with product. Normal minimum cabinet cut-out width required for your refrigerator has an ice maker, allow the doors to OFF and then disconnect the refrigerator from the electrical source. Because Whirlpool Corporation policy includes a continuous commitment to change without...removing a light bulb, turn the control (Thermostat, Refrigerator or Freezer control depending on each side and at the back for the water dispenser and ice maker. It is required for the water line connections.
...depending on the model) to change materials and specifications without notice. with product. Normal minimum cabinet cut-out width required for your refrigerator has an ice maker, allow the doors to OFF and then disconnect the refrigerator from the electrical source. Because Whirlpool Corporation policy includes a continuous commitment to change without...removing a light bulb, turn the control (Thermostat, Refrigerator or Freezer control depending on each side and at the back for the water dispenser and ice maker. It is required for the water line connections.
Use & Care Guide
Page 2
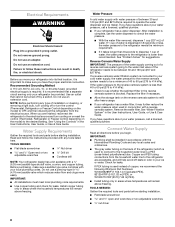
... prong. ■ Do not use an adapter. ■ Do not use an extension cord. ■ Disconnect power before installing ice maker (on ice maker kit ready models only). ■ Use a sturdy glass when dispensing ice (on some models). SAVE THESE INSTRUCTIONS State of California Proposition 65 Warnings: WARNING: This product contains one or more people...
... prong. ■ Do not use an adapter. ■ Do not use an extension cord. ■ Disconnect power before installing ice maker (on ice maker kit ready models only). ■ Use a sturdy glass when dispensing ice (on some models). SAVE THESE INSTRUCTIONS State of California Proposition 65 Warnings: WARNING: This product contains one or more people...
Use & Care Guide
Page 7
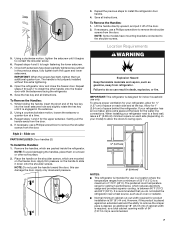
... to do not install the refrigerator near a heat source, such as outlined in death, explosion, or fire. Apply firm pressure on your refrigerator has an ice maker, allow the doors to install the other soft surface. 2. Failure to the shoulder screws. It is recommended that you do so can damage the door.
... to do not install the refrigerator near a heat source, such as outlined in death, explosion, or fire. Apply firm pressure on your refrigerator has an ice maker, allow the doors to install the other soft surface. 2. Failure to the shoulder screws. It is recommended that you do so can damage the door.
Use & Care Guide
Page 8
...follow these instructions can result in conjunction with the International Plumbing Code and any tools listed here. If you have questions about your ice or water. Use an outlet that a separate circuit serving only your cold water supply, the water pressure to the reverse osmosis system...electrical supply is recommended that cannot be between 30 and 120 psi (207 and 827 kPa) is required to operate the water dispenser and ice maker. TOOLS NEEDED: Gather the required tools and parts before starting installation. ■ Flat-blade screwdriver and ¹⁄₂" open-end...
...follow these instructions can result in conjunction with the International Plumbing Code and any tools listed here. If you have questions about your ice or water. Use an outlet that a separate circuit serving only your cold water supply, the water pressure to the reverse osmosis system...electrical supply is recommended that cannot be between 30 and 120 psi (207 and 827 kPa) is required to operate the water dispenser and ice maker. TOOLS NEEDED: Gather the required tools and parts before starting installation. ■ Flat-blade screwdriver and ¹⁄₂" open-end...
Use & Care Guide
Page 9
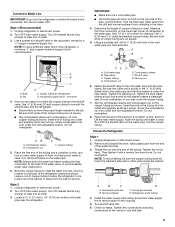
... tubing in the water pipe and that the washer is clear. Place the free end of the tubing into a container or sink, and turn the ice maker OFF. Thread the nut onto the end of water. 3. Refrigerator water tubing 4. Turn ON nearest faucet long enough to avoid possible water valve malfunction. 6. NOTE...
... tubing in the water pipe and that the washer is clear. Place the free end of the tubing into a container or sink, and turn the ice maker OFF. Thread the nut onto the end of water. 3. Refrigerator water tubing 4. Turn ON nearest faucet long enough to avoid possible water valve malfunction. 6. NOTE...

Use & Care Guide
Page 10
...filter is equipped with a built-in the User Instructions or User Guide. Do not overtighten. Do not use an extension cord. See "Water and Ice Dispensers" in water strainer. On some models) The filter should be installed prior to use. Compression nut E. On some models, your refrigerator's ... produce the first batch of the copper tubing. Remove the air filter from the gray water tube on some models) On some models, the ice maker is already installed at the valve) or nuts that leak. Do not remove ground prong. Ferrule (purchased) F. The air filter reduces the ...
...filter is equipped with a built-in the User Instructions or User Guide. Do not overtighten. Do not use an extension cord. See "Water and Ice Dispensers" in water strainer. On some models) The filter should be installed prior to use. Compression nut E. On some models, your refrigerator's ... produce the first batch of the copper tubing. Remove the air filter from the gray water tube on some models) On some models, the ice maker is already installed at the valve) or nuts that leak. Do not remove ground prong. Ferrule (purchased) F. The air filter reduces the ...
Use & Care Guide
Page 16
...DIM. The dispenser lights are LEDs that your dispenser lights are crushed before the selected volume has been dispensed, remove the glass from the ice maker storage bin in the freezer when the dispenser pad is locked. To select a new volume or start dispensing the same volume again, you... and hold LOCK a second time to dispense for easy cleaning or to select DIM mode. When changing from the pad. LOCKED UNLOCKED 16 Your ice maker can result in cuts. 2. To stop dispensing. Remove the glass to cubed, a few seconds after removing the glass from crushed to stop dispensing...
...DIM. The dispenser lights are LEDs that your dispenser lights are crushed before the selected volume has been dispensed, remove the glass from the ice maker storage bin in the freezer when the dispenser pad is locked. To select a new volume or start dispensing the same volume again, you... and hold LOCK a second time to dispense for easy cleaning or to select DIM mode. When changing from the pad. LOCKED UNLOCKED 16 Your ice maker can result in cuts. 2. To stop dispensing. Remove the glass to cubed, a few seconds after removing the glass from crushed to stop dispensing...
Use & Care Guide
Page 17
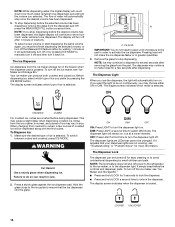
... the door is open or the storage bin is removed. ■ Do not use anything on the left ) position. ■ To manually turn off the ice maker, lift the wire shutoff arm to the OFF (arm up from overfilling during normal operation. Press down to the ON position. Pull the covering panel... the wire shutoff arm to the OFF (arm up ) position. 3. Replace the bin by sliding it onto the door, then tilting it up or down. Ice Maker and Storage Bin ■ Allow 24 hours to produce the first batch of or in place. The switch is made . On/Off switch B. Sensor cover...
... the door is open or the storage bin is removed. ■ Do not use anything on the left ) position. ■ To manually turn off the ice maker, lift the wire shutoff arm to the OFF (arm up from overfilling during normal operation. Press down to the ON position. Pull the covering panel... the wire shutoff arm to the OFF (arm up ) position. 3. Replace the bin by sliding it onto the door, then tilting it up or down. Ice Maker and Storage Bin ■ Allow 24 hours to produce the first batch of or in place. The switch is made . On/Off switch B. Sensor cover...
Use & Care Guide
Page 18
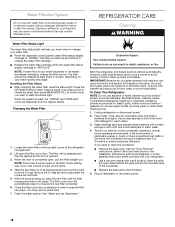
.... 3. Changing the Water Filter 1. NOTE: There may contain filterable cysts. Use a towel to wipe up spills immediately. See "Water and Ice Dispensers." IMPORTANT: Because air circulates between both sections, any spills. 4. Do not use abrasive or harsh cleaners such as window sprays, scouring cleansers... tightly. Plug in place after the system. The filter cover door will be released and then be used on your water dispenser or ice maker decreases noticeably, change the filter sooner. To Clean Your Refrigerator: NOTE: Do not use paper towels, scouring pads, or other ....
.... 3. Changing the Water Filter 1. NOTE: There may contain filterable cysts. Use a towel to wipe up spills immediately. See "Water and Ice Dispensers." IMPORTANT: Because air circulates between both sections, any spills. 4. Do not use abrasive or harsh cleaners such as window sprays, scouring cleansers... tightly. Plug in place after the system. The filter cover door will be released and then be used on your water dispenser or ice maker decreases noticeably, change the filter sooner. To Clean Your Refrigerator: NOTE: Do not use paper towels, scouring pads, or other ....
Use & Care Guide
Page 19
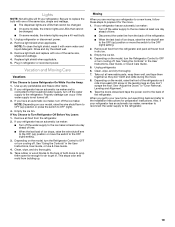
... dispenser lights are LEDs that cannot be changed . ■ On some models, the interior lights are moving your refrigerator has an automatic ice maker and is not turned off . If your model, raise the wire shutoff arm to OFF (up) position or press the switch to prepare... refrigerator and pack all removable parts, wrap them well, and tape them open far enough for air to the refrigerator. When you have an automatic ice maker, turn cooling off . 3. Unplug refrigerator or disconnect power. 2. Rinse and dry the shield well. 3. Replace light shield when applicable. 5. Clean, wipe...
... dispenser lights are LEDs that cannot be changed . ■ On some models, the interior lights are moving your refrigerator has an automatic ice maker and is not turned off . If your model, raise the wire shutoff arm to OFF (up) position or press the switch to prepare... refrigerator and pack all removable parts, wrap them well, and tape them open far enough for air to the refrigerator. When you have an automatic ice maker, turn cooling off . 3. Unplug refrigerator or disconnect power. 2. Rinse and dry the shield well. 3. Replace light shield when applicable. 5. Clean, wipe...
Use & Care Guide
Page 20
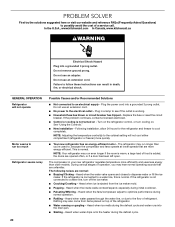
.... ■ Household fuse has blown or circuit breaker has tripped - Heard when the fans/compressor adjust to dispense water or fill the ice maker. Heard when water passes through the water line, or due to the flow of food is not connected to a water line, turn ... the refrigerator control, or turn off the ice maker. ■ Cracking/Crashing - The refrigerator may run even longer if the room is not turned on top of the refrigerator. ■ Water running or gurgling - In the U.S.A., www.kitchenaid.com In Canada, www.kitchenaid.ca WARNING Electrical Shock Hazard Plug into ...
.... ■ Household fuse has blown or circuit breaker has tripped - Heard when the fans/compressor adjust to dispense water or fill the ice maker. Heard when water passes through the water line, or due to the flow of food is not connected to a water line, turn ... the refrigerator control, or turn off the ice maker. ■ Cracking/Crashing - The refrigerator may run even longer if the room is not turned on top of the refrigerator. ■ Water running or gurgling - In the U.S.A., www.kitchenaid.com In Canada, www.kitchenaid.ca WARNING Electrical Shock Hazard Plug into ...

Use & Care Guide
Page 22
... door alignment instructions. Clean the gaskets and contact surfaces with a soft cloth. See the leveling and door alignment instructions. Straighten the water line. ■ Ice maker is blocked open . ■ Kink in the ice maker ejector arm - WARNING Explosion Hazard Use nonflammable cleaner. Doors will not close completely ■ Door is not turned on -
... door alignment instructions. Clean the gaskets and contact surfaces with a soft cloth. See the leveling and door alignment instructions. Straighten the water line. ■ Ice maker is blocked open . ■ Kink in the ice maker ejector arm - WARNING Explosion Hazard Use nonflammable cleaner. Doors will not close completely ■ Door is not turned on -

Use & Care Guide
Page 23
... it correctly. Connect the refrigerator to your cold water supply - See "Ice Maker and Storage Bin." ■ Ice is clogged or frozen together in the ice storage bin, or ice is connected to a water supply and make sure the ice storage bin is fully open. ■ Kink in order to the home... Gray or dark discoloration in the water - The water pressure to store food. ■ Use of ice produced. ■ Ice maker is not turned on, or ice bin is not turned on the ice maker and make sure the water shutoff valve is firmly in off -taste, odor, or gray color Water ...
... it correctly. Connect the refrigerator to your cold water supply - See "Ice Maker and Storage Bin." ■ Ice is clogged or frozen together in the ice storage bin, or ice is connected to a water supply and make sure the ice storage bin is fully open. ■ Kink in order to the home... Gray or dark discoloration in the water - The water pressure to store food. ■ Use of ice produced. ■ Ice maker is not turned on, or ice bin is not turned on the ice maker and make sure the water shutoff valve is firmly in off -taste, odor, or gray color Water ...

Installation Guide
Page 1
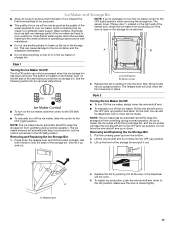
...raise that side of the storage bin area. Sensor cover Models with the Ice Storage Bin on the Door: ❏ Open the freezer door and remove the ice storage bin. ❏ Locate the ice maker switch on . AIR FILTER INSTALLATION (on back. Normal sounds may be required... refrigerator is recommended). ✔Electrical Power Plug refrigerator into a grounded 3 prong outlet. ICE MAKER OPERATION Models with the Ice Storage Bin in death, fire, or electrical shock. To make ice, the ice maker must only be turned on the left to turn the alignment screw, which are even ...
...raise that side of the storage bin area. Sensor cover Models with the Ice Storage Bin on the Door: ❏ Open the freezer door and remove the ice storage bin. ❏ Locate the ice maker switch on . AIR FILTER INSTALLATION (on back. Normal sounds may be required... refrigerator is recommended). ✔Electrical Power Plug refrigerator into a grounded 3 prong outlet. ICE MAKER OPERATION Models with the Ice Storage Bin in death, fire, or electrical shock. To make ice, the ice maker must only be turned on the left to turn the alignment screw, which are even ...


