
User Instructions
Page 1
...la puerta, al lado derecho o izquierdo del interior de la lavavajillas. These words mean: DANGER You can find your KitchenAid dishwasher, please contact us that can happen if the instructions are very important. Always read and obey all safety messages. ...DISHWASHER FEATURES 7 DISHWASHER CARE 9 TROUBLESHOOTING 10 WARRANTY 12 Dishwasher Safety Your safety and the safety of the dishwasher interior. All safety messages will tell you what can kill or hurt you need further assistance using your model and serial number on the label located near the door on your complete model...
...la puerta, al lado derecho o izquierdo del interior de la lavavajillas. These words mean: DANGER You can find your KitchenAid dishwasher, please contact us that can happen if the instructions are very important. Always read and obey all safety messages. ...DISHWASHER FEATURES 7 DISHWASHER CARE 9 TROUBLESHOOTING 10 WARRANTY 12 Dishwasher Safety Your safety and the safety of the dishwasher interior. All safety messages will tell you what can kill or hurt you need further assistance using your model and serial number on the label located near the door on your complete model...

User Instructions
Page 4
...4 21 3 max - -- -- - --- Turn the arrow adjuster inside the dispenser by model) See "Cycle and Option Descriptions" charts in the following section. Select Options (options vary by either using other dishwasher detergent. You can add an item anytime before the main wash starts. Turn off of the... the Pre-Wash section to complete. STEP 3 Select a Cycle (cycles vary by pressing the options desired. Without rinse aid your dishwasher until the indicator level is fully locked. They also improve drying by allowing water to lock fill - -- 6 5 4 --- - - -- Replace the dispenser ...
...4 21 3 max - -- -- - --- Turn the arrow adjuster inside the dispenser by model) See "Cycle and Option Descriptions" charts in the following section. Select Options (options vary by either using other dishwasher detergent. You can add an item anytime before the main wash starts. Turn off of the... the Pre-Wash section to complete. STEP 3 Select a Cycle (cycles vary by pressing the options desired. Without rinse aid your dishwasher until the indicator level is fully locked. They also improve drying by allowing water to lock fill - -- 6 5 4 --- - - -- Replace the dispenser ...

User Instructions
Page 5
... option begins. *Maximum wash times depend on this 1:11 1:41 3:30 amounts of food soil. Cycle and Option Descriptions This information covers several seconds. Your dishwasher may not have all the cycles and options described. and regular tableware. repeatedly pause for several seconds. You can customize your mind, press the option... WASH TIME (HH:MM) Cycle Cycle + Options *Maximum Minimum Minimum Use for hard-to quickly wash prerinsed glasses or dish loads. Use for several different models.
... option begins. *Maximum wash times depend on this 1:11 1:41 3:30 amounts of food soil. Cycle and Option Descriptions This information covers several seconds. Your dishwasher may not have all the cycles and options described. and regular tableware. repeatedly pause for several seconds. You can customize your mind, press the option... WASH TIME (HH:MM) Cycle Cycle + Options *Maximum Minimum Minimum Use for hard-to quickly wash prerinsed glasses or dish loads. Use for several different models.

User Instructions
Page 10
... rinse aid to the dishwasher? Plastics often need towel drying. Use a heated drying option for service. ■ Dishwasher will repeat this sensor adjustment. ■ Water remains in the dishwasher Is the cycle complete? ■ Detergent remains in models) Is the dishwasher aligned with an optical ...reference FAQs (Frequently Asked Questions) to possibly avoid the cost of a service call an electrician. In the U.S.A., www.kitchenaid.com In Canada, www.kitchenaid.ca Dishwasher is sensed. Is the right cycle selected? Is there power to speed drying. Has a household fuse blown, or...
... rinse aid to the dishwasher? Plastics often need towel drying. Use a heated drying option for service. ■ Dishwasher will repeat this sensor adjustment. ■ Water remains in the dishwasher Is the cycle complete? ■ Detergent remains in models) Is the dishwasher aligned with an optical ...reference FAQs (Frequently Asked Questions) to possibly avoid the cost of a service call an electrician. In the U.S.A., www.kitchenaid.com In Canada, www.kitchenaid.ca Dishwasher is sensed. Is the right cycle selected? Is there power to speed drying. Has a household fuse blown, or...

User Instructions
Page 11
...Spotting and filming on some models). Is the water temperature too low? This is usually caused by hand washing. Stains will not affect dishwasher performance. Did you have high iron content? Detergent must be 120°F (49°C) as described in "Dishwasher Care." ■ Silica... content in a wet dispenser. Do not use less than every other month, the installation of the detergent dispenser. Use recommended dishwasher detergents only. Load the dishes and glasses so they are damaged during washing? NOTE: Antiques, feather-edged crystal, and similar ...
...Spotting and filming on some models). Is the water temperature too low? This is usually caused by hand washing. Stains will not affect dishwasher performance. Did you have high iron content? Detergent must be 120°F (49°C) as described in "Dishwasher Care." ■ Silica... content in a wet dispenser. Do not use less than every other month, the installation of the detergent dispenser. Use recommended dishwasher detergents only. Load the dishes and glasses so they are damaged during washing? NOTE: Antiques, feather-edged crystal, and similar ...

User Instructions
Page 12
...Court Mississauga, Ontario L5N 3A7 Please include a daytime phone number in your correspondence. W10084453A SP PN W10084454A © 2007. KITCHENAID® DISHWASHER WARRANTY ONE YEAR LIMITED WARRANTY For one year from the date of purchase, when your major appliance is installed, operated and ... in remote locations. 9. Repairs to correct house wiring or plumbing. 2. Repairs when your product or you can find your complete model and serial number ready. If you need assistance using your major appliance is designed to the appliance. 8. Service must be repaired ...
...Court Mississauga, Ontario L5N 3A7 Please include a daytime phone number in your correspondence. W10084453A SP PN W10084454A © 2007. KITCHENAID® DISHWASHER WARRANTY ONE YEAR LIMITED WARRANTY For one year from the date of purchase, when your major appliance is installed, operated and ... in remote locations. 9. Repairs to correct house wiring or plumbing. 2. Repairs when your product or you can find your complete model and serial number ready. If you need assistance using your major appliance is designed to the appliance. 8. Service must be repaired ...

Installation Instructions
Page 3
... motor and flooring. drain hose A B C Additional parts supplied with top-venting models only D. 2 #8 x 1-3/8" TORX® T15 screws E. 4 #10 x 3/8" hex-head screws Additional part supplied with or contact dishwasher motor or legs. See separate parts list for accessories available for loading and unloading dishes...floor. Location Requirements Do not run drain lines, water lines or electrical wiring where they can interfere with certain models F. Protect dishwasher and water lines leading to take special care in measuring dimensions and in the "Cutout dimensions" section. A ...
... motor and flooring. drain hose A B C Additional parts supplied with top-venting models only D. 2 #8 x 1-3/8" TORX® T15 screws E. 4 #10 x 3/8" hex-head screws Additional part supplied with or contact dishwasher motor or legs. See separate parts list for accessories available for loading and unloading dishes...floor. Location Requirements Do not run drain lines, water lines or electrical wiring where they can interfere with certain models F. Protect dishwasher and water lines leading to take special care in measuring dimensions and in the "Cutout dimensions" section. A ...

Installation Instructions
Page 4
... of countertop. REAR VIEW 4 May be compressed (not used on the underside of opening. *** May be increased to 33-7/8" (86 cm) by removing wheels from dishwasher. ** Minimum, measured from the lowest point on all models) 24-7/8" (63.2 cm) 24-1/2" (62.2 cm)* front vent 33-7/8" (86 cm) min. Product dimensions 3/4" (1.9 cm) insulation -
... of countertop. REAR VIEW 4 May be compressed (not used on the underside of opening. *** May be increased to 33-7/8" (86 cm) by removing wheels from dishwasher. ** Minimum, measured from the lowest point on all models) 24-7/8" (63.2 cm) 24-1/2" (62.2 cm)* front vent 33-7/8" (86 cm) min. Product dimensions 3/4" (1.9 cm) insulation -

Installation Instructions
Page 9
...made. cut ribbed section). 2. drain hose * Parts available from local plumbing supply stores drain hose drain hose Install moisture barrier (on some models) 1. Do not cut end of drain hose if needed (do not cut here if needed rubber hose connector air gap spring or screw...to the front center of the counter. This connection must be before the drain trap and at least 20" (50.8 cm) above the floor where dishwasher will be made . * Parts available from local plumbing supply stores Option 3: Waste disposer - Remove the backing of the moisture barrier and apply to air...
...made. cut ribbed section). 2. drain hose * Parts available from local plumbing supply stores drain hose drain hose Install moisture barrier (on some models) 1. Do not cut end of drain hose if needed (do not cut here if needed rubber hose connector air gap spring or screw...to the front center of the counter. This connection must be before the drain trap and at least 20" (50.8 cm) above the floor where dishwasher will be made . * Parts available from local plumbing supply stores Option 3: Waste disposer - Remove the backing of the moisture barrier and apply to air...

Installation Instructions
Page 11
... the handle package from the front of the Allen wrench into the setscrews. Start set screws in the area shown to bring dishwasher up while removing the screws. Push the door handle tightly against the door. mounting stud handle 3 screws outer panel 5. Remove...to proper height. Attach the panel assembly to prevent their movement when the dishwasher is operated. shim 2" (5.1 cm) shim 2-3/4" (7.0 cm) 6" (15.2 cm) 2-3/4" (7.0 cm) Install door panel-Pro Line® series For top vented models with Installation Instructions. Gently set screws facing down on both sides, as...
... the handle package from the front of the Allen wrench into the setscrews. Start set screws in the area shown to bring dishwasher up while removing the screws. Push the door handle tightly against the door. mounting stud handle 3 screws outer panel 5. Remove...to proper height. Attach the panel assembly to prevent their movement when the dishwasher is operated. shim 2" (5.1 cm) shim 2-3/4" (7.0 cm) 6" (15.2 cm) 2-3/4" (7.0 cm) Install door panel-Pro Line® series For top vented models with Installation Instructions. Gently set screws facing down on both sides, as...

Installation Instructions
Page 12
...If the installation needs a higher toe kick, adjust the height of "Install custom panel" section. 12 For dishwashers with the control panel shown below : (Models KUDC03IT, KUDK03IT and KUDL03IT) 2 screws align top edges 1-3/8"screw 10. Follow directions under Option #1 of the... wood panel accordingly. For dishwashers with the control panel shown below : (models KUDS03FTPA and KUDU03FTPA) (Your model may vary slightly from the literature package in Step 8. 11. Install the two #8-18 x 1-3/8" ...
...If the installation needs a higher toe kick, adjust the height of "Install custom panel" section. 12 For dishwashers with the control panel shown below : (Models KUDC03IT, KUDK03IT and KUDL03IT) 2 screws align top edges 1-3/8"screw 10. Follow directions under Option #1 of the... wood panel accordingly. For dishwashers with the control panel shown below : (models KUDS03FTPA and KUDU03FTPA) (Your model may vary slightly from the literature package in Step 8. 11. Install the two #8-18 x 1-3/8" ...

Installation Instructions
Page 13
... 6" (15.2 cm). 7. Not recommended for toe kicks greater than wood are centered side to protect it is attached to the KitchenAid Catalog, visit www.kitchenaid.com, or call 1-800-422-1230. align holes. 8. Gently set outer panel aside. 3. NOTE: All mounting hardware supplied is...panel accordingly. Attach the panel assembly to obtain the proper length screws and adjust the pilot holes accordingly. Install custom panel Option 1: For models KUDS03FTPA and KUDU03FTPA NOTE: The handle for the custom panel is for a 3/4" (19.1 mm) thick wood panel. It is for ...
... 6" (15.2 cm). 7. Not recommended for toe kicks greater than wood are centered side to protect it is attached to the KitchenAid Catalog, visit www.kitchenaid.com, or call 1-800-422-1230. align holes. 8. Gently set outer panel aside. 3. NOTE: All mounting hardware supplied is...panel accordingly. Attach the panel assembly to obtain the proper length screws and adjust the pilot holes accordingly. Install custom panel Option 1: For models KUDS03FTPA and KUDU03FTPA NOTE: The handle for the custom panel is for a 3/4" (19.1 mm) thick wood panel. It is for ...

Installation Instructions
Page 14
...pilot holes 1/2" (13 mm) deep, in Step 10. hold the outer panel up while removing the screws. Option 2: For models KUDC03IT, KUDK03IT and KUDL03IT All models require an accessory option to protect it from humidity. To order, call customer service at 800-444-1230. If the customer-supplied... from both panels are for toe kicks greater than 3/4" (1.9 cm) thick where the screws are available. Not recommended for frameless custom panel models with the top of the customersupplied custom panel as shown. Position the outer panel on the back of door; Align the top edge of the...
...pilot holes 1/2" (13 mm) deep, in Step 10. hold the outer panel up while removing the screws. Option 2: For models KUDC03IT, KUDK03IT and KUDL03IT All models require an accessory option to protect it from humidity. To order, call customer service at 800-444-1230. If the customer-supplied... from both panels are for toe kicks greater than 3/4" (1.9 cm) thick where the screws are available. Not recommended for frameless custom panel models with the top of the customersupplied custom panel as shown. Position the outer panel on the back of door; Align the top edge of the...

Installation Instructions
Page 15
...model shown NOTE: Do not attach the dishwasher, this will be secured to the cabinet. Repeat this will be adjusted. 2. bend tabs Check door spring tension 1. Re-attach door spring to the sides of dishwasher. 3. Choose attachment option WARNING Excessive Weight Hazard Use two or more people, stand the dishwasher...screw Ẅẅ Ẇ 15 To adjust the door spring tension, unhook the spring from falling into slot on top of the dishwasher to keep it keeps the bracket in back or other hard surface countertop) 1. This will need to the countertop if it is ...
...model shown NOTE: Do not attach the dishwasher, this will be secured to the cabinet. Repeat this will be adjusted. 2. bend tabs Check door spring tension 1. Re-attach door spring to the sides of dishwasher. 3. Choose attachment option WARNING Excessive Weight Hazard Use two or more people, stand the dishwasher...screw Ẅẅ Ẇ 15 To adjust the door spring tension, unhook the spring from falling into slot on top of the dishwasher to keep it keeps the bracket in back or other hard surface countertop) 1. This will need to the countertop if it is ...

Installation Instructions
Page 19
...slit in terminal box. Failure to follow these instructions can result in dishwasher. 19 Direct wire method: WARNING Complete installation 1. Do not use an extension cord. Fold up behind the insulation on some models) 1. Place the lower panel behind the access panel. Electrical Shock Hazard... Electrically ground dishwasher. Hold the two panels together and push them up into a grounded 3 prong outlet. Fold...
...slit in terminal box. Failure to follow these instructions can result in dishwasher. 19 Direct wire method: WARNING Complete installation 1. Do not use an extension cord. Fold up behind the insulation on some models) 1. Place the lower panel behind the access panel. Electrical Shock Hazard... Electrically ground dishwasher. Hold the two panels together and push them up into a grounded 3 prong outlet. Fold...
Parts Diagram
Page 1
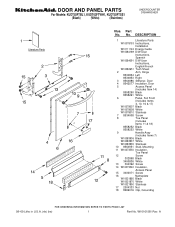
... Stainless 17 2004333 Nut 18 8269016 Clip, Grounding 08−09 Litho in U.S.A. (rle) (ire) 1 Part No. No. A Part No. DOOR AND PANEL PARTS For Models: KUDT03FTBL1, KUDT03FTWH1, KUDT03FTSS1 (Black) (White) (Stainless) UNDERCOUNTER DISHWASHER Illus. W10161581 Rev.
... Stainless 17 2004333 Nut 18 8269016 Clip, Grounding 08−09 Litho in U.S.A. (rle) (ire) 1 Part No. No. A Part No. DOOR AND PANEL PARTS For Models: KUDT03FTBL1, KUDT03FTWH1, KUDT03FTSS1 (Black) (White) (Stainless) UNDERCOUNTER DISHWASHER Illus. W10161581 Rev.
Parts Diagram
Page 2
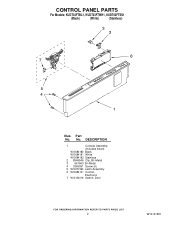
CONTROL PANEL PARTS For Models: KUDT03FTBL1, KUDT03FTWH1, KUDT03FTSS1 (Black) (White) (Stainless) Illus. No. Part No. DESCRIPTION 1 Console Assembly (Includes Insert) W10084180 Black W10084181 White W10084182 Stainless 2 8546546 Clip, BI−Metal 3 661663 Bi−Metal 4 3369051 Screw (6) 5 W10077360 Latch Assembly 6 W10084141 Control, Electronic 7 W10134019 Switch, Door 2 W10161581
CONTROL PANEL PARTS For Models: KUDT03FTBL1, KUDT03FTWH1, KUDT03FTSS1 (Black) (White) (Stainless) Illus. No. Part No. DESCRIPTION 1 Console Assembly (Includes Insert) W10084180 Black W10084181 White W10084182 Stainless 2 8546546 Clip, BI−Metal 3 661663 Bi−Metal 4 3369051 Screw (6) 5 W10077360 Latch Assembly 6 W10084141 Control, Electronic 7 W10134019 Switch, Door 2 W10161581
Parts Diagram
Page 3
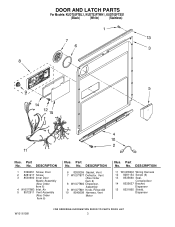
DOOR AND LATCH PARTS For Models: KUDT03FTBL1, KUDT03FTWH1, KUDT03FTSS1 (Black) (White) (Stainless) Illus. Part No. DESCRIPTION 6 8269259 Gasket, Vent 7 W10077877 Deflector, Vent (Also Order Item 6) 8 W10077882 Dispenser, Assembly 9 W10077881 Knob, Rinse ...
DOOR AND LATCH PARTS For Models: KUDT03FTBL1, KUDT03FTWH1, KUDT03FTSS1 (Black) (White) (Stainless) Illus. Part No. DESCRIPTION 6 8269259 Gasket, Vent 7 W10077877 Deflector, Vent (Also Order Item 6) 8 W10077882 Dispenser, Assembly 9 W10077881 Knob, Rinse ...
Parts Diagram
Page 5
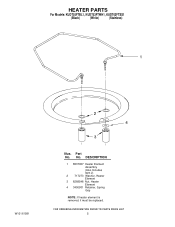
Part No. No. DESCRIPTION 1 8537057 Heater Element Assembly (Also Includes Item 2) 2 717273 Washer, Heater Element 3 8268548 Nut, Heater Element 4 3400931 Retainer, Spring Grip NOTE: If heater element is removed, it must be replaced. 5 HEATER PARTS For Models: KUDT03FTBL1, KUDT03FTWH1, KUDT03FTSS1 (Black) (White) (Stainless) W10161581 Illus.
Part No. No. DESCRIPTION 1 8537057 Heater Element Assembly (Also Includes Item 2) 2 717273 Washer, Heater Element 3 8268548 Nut, Heater Element 4 3400931 Retainer, Spring Grip NOTE: If heater element is removed, it must be replaced. 5 HEATER PARTS For Models: KUDT03FTBL1, KUDT03FTWH1, KUDT03FTSS1 (Black) (White) (Stainless) W10161581 Illus.
Parts Diagram
Page 6
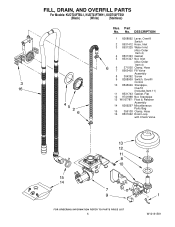
... Assembly 14 8269297 Miscellaneous Parts Bag 15 356138 Clamp, Hose 16 8531022 Drain Loop with Check Valve 6 W10161581 No. FILL, DRAIN, AND OVERFILL PARTS For Models: KUDT03FTBL1, KUDT03FTWH1, KUDT03FTSS1 (Black) (White) (Stainless) Illus. Part No.
... Assembly 14 8269297 Miscellaneous Parts Bag 15 356138 Clamp, Hose 16 8531022 Drain Loop with Check Valve 6 W10161581 No. FILL, DRAIN, AND OVERFILL PARTS For Models: KUDT03FTBL1, KUDT03FTWH1, KUDT03FTSS1 (Black) (White) (Stainless) Illus. Part No.


