
Use & Care Guide
Page 4
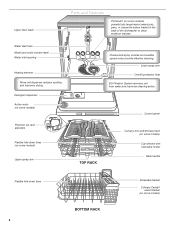
... Control panel Culinary tool rack/3rd level rack (on some models) Cup shelves with stemware holder Rack handle Flexible fold-down tines (on some models) powerful jets target water toward pots, pans, or casserole dishes loaded in the back of the dishwasher to clean stubborn messes. Upper level wash Parts and...
... Control panel Culinary tool rack/3rd level rack (on some models) Cup shelves with stemware holder Rack handle Flexible fold-down tines (on some models) powerful jets target water toward pots, pans, or casserole dishes loaded in the back of the dishwasher to clean stubborn messes. Upper level wash Parts and...

Use & Care Guide
Page 9
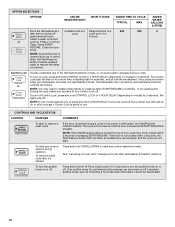
... DOES ADDED TIME TO CYCLE TYPICAL MAX Cleans pans, casseroles, Heavy Duty Activates the 53 73 etc., with any Uses the heating 44 51 a fan. power to provide soaking and scrubbing of the cycle whether the Sani Rinse option was successfully completed. Sanitizes dishes and Heavy Duty Increases the main 53...
... DOES ADDED TIME TO CYCLE TYPICAL MAX Cleans pans, casseroles, Heavy Duty Activates the 53 73 etc., with any Uses the heating 44 51 a fan. power to provide soaking and scrubbing of the cycle whether the Sani Rinse option was successfully completed. Sanitizes dishes and Heavy Duty Increases the main 53...
Use & Care Guide
Page 10
... or options. Press START/ RESUME. Control Lock or Avoids unintended use of the dishwasher between cycles, or cycle and option changes during a cycle or the power is pressed. If the door is activated, and all buttons are locked. Press and hold CONTROL LOCK or 4 HOUR DELAY (depending on or off .
... or options. Press START/ RESUME. Control Lock or Avoids unintended use of the dishwasher between cycles, or cycle and option changes during a cycle or the power is pressed. If the door is activated, and all buttons are locked. Press and hold CONTROL LOCK or 4 HOUR DELAY (depending on or off .
Use & Care Guide
Page 16
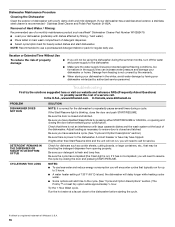
... Procedure Cleaning the Dishwasher Clean the exterior of a service call for heavily soiled dishes and start dishwasher. In the U.S.A., www.kitchenaid.com In Canada, www.kitchenaid.ca PROBLEM DISHWASHER DOES NOT RUN DETERGENT REMAINS IN THE DISPENSER OR TABLET IS ON BOTTOM OF TUB CYCLE RUNS TOO LONG SOLUTION... NOTE: It is power to possibly avoid the cost of dishwasher with large casserole dishes and the wash system at a faucet ...
... Procedure Cleaning the Dishwasher Clean the exterior of a service call for heavily soiled dishes and start dishwasher. In the U.S.A., www.kitchenaid.com In Canada, www.kitchenaid.ca PROBLEM DISHWASHER DOES NOT RUN DETERGENT REMAINS IN THE DISPENSER OR TABLET IS ON BOTTOM OF TUB CYCLE RUNS TOO LONG SOLUTION... NOTE: It is power to possibly avoid the cost of dishwasher with large casserole dishes and the wash system at a faucet ...

Dimension Guide
Page 1
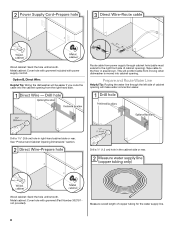
... Cord Kit (Part Number 4317824) marked for planning purposes only. external pipe threads on one end. Power supply cord must plug into a grounded three-prong outlet, located in the cabinet next to the waste tee or disposer inlet. Use &#... 120°F (49°C) water at dishwasher. Page 1 of 12' (3.7 m) (Part Number 3385556) that meets the wiring requirements for installing the power supply cord. Follow the kit instructions for your dishwasher. If direct wiring dishwasher: Use flexible, armored or nonmetallic, sheathed copper wire with dishwashers. or 20...
... Cord Kit (Part Number 4317824) marked for planning purposes only. external pipe threads on one end. Power supply cord must plug into a grounded three-prong outlet, located in the cabinet next to the waste tee or disposer inlet. Use &#... 120°F (49°C) water at dishwasher. Page 1 of 12' (3.7 m) (Part Number 3385556) that meets the wiring requirements for installing the power supply cord. Follow the kit instructions for your dishwasher. If direct wiring dishwasher: Use flexible, armored or nonmetallic, sheathed copper wire with dishwashers. or 20...

Installation Guide
Page 2
Doing so can be killed or seriously injured if you don't immediately follow instructions. You Need to the power-supply cord. Always read and obey all governing codes and ordinances. ■ Install this manual and on your appliance. These words ... Opening-New Utilities 7 Prepare and Route Water Line 8 Install Drain Hose 9 Install Moisture Barrier (under a wood countertop 11 Prepare Dishwasher 11 Make Power Supply Cord Connection 12 Determine Cabinet Opening 14 Install Door Handle (on some models 15 Custom Panel Dimensions 15 Install Custom Panel 15 Choose Attachment...
Doing so can be killed or seriously injured if you don't immediately follow instructions. You Need to the power-supply cord. Always read and obey all governing codes and ordinances. ■ Install this manual and on your appliance. These words ... Opening-New Utilities 7 Prepare and Route Water Line 8 Install Drain Hose 9 Install Moisture Barrier (under a wood countertop 11 Prepare Dishwasher 11 Make Power Supply Cord Connection 12 Determine Cabinet Opening 14 Install Door Handle (on some models 15 Custom Panel Dimensions 15 Install Custom Panel 15 Choose Attachment...

Installation Guide
Page 6
... A hot water line with the air gap installation instructions. latest edition and all local codes and ordinances. If connecting dishwasher with dishwasher. ■ Power supply cord must have: ■ 120-volt, 60 Hz, AC-only, 15- If connecting dishwasher with direct wiring: ■ Use flexible,... armored or nonmetallic sheathed, copper wire with grounding wire that meets the wiring requirements for use with a power supply cord: ■ Use UL Listed power supply cord kit (Part Number 4317824) marked for your dishwasher. If drain hose is not long enough, use an ...
... A hot water line with the air gap installation instructions. latest edition and all local codes and ordinances. If connecting dishwasher with dishwasher. ■ Power supply cord must have: ■ 120-volt, 60 Hz, AC-only, 15- If connecting dishwasher with direct wiring: ■ Use flexible,... armored or nonmetallic sheathed, copper wire with grounding wire that meets the wiring requirements for use with a power supply cord: ■ Use UL Listed power supply cord kit (Part Number 4317824) marked for your dishwasher. If drain hose is not long enough, use an ...
Installation Guide
Page 7
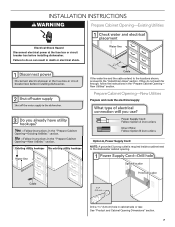
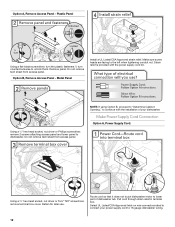
Prepare Cabinet Opening-New Utilities Prepare and route the electrical supply Option A, Power Supply Cord: NOTE: A grounded 3 prong outlet is required inside a cabinet next to the "Install Drain Hose" section. Failure to do not reach far enough, follow ... opening. If they do so can result in cabinet side or rear. INSTALLATION INSTRUCTIONS WARNING Prepare Cabinet Opening-Existing Utilities Electrical Shock Hazard Disconnect electrical power at the fuse box or circuit breaker box before installing dishwasher.
Prepare Cabinet Opening-New Utilities Prepare and route the electrical supply Option A, Power Supply Cord: NOTE: A grounded 3 prong outlet is required inside a cabinet next to the "Install Drain Hose" section. Failure to do not reach far enough, follow ... opening. If they do so can result in cabinet side or rear. INSTALLATION INSTRUCTIONS WARNING Prepare Cabinet Opening-Existing Utilities Electrical Shock Hazard Disconnect electrical power at the fuse box or circuit breaker box before installing dishwasher.
Installation Guide
Page 8
... through the left side of copper tubing for the water supply line. 8 Metal cabinet: Cover hole with power supply cord kit. Tape cable to the right front side of cabinet opening from moving when dishwasher is moved into the cabinet opening ). Drill a 1¹&#...
... through the left side of copper tubing for the water supply line. 8 Metal cabinet: Cover hole with power supply cord kit. Tape cable to the right front side of cabinet opening from moving when dishwasher is moved into the cabinet opening ). Drill a 1¹&#...
Installation Guide
Page 12
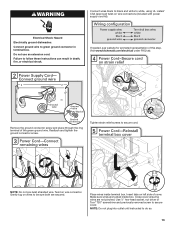
... facing to unlock them. Do not remove tech sheet from access panel. Pull cord through strain relief in terminal box. Make Power Supply Cord Connection Option A, Power Supply Cord: Using a ¹⁄₄" hex-head socket, nut driver or Torx® T20® screwdriver, remove ...terminal box cover. Route cord so that it does not touch dishwasher motor to lower part of your power supply cord to continue with the power supply cord kit. Plastic Panel Using a flat-blade screwdriver, turn the plastic fasteners ¹⁄₄ turn counterclockwise...
... facing to unlock them. Do not remove tech sheet from access panel. Pull cord through strain relief in terminal box. Make Power Supply Cord Connection Option A, Power Supply Cord: Using a ¹⁄₄" hex-head socket, nut driver or Torx® T20® screwdriver, remove ...terminal box cover. Route cord so that it does not touch dishwasher motor to lower part of your power supply cord to continue with the power supply cord kit. Plastic Panel Using a flat-blade screwdriver, turn the plastic fasteners ¹⁄₄ turn counterclockwise...
Installation Guide
Page 13
... twist-on wire connector. Electrical Shock Hazard Electrically ground dishwasher. Twist on wire connectors (included with power supply cord kit). Insert tabs on wires to secure cord. Do not use an extension cord. Visit www.kitchenaid.com/electrical under FAQ tab. Use ¹⁄₄" hex-head socket, nut driver or Torx...
... twist-on wire connector. Electrical Shock Hazard Electrically ground dishwasher. Twist on wire connectors (included with power supply cord kit). Insert tabs on wires to secure cord. Do not use an extension cord. Visit www.kitchenaid.com/electrical under FAQ tab. Use ¹⁄₄" hex-head socket, nut driver or Torx...
Installation Guide
Page 20
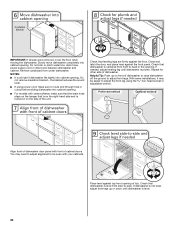
...be even with water softener, make sure to back in on the side of the unit. Do not kink or pinch water line, drain hose, power supply cord or direct wire between dishwasher and cabinet. the blanket reduces the sound level. ■ If using the hex-head socket or adjustable ...of tub. Do not remove insulation blanket - With some installations, it may need to adjust alignment to be easier to adjust the front leg using power cord, make sure that the drain hose stays on the hanger that dishwasher is plumb. Slowly move dishwasher completely into cabinet opening of dishwasher to...
...be even with water softener, make sure to back in on the side of the unit. Do not kink or pinch water line, drain hose, power supply cord or direct wire between dishwasher and cabinet. the blanket reduces the sound level. ■ If using the hex-head socket or adjustable ...of tub. Do not remove insulation blanket - With some installations, it may need to adjust alignment to be easier to adjust the front leg using power cord, make sure that the drain hose stays on the hanger that dishwasher is plumb. Slowly move dishwasher completely into cabinet opening of dishwasher to...

Installation Guide
Page 22
Make Direct Wire Electrical Connection NOTE: If the power supply cord was connected earlier, proceed to "Secure Dishwasher in death, fire, or electrical shock. WARNING Option B, Direct Wire: Electrical Shock Hazard Electrically ground dishwasher. ...
Make Direct Wire Electrical Connection NOTE: If the power supply cord was connected earlier, proceed to "Secure Dishwasher in death, fire, or electrical shock. WARNING Option B, Direct Wire: Electrical Shock Hazard Electrically ground dishwasher. ...

Installation Guide
Page 26
... you do this when adding a dish during the middle of a cycle.) NOTE: If a braided supply hose is working properly, disconnect power or unplug dishwasher and see your Use and Care Guide for good drying performance and controlling hard water deposit buildup. Check that there is ...service contact information. Plug into a grounded 3 prong outlet. Check that you must also do not close the door within 3 seconds. Reconnect Power Check Operation ■ Read the Dishwasher User Instructions that all parts have all tools used , replace inlet hose after 5 years to reduce ...
... you do this when adding a dish during the middle of a cycle.) NOTE: If a braided supply hose is working properly, disconnect power or unplug dishwasher and see your Use and Care Guide for good drying performance and controlling hard water deposit buildup. Check that there is ...service contact information. Plug into a grounded 3 prong outlet. Check that you must also do not close the door within 3 seconds. Reconnect Power Check Operation ■ Read the Dishwasher User Instructions that all parts have all tools used , replace inlet hose after 5 years to reduce ...


