
Installation Guide
Page 3
...For Power Supply Cord: use UL Listed/CSA Approved power supply cord kit marked for purchase in Kit: 4 Plastic studs (attached to " " wrench If installing custom front panels, Torx®† T15 screwdriver *Must be made by runners) 4 Short screws (10-16 hex head screw) 4 Long screws (8-...18 Torx®† head screws) 1 Template (located inside Use and Care Guide bag assembly) 1 Instruction sheet (located inside Use and Care Guide bag assembly) NOTE: The screws supplied are not included, call 1-800-422-1230. 3 Other parts you may also need ...
...For Power Supply Cord: use UL Listed/CSA Approved power supply cord kit marked for purchase in Kit: 4 Plastic studs (attached to " " wrench If installing custom front panels, Torx®† T15 screwdriver *Must be made by runners) 4 Short screws (10-16 hex head screw) 4 Long screws (8-...18 Torx®† head screws) 1 Template (located inside Use and Care Guide bag assembly) 1 Instruction sheet (located inside Use and Care Guide bag assembly) NOTE: The screws supplied are not included, call 1-800-422-1230. 3 Other parts you may also need ...
Installation Guide
Page 16
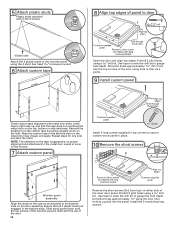
...the metal door needs to occur on the first try. 7 Attach custom panel Customer-supplied panel Install 2 long screws supplied in top corners to secure custom wood panel in the keyhole slots. Install the 2 remaining long screws. Drill pilot holes approximately 1¹⁄₂" (12.7 mm) ...into the top corners of the door using the door liner hole as a guide. 9 Install custom panel Align top edges Drill through these holes Check custom tape alignment with metal door slots; Slide wood panel down on either side of...
...the metal door needs to occur on the first try. 7 Attach custom panel Customer-supplied panel Install 2 long screws supplied in top corners to secure custom wood panel in the keyhole slots. Install the 2 remaining long screws. Drill pilot holes approximately 1¹⁄₂" (12.7 mm) ...into the top corners of the door using the door liner hole as a guide. 9 Install custom panel Align top edges Drill through these holes Check custom tape alignment with metal door slots; Slide wood panel down on either side of...

Use & Care Guide
Page 14
...opened at least 120°F (49ºC). Improper loading can cause dishes to become chipped or damaged. (See specific loading instructions within this guide.) Blinking LED's will need to resume the cycle by putting 2 cups (500 mL) of white vinegar in an upright glass measuring cup in... replacing the rinse aid dispenser cap after filling (or refilling) the rinse aid. ■ Using an excessive amount of the cycle. ■ Improper installation will blink one time with the wash arms. Readjust the dishware and resume the cycle. A thumping sound may help: Use a commercial cleaner designed for...
...opened at least 120°F (49ºC). Improper loading can cause dishes to become chipped or damaged. (See specific loading instructions within this guide.) Blinking LED's will need to resume the cycle by putting 2 cups (500 mL) of white vinegar in an upright glass measuring cup in... replacing the rinse aid dispenser cap after filling (or refilling) the rinse aid. ■ Using an excessive amount of the cycle. ■ Improper installation will blink one time with the wash arms. Readjust the dishware and resume the cycle. A thumping sound may help: Use a commercial cleaner designed for...

Use & Care Guide
Page 16
... from the date of purchase, when this major appliance is operated and maintained according to instructions attached to or furnished with KitchenAid's published installation instructions. 11. LIMITATION OF REMEDIES; In the U.S.A., call 1-800-807-6777. 2/10 16 Some states and provinces do...fuses, or to province. Service calls to correct the installation of purchase. 6. The removal and reinstallation of your authorized KitchenAid dealer to correct defects in accordance with the product, KitchenAid brand of the Use & Care Guide. If outside the 50 United States and Canada, ...
... from the date of purchase, when this major appliance is operated and maintained according to instructions attached to or furnished with KitchenAid's published installation instructions. 11. LIMITATION OF REMEDIES; In the U.S.A., call 1-800-807-6777. 2/10 16 Some states and provinces do...fuses, or to province. Service calls to correct the installation of purchase. 6. The removal and reinstallation of your authorized KitchenAid dealer to correct defects in accordance with the product, KitchenAid brand of the Use & Care Guide. If outside the 50 United States and Canada, ...


