

Installation Guide
Page 3
... and head mounting tape 1 small) screws (2) brackets (top) Parts needed : Cordless drill with certain models only: Bottom sound pad (located in lower rack) Make sure all these parts are included in Kit: 4 Plastic studs (attached to " " wrench If installing custom front panels, Torx®† ..." " nut drivers or hex sockets Measuring tape or ruler UL Listed/CSA Approved twist-on wire connectors* Small level 10" adjustable wrench that electrical connections be the proper size to connect your household wiring to 16-gauge wiring in plumbing supply stores. All Installations...
... and head mounting tape 1 small) screws (2) brackets (top) Parts needed : Cordless drill with certain models only: Bottom sound pad (located in lower rack) Make sure all these parts are included in Kit: 4 Plastic studs (attached to " " wrench If installing custom front panels, Torx®† ..." " nut drivers or hex sockets Measuring tape or ruler UL Listed/CSA Approved twist-on wire connectors* Small level 10" adjustable wrench that electrical connections be the proper size to connect your household wiring to 16-gauge wiring in plumbing supply stores. All Installations...
Installation Guide
Page 22
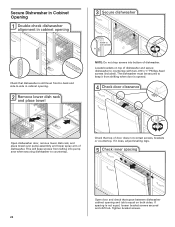
Tighten bracket screws. 22 This will keep it does, adjust leveling legs. 5 Check inner spacing Open door and check that space between dishwasher cabinet opening . 2 Remove lower dish rack and place towel 3 Secure dishwasher screw to side cabinet NOTE: Do not drop screws into pump area when ... dishwasher must be secured to keep screws from shifting when door is opened. 4 Check door clearance Open dishwasher door, remove lower dish rack, and place towel over pump assembly and lower spray arm of dishwasher and secure dishwasher to countertop. Locate brackets on both sides. If...
Tighten bracket screws. 22 This will keep it does, adjust leveling legs. 5 Check inner spacing Open door and check that space between dishwasher cabinet opening . 2 Remove lower dish rack and place towel 3 Secure dishwasher screw to side cabinet NOTE: Do not drop screws into pump area when ... dishwasher must be secured to keep screws from shifting when door is opened. 4 Check door clearance Open dishwasher door, remove lower dish rack, and place towel over pump assembly and lower spray arm of dishwasher and secure dishwasher to countertop. Locate brackets on both sides. If...

Use & Care Guide
Page 4
Four stainless steel wash arms spray the load four times with stemware holder (on some models) Rack handle Flexible fold-down tines (on some models) Upper spray arm Parts and Features ProScrub® (on some models) powerful jets target water toward pots...grind food particles, which are flushed out the drain at the end of each cycle. Detergent dispenser Active vents Premium top rack adjusters (on some models) Flexible fold-down tines 4 BOTTOM RACK Silverware basket Culinary Caddy® Utensil Baset (on some models) Upper level wash Water feed tube Model and serial number ...
Four stainless steel wash arms spray the load four times with stemware holder (on some models) Rack handle Flexible fold-down tines (on some models) Upper spray arm Parts and Features ProScrub® (on some models) powerful jets target water toward pots...grind food particles, which are flushed out the drain at the end of each cycle. Detergent dispenser Active vents Premium top rack adjusters (on some models) Flexible fold-down tines 4 BOTTOM RACK Silverware basket Culinary Caddy® Utensil Baset (on some models) Upper level wash Water feed tube Model and serial number ...

Use & Care Guide
Page 7
...also improve drying by either using other dishwasher Main Wash Pre-Wash detergent types. Add ■ Check the rinse aid indicator. Turn the arrow adjuster inside the dispenser by allowing water to show which selections you have excessive moisture. STEP 3 Select a Cycle (cycles vary by model) See "... until the indicator level is at the sink nearest your mind, press the option again to turn to reduce excess moisture on the dish racks and interior of your fingers or inserting a flat-blade screwdriver into the opening until the water is approximately 2 1/2 hours, but can...
...also improve drying by either using other dishwasher Main Wash Pre-Wash detergent types. Add ■ Check the rinse aid indicator. Turn the arrow adjuster inside the dispenser by allowing water to show which selections you have excessive moisture. STEP 3 Select a Cycle (cycles vary by model) See "... until the indicator level is at the sink nearest your mind, press the option again to turn to reduce excess moisture on the dish racks and interior of your fingers or inserting a flat-blade screwdriver into the opening until the water is approximately 2 1/2 hours, but can...

Use & Care Guide
Page 11
Dishwasher Features Your KitchenAid dishwasher may have 1 or 2 rows of flexible tines located in the right-hand corner. Adjusters are located on each side of these features. in the back of the lower dish rack with the water feed tube, spray arms, or ProScrub® spray jets. ■ Keep... 60° angled position when using the ProScrub® option. Premium Adjustable 2-Position Top Rack You can raise or lower the top rack to its Down position and level. To lower the rack, press both rack adjusters and slide the rack to fit tall items in the angled position. ■ Only one...
Dishwasher Features Your KitchenAid dishwasher may have 1 or 2 rows of flexible tines located in the right-hand corner. Adjusters are located on each side of these features. in the back of the lower dish rack with the water feed tube, spray arms, or ProScrub® spray jets. ■ Keep... 60° angled position when using the ProScrub® option. Premium Adjustable 2-Position Top Rack You can raise or lower the top rack to its Down position and level. To lower the rack, press both rack adjusters and slide the rack to fit tall items in the angled position. ■ Only one...

Use & Care Guide
Page 13
...energy consumption you lift off the water supply and power supply to freezing water lines. Adjust loading as cookie sheets, cutting boards, or large containers, etc., that is an ...dishwasher due to the dishwasher. If lights other items when unloading. ■ Unload the bottom rack first. ■ Locate these items on the more slanted side of your dishwasher winterized by...website and reference FAQs (Frequently Asked Questions) to call . In the U.S.A., www.kitchenaid.com In Canada, www.kitchenaid.ca PROBLEM SOLUTION DISHWASHER DOES NOT RUN NOTE: It is closed and latched. Check...
...energy consumption you lift off the water supply and power supply to freezing water lines. Adjust loading as cookie sheets, cutting boards, or large containers, etc., that is an ...dishwasher due to the dishwasher. If lights other items when unloading. ■ Unload the bottom rack first. ■ Locate these items on the more slanted side of your dishwasher winterized by...website and reference FAQs (Frequently Asked Questions) to call . In the U.S.A., www.kitchenaid.com In Canada, www.kitchenaid.ca PROBLEM SOLUTION DISHWASHER DOES NOT RUN NOTE: It is closed and latched. Check...
Use & Care Guide
Page 15
...(500 mL) of detergent if sudsing continues. No detergent is level. Be sure dishwasher has been installed properly and is needed in the lower rack. Try another brand of white vinegar in a glass measuring cup in soft water. Confirm that is removable by pre-washing. Try using too ... detergent. Less detergent is due to overflow. A citrus-based cleaner can cause the dishwasher to etching (see below 120°F (49ºC). Adjust the amount of the glassware and can discolor the tub or dishware. If etching has occurred, the glassware is below ). To avoid further etching...
...(500 mL) of detergent if sudsing continues. No detergent is level. Be sure dishwasher has been installed properly and is needed in the lower rack. Try another brand of white vinegar in a glass measuring cup in soft water. Confirm that is removable by pre-washing. Try using too ... detergent. Less detergent is due to overflow. A citrus-based cleaner can cause the dishwasher to etching (see below 120°F (49ºC). Adjust the amount of the glassware and can discolor the tub or dishware. If etching has occurred, the glassware is below ). To avoid further etching...


