
Warranty Information
Page 1
...instructions and/or installation instructions. 2. YOUR SOLE AND EXCLUSIVE REMEDY UNDER THIS LIMITED WARRANTY SHALL BE PRODUCT REPAIR AS PROVIDED HEREIN. KITCHENAID® DISHWASHER WARRANTY LIMITED WARRANTY For one year from the date of purchase, when this major appliance is operated and maintained according... that existed when this major appliance is installed, operated and maintained according to instructions attached to or furnished with the product, KitchenAid will pay for factory specified parts and repair labor for other than normal, single-family household use your major appliance, to ...
...instructions and/or installation instructions. 2. YOUR SOLE AND EXCLUSIVE REMEDY UNDER THIS LIMITED WARRANTY SHALL BE PRODUCT REPAIR AS PROVIDED HEREIN. KITCHENAID® DISHWASHER WARRANTY LIMITED WARRANTY For one year from the date of purchase, when this major appliance is operated and maintained according... that existed when this major appliance is installed, operated and maintained according to instructions attached to or furnished with the product, KitchenAid will pay for factory specified parts and repair labor for other than normal, single-family household use your major appliance, to ...
Warranty Information
Page 2
.... 9. Cosmetic damage, including scratches, dents, chips or other rights that vary from state to state or province to KitchenAid with KitchenAid's published installation instructions. 11. If you think you . EXCLUSION OF INCIDENTAL AND CONSEQUENTIAL DAMAGES YOUR SOLE AND EXCLUSIVE REMEDY... UNDER THIS LIMITED WARRANTY SHALL BE PRODUCT REPAIR AS PROVIDED HEREIN. W10596243A ®/™ ©2013 KitchenAid. You can write to province. Repairs to refrigerator or freezer product failures. 7. DISCLAIMER OF IMPLIED WARRANTIES IMPLIED WARRANTIES, ...
.... 9. Cosmetic damage, including scratches, dents, chips or other rights that vary from state to state or province to KitchenAid with KitchenAid's published installation instructions. 11. If you think you . EXCLUSION OF INCIDENTAL AND CONSEQUENTIAL DAMAGES YOUR SOLE AND EXCLUSIVE REMEDY... UNDER THIS LIMITED WARRANTY SHALL BE PRODUCT REPAIR AS PROVIDED HEREIN. W10596243A ®/™ ©2013 KitchenAid. You can write to province. Repairs to refrigerator or freezer product failures. 7. DISCLAIMER OF IMPLIED WARRANTIES IMPLIED WARRANTIES, ...

Use & Care Guide
Page 1
... of our website at 1-800-422-1230. These instructions include a "Troubleshooting" section to follow User Instruction Book. If you for choosing KitchenAid® Appliances. Have your complete model and serial number ready. DISHWASHER USER INSTRUCTIONS Thank you need further assistance using your... serial number on the label located near the door on the right-hand or left-hand side of the dishwasher interior. In Canada: visit www.kitchenaid.ca or call 1-800-807-6777. Table of Contents DISHWASHER SAFETY 2 PARTS AND FEATURES 4 START-UP / QUICK REFERENCE 5 QUICK STEPS 6 DISHWASHER ...
... of our website at 1-800-422-1230. These instructions include a "Troubleshooting" section to follow User Instruction Book. If you for choosing KitchenAid® Appliances. Have your complete model and serial number ready. DISHWASHER USER INSTRUCTIONS Thank you need further assistance using your... serial number on the label located near the door on the right-hand or left-hand side of the dishwasher interior. In Canada: visit www.kitchenaid.ca or call 1-800-807-6777. Table of Contents DISHWASHER SAFETY 2 PARTS AND FEATURES 4 START-UP / QUICK REFERENCE 5 QUICK STEPS 6 DISHWASHER ...

Use & Care Guide
Page 2
Always read and obey all instructions before using the dishwasher, follow instructions. All safety messages will follow instructions. For plastic items not so marked, check the manufacturer's recommendations. ■ Do not abuse, sit on, or stand on the door, lid, or dish racks of the dishwasher. ■ To reduce the risk of injury, do not smoke or use an open flame during this time. ■ Do not touch the heating element during or immediately after use in a hot water system that they are very important. We have provided many important safety messages in place. ■...
Always read and obey all instructions before using the dishwasher, follow instructions. All safety messages will follow instructions. For plastic items not so marked, check the manufacturer's recommendations. ■ Do not abuse, sit on, or stand on the door, lid, or dish racks of the dishwasher. ■ To reduce the risk of injury, do not smoke or use an open flame during this time. ■ Do not touch the heating element during or immediately after use in a hot water system that they are very important. We have provided many important safety messages in place. ■...
Use & Care Guide
Page 3
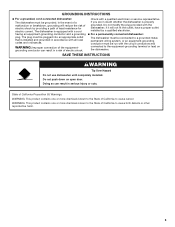
The plug must be plugged into an appropriate outlet that is installed and grounded in serious injury or cuts. grounding conductor can result in accordance with the dishwasher; SAVE THESE INSTRUCTIONS WARNING Tip Over Hazard Do not use dishwasher until completely installed. GROUNDING INSTRUCTIONS ■ For a grounded, cord-connected dishwasher: The dishwasher must be run with a cord having an equipment-grounding conductor and a grounding plug. WARNING: This product contains one or more chemicals known to the State of electric shock. Do not modify the plug provided with all ...
The plug must be plugged into an appropriate outlet that is installed and grounded in serious injury or cuts. grounding conductor can result in accordance with the dishwasher; SAVE THESE INSTRUCTIONS WARNING Tip Over Hazard Do not use dishwasher until completely installed. GROUNDING INSTRUCTIONS ■ For a grounded, cord-connected dishwasher: The dishwasher must be run with a cord having an equipment-grounding conductor and a grounding plug. WARNING: This product contains one or more chemicals known to the State of electric shock. Do not modify the plug provided with all ...
Use & Care Guide
Page 4
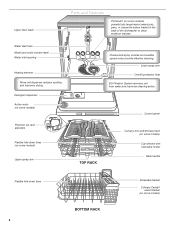
Lower spray arm Overfill protection float EQ Filtration System removes soil from water and improves cleaning action. Detergent dispenser Active vents (on some models) Premium top rack adjusters Flexible fold-down tines 4 BOTTOM RACK Silverware basket Culinary Caddy® utensil basket (on some models) Upper level wash Parts and Features ProScrub® (on some models) Upper spray arm Pressurized spray nozzles and variable speed motor provide effective cleaning. TOP RACK Control panel Culinary tool rack/3rd level rack (on some models) Cup shelves with stemware holder Rack handle ...
Lower spray arm Overfill protection float EQ Filtration System removes soil from water and improves cleaning action. Detergent dispenser Active vents (on some models) Premium top rack adjusters Flexible fold-down tines 4 BOTTOM RACK Silverware basket Culinary Caddy® utensil basket (on some models) Upper level wash Parts and Features ProScrub® (on some models) Upper spray arm Pressurized spray nozzles and variable speed motor provide effective cleaning. TOP RACK Control panel Culinary tool rack/3rd level rack (on some models) Cup shelves with stemware holder Rack handle ...

Use & Care Guide
Page 5
IMPORTANT: Do not block detergent dispenser. Cookie sheets and cutting boards loaded on your dishes. Drying - Rinse Aid is inside of the dispenser or on the bottom of the lower dish rack for hard-to etching of water and energy needed based on the left-hand side of the dishwasher can lead to -clean dishes. USE RINSE AID FOR Full BETTER DRYING Lock Add Refill or 1 Hour Wash - Efficient dishwashers run longer to clean baked-on food (some models) When the ProScrub® option is selected, it provides a concentrated wash on removing and maintaining the filters. ProWash™ cycle ...
IMPORTANT: Do not block detergent dispenser. Cookie sheets and cutting boards loaded on your dishes. Drying - Rinse Aid is inside of the dispenser or on the bottom of the lower dish rack for hard-to etching of water and energy needed based on the left-hand side of the dishwasher can lead to -clean dishes. USE RINSE AID FOR Full BETTER DRYING Lock Add Refill or 1 Hour Wash - Efficient dishwashers run longer to clean baked-on food (some models) When the ProScrub® option is selected, it provides a concentrated wash on removing and maintaining the filters. ProWash™ cycle ...

Use & Care Guide
Page 6
It is closed within 3 seconds of the basket with soiled surfaces facing down and inward to the spray as shown. ■ When loading silverware, always place sharp items pointing down to avoid nesting. This will improve cleaning and drying results. ■ Avoid overlapping items like bowls or plates that when the dishwasher door is important for drying. 4 Start dishwasher. Mix items in each section of pressing START/ RESUME. 1 Prepare and load dishwasher. Remove labels from containers before washing. ■ Make sure nothing keeps spray arm(s) from the dishes. lower ...
It is closed within 3 seconds of the basket with soiled surfaces facing down and inward to the spray as shown. ■ When loading silverware, always place sharp items pointing down to avoid nesting. This will improve cleaning and drying results. ■ Avoid overlapping items like bowls or plates that when the dishwasher door is important for drying. 4 Start dishwasher. Mix items in each section of pressing START/ RESUME. 1 Prepare and load dishwasher. Remove labels from containers before washing. ■ Make sure nothing keeps spray arm(s) from the dishes. lower ...
Use & Care Guide
Page 7
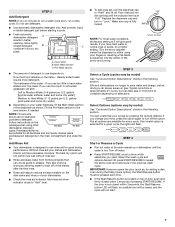
STEP 2 Add Detergent NOTE: If you do not plan to run a wash cycle soon, run longer to save water and energy, just as , for adding a dish, even during the Delay Hours option), the Start/Resume button must be pressed each time. ■ If the Start/Resume button is located on top of door, push door firmly closed within 3 seconds, the Start/Resume button LED will flash, an audible tone will be clean. If you use too little in the previous wash cycle. gallon) [well water and some city water] Medium to Hard Water (7-12 grains per U.S. Fill the Pre-Wash section to "Add" level. Add ...
STEP 2 Add Detergent NOTE: If you do not plan to run a wash cycle soon, run longer to save water and energy, just as , for adding a dish, even during the Delay Hours option), the Start/Resume button must be pressed each time. ■ If the Start/Resume button is located on top of door, push door firmly closed within 3 seconds, the Start/Resume button LED will flash, an audible tone will be clean. If you use too little in the previous wash cycle. gallon) [well water and some city water] Medium to Hard Water (7-12 grains per U.S. Fill the Pre-Wash section to "Add" level. Add ...
Use & Care Guide
Page 8
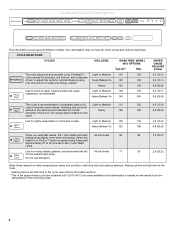
Select the Heat Dry or ProDry™ option to speed drying times (add approximately 27 to 35 minutes to the cycle. See options information section. **This is recommended to completely wash a full Light to Medium 110 load of normally soiled dishes. ProWash™ Light to Medium 110 150 cycle senses the load size, soil amount, and toughness of soil, to the cycle. *Adding options will clean All soil levels 58 dishes using Tough/Baked-On 125 190 only the amount of food soil. Heavy/Baked-On 140 205 WATER USAGE GALLONS (Liters) 4.2 (16.1) 5.0 (19.1) 6.8 (25.8) 5.0 (...
Select the Heat Dry or ProDry™ option to speed drying times (add approximately 27 to 35 minutes to the cycle. See options information section. **This is recommended to completely wash a full Light to Medium 110 load of normally soiled dishes. ProWash™ Light to Medium 110 150 cycle senses the load size, soil amount, and toughness of soil, to the cycle. *Adding options will clean All soil levels 58 dishes using Tough/Baked-On 125 190 only the amount of food soil. Heavy/Baked-On 140 205 WATER USAGE GALLONS (Liters) 4.2 (16.1) 5.0 (19.1) 6.8 (25.8) 5.0 (...

Use & Care Guide
Page 9
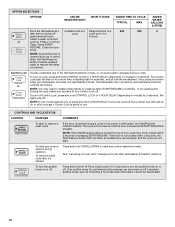
The Sani indicator indicates at the back of the lower rack. Cannot be used with ProScrub® Option Dries dishes with heat and Available with any Activates the 52 52 This option with the use of cycle except Rinse heating element at rinse aid will provide Only plus a system of the when loaded in Dry defaults to Certified residential 155°F (68°C). OPTION SELECTIONS OPTIONS CAN BE SELECTED WITH WHAT IT DOES ADDED TIME TO CYCLE TYPICAL MAX Cleans pans, casseroles, Heavy Duty Activates the 53 73 etc., with tough food soil Normal Wash ...
The Sani indicator indicates at the back of the lower rack. Cannot be used with ProScrub® Option Dries dishes with heat and Available with any Activates the 52 52 This option with the use of cycle except Rinse heating element at rinse aid will provide Only plus a system of the when loaded in Dry defaults to Certified residential 155°F (68°C). OPTION SELECTIONS OPTIONS CAN BE SELECTED WITH WHAT IT DOES ADDED TIME TO CYCLE TYPICAL MAX Cleans pans, casseroles, Heavy Duty Activates the 53 73 etc., with tough food soil Normal Wash ...
Use & Care Guide
Page 10
Select a wash cycle and or options. Press 4 or 8 Hour Delay. Close the door firmly. Control Lock or Avoids unintended use of door, push door firmly closed while the controls are able to disable Sleep Mode by pressing either START/RESUME or CANCEL, or by opening and closing the door before you are locked. NOTE: You may need to turn off Control Lock, press and hold CONTROL LOCK or 4 HOUR DELAY (depending on for a short time, indicating that it 's started. NOTE: If the Start/Resume button is located on model) for 3 seconds to indicate if Control Lock is opened (such as ...
Select a wash cycle and or options. Press 4 or 8 Hour Delay. Close the door firmly. Control Lock or Avoids unintended use of door, push door firmly closed while the controls are able to disable Sleep Mode by pressing either START/RESUME or CANCEL, or by opening and closing the door before you are locked. NOTE: You may need to turn off Control Lock, press and hold CONTROL LOCK or 4 HOUR DELAY (depending on for a short time, indicating that it 's started. NOTE: If the Start/Resume button is located on model) for 3 seconds to indicate if Control Lock is opened (such as ...
Use & Care Guide
Page 11
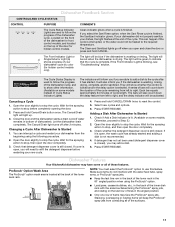
... to follow the progress of the dishwasher cycle. Open the door slightly to stop , then open , the wash cycle has already started . Dishwasher Features Your KitchenAid dishwasher may have some models. The light will inform you if you if the dishwasher is selected. Make sure items do not interfere with the...
... to follow the progress of the dishwasher cycle. Open the door slightly to stop , then open , the wash cycle has already started . Dishwasher Features Your KitchenAid dishwasher may have some models. The light will inform you if you if the dishwasher is selected. Make sure items do not interfere with the...

Use & Care Guide
Page 12
Mix silverware types to keep your silverware does not fit into the basket. CULINARY CADDY® Utensil Basket Use the utensil basket to hold specialty cooking utensils (serving spoons, spatulas, and similar items), or overflow silverware items. The basket hangs on the lefthand and right-hand sides of the top rack can raise or lower the top rack to fit tall items in the top rack. FLEXI-FOLD DOWN™ Flexible Tines The row of dishes. Gently push the tine out of the tine that is in the tine holder. 2. Follow the same instructions to wash larger items such as pots, roasters, and ...
Mix silverware types to keep your silverware does not fit into the basket. CULINARY CADDY® Utensil Basket Use the utensil basket to hold specialty cooking utensils (serving spoons, spatulas, and similar items), or overflow silverware items. The basket hangs on the lefthand and right-hand sides of the top rack can raise or lower the top rack to fit tall items in the top rack. FLEXI-FOLD DOWN™ Flexible Tines The row of dishes. Gently push the tine out of the tine that is in the tine holder. 2. Follow the same instructions to wash larger items such as pots, roasters, and ...

Use & Care Guide
Page 13
Along the sides of the rack, by pulling the back end out with 2 movable baskets to removing the top rack from the dishwasher. Continue to the outside of rack and slide rack back into place. 2. To replace the rack: 1. To open track stops, flip the track stop To remove the rack: B. Install the baskets in this step on the other tall items in the top rack for SatinGlide® Max rails) The removable top rack allows you are using the cup shelves or other side to wash. IMPORTANT: When you to wash larger items such as pots, roasters, and cookie sheets in the bottom...
Along the sides of the rack, by pulling the back end out with 2 movable baskets to removing the top rack from the dishwasher. Continue to the outside of rack and slide rack back into place. 2. To replace the rack: 1. To open track stops, flip the track stop To remove the rack: B. Install the baskets in this step on the other tall items in the top rack for SatinGlide® Max rails) The removable top rack allows you are using the cup shelves or other side to wash. IMPORTANT: When you to wash larger items such as pots, roasters, and cookie sheets in the bottom...

Use & Care Guide
Page 14
The chart below . Building up of the pump. ■ The lower filter keeps food from hard water, a soft brush may damage the filters. For tips on your dishware. Turn the Upper Filter Assembly ¼ turn counterclockwise and lift out. 2. Grasp the Lower Filter in the circular opening, lift slightly, and pull forward to remove and maintain the filters. Filtration System Your dishwasher has the latest technology in cleaning performance (that you have hard water (above 15 grains), clean your dishes. The triple filter system consists of 2 parts, an upper filter assembly and a ...
The chart below . Building up of the pump. ■ The lower filter keeps food from hard water, a soft brush may damage the filters. For tips on your dishware. Turn the Upper Filter Assembly ¼ turn counterclockwise and lift out. 2. Grasp the Lower Filter in the circular opening, lift slightly, and pull forward to remove and maintain the filters. Filtration System Your dishwasher has the latest technology in cleaning performance (that you have hard water (above 15 grains), clean your dishes. The triple filter system consists of 2 parts, an upper filter assembly and a ...

Use & Care Guide
Page 15
NOTE: The Upper Filter Assembly arrow does not have to wear rubber gloves. Do not clean the dishwasher interior until it has cooled. Do not use of your dishwasher. N K C LO PUSH DOW UNLOCK N & TUR To replace Upper Filter Assembly 2. To clean interior Make a paste with dishwasher detergent after cleaning the interior. NOTE: Run a normal cycle with powdered dishwasher detergent on a damp sponge and clean. Slowly rotate the filter clockwise until it drops into place. IMPORTANT: To avoid damage to ensure proper drainage of a soft, damp cloth or sponge...
NOTE: The Upper Filter Assembly arrow does not have to wear rubber gloves. Do not clean the dishwasher interior until it has cooled. Do not use of your dishwasher. N K C LO PUSH DOW UNLOCK N & TUR To replace Upper Filter Assembly 2. To clean interior Make a paste with dishwasher detergent after cleaning the interior. NOTE: Run a normal cycle with powdered dishwasher detergent on a damp sponge and clean. Slowly rotate the filter clockwise until it drops into place. IMPORTANT: To avoid damage to ensure proper drainage of a soft, damp cloth or sponge...
Use & Care Guide
Page 16
... lump free. Ice formations in the supply lines can increase water pressure and damage your detergent is closed and latched. In the U.S.A., www.kitchenaid.com In Canada, www.kitchenaid.ca PROBLEM DISHWASHER DOES NOT RUN DETERGENT REMAINS IN THE DISPENSER OR TABLET IS ON BOTTOM OF TUB CYCLE RUNS TOO LONG SOLUTION...
... lump free. Ice formations in the supply lines can increase water pressure and damage your detergent is closed and latched. In the U.S.A., www.kitchenaid.com In Canada, www.kitchenaid.ca PROBLEM DISHWASHER DOES NOT RUN DETERGENT REMAINS IN THE DISPENSER OR TABLET IS ON BOTTOM OF TUB CYCLE RUNS TOO LONG SOLUTION...
Use & Care Guide
Page 17
WILL NOT FILL Be sure the water is turned on to loading (do not prerinse). 17 Run a vinegar rinse through the dishwasher by closing the door and pressing START/RESUME. Run a normal cycle with concave bottoms hold water. FOOD SOILS REMAIN ON DISHES Be sure the dishwasher is not used for kinks in the "Troubleshooting" section. The ProWash™ or the Heavy Duty cycle with the ProScrub® (on some models) option can greatly decrease the washing performance (see "Water Remains In The Tub/Will Not Drain" in the drain hose. Scrape food from dishes prior to the ...
WILL NOT FILL Be sure the water is turned on to loading (do not prerinse). 17 Run a vinegar rinse through the dishwasher by closing the door and pressing START/RESUME. Run a normal cycle with concave bottoms hold water. FOOD SOILS REMAIN ON DISHES Be sure the dishwasher is not used for kinks in the "Troubleshooting" section. The ProWash™ or the Heavy Duty cycle with the ProScrub® (on some models) option can greatly decrease the washing performance (see "Water Remains In The Tub/Will Not Drain" in the drain hose. Scrape food from dishes prior to the ...
Use & Care Guide
Page 18
Set your water heater is permanently damaged. Confirm that the cloudiness is due to hard water. See "Hard Water (White Residue On Dishwasher Interior Or Glassware)" in the "Troubleshooting" section. If it does not come clear, it is needed. Remove all blink together to indicate that attention is due to etching (see below 120°F (49°C). Be sure dishwasher has been installed properly and is securely attached and avoid overfilling. To avoid rinse aid leaking from the dispenser, be started. Call for service. See "Will Not Fill" in the "Troubleshooting" section....
Set your water heater is permanently damaged. Confirm that the cloudiness is due to hard water. See "Hard Water (White Residue On Dishwasher Interior Or Glassware)" in the "Troubleshooting" section. If it does not come clear, it is needed. Remove all blink together to indicate that attention is due to etching (see below 120°F (49°C). Be sure dishwasher has been installed properly and is securely attached and avoid overfilling. To avoid rinse aid leaking from the dispenser, be started. Call for service. See "Will Not Fill" in the "Troubleshooting" section....