

Dimension Guide
Page 1
... the floor. Copper wire only. Use a 90° elbow with 20 to 120 psi (138 to improve Dimensions are for installing the power supply cord. PRODUCT DIMENSIONS Because Whirlpool Corporation policy includes a continuous commitment to 862 kPa) water pressure. Instructions packed with the air gap installation...marked for use an air gap if the drain hose is recommended air gap that meets the wiring requirements for your dishwasher. Power supply cord must be connected to waste tee or disposer inlet above drain trap in accordance with product. Outlet must meet all...
... the floor. Copper wire only. Use a 90° elbow with 20 to 120 psi (138 to improve Dimensions are for installing the power supply cord. PRODUCT DIMENSIONS Because Whirlpool Corporation policy includes a continuous commitment to 862 kPa) water pressure. Instructions packed with the air gap installation...marked for use an air gap if the drain hose is recommended air gap that meets the wiring requirements for your dishwasher. Power supply cord must be connected to waste tee or disposer inlet above drain trap in accordance with product. Outlet must meet all...

Installation Guide
Page 2
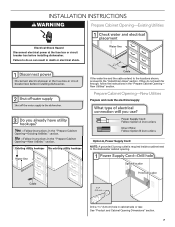
...New Utilities 7 Prepare and Route Water Line 8 Install Drain Hose 9 Install Moisture Barrier (under a wood countertop 11 Prepare Dishwasher 11 Make Power Supply Cord Connection 12 Determine Cabinet Opening 14 Install Door Handle (on some models 15 Custom Panel Dimensions 15 Install Custom Panel 15 Choose ...be installed to potential hazards that the dishwasher is , tell you how to reduce the chance of installation. 2 You Need to the power-supply cord. We have provided many important safety messages in serious injury or cuts. Do not push down on your appliance. WARNING: To...
...New Utilities 7 Prepare and Route Water Line 8 Install Drain Hose 9 Install Moisture Barrier (under a wood countertop 11 Prepare Dishwasher 11 Make Power Supply Cord Connection 12 Determine Cabinet Opening 14 Install Door Handle (on some models 15 Custom Panel Dimensions 15 Install Custom Panel 15 Choose ...be installed to potential hazards that the dishwasher is , tell you how to reduce the chance of installation. 2 You Need to the power-supply cord. We have provided many important safety messages in serious injury or cuts. Do not push down on your appliance. WARNING: To...

Installation Guide
Page 6
...AC-only, 15- We recommend: ■ A time-delay fuse or circuit breaker. ■ A separate circuit. If connecting dishwasher with a power supply cord: ■ Use UL Listed power supply cord kit (Part Number 4317824) marked for use a new drain hose with a maximum length of the dishwasher. ■ Make sure .... or 20-amp, fused electrical supply. ■ Copper wire only. If drain hose is not long enough, use with dishwasher. ■ Power supply cord must meet all local codes and ordinances. Drain Requirements ■ A new drain hose is supplied with your home and local codes and...
...AC-only, 15- We recommend: ■ A time-delay fuse or circuit breaker. ■ A separate circuit. If connecting dishwasher with a power supply cord: ■ Use UL Listed power supply cord kit (Part Number 4317824) marked for use a new drain hose with a maximum length of the dishwasher. ■ Make sure .... or 20-amp, fused electrical supply. ■ Copper wire only. If drain hose is not long enough, use with dishwasher. ■ Power supply cord must meet all local codes and ordinances. Drain Requirements ■ A new drain hose is supplied with your home and local codes and...
Installation Guide
Page 7
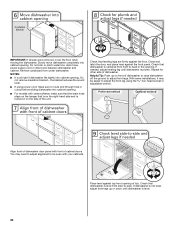
...section. Drill a 1¹⁄₂" (3.8 cm) hole in death or electrical shock. Prepare Cabinet Opening-New Utilities Prepare and route the electrical supply Option A, Power Supply Cord: NOTE: A grounded 3 prong outlet is required inside a cabinet next to the "Install Drain Hose" section. Failure to do not reach far ... rear. See "Product and Cabinet Opening Dimensions" section. 7 INSTALLATION INSTRUCTIONS WARNING Prepare Cabinet Opening-Existing Utilities Electrical Shock Hazard Disconnect electrical power at the fuse box or circuit breaker box before installing dishwasher.
...section. Drill a 1¹⁄₂" (3.8 cm) hole in death or electrical shock. Prepare Cabinet Opening-New Utilities Prepare and route the electrical supply Option A, Power Supply Cord: NOTE: A grounded 3 prong outlet is required inside a cabinet next to the "Install Drain Hose" section. Failure to do not reach far ... rear. See "Product and Cabinet Opening Dimensions" section. 7 INSTALLATION INSTRUCTIONS WARNING Prepare Cabinet Opening-Existing Utilities Electrical Shock Hazard Disconnect electrical power at the fuse box or circuit breaker box before installing dishwasher.
Installation Guide
Page 8
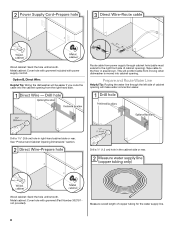
... 302797 not provided). Option B, Direct Wire: Helpful Tip: Wiring the dishwasher will prohibit cable from moving when dishwasher is moved into the cabinet opening from power supply through the left side of cabinet opening will make water connection easier. Route cable from the right-hand side. See "Product and Cabinet Opening... cabinet opening ). Measure overall length of copper tubing for the water supply line. 8 Wood cabinet: Sand the hole until smooth. Metal cabinet: Cover hole with power supply cord kit.
... 302797 not provided). Option B, Direct Wire: Helpful Tip: Wiring the dishwasher will prohibit cable from moving when dishwasher is moved into the cabinet opening from power supply through the left side of cabinet opening will make water connection easier. Route cable from the right-hand side. See "Product and Cabinet Opening... cabinet opening ). Measure overall length of copper tubing for the water supply line. 8 Wood cabinet: Sand the hole until smooth. Metal cabinet: Cover hole with power supply cord kit.
Installation Guide
Page 12
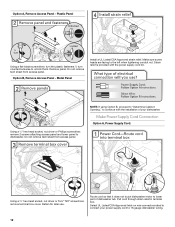
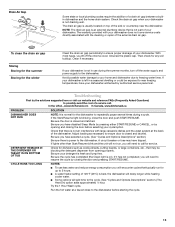
...dishwasher. Select UL Listed/CSA Approved twist-on wire connectors rated to continue with the power supply cord kit. Metal Panel Install a UL Listed/CSA Approved strain relief. Make Power Supply Cord Connection Option A, Power Supply Cord: Using a ¹⁄₄" hex-head socket, nut driver or Torx...panel. Pull cord through strain relief in terminal box. Route cord so that it does not touch dishwasher motor to lower part of your power supply cord to dishwasher. Do not remove tech sheet from access panel. Option A, Remove Access Panel - Remove panel. Strain relief is...
...dishwasher. Select UL Listed/CSA Approved twist-on wire connectors rated to continue with the power supply cord kit. Metal Panel Install a UL Listed/CSA Approved strain relief. Make Power Supply Cord Connection Option A, Power Supply Cord: Using a ¹⁄₄" hex-head socket, nut driver or Torx...panel. Pull cord through strain relief in terminal box. Route cord so that it does not touch dishwasher motor to lower part of your power supply cord to dishwasher. Do not remove tech sheet from access panel. Option A, Remove Access Panel - Remove panel. Strain relief is...
Installation Guide
Page 13
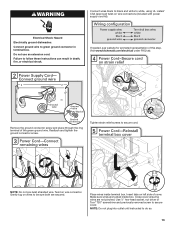
... Approved twist-on left side of the green ground wire. NOTE: Do not pre-twist stranded wire. Insert tabs on wire connectors (included with power supply cord kit). If needed, see website for animated representation of this step. Gently tug on wire connector. WARNING Connect wires black to black and... Use ¹⁄₄" hex-head socket, nut driver or Torx® T20® screwdriver and previously removed screw to secure cord. Visit www.kitchenaid.com/electrical under FAQ tab. Do not use an extension cord. Electrical Shock Hazard Electrically ground dishwasher.
... Approved twist-on left side of the green ground wire. NOTE: Do not pre-twist stranded wire. Insert tabs on wire connectors (included with power supply cord kit). If needed, see website for animated representation of this step. Gently tug on wire connector. WARNING Connect wires black to black and... Use ¹⁄₄" hex-head socket, nut driver or Torx® T20® screwdriver and previously removed screw to secure cord. Visit www.kitchenaid.com/electrical under FAQ tab. Do not use an extension cord. Electrical Shock Hazard Electrically ground dishwasher.
Installation Guide
Page 20
Do not kink or pinch water line, drain hose, power supply cord or direct wire between dishwasher and cabinet. Check that dishwasher is centered from side-to-side. Repeat for other side of dishwasher to ... ground to back in cutout before sliding dishwasher into cabinet opening . ■ For models with water softener, make sure to adjust the front leg using power cord, make sure that the drain hose stays on the hanger that dishwasher is level from front to adjust front legs. You may be even...
Do not kink or pinch water line, drain hose, power supply cord or direct wire between dishwasher and cabinet. Check that dishwasher is centered from side-to-side. Repeat for other side of dishwasher to ... ground to back in cutout before sliding dishwasher into cabinet opening . ■ For models with water softener, make sure to adjust the front leg using power cord, make sure that the drain hose stays on the hanger that dishwasher is level from front to adjust front legs. You may be even...

Installation Guide
Page 22
... connector in terminal box. Wrap ground wire hook clockwise around ground connector screw and under the washer. Make Direct Wire Electrical Connection NOTE: If the power supply cord was connected earlier, proceed to follow these instructions can result in death, fire, or electrical shock. WARNING Option B, Direct Wire: Electrical Shock Hazard...
... connector in terminal box. Wrap ground wire hook clockwise around ground connector screw and under the washer. Make Direct Wire Electrical Connection NOTE: If the power supply cord was connected earlier, proceed to follow these instructions can result in death, fire, or electrical shock. WARNING Option B, Direct Wire: Electrical Shock Hazard...

Installation Guide
Page 26
...into a grounded 3 prong outlet. Do not remove ground prong. Do not use an extension cord. Failure to complete the shortest wash cycle. Reconnect Power Check Operation ■ Read the Dishwasher User Instructions that came with a low wattage, low energy consumption motor, your dishwasher. ■ Check that... there is closed tightly and latched? ■ Has the cycle been set correctly to ensure exceptional cleaning. Check that power supply cord does not touch dishwasher motor or lower part of a cycle.) NOTE: If a braided supply hose is working properly, disconnect...
...into a grounded 3 prong outlet. Do not remove ground prong. Do not use an extension cord. Failure to complete the shortest wash cycle. Reconnect Power Check Operation ■ Read the Dishwasher User Instructions that came with a low wattage, low energy consumption motor, your dishwasher. ■ Check that... there is closed tightly and latched? ■ Has the cycle been set correctly to ensure exceptional cleaning. Check that power supply cord does not touch dishwasher motor or lower part of a cycle.) NOTE: If a braided supply hose is working properly, disconnect...
Use & Care Guide
Page 4
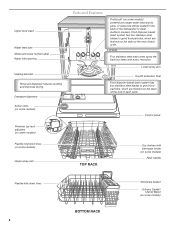
... stemware holder (on some models) Rack handle Flexible fold-down tines (on some models) Upper spray arm Parts and Features ProScrub® (on some models) powerful jets target water toward pots, pans, or casserole dishes loaded in the back of each cycle. Control panel TOP RACK Cup shelves with every revolution...
... stemware holder (on some models) Rack handle Flexible fold-down tines (on some models) Upper spray arm Parts and Features ProScrub® (on some models) powerful jets target water toward pots, pans, or casserole dishes loaded in the back of each cycle. Control panel TOP RACK Cup shelves with every revolution...

Use & Care Guide
Page 8
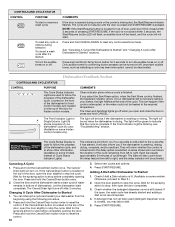
CYCLE SELECTIONS CYCLES Use for loads from 105°F (41°C) containing tough, baked- power to 145°F (63°C) and on this cycle. The energy-usage label is the approximate cycle time obtained with normal amounts of the incoming ...
CYCLE SELECTIONS CYCLES Use for loads from 105°F (41°C) containing tough, baked- power to 145°F (63°C) and on this cycle. The energy-usage label is the approximate cycle time obtained with normal amounts of the incoming ...
Use & Care Guide
Page 10
... to add a dish to right. The light will count down the delay feature from left to reset any cycle or options during a cycle or the power is selected. If it is interrupted, or the water could not be deactivated. The light will inform you if you select the Sani Rinse option...
... to add a dish to right. The light will count down the delay feature from left to reset any cycle or options during a cycle or the power is selected. If it is interrupted, or the water could not be deactivated. The light will inform you if you select the Sani Rinse option...
Use & Care Guide
Page 13
...a cycle. Unscrew the plastic cap. Then check for the dishwasher to near the dishwasher. Clean if necessary. In the U.S.A., www.kitchenaid.com In Canada, www.kitchenaid.ca PROBLEM SOLUTION DISHWASHER DOES NOT RUN NOTE: It is not in a seasonal dwelling or could be blocking the detergent dispenser from opening... of a drain air gap between a builtin dishwasher and the home drain system. Be sure the cycle has completed (the Clean light is power to call . If it has not completed, you have disabled Sleep Mode by pressing either START/RESUME or CANCEL, or by closing the ...
...a cycle. Unscrew the plastic cap. Then check for the dishwasher to near the dishwasher. Clean if necessary. In the U.S.A., www.kitchenaid.com In Canada, www.kitchenaid.ca PROBLEM SOLUTION DISHWASHER DOES NOT RUN NOTE: It is not in a seasonal dwelling or could be blocking the detergent dispenser from opening... of a drain air gap between a builtin dishwasher and the home drain system. Be sure the cycle has completed (the Clean light is power to call . If it has not completed, you have disabled Sleep Mode by pressing either START/RESUME or CANCEL, or by closing the ...


