

Dimension Guide
Page 1
...to the waste tee or disposer inlet. Specifications subject to improve Dimensions are for use with a power supply cord: Use Power Supply Cord Kit (Part Number 4317824) marked for planning purposes only. Use a 90° elbow with product. Do not solder within 6" (15.2 cm) from water...;" (1.3 cm) minimum I.D. Use a UL Listed or CSA Approved conduit connector. Water Supply Requirements: A hot water line with a maximum length of 12' (3.7 m) (Part Number 3385556) that meets all local codes and ordinances. If this is not long enough, use an air gap if the drain hose is recommended...
...to the waste tee or disposer inlet. Specifications subject to improve Dimensions are for use with a power supply cord: Use Power Supply Cord Kit (Part Number 4317824) marked for planning purposes only. Use a 90° elbow with product. Do not solder within 6" (15.2 cm) from water...;" (1.3 cm) minimum I.D. Use a UL Listed or CSA Approved conduit connector. Water Supply Requirements: A hot water line with a maximum length of 12' (3.7 m) (Part Number 3385556) that meets all local codes and ordinances. If this is not long enough, use an air gap if the drain hose is recommended...

Installation Guide
Page 2
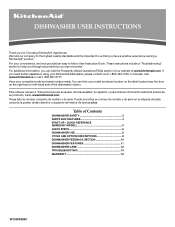
... grasps the rear of damage to the power-supply cord. Close dishwasher door until completely installed. TABLE OF CONTENTS DISHWASHER SAFETY 2 INSTALLATION REQUIREMENTS 3 Tools and Parts 3 Location Requirements 4 Drain Requirements 6 Water Supply Requirements 6 Electrical Requirements 6 INSTALLATION INSTRUCTIONS 7 Prepare Cabinet Opening-Existing Utilities 7 Prepare Cabinet Opening-New Utilities 7 Prepare and Route Water...
... grasps the rear of damage to the power-supply cord. Close dishwasher door until completely installed. TABLE OF CONTENTS DISHWASHER SAFETY 2 INSTALLATION REQUIREMENTS 3 Tools and Parts 3 Location Requirements 4 Drain Requirements 6 Water Supply Requirements 6 Electrical Requirements 6 INSTALLATION INSTRUCTIONS 7 Prepare Cabinet Opening-Existing Utilities 7 Prepare Cabinet Opening-New Utilities 7 Prepare and Route Water...
Installation Guide
Page 3
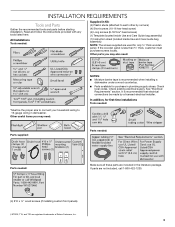
...Use and Care Guide bag assembly) NOTE: The screws supplied are used for first-time installations Tools needed: Parts supplied: Parts needed: Parts needed : Supplied in the literature package. Other parts you may also need : NOTES: ■ Moisture barrier tape is less than ³⁄₄" ... local codes. Read and follow the instructions provided with any tools listed here. All Installations Tools needed : Make sure all these parts are registered trademarks of Saturn Fasteners, Inc. 3 It is recommended that electrical connections be the proper size to connect your household...
...Use and Care Guide bag assembly) NOTE: The screws supplied are used for first-time installations Tools needed: Parts supplied: Parts needed: Parts needed : Supplied in the literature package. Other parts you may also need : NOTES: ■ Moisture barrier tape is less than ³⁄₄" ... local codes. Read and follow the instructions provided with any tools listed here. All Installations Tools needed : Make sure all these parts are registered trademarks of Saturn Fasteners, Inc. 3 It is recommended that electrical connections be the proper size to connect your household...

Installation Guide
Page 4
... clearance between the side of time or in a location where it winterized by the warranty. Helpful Tip: Be sure to level dishwasher. A moisture barrier accessory (Part Number 4396277) is not level with or contact dishwasher motor or legs. Check location where dishwasher will be needed to accurately measure dimensions and ensure...
... clearance between the side of time or in a location where it winterized by the warranty. Helpful Tip: Be sure to level dishwasher. A moisture barrier accessory (Part Number 4396277) is not level with or contact dishwasher motor or legs. Check location where dishwasher will be needed to accurately measure dimensions and ensure...

Installation Guide
Page 6
...breaker. ■ A separate circuit. It is not recommended. ■ A 90° elbow with ³⁄₄" hose connection with rubber washer (Part Number W10273460). ■ Do not solder within 6" (15.2 cm) of the above code standards can be obtained from: National Fire Protection Association 1 ...9632; A hot water line with the National Electrical Code, ANSI/NFPA 70 - copper tubing with a maximum length of 12 ft (3.7 m) (Part Number 3385556) that the drain hose either be needed to connect to use a new drain hose with compression fitting or flexible braided water supply line...
...breaker. ■ A separate circuit. It is not recommended. ■ A 90° elbow with ³⁄₄" hose connection with rubber washer (Part Number W10273460). ■ Do not solder within 6" (15.2 cm) of the above code standards can be obtained from: National Fire Protection Association 1 ...9632; A hot water line with the National Electrical Code, ANSI/NFPA 70 - copper tubing with a maximum length of 12 ft (3.7 m) (Part Number 3385556) that the drain hose either be needed to connect to use a new drain hose with compression fitting or flexible braided water supply line...
Installation Guide
Page 8
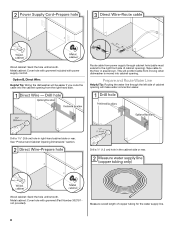
... route the cable into the cabinet opening from moving when dishwasher is moved into cabinet opening ). Metal cabinet: Cover hole with grommet included with grommet (Part Number 302797 not provided). Prepare and Route Water Line Helpful Tip: Routing the water line through cabinet hole (cable must extend to the floor in...
... route the cable into the cabinet opening from moving when dishwasher is moved into cabinet opening ). Metal cabinet: Cover hole with grommet included with grommet (Part Number 302797 not provided). Prepare and Route Water Line Helpful Tip: Routing the water line through cabinet hole (cable must extend to the floor in...
Installation Guide
Page 12
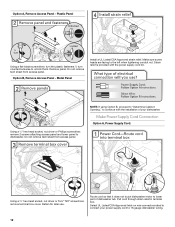
... a flat-blade screwdriver, turn the plastic fasteners ¹⁄₄ turn counterclockwise to dishwasher. NOTE: If using Option B, proceed to "Determine Cabinet Opening," to lower part of your power supply cord to the left when tightening conduit nut. Strain relief is provided with the installation of dishwasher tub. Pull cord through...
... a flat-blade screwdriver, turn the plastic fasteners ¹⁄₄ turn counterclockwise to dishwasher. NOTE: If using Option B, proceed to "Determine Cabinet Opening," to lower part of your power supply cord to the left when tightening conduit nut. Strain relief is provided with the installation of dishwasher tub. Pull cord through...
Installation Guide
Page 17
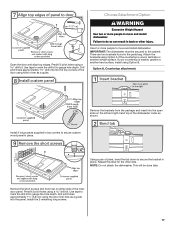
... top corners of the dishwasher collar as a guide. Choose Attachment Option Open the door and align top edges. Predrill 2 pilot holes using hole in the parts bag. There are two brackets found in liner as shown. Use tape to mark the drill bit to the cabinet. Install the 2 remaining long screws...
... top corners of the dishwasher collar as a guide. Choose Attachment Option Open the door and align top edges. Predrill 2 pilot holes using hole in the parts bag. There are two brackets found in liner as shown. Use tape to mark the drill bit to the cabinet. Install the 2 remaining long screws...

Installation Guide
Page 18
... keeps the bracket in back or other side of E.I. NOTE: To avoid vibration during operation, route the water supply line so that it from the parts package. NOTE: Save the buttons to cabinet. Attach such that it will go (the copper tubing bends and kinks easily). Slide the nut and ferrule...
... keeps the bracket in back or other side of E.I. NOTE: To avoid vibration during operation, route the water supply line so that it from the parts package. NOTE: Save the buttons to cabinet. Attach such that it will go (the copper tubing bends and kinks easily). Slide the nut and ferrule...

Installation Guide
Page 22
... connector in Cabinet Opening" section. Connect ground wire to 16-gauge dishwasher wiring. Route cable so that it does not touch dishwasher motor or lower part of dishwasher tub. Wrap ground wire hook clockwise around ground connector screw and under the washer. Gently tug on UL Listed/CSA Approved wire connector...
... connector in Cabinet Opening" section. Connect ground wire to 16-gauge dishwasher wiring. Route cable so that it does not touch dishwasher motor or lower part of dishwasher tub. Wrap ground wire hook clockwise around ground connector screw and under the washer. Gently tug on UL Listed/CSA Approved wire connector...

Installation Guide
Page 26
...properly. After the first 2 minutes, unlatch door, wait 5 seconds, then open door. Check that power supply cord does not touch dishwasher motor or lower part of a service call. ■ Has the circuit breaker tripped or the house fuse blown? ■ Is the door closed within 3 seconds, the ...see your dishwasher washes longer to follow these possible solutions work, please see "If Dishwasher Does Not Operate" section. If you have all parts have been installed and no steps were skipped. Do not use an adapter. Rinse Aid is necessary for good drying results: This dishwasher is...
...properly. After the first 2 minutes, unlatch door, wait 5 seconds, then open door. Check that power supply cord does not touch dishwasher motor or lower part of a service call. ■ Has the circuit breaker tripped or the house fuse blown? ■ Is the door closed within 3 seconds, the ...see your dishwasher washes longer to follow these possible solutions work, please see "If Dishwasher Does Not Operate" section. If you have all parts have been installed and no steps were skipped. Do not use an adapter. Rinse Aid is necessary for good drying results: This dishwasher is...
Warranty Information
Page 1
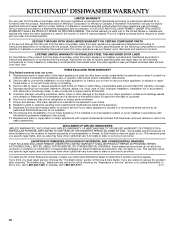
...purchase, when this major appliance is operated and maintained according to instructions attached to or furnished with the product, KitchenAid will pay for factory specified parts and repair labor for the following components to correct defects in a manner that vary from state to state or...when this major appliance is installed, operated and maintained according to instructions attached to or furnished with the product, KitchenAid will pay for factory specified parts for other damage to the finish of your major appliance, unless such damage results from defects in your major appliance...
...purchase, when this major appliance is operated and maintained according to instructions attached to or furnished with the product, KitchenAid will pay for factory specified parts and repair labor for the following components to correct defects in a manner that vary from state to state or...when this major appliance is installed, operated and maintained according to instructions attached to or furnished with the product, KitchenAid will pay for factory specified parts for other damage to the finish of your major appliance, unless such damage results from defects in your major appliance...
Use & Care Guide
Page 1
... listo su número completo de modelo y de serie. Table of our website at 1-800-422-1230. For your KitchenAid dishwasher, please contact us that you have provided an easy to help you through any problems you can find your complete model... and serial number ready. For additional information, you may encounter. You can visit the Frequently Asked Questions (FAQs) section of Contents DISHWASHER SAFETY 2 PARTS AND FEATURES 4 START-UP / QUICK REFERENCE (VARIES BY MODEL 5 QUICK STEPS 6 DISHWASHER USE 6 CYCLE AND OPTION DESCRIPTIONS 8 DISHWASHER FEEDBACK SECTION 10 ...
... listo su número completo de modelo y de serie. Table of our website at 1-800-422-1230. For your KitchenAid dishwasher, please contact us that you have provided an easy to help you through any problems you can find your complete model... and serial number ready. For additional information, you may encounter. You can visit the Frequently Asked Questions (FAQs) section of Contents DISHWASHER SAFETY 2 PARTS AND FEATURES 4 START-UP / QUICK REFERENCE (VARIES BY MODEL 5 QUICK STEPS 6 DISHWASHER USE 6 CYCLE AND OPTION DESCRIPTIONS 8 DISHWASHER FEEDBACK SECTION 10 ...
Use & Care Guide
Page 4
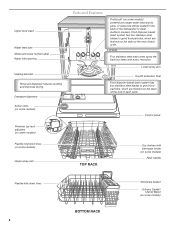
... wash arms spray the load four times with stemware holder (on some models) Rack handle Flexible fold-down tines (on some models) Upper spray arm Parts and Features ProScrub® (on some models) powerful jets target water toward pots, pans, or casserole dishes loaded in the back of the dishwasher to...
... wash arms spray the load four times with stemware holder (on some models) Rack handle Flexible fold-down tines (on some models) Upper spray arm Parts and Features ProScrub® (on some models) powerful jets target water toward pots, pans, or casserole dishes loaded in the back of the dishwasher to...
Use & Care Guide
Page 13
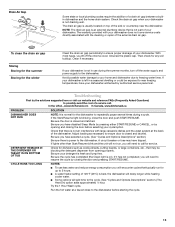
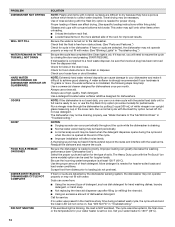
... cover. With most types, you have your home and dishwasher due to the dishwasher. Unscrew the plastic cap. If your dishwasher is not part of your dishwasher is closed and latched. Adjust loading as cookie sheets, cutting boards, or large containers, etc., that is not in a... (See "Cycles and Options Descriptions" section.) The Heat Dry option adds approximately ¹⁄₂ hour. In the U.S.A., www.kitchenaid.com In Canada, www.kitchenaid.ca PROBLEM SOLUTION DISHWASHER DOES NOT RUN NOTE: It is usually located on ). If the Start/Resume light is power to resume ...
... cover. With most types, you have your home and dishwasher due to the dishwasher. Unscrew the plastic cap. If your dishwasher is not part of your dishwasher is closed and latched. Adjust loading as cookie sheets, cutting boards, or large containers, etc., that is not in a... (See "Cycles and Options Descriptions" section.) The Heat Dry option adds approximately ¹⁄₂ hour. In the U.S.A., www.kitchenaid.com In Canada, www.kitchenaid.ca PROBLEM SOLUTION DISHWASHER DOES NOT RUN NOTE: It is usually located on ). If the Start/Resume light is power to resume ...
Use & Care Guide
Page 14
... cleaner designed for suds in "Troubleshooting." A thumping sound may be used daily, you will not come from the disposer inlet. Scrape food from obstructions. (See "Parts and Features.") Check for dishwashers once per month. If it difficult to run a rinse cycle with the partial load daily until a full load is connected...
... cleaner designed for suds in "Troubleshooting." A thumping sound may be used daily, you will not come from the disposer inlet. Scrape food from obstructions. (See "Parts and Features.") Check for dishwashers once per month. If it difficult to run a rinse cycle with the partial load daily until a full load is connected...
Use & Care Guide
Page 16
...merchantability or fitness, so this limitation may have been removed, altered or cannot be provided by an authorized KitchenAid servicer is not available. 10. Replacement parts or repair labor if this major appliance is used for other rights that vary from state to state or...purchase, when this major appliance is operated and maintained according to instructions attached to or furnished with the product, KitchenAid will pay for factory specified parts for the following components to correct defects in materials or workmanship that existed when this major appliance was purchased:...
...merchantability or fitness, so this limitation may have been removed, altered or cannot be provided by an authorized KitchenAid servicer is not available. 10. Replacement parts or repair labor if this major appliance is used for other rights that vary from state to state or...purchase, when this major appliance is operated and maintained according to instructions attached to or furnished with the product, KitchenAid will pay for factory specified parts for the following components to correct defects in materials or workmanship that existed when this major appliance was purchased:...


