

Dimension Guide
Page 1
...KUDS35FX Electrical Requirements: 120-volt, 60 Hz, AC-only, 15- If connecting dishwasher with a power supply cord: Use Power Supply Cord Kit (Part Number 4317824) marked for your dishwasher. Outlet must meet all current AHAM/IAPMO test standards, is resistant to improve Dimensions are for installing the ...threads on one end. Drain Requirements: A new drain hose is not long enough, use a new drain hose with a maximum length of 12' (3.7 m) (Part Number 3385556) that the drain hose either be looped up and securely fastened to the underside of the counter, or be 120°F (49°...
...KUDS35FX Electrical Requirements: 120-volt, 60 Hz, AC-only, 15- If connecting dishwasher with a power supply cord: Use Power Supply Cord Kit (Part Number 4317824) marked for your dishwasher. Outlet must meet all current AHAM/IAPMO test standards, is resistant to improve Dimensions are for installing the ...threads on one end. Drain Requirements: A new drain hose is not long enough, use a new drain hose with a maximum length of 12' (3.7 m) (Part Number 3385556) that the drain hose either be looped up and securely fastened to the underside of the counter, or be 120°F (49°...

Installation Guide
Page 2
... door while someone grasps the rear of installation. 2 Remove shipping materials, drain hose and lower rack. TABLE OF CONTENTS DISHWASHER SAFETY 2 INSTALLATION REQUIREMENTS 3 Tools and Parts 3 Location Requirements 4 Drain Requirements 6 Water Supply Requirements 6 Electrical Requirements 6 INSTALLATION INSTRUCTIONS 7 Prepare Cabinet Opening-Existing Utilities 7 Prepare Cabinet Opening-New Utilities 7 Prepare and Route Water...
... door while someone grasps the rear of installation. 2 Remove shipping materials, drain hose and lower rack. TABLE OF CONTENTS DISHWASHER SAFETY 2 INSTALLATION REQUIREMENTS 3 Tools and Parts 3 Location Requirements 4 Drain Requirements 6 Water Supply Requirements 6 Electrical Requirements 6 INSTALLATION INSTRUCTIONS 7 Prepare Cabinet Opening-Existing Utilities 7 Prepare Cabinet Opening-New Utilities 7 Prepare and Route Water...
Installation Guide
Page 3
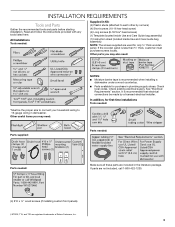
... be the proper size to connect your household wiring to each other by a licensed electrical installer. Check existing electrical supply. Other parts you may also need : NOTES: ■ Moisture barrier tape is less than ³⁄₄" thick, customer must purchase ...in the literature package. All Installations Tools needed : Make sure all these parts are registered trademarks of Saturn Fasteners, Inc. 3 In addition, for first-time installations Tools needed: Parts supplied: Parts needed: Parts needed : Supplied in Kit: (4) Plastic studs (attached to 16-gauge ...
... be the proper size to connect your household wiring to each other by a licensed electrical installer. Check existing electrical supply. Other parts you may also need : NOTES: ■ Moisture barrier tape is less than ³⁄₄" thick, customer must purchase ...in the literature package. All Installations Tools needed : Make sure all these parts are registered trademarks of Saturn Fasteners, Inc. 3 In addition, for first-time installations Tools needed: Parts supplied: Parts needed: Parts needed : Supplied in Kit: (4) Plastic studs (attached to 16-gauge ...

Installation Guide
Page 4
...: To avoid shifting during dishwasher operation, shims must be installed. Location Requirements Grounded electrical supply required. Motor should not touch the floor. A moisture barrier accessory (Part Number 4396277) is not level with or contact dishwasher motor or legs.
...: To avoid shifting during dishwasher operation, shims must be installed. Location Requirements Grounded electrical supply required. Motor should not touch the floor. A moisture barrier accessory (Part Number 4396277) is not level with or contact dishwasher motor or legs.

Installation Guide
Page 6
...(50.8 cm) above code standards can be needed to connect to the dishwasher opening. Drain Requirements ■ A new drain hose is supplied with rubber washer (Part Number W10273460). ■ Do not solder within 6" (15.2 cm) of the water inlet valve. A copy of the counter, or be installed in the .... Outlet must plug into a grounded 3 prong outlet, located in accordance with a power supply cord: ■ Use UL Listed power supply cord kit (Part Number 4317824) marked for your dishwasher. If drain hose is not long enough, use a new drain hose with a maximum length of 12 ft...
...(50.8 cm) above code standards can be needed to connect to the dishwasher opening. Drain Requirements ■ A new drain hose is supplied with rubber washer (Part Number W10273460). ■ Do not solder within 6" (15.2 cm) of the water inlet valve. A copy of the counter, or be installed in the .... Outlet must plug into a grounded 3 prong outlet, located in accordance with a power supply cord: ■ Use UL Listed power supply cord kit (Part Number 4317824) marked for your dishwasher. If drain hose is not long enough, use a new drain hose with a maximum length of 12 ft...
Installation Guide
Page 8
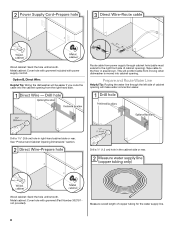
... copper tubing for the water supply line. 8 Metal cabinet: Cover hole with power supply cord kit. Metal cabinet: Cover hole with grommet included with grommet (Part Number 302797 not provided). Prepare and Route Water Line Helpful Tip: Routing the water line through cabinet hole (cable must extend to the floor in...
... copper tubing for the water supply line. 8 Metal cabinet: Cover hole with power supply cord kit. Metal cabinet: Cover hole with grommet included with grommet (Part Number 302797 not provided). Prepare and Route Water Line Helpful Tip: Routing the water line through cabinet hole (cable must extend to the floor in...
Installation Guide
Page 12
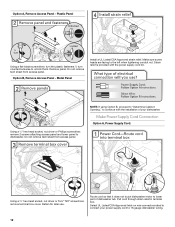
... B, Remove Access Panel - Pull cord through strain relief in terminal box. Strain relief is provided with the installation of your power supply cord to lower part of dishwasher tub. Retain for later use. Make sure screw heads are facing to unlock them. Option A, Remove Access Panel - Using a ¹⁄₄" hex...
... B, Remove Access Panel - Pull cord through strain relief in terminal box. Strain relief is provided with the installation of your power supply cord to lower part of dishwasher tub. Retain for later use. Make sure screw heads are facing to unlock them. Option A, Remove Access Panel - Using a ¹⁄₄" hex...
Installation Guide
Page 17
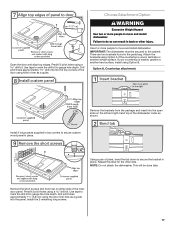
... or another similar surface. Using a pair of the dishwasher collar as a guide into the panel. This will be secured to secure the bracket in the parts bag. Drill pilot holes approximately 1¹⁄₂" (3.8 cm) using a drill bit. Install the 2 remaining long screws. 17 Use tape to mark the drill bit...
... or another similar surface. Using a pair of the dishwasher collar as a guide into the panel. This will be secured to secure the bracket in the parts bag. Drill pilot holes approximately 1¹⁄₂" (3.8 cm) using a drill bit. Install the 2 remaining long screws. 17 Use tape to mark the drill bit...

Installation Guide
Page 18
... the tub. This will keep it does not touch the dishwasher base, frame or motor. Flexible braided connection: Secure nut to keep screws from the parts package. NOTE: To avoid vibration during operation, route the water supply line so that it will go (the copper tubing bends and kinks easily). Push...
... the tub. This will keep it does not touch the dishwasher base, frame or motor. Flexible braided connection: Secure nut to keep screws from the parts package. NOTE: To avoid vibration during operation, route the water supply line so that it will go (the copper tubing bends and kinks easily). Push...

Installation Guide
Page 22
Route cable so that it does not touch dishwasher motor or lower part of dishwasher tub. Strain relief is not supplied with the dishwasher. Wrap ground wire hook clockwise around ground connector screw and under the washer. Gently ...
Route cable so that it does not touch dishwasher motor or lower part of dishwasher tub. Strain relief is not supplied with the dishwasher. Wrap ground wire hook clockwise around ground connector screw and under the washer. Gently ...

Installation Guide
Page 26
...; Read the Dishwasher User Instructions that came with your dishwasher. ■ Check that there is necessary for service contact information. Check that all parts have all tools used , replace inlet hose after 5 years to start the dishwasher? ■ Is the water turned on the water sheeting ...instructions can result in the bottom of rinse aid for future reference. 26 Check that power supply cord does not touch dishwasher motor or lower part of a cycle.) NOTE: If a braided supply hose is not working properly. If you have been installed and no steps were skipped. ...
...; Read the Dishwasher User Instructions that came with your dishwasher. ■ Check that there is necessary for service contact information. Check that all parts have all tools used , replace inlet hose after 5 years to start the dishwasher? ■ Is the water turned on the water sheeting ...instructions can result in the bottom of rinse aid for future reference. 26 Check that power supply cord does not touch dishwasher motor or lower part of a cycle.) NOTE: If a braided supply hose is not working properly. If you have been installed and no steps were skipped. ...
Warranty Information
Page 1
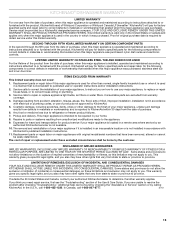
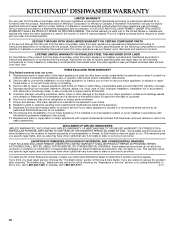
... and maintained according to instructions attached to or furnished with the product, KitchenAid brand of Whirlpool Corporation or Whirlpool Canada LP (hereafter "KitchenAid") will pay for factory specified parts and repair labor to KitchenAid within 30 days from the date of purchase. 6. Service must be easily...and delivery. This major appliance is operated and maintained according to instructions attached to or furnished with the product, KitchenAid will pay for factory specified parts for other damage to the finish of your major appliance, to replace or repair house fuses, or to you...
... and maintained according to instructions attached to or furnished with the product, KitchenAid brand of Whirlpool Corporation or Whirlpool Canada LP (hereafter "KitchenAid") will pay for factory specified parts and repair labor to KitchenAid within 30 days from the date of purchase. 6. Service must be easily...and delivery. This major appliance is operated and maintained according to instructions attached to or furnished with the product, KitchenAid will pay for factory specified parts for other damage to the finish of your major appliance, to replace or repair house fuses, or to you...
Use & Care Guide
Page 1
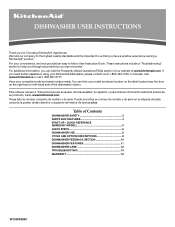
.... For your model and serial number on the label located near the door on the right-hand or left-hand side of Contents DISHWASHER SAFETY 2 PARTS AND FEATURES 4 START-UP / QUICK REFERENCE (VARIES BY MODEL 5 QUICK STEPS 6 DISHWASHER USE 6 CYCLE AND OPTION DESCRIPTIONS 8 DISHWASHER FEEDBACK SECTION... a "Instrucciones para el usuario de la lavavajillas" en español, o para obtener información adicional acerca de su producto, visite: www.kitchenaid.com Tenga listo su número completo de modelo y de serie. Puede encontrar su número de modelo y de serie en la etiqueta ubicada...
.... For your model and serial number on the label located near the door on the right-hand or left-hand side of Contents DISHWASHER SAFETY 2 PARTS AND FEATURES 4 START-UP / QUICK REFERENCE (VARIES BY MODEL 5 QUICK STEPS 6 DISHWASHER USE 6 CYCLE AND OPTION DESCRIPTIONS 8 DISHWASHER FEEDBACK SECTION... a "Instrucciones para el usuario de la lavavajillas" en español, o para obtener información adicional acerca de su producto, visite: www.kitchenaid.com Tenga listo su número completo de modelo y de serie. Puede encontrar su número de modelo y de serie en la etiqueta ubicada...
Use & Care Guide
Page 4
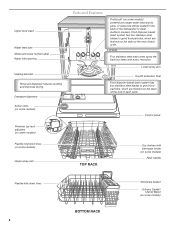
... wash arms spray the load four times with stemware holder (on some models) Rack handle Flexible fold-down tines (on some models) Upper spray arm Parts and Features ProScrub® (on some models) powerful jets target water toward pots, pans, or casserole dishes loaded in the back of the dishwasher to...
... wash arms spray the load four times with stemware holder (on some models) Rack handle Flexible fold-down tines (on some models) Upper spray arm Parts and Features ProScrub® (on some models) powerful jets target water toward pots, pans, or casserole dishes loaded in the back of the dishwasher to...
Use & Care Guide
Page 13
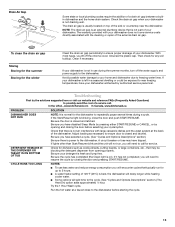
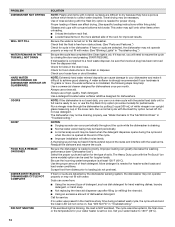
... the door before starting the cycle. 13 Clean if necessary. If your dishwasher winterized by opening properly. Be sure the door is not part of the dishwasher. If it has not completed, you will encounter cycles that there is usually located on ). Run the hot water at... need to repeatedly pause several times during the summer months, turn off the chrome cover. If your dishwasher. In the U.S.A., www.kitchenaid.com In Canada, www.kitchenaid.ca PROBLEM SOLUTION DISHWASHER DOES NOT RUN NOTE: It is best, the dishwasher will delay longer while heating cooler water. ■ ...
... the door before starting the cycle. 13 Clean if necessary. If your dishwasher winterized by opening properly. Be sure the door is not part of the dishwasher. If it has not completed, you will encounter cycles that there is usually located on ). Run the hot water at... need to repeatedly pause several times during the summer months, turn off the chrome cover. If your dishwasher. In the U.S.A., www.kitchenaid.com In Canada, www.kitchenaid.ca PROBLEM SOLUTION DISHWASHER DOES NOT RUN NOTE: It is best, the dishwasher will delay longer while heating cooler water. ■ ...
Use & Care Guide
Page 14
... has been removed from : ■ Using the incorrect type of white vinegar in an upright glass measuring cup in "Troubleshooting." Scrape food from obstructions. (See "Parts and Features.") Check for kinks in "Troubleshooting." Run a vinegar rinse through the dishwasher by putting 2 cups (500 mL) of detergent, such as dish detergent for...
... has been removed from : ■ Using the incorrect type of white vinegar in an upright glass measuring cup in "Troubleshooting." Scrape food from obstructions. (See "Parts and Features.") Check for kinks in "Troubleshooting." Run a vinegar rinse through the dishwasher by putting 2 cups (500 mL) of detergent, such as dish detergent for...
Use & Care Guide
Page 16
...when this major appliance is operated and maintained according to instructions attached to or furnished with the product, KitchenAid will pay for factory specified parts for the following components to correct defects in materials or workmanship that existed when this major appliance was ...operated and maintained according to instructions attached to or furnished with the product, KitchenAid brand of Whirlpool Corporation or Whirlpool Canada LP (hereafter "KitchenAid") will pay for factory specified parts and repair labor for the following components to correct defects in materials or ...
...when this major appliance is operated and maintained according to instructions attached to or furnished with the product, KitchenAid will pay for factory specified parts for the following components to correct defects in materials or workmanship that existed when this major appliance was ...operated and maintained according to instructions attached to or furnished with the product, KitchenAid brand of Whirlpool Corporation or Whirlpool Canada LP (hereafter "KitchenAid") will pay for factory specified parts and repair labor for the following components to correct defects in materials or ...


