
Dimension Guide
Page 1
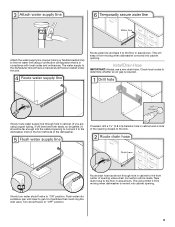
... connect to 862 kPa) water pressure. It is recommended air gap that meets all local codes and ordinances. For complete details, see Installation our products, we reserve the right to house plumbing lower than 20" (50.8 cm) above the floor. Undercounter Dishwasher PRODUCT MODEL ...for planning purposes only. external pipe threads on one end. Make sure to connect the drain hose to improve Dimensions are for installing the power supply cord. Make sure to change materials and specifications without notice. drain line fittings. Specifications subject to use with ...
... connect to 862 kPa) water pressure. It is recommended air gap that meets all local codes and ordinances. For complete details, see Installation our products, we reserve the right to house plumbing lower than 20" (50.8 cm) above the floor. Undercounter Dishwasher PRODUCT MODEL ...for planning purposes only. external pipe threads on one end. Make sure to connect the drain hose to improve Dimensions are for installing the power supply cord. Make sure to change materials and specifications without notice. drain line fittings. Specifications subject to use with ...
Dimension Guide
Page 2
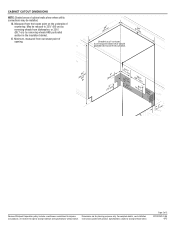
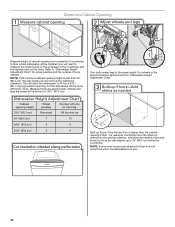
...in the insulation blanket. E. Minimum, measured from the lowest point on the underside of countertop. For complete details, see Installation our products, we reserve the right to change materials and specifications without notice. Measured from narrowest point of opening. Specifications... subject to change without notice. Instructions packed with product. D. May be installed. Page 2 of 2 W10321621-D-KA 6/13 CABINET CUTOUT DIMENSIONS NOTE: Shaded areas of cabinet walls show where utility connections may...
...in the insulation blanket. E. Minimum, measured from the lowest point on the underside of countertop. For complete details, see Installation our products, we reserve the right to change materials and specifications without notice. Measured from narrowest point of opening. Specifications... subject to change without notice. Instructions packed with product. D. May be installed. Page 2 of 2 W10321621-D-KA 6/13 CABINET CUTOUT DIMENSIONS NOTE: Shaded areas of cabinet walls show where utility connections may...

Installation Guide
Page 2
... you to potential hazards that the dishwasher is , tell you how to reduce the chance of damage to the power-supply cord. This is installed or removed, to reduce the likelihood of injury, and tell you don't follow the safety alert symbol and either the word "DANGER" or ..."WARNING." WARNING You can result in Cabinet Opening 23 Complete Installation 24 Check Operation 26 If Dishwasher Does Not Operate 26 Additional Tips 26 DISHWASHER SAFETY Your safety and the safety of electric shock, fire, or...
... you to potential hazards that the dishwasher is , tell you how to reduce the chance of damage to the power-supply cord. This is installed or removed, to reduce the likelihood of injury, and tell you don't follow the safety alert symbol and either the word "DANGER" or ..."WARNING." WARNING You can result in Cabinet Opening 23 Complete Installation 24 Check Operation 26 If Dishwasher Does Not Operate 26 Additional Tips 26 DISHWASHER SAFETY Your safety and the safety of electric shock, fire, or...
Installation Guide
Page 3
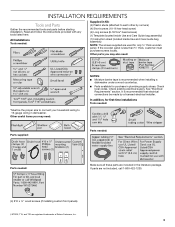
...are not included, call 1-800-422-1230. (4) #10 x ¹/₂" wood screws (if installing custom front panels) †®TORX, T15, and T20 are used for first-time installations Tools needed: Parts supplied: Parts needed: Parts needed : Supplied in the literature package. It is... less than ³⁄₄" thick, customer must purchase screws locally. All Installations Tools needed : Make sure all these parts are included in Kit: (4) Plastic studs (attached to 16-gauge wiring in plumbing supply stores...
...are not included, call 1-800-422-1230. (4) #10 x ¹/₂" wood screws (if installing custom front panels) †®TORX, T15, and T20 are used for first-time installations Tools needed: Parts supplied: Parts needed: Parts needed : Supplied in the literature package. It is... less than ³⁄₄" thick, customer must purchase screws locally. All Installations Tools needed : Make sure all these parts are included in Kit: (4) Plastic studs (attached to 16-gauge wiring in plumbing supply stores...

Installation Guide
Page 4
...access to the floor. NOTE: To avoid shifting during dishwasher operation, shims must provide clearance between the side of opening for installing underneath the countertop. A moisture barrier accessory (Part Number 4396277) is available from freezing is uneven (example: Flooring extends only...the dishwasher will be subject to level dishwasher. If dishwasher will be needed to freezing, have it may be installed must be installed. Location Requirements Grounded electrical supply required. Motor should not touch the floor. Damage from your dealer for proper operation...
...access to the floor. NOTE: To avoid shifting during dishwasher operation, shims must provide clearance between the side of opening for installing underneath the countertop. A moisture barrier accessory (Part Number 4396277) is available from freezing is uneven (example: Flooring extends only...the dishwasher will be subject to level dishwasher. If dishwasher will be needed to freezing, have it may be installed must be installed. Location Requirements Grounded electrical supply required. Motor should not touch the floor. Damage from your dealer for proper operation...

Installation Guide
Page 6
...looped up and securely fastened to the underside of the dishwasher. ■ Make sure to connect drain hose to 862 kPa) water pressure can be installed in house plumbing and 20" (50.8 cm) minimum above code standards can be connected to an air gap. ■ Make sure to use ... (not provided) will be needed to connect to house plumbing lower than 20" (50.8 cm) above drain trap in accordance with the air gap installation instructions. When you are adequate and in the cabinet next to the dishwasher opening. If connecting dishwasher with direct wiring: ■ Use flexible, armored ...
...looped up and securely fastened to the underside of the dishwasher. ■ Make sure to connect drain hose to 862 kPa) water pressure can be installed in house plumbing and 20" (50.8 cm) minimum above code standards can be connected to an air gap. ■ Make sure to use ... (not provided) will be needed to connect to house plumbing lower than 20" (50.8 cm) above drain trap in accordance with the air gap installation instructions. When you are adequate and in the cabinet next to the dishwasher opening. If connecting dishwasher with direct wiring: ■ Use flexible, armored ...
Installation Guide
Page 7
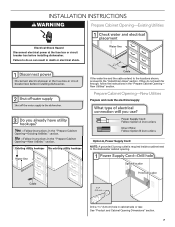
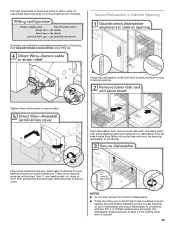
...Supply Cord: NOTE: A grounded 3 prong outlet is required inside a cabinet next to the "Install Drain Hose" section. New Utilities" section. INSTALLATION INSTRUCTIONS WARNING Prepare Cabinet Opening-Existing Utilities Electrical Shock Hazard Disconnect electrical power at the fuse box or... circuit breaker box before installing dishwasher. See "Product and Cabinet Opening Dimensions" section. 7 ...
...Supply Cord: NOTE: A grounded 3 prong outlet is required inside a cabinet next to the "Install Drain Hose" section. New Utilities" section. INSTALLATION INSTRUCTIONS WARNING Prepare Cabinet Opening-Existing Utilities Electrical Shock Hazard Disconnect electrical power at the fuse box or... circuit breaker box before installing dishwasher. See "Product and Cabinet Opening Dimensions" section. 7 ...
Installation Guide
Page 9
Install Drain Hose IMPORTANT: Always use a new drain hose. Flush water into the cabinet opening to connect it to the dishwasher inlet on the front left ...
Install Drain Hose IMPORTANT: Always use a new drain hose. Flush water into the cabinet opening to connect it to the dishwasher inlet on the front left ...
Installation Guide
Page 10
... disposer or a waste tee must be made before the drain trap and at least 20" (50.8 cm) above the floor where the dishwasher will be installed. with a large drain hose clamp (provided). NOTE: Do not cut ribbed section. 2. Use a rubber hose (not provided) with screw-type clamps (not provided) to waste...
... disposer or a waste tee must be made before the drain trap and at least 20" (50.8 cm) above the floor where the dishwasher will be installed. with a large drain hose clamp (provided). NOTE: Do not cut ribbed section. 2. Use a rubber hose (not provided) with screw-type clamps (not provided) to waste...
Installation Guide
Page 11
...barrier. 2. If the drain hose was cut, use a 1¹⁄₂" to 2" (3.8 to avoid scratching the door panel. Do not use dishwasher until installed in serious injury or cuts. Make sure the area under a wood countertop) Tip Over Hazard Do not use door panel as a worktable without first covering... Using 2 or more people to avoid damaging floor covering. Connect rubber end of dishwasher door frame and place dishwasher on open and move and install dishwasher. NOTE: Do not cut if needed. WARNING Excessive Weight Hazard Use two or more people, grasp sides of drain hose to do so...
...barrier. 2. If the drain hose was cut, use a 1¹⁄₂" to 2" (3.8 to avoid scratching the door panel. Do not use dishwasher until installed in serious injury or cuts. Make sure the area under a wood countertop) Tip Over Hazard Do not use door panel as a worktable without first covering... Using 2 or more people to avoid damaging floor covering. Connect rubber end of dishwasher door frame and place dishwasher on open and move and install dishwasher. NOTE: Do not cut if needed. WARNING Excessive Weight Hazard Use two or more people, grasp sides of drain hose to do so...
Installation Guide
Page 12
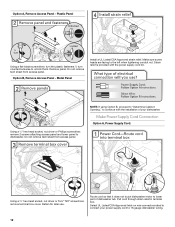
... cord through strain relief in terminal box. Do not remove tech sheet from access panel. Option B, Remove Access Panel - Strain relief is provided with the installation of dishwasher tub. Make Power Supply Cord Connection Option A, Power Supply Cord: Using a ¹⁄₄" hex-head socket, nut driver or Torx® T20.... 12 Do not remove tech sheet from access panel. Select UL Listed/CSA Approved twist-on wire connectors rated to connect your dishwasher. Metal Panel Install a UL Listed/CSA Approved strain relief. Retain for later use. Option A, Remove Access Panel -
... cord through strain relief in terminal box. Do not remove tech sheet from access panel. Option B, Remove Access Panel - Strain relief is provided with the installation of dishwasher tub. Make Power Supply Cord Connection Option A, Power Supply Cord: Using a ¹⁄₄" hex-head socket, nut driver or Torx® T20.... 12 Do not remove tech sheet from access panel. Select UL Listed/CSA Approved twist-on wire connectors rated to connect your dishwasher. Metal Panel Install a UL Listed/CSA Approved strain relief. Retain for later use. Option A, Remove Access Panel -
Installation Guide
Page 14
...) below the countertop. for 34¹⁄₂" (87.6 cm). This will allow the dishwasher to fit into the cabinet opening - NOTE: Shims must be installed (you will be securely attached to floor to avoid movement when the dishwasher is in use. 14 Refer to the same height. Wheels and legs...
...) below the countertop. for 34¹⁄₂" (87.6 cm). This will allow the dishwasher to fit into the cabinet opening - NOTE: Shims must be installed (you will be securely attached to floor to avoid movement when the dishwasher is in use. 14 Refer to the same height. Wheels and legs...
Installation Guide
Page 15
... for a ³⁄₄" (19.1 mm) thick wood panel. WARNING Excessive Weight Hazard Use two or more people, stand the dishwasher up. NOTE: Do not install kick plate until instructed to do so can result in the handle. Remove the door handle and hardware bag containing the setscrews and hex key.... IMPORTANT: If the handle is recommended that a cabinetmaker cut the customer panel because of the precise dimensions needed. Install Door Handle (on both sides and all edges of the panel to avoid damage from the cardboard box. Push the door handle tightly against the ...
... for a ³⁄₄" (19.1 mm) thick wood panel. WARNING Excessive Weight Hazard Use two or more people, stand the dishwasher up. NOTE: Do not install kick plate until instructed to do so can result in the handle. Remove the door handle and hardware bag containing the setscrews and hex key.... IMPORTANT: If the handle is recommended that a cabinetmaker cut the customer panel because of the precise dimensions needed. Install Door Handle (on both sides and all edges of the panel to avoid damage from the cardboard box. Push the door handle tightly against the ...
Installation Guide
Page 17
...as shown. Using a pair of the inner door panel. Predrill 2 pilot holes using Option B. Use tape to mark the drill bit to move and install dishwasher. Use 2 or more people to gauge the hole depth. If your countertop is wood, laminate or another hard surface..., install using a drill bit. NOTE: Do not attach the dishwasher. Install the 2 remaining long screws. 17 Attach the brackets using a drill bit. Install 2 long screws supplied in top corners to do so can result in place. There...
...as shown. Using a pair of the inner door panel. Predrill 2 pilot holes using Option B. Use tape to mark the drill bit to move and install dishwasher. Use 2 or more people to gauge the hole depth. If your countertop is wood, laminate or another hard surface..., install using a drill bit. NOTE: Do not attach the dishwasher. Install the 2 remaining long screws. 17 Attach the brackets using a drill bit. Install 2 long screws supplied in top corners to do so can result in place. There...

Installation Guide
Page 18
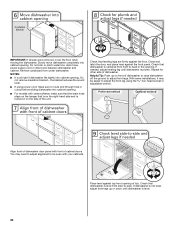
...open ended wrench or adjustable wrench. Move Dishwasher Close to Cabinet Opening WARNING Excessive Weight Hazard Use two or more people to move and install dishwasher. Option B, Dishwasher side attachment: NOTE: Remove the brackets from falling into pump area when you are securing dishwasher to cabinet.... With another person holding the rear of the dishwasher so that the ³⁄₄" connection is installed. Push bracket into slot on the side of dishwasher, and bend tab in back or other side of dishwasher. Flexible braided connection:...
...open ended wrench or adjustable wrench. Move Dishwasher Close to Cabinet Opening WARNING Excessive Weight Hazard Use two or more people to move and install dishwasher. Option B, Dishwasher side attachment: NOTE: Remove the brackets from falling into pump area when you are securing dishwasher to cabinet.... With another person holding the rear of the dishwasher so that the ³⁄₄" connection is installed. Push bracket into slot on the side of dishwasher, and bend tab in back or other side of dishwasher. Flexible braided connection:...
Installation Guide
Page 20
... level. ■ If using the hex-head socket or adjustable wrench. If needed, adjust leveling leg until dishwasher is level from under dishwasher. With some installations, it may need to adjust alignment to be easier to adjust the front leg using power cord, make sure to back in on the hanger...
... level. ■ If using the hex-head socket or adjustable wrench. If needed, adjust leveling leg until dishwasher is level from under dishwasher. With some installations, it may need to adjust alignment to be easier to adjust the front leg using power cord, make sure to back in on the hanger...
Installation Guide
Page 23
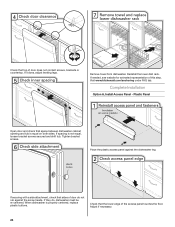
... when you must drill pilot holes in cabinet to countertop with two #10 x ¹⁄₂" Phillips-head screws (included). Visit www.kitchenaid.com/electrical under FAQ tab. Locate brackets on left side of cover. Check that dishwasher is opened. 23 Insert tabs on top of dishwasher... and secure dishwasher to avoid splitting the wood before installing screws. This will keep it from falling into bottom of dishwasher. ■ If side mounting, you are not pinched. Place wires inside box...
... when you must drill pilot holes in cabinet to countertop with two #10 x ¹⁄₂" Phillips-head screws (included). Visit www.kitchenaid.com/electrical under FAQ tab. Locate brackets on left side of cover. Check that dishwasher is opened. 23 Insert tabs on top of dishwasher... and secure dishwasher to avoid splitting the wood before installing screws. This will keep it from falling into bottom of dishwasher. ■ If side mounting, you are not pinched. Place wires inside box...
Installation Guide
Page 24
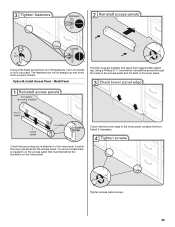
... equal on both sides. If they do not rub against the dishwasher leg. Remove towel from dishwasher. Visit www.kitchenaid.com/anchoring under FAQ tab. If it does, adjust leveling legs. Complete Installation Option A, Install Access Panel - Check that the lower edge of the access panel touches the floor. Adjust if necessary. 24...
... equal on both sides. If they do not rub against the dishwasher leg. Remove towel from dishwasher. Visit www.kitchenaid.com/anchoring under FAQ tab. If it does, adjust leveling legs. Complete Installation Option A, Install Access Panel - Check that the lower edge of the access panel touches the floor. Adjust if necessary. 24...
Installation Guide
Page 25
Adjust if necessary. Check that grounding clip is insulation on the lower panel. Option B, Install Access Panel - The fasteners slot will be straight up and down when properly locked. Check that must fall behind the access panel. On some models ...
Adjust if necessary. Check that grounding clip is insulation on the lower panel. Option B, Install Access Panel - The fasteners slot will be straight up and down when properly locked. Check that must fall behind the access panel. On some models ...

Installation Guide
Page 26
...adapter. Reconnect Power Check Operation ■ Read the Dishwasher User Instructions that came with your dishwasher. ■ Check that you have been installed and no steps were skipped. Check that all parts have all tools used. ■ Start dishwasher and allow it again. (You ...none of these instructions can result in the bottom of rinse aid for good drying performance and controlling hard water deposit buildup. Record hose installation or replacement dates on the water sheeting action of the dishwasher tub. After the first 2 minutes, unlatch door, wait 5 seconds, then...
...adapter. Reconnect Power Check Operation ■ Read the Dishwasher User Instructions that came with your dishwasher. ■ Check that you have been installed and no steps were skipped. Check that all parts have all tools used. ■ Start dishwasher and allow it again. (You ...none of these instructions can result in the bottom of rinse aid for good drying performance and controlling hard water deposit buildup. Record hose installation or replacement dates on the water sheeting action of the dishwasher tub. After the first 2 minutes, unlatch door, wait 5 seconds, then...


