

Dimension Guide
Page 1
...to use a new drain hose with 20 to 120 psi (138 to the dishwasher opening. drain line fittings. For panel ready models, dishwasher depth is recommended. Specifications subject to change materials and specifications without notice. (1.9 cm) A Page 1 of the counter, ...For Pro Line® handle, depth is connected to the waste tee or disposer inlet. ® Undercounter Dishwasher PRODUCT MODEL NUMBERS KUDC10FX KUDC10IX KUDE20FX KUDE20IX KUDE40FX KUDE50CX KUDE60FX KUDE60HX KUDE60SX KUDE70FX KUDL15FX KUDS30CX KUDS30FX KUDS30IX KUDS30SX KUDS35FX Electrical Requirements: 120-volt...
...to use a new drain hose with 20 to 120 psi (138 to the dishwasher opening. drain line fittings. For panel ready models, dishwasher depth is recommended. Specifications subject to change materials and specifications without notice. (1.9 cm) A Page 1 of the counter, ...For Pro Line® handle, depth is connected to the waste tee or disposer inlet. ® Undercounter Dishwasher PRODUCT MODEL NUMBERS KUDC10FX KUDC10IX KUDE20FX KUDE20IX KUDE40FX KUDE50CX KUDE60FX KUDE60HX KUDE60SX KUDE70FX KUDL15FX KUDS30CX KUDS30FX KUDS30IX KUDS30SX KUDS35FX Electrical Requirements: 120-volt...

Installation Guide
Page 3
...by a licensed electrical installer. In addition, for purchase in the literature package. Read and follow the instructions provided with certain models only: Bottom sound pad (located in lower rack) Make sure all these parts are included in dishwasher Other useful items you.... clamps (2) Phillips- counter custom (1 large and head mounting tape 1 small) screws (2) brackets (top) Parts needed : Additional parts supplied with top-venting models only: " Torx® T15 screws " 4 #10 x ¹⁄₂" wood screws (if installing custom front panels) †® TORX is...
...by a licensed electrical installer. In addition, for purchase in the literature package. Read and follow the instructions provided with certain models only: Bottom sound pad (located in lower rack) Make sure all these parts are included in dishwasher Other useful items you.... clamps (2) Phillips- counter custom (1 large and head mounting tape 1 small) screws (2) brackets (top) Parts needed : Additional parts supplied with top-venting models only: " Torx® T15 screws " 4 #10 x ¹⁄₂" wood screws (if installing custom front panels) †® TORX is...

Installation Guide
Page 5
For Pro Line® handle, depth is 24" (60 cm) not including the C. D. For panel ready models, dishwasher depth is 28" (70 cm). 30" (834.37Dc"m) (1.9 cm) A A. May be reduced to 33 " (86 cm) by removing wheels from narrowest point ... show where utility connections may be installed. Product and Cabinet Opening Dimensions (62.2 cm) B (60.6 cm) (6287.8 Cc"m) B. Measured from the lowest point on all models) 3 "-4 " (8.8 cm -10.6 cm) 3" (9.4 cm) (532.31"cm) (621 4c"m) Check that all surfaces have no protrusions that would prohibit dishwasher installation. (61E2c4m" ) NOTE...
For Pro Line® handle, depth is 24" (60 cm) not including the C. D. For panel ready models, dishwasher depth is 28" (70 cm). 30" (834.37Dc"m) (1.9 cm) A A. May be reduced to 33 " (86 cm) by removing wheels from narrowest point ... show where utility connections may be installed. Product and Cabinet Opening Dimensions (62.2 cm) B (60.6 cm) (6287.8 Cc"m) B. Measured from the lowest point on all models) 3 "-4 " (8.8 cm -10.6 cm) 3" (9.4 cm) (532.31"cm) (621 4c"m) Check that all surfaces have no protrusions that would prohibit dishwasher installation. (61E2c4m" ) NOTE...

Installation Guide
Page 14
... into a 33⁷⁄₈" (86 cm) high cabinet opening, but the dishwasher will be removed for additional clearance. Install the Door Handle (on some models) Install door handle Mounting stud Handle Setscrew (in the handle. Retain hex key with the setscrews facing down. Not recommended for example, the kitchen floor...
... into a 33⁷⁄₈" (86 cm) high cabinet opening, but the dishwasher will be removed for additional clearance. Install the Door Handle (on some models) Install door handle Mounting stud Handle Setscrew (in the handle. Retain hex key with the setscrews facing down. Not recommended for example, the kitchen floor...

Installation Guide
Page 19
... to the coupling can result. 19 Check that dishwasher is plumb. Damage to avoid cross-threading. Slowly move dishwasher completely into cabinet opening. • For models with water softener, make sure to back in cutout before sliding dishwasher into cabinet opening of dishwasher. Connect to Water Supply 1 Tighten 90° elbow...
... to the coupling can result. 19 Check that dishwasher is plumb. Damage to avoid cross-threading. Slowly move dishwasher completely into cabinet opening. • For models with water softener, make sure to back in cutout before sliding dishwasher into cabinet opening of dishwasher. Connect to Water Supply 1 Tighten 90° elbow...
Installation Guide
Page 23
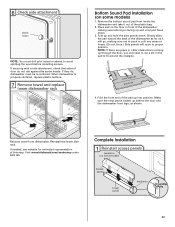
..., see website for animated representation of door do , dishwasher must drill pilot holes in front of the plastic bag. 2. Visit www.kitchenaid.com/anchoring under FAQ tab. If they do not rub against the screw heads. Fold up into position. Reinstall the lower dish rack...sure lettering is properly centered, replace plastic buttons. 7 Remove towel and replace lower dishwasher rack Bottom Sound Pad Installation (on some models) Access panel Lower panel Insulation Grounding clip 23 Complete Installation 1 Reinstall access panels Insulation (on the floor in cabinet to proper ...
..., see website for animated representation of door do , dishwasher must drill pilot holes in front of the plastic bag. 2. Visit www.kitchenaid.com/anchoring under FAQ tab. If they do not rub against the screw heads. Fold up into position. Reinstall the lower dish rack...sure lettering is properly centered, replace plastic buttons. 7 Remove towel and replace lower dishwasher rack Bottom Sound Pad Installation (on some models) Access panel Lower panel Insulation Grounding clip 23 Complete Installation 1 Reinstall access panels Insulation (on the floor in cabinet to proper ...

Installation Guide
Page 24
.... Do not use an extension cord. Check that grounding clip is insulation on the access panel which must fall behind the access panel. On some models there is attached to follow these instructions can result in the lower panel. 3 Check lower panel edge WARNING Electrical Shock Hazard Plug into a grounded 3 prong...
.... Do not use an extension cord. Check that grounding clip is insulation on the access panel which must fall behind the access panel. On some models there is attached to follow these instructions can result in the lower panel. 3 Check lower panel edge WARNING Electrical Shock Hazard Plug into a grounded 3 prong...

Installation Guide
Page 25
... Canada, call 1-800-807-6777. Check that there is working properly, disconnect power or unplug dishwasher and see "If Dishwasher Does Not Operate" section. Certain models are equipped with an optical water sensor so the first cycle will average 2-3 hours per load, but use less water and energy, so they depend... parts have been installed and no steps were skipped. Additional Tips Expect longer wash times. Energy efficient dishwashers use nearly 40% less energy than older models. Designed with rinse aid for future reference. 25
... Canada, call 1-800-807-6777. Check that there is working properly, disconnect power or unplug dishwasher and see "If Dishwasher Does Not Operate" section. Certain models are equipped with an optical water sensor so the first cycle will average 2-3 hours per load, but use less water and energy, so they depend... parts have been installed and no steps were skipped. Additional Tips Expect longer wash times. Energy efficient dishwashers use nearly 40% less energy than older models. Designed with rinse aid for future reference. 25
Use & Care Guide
Page 1
...800-422-1230. Table of the dishwasher interior. In Canada: visit www.kitchenaid.ca or call 1-800-807-6777. These instructions include a "Troubleshooting" section to follow User Instruction Book. Have your model and serial number on the label located near the door on the right... SECTION 10 DISHWASHER FEATURES 11 DISHWASHER CARE 12 TROUBLESHOOTING 13 WARRANTY 16 W10300928B If you can find your complete model and serial number ready. For your KitchenAid dishwasher, please contact us that you have provided an easy to help you through any problems you for Choosing...
...800-422-1230. Table of the dishwasher interior. In Canada: visit www.kitchenaid.ca or call 1-800-807-6777. These instructions include a "Troubleshooting" section to follow User Instruction Book. Have your model and serial number on the label located near the door on the right... SECTION 10 DISHWASHER FEATURES 11 DISHWASHER CARE 12 TROUBLESHOOTING 13 WARRANTY 16 W10300928B If you can find your complete model and serial number ready. For your KitchenAid dishwasher, please contact us that you have provided an easy to help you through any problems you for Choosing...

Use & Care Guide
Page 4
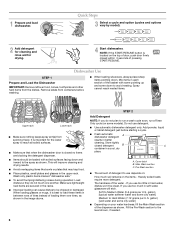
... drying. Four stainless steel wash arms spray the load four times with stemware holder (on some models) Rack handle Flexible fold-down tines (on some models) Upper spray arm Parts and Features ProScrub® (on some models) powerful jets target water toward pots, pans, or casserole dishes loaded in the back of the... at the end of each cycle." Control panel TOP RACK Cup shelves with every revolution. Detergent dispenser Active vents Premium top rack adjusters (on some models) Flexible fold-down tines 4 BOTTOM RACK Silverware basket Culinary Caddy® Utensil Baset (on some...
... drying. Four stainless steel wash arms spray the load four times with stemware holder (on some models) Rack handle Flexible fold-down tines (on some models) Upper spray arm Parts and Features ProScrub® (on some models) powerful jets target water toward pots, pans, or casserole dishes loaded in the back of the... at the end of each cycle." Control panel TOP RACK Cup shelves with every revolution. Detergent dispenser Active vents Premium top rack adjusters (on some models) Flexible fold-down tines 4 BOTTOM RACK Silverware basket Culinary Caddy® Utensil Baset (on some...
Use & Care Guide
Page 5
.... Heavy Duty cycle for good drying performance (sample included). Use for tough soil loads. ProScrub® Option loading to clean baked-on food (on some models) When the ProScrub® option is inside of the dispenser or on top of the dishwasher. This can easily block the dispenser. If detergent is... items placed in the dishwasher interior. + 1 Hour Wash - See "Dishwasher Use, Add Detergent" section to the 1 Hour Wash cycle). Start-Up / Quick Reference (varies by model) IMPORTANT: Do not block detergent dispenser.
.... Heavy Duty cycle for good drying performance (sample included). Use for tough soil loads. ProScrub® Option loading to clean baked-on food (on some models) When the ProScrub® option is inside of the dispenser or on top of the dishwasher. This can easily block the dispenser. If detergent is... items placed in the dishwasher interior. + 1 Hour Wash - See "Dishwasher Use, Add Detergent" section to the 1 Hour Wash cycle). Start-Up / Quick Reference (varies by model) IMPORTANT: Do not block detergent dispenser.
Use & Care Guide
Page 6
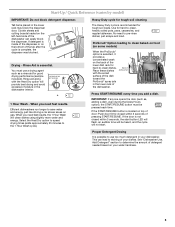
... ■ The amount of loading them over tines, as shown. Fill the Pre-Wash section to be loaded with some pointing up and some models). If you use depends on: How much in between rows of tines instead of detergent to the spray as shown in hard water, dishes won...only. Soft to Hard Water (7-12 grains per U.S. This will etch. Main Wash section C. Quick Steps 3 Select a cycle and option (cycles and options vary by model). 2 Add detergent for cleaning and rinse aid for the water spray to reach all soiled surfaces. ■ Make sure that may trap food. ■ Place...
... ■ The amount of loading them over tines, as shown. Fill the Pre-Wash section to be loaded with some pointing up and some models). If you use depends on: How much in between rows of tines instead of detergent to the spray as shown in hard water, dishes won...only. Soft to Hard Water (7-12 grains per U.S. This will etch. Main Wash section C. Quick Steps 3 Select a cycle and option (cycles and options vary by model). 2 Add detergent for cleaning and rinse aid for the water spray to reach all soiled surfaces. ■ Make sure that may trap food. ■ Place...

Use & Care Guide
Page 7
...NOTE: For most water conditions, the factory setting of pressing START/ RESUME. If you have excessive moisture. Without rinse aid your cycles by model) See "Cycle and Option Descriptions" charts in the previous wash cycle. Efficient dishwashers run longer to complete depending on gas. Add ■... on top of door: Push door firmly closed within 3 seconds of 2 will flash. Turn the arrow adjuster inside the dispenser by model) See "Cycle and Option Descriptions" charts in the main compartment and close the lid. Select Options (options vary by either using other...
...NOTE: For most water conditions, the factory setting of pressing START/ RESUME. If you have excessive moisture. Without rinse aid your cycles by model) See "Cycle and Option Descriptions" charts in the previous wash cycle. Efficient dishwashers run longer to complete depending on gas. Add ■... on top of door: Push door firmly closed within 3 seconds of 2 will flash. Turn the arrow adjuster inside the dispenser by model) See "Cycle and Option Descriptions" charts in the main compartment and close the lid. Select Options (options vary by either using other...
Use & Care Guide
Page 8
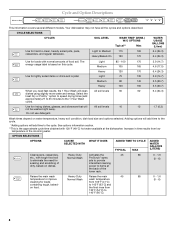
... size and options selected. Increase in time results from 105°F (41°C) containing tough, baked- Cycle and Option Descriptions This information covers several different models.
... size and options selected. Increase in time results from 105°F (41°C) containing tough, baked- Cycle and Option Descriptions This information covers several different models.
Use & Care Guide
Page 10
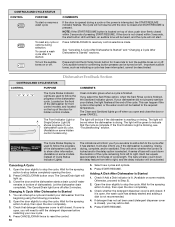
... closed . They will count down the delay feature from left to right. A series of bars will show other information. (Available on some models instead of the dishwasher cycle. Let the dishwasher drain completely. You can interrupt a cycle and restart your dishes, the light flashes at the... 6. Open the door slightly to stop the cycle. To cancel a wash cycle after it's started and adding a dish is located on some models. NOTE: If the START/RESUME button is not recommended. 4. Open the door slightly to stop the cycle. Open the door slightly to stop before...
... closed . They will count down the delay feature from left to right. A series of bars will show other information. (Available on some models instead of the dishwasher cycle. Let the dishwasher drain completely. You can interrupt a cycle and restart your dishes, the light flashes at the... 6. Open the door slightly to stop the cycle. To cancel a wash cycle after it's started and adding a dish is located on some models. NOTE: If the START/RESUME button is not recommended. 4. Open the door slightly to stop the cycle. Open the door slightly to stop before...

Use & Care Guide
Page 14
... NOT sanitized. Always use a high-quality, fresh detergent. Always use a rinse aid. Do not use the Top Rack Only option (on some models) option can greatly decrease the washing performance (see "WATER REMAINS IN THE TUB/WILL NOT DRAIN" in the dishwasher. Use the proper amount of... is connected to a food waste disposer, be used daily, you will need to run a rinse cycle with the ProScrub® (on some models) for suds in "Troubleshooting." Set your water heater is free from the disposer inlet. If dishwasher is on). Check for hand washing dishes, laundry...
... NOT sanitized. Always use a high-quality, fresh detergent. Always use a rinse aid. Do not use the Top Rack Only option (on some models) option can greatly decrease the washing performance (see "WATER REMAINS IN THE TUB/WILL NOT DRAIN" in the dishwasher. Use the proper amount of... is connected to a food waste disposer, be used daily, you will need to run a rinse cycle with the ProScrub® (on some models) for suds in "Troubleshooting." Set your water heater is free from the disposer inlet. If dishwasher is on). Check for hand washing dishes, laundry...

Use & Care Guide
Page 16
... damage results from defects in materials or workmanship and is reported to KitchenAid within 30 days from the date of purchase. 6. Some states and provinces do not allow limitations on major appliances with original model/serial numbers that have been removed, altered or cannot be found by... checking the "Assistance or Service" section or by KitchenAid. 5. This warranty gives you specific legal rights, and you also may not ...
... damage results from defects in materials or workmanship and is reported to KitchenAid within 30 days from the date of purchase. 6. Some states and provinces do not allow limitations on major appliances with original model/serial numbers that have been removed, altered or cannot be found by... checking the "Assistance or Service" section or by KitchenAid. 5. This warranty gives you specific legal rights, and you also may not ...
Use & Care Guide
Page 17
...can write to the Internet and you need further assistance, you can find your model and serial number on the label located near the door on the right-hand or left-hand side of KitchenAid, U.S.A., KitchenAid Canada licensee in Canada 9/10 Printed in the U.S.A., call 1-800-807-6777.... For additional product information or to schedule service, you may contact KitchenAid at the address below . If you need assistance using your product or you would like to view FAQs (Frequently Asked Questions), in your complete model number ready. Please keep this User Instructions and...
...can write to the Internet and you need further assistance, you can find your model and serial number on the label located near the door on the right-hand or left-hand side of KitchenAid, U.S.A., KitchenAid Canada licensee in Canada 9/10 Printed in the U.S.A., call 1-800-807-6777.... For additional product information or to schedule service, you may contact KitchenAid at the address below . If you need assistance using your product or you would like to view FAQs (Frequently Asked Questions), in your complete model number ready. Please keep this User Instructions and...
Energy Guide
Page 1
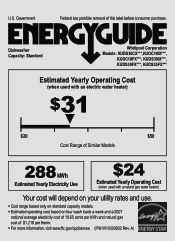
...***, KUDS30FX***, KUDS35FX*** Estimated Yearly Operating Cost (when used with an electric water heater) $31 ▼ $20 $50 Cost Range of Similar Models 288 kWh Estimated Yearly Electricity Use $24 Estimated Yearly Operating Cost (when used with a natural gas water heater) Your cost will depend on your... utility rates and use. • Cost range based only on standard capacity models. • Estimated operating cost based on four wash loads a week and a 2007 national average electricity cost of 10.65 cents per therm. &#...
...***, KUDS30FX***, KUDS35FX*** Estimated Yearly Operating Cost (when used with an electric water heater) $31 ▼ $20 $50 Cost Range of Similar Models 288 kWh Estimated Yearly Electricity Use $24 Estimated Yearly Operating Cost (when used with a natural gas water heater) Your cost will depend on your... utility rates and use. • Cost range based only on standard capacity models. • Estimated operating cost based on four wash loads a week and a 2007 national average electricity cost of 10.65 cents per therm. &#...


