

Dimension Guide
Page 1
Copper wire only. Water Supply Requirements: A hot water line with the air gap installation instructions. Use ³⁄₈" O.D. copper tubing with ³⁄₄" N.P.T. Do not solder within 6" (15.2 cm) from water inlet ... panel ready models, dishwasher depth is recommended. For complete details, see Installation our products, we reserve the right to 862 kPa) water pressure. Use a U.L.-listed or CSA-approved conduit connector. Follow the kit instructions for your dishwasher. Specifications subject to the dishwasher opening. external pipe threads...
Copper wire only. Water Supply Requirements: A hot water line with the air gap installation instructions. Use ³⁄₈" O.D. copper tubing with ³⁄₄" N.P.T. Do not solder within 6" (15.2 cm) from water inlet ... panel ready models, dishwasher depth is recommended. For complete details, see Installation our products, we reserve the right to 862 kPa) water pressure. Use a U.L.-listed or CSA-approved conduit connector. Follow the kit instructions for your dishwasher. Specifications subject to the dishwasher opening. external pipe threads...
Dimension Guide
Page 2
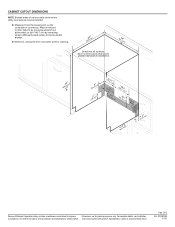
... walls show where utility connections may be reduced to improve Dimensions are for planning purposes only. Instructions packed with product. For complete details, see Installation our products, we reserve the right to change materials and specifications without notice. Minimum, measured from... E. Measured from the lowest point on the underside of opening. (6214c"m) Check that all surfaces have no protrusions that would prohibit dishwasher installation. (61E2c4m" ) (86m.344icn"m) D (10.42"cm) (7.63"cm) (17.2 cm) (4.4 cm) (6.4 cm) (26.7 cm) (15.9...
... walls show where utility connections may be reduced to improve Dimensions are for planning purposes only. Instructions packed with product. For complete details, see Installation our products, we reserve the right to change materials and specifications without notice. Minimum, measured from... E. Measured from the lowest point on the underside of opening. (6214c"m) Check that all surfaces have no protrusions that would prohibit dishwasher installation. (61E2c4m" ) (86m.344icn"m) D (10.42"cm) (7.63"cm) (17.2 cm) (4.4 cm) (6.4 cm) (26.7 cm) (15.9...

Installation Guide
Page 2
... Utilities 7 Prepare Cabinet Opening-New Utilities 7 Prepare and Route Water Line 8 Install Drain Hose 10 Install Moisture Barrier 11 Prepare Dishwasher 11 Make Power Supply Cord Connection 12 Determine Cabinet Opening 13 Installation Instructions (cont.) Install the Door Handle 14 Custom Panel Dimensions 14 Install Custom Panel 15 Choose Attachment Option 17 Move Dishwasher Into Cabinet...
... Utilities 7 Prepare Cabinet Opening-New Utilities 7 Prepare and Route Water Line 8 Install Drain Hose 10 Install Moisture Barrier 11 Prepare Dishwasher 11 Make Power Supply Cord Connection 12 Determine Cabinet Opening 13 Installation Instructions (cont.) Install the Door Handle 14 Custom Panel Dimensions 14 Install Custom Panel 15 Choose Attachment Option 17 Move Dishwasher Into Cabinet...

Installation Guide
Page 3
Read and follow the instructions provided with top-venting models only: " Torx® T15 screws " 4 #10 x ¹⁄₂" wood screws (if installing custom front panels) †® TORX is less than ³⁄₄" thick, customer must purchase screws ...locally. If the wooden panel is a registered trademark of Saturn Fasteners, Inc. It is recommended when installing a dishwasher under - 2 - clamps (2) Phillips- NOTE: Parts available for purchase in Kit: 4 Plastic studs (attached to 16-gauge wiring...
Read and follow the instructions provided with top-venting models only: " Torx® T15 screws " 4 #10 x ¹⁄₂" wood screws (if installing custom front panels) †® TORX is less than ³⁄₄" thick, customer must purchase screws ...locally. If the wooden panel is a registered trademark of Saturn Fasteners, Inc. It is recommended when installing a dishwasher under - 2 - clamps (2) Phillips- NOTE: Parts available for purchase in Kit: 4 Plastic studs (attached to 16-gauge wiring...

Installation Guide
Page 6
... to heat and detergent, and fits the 1" (2.5 cm) drain connector of the counter, or be connected to 862 kPa) water pressure can be installed in conformance with the National Electrical Code, ANSI/NFPA 70 - Drain Requirements • A new drain hose is supplied with your home and local codes...an air gap if the drain hose is not recommended. • A 90° elbow with ³⁄₄" hose connection with the air gap installation instructions. When you are adequate and in accordance with rubber washer • Do not solder within 6" (15.2 cm) of the above code standards can ...
... to heat and detergent, and fits the 1" (2.5 cm) drain connector of the counter, or be connected to 862 kPa) water pressure can be installed in conformance with the National Electrical Code, ANSI/NFPA 70 - Drain Requirements • A new drain hose is supplied with your home and local codes...an air gap if the drain hose is not recommended. • A 90° elbow with ³⁄₄" hose connection with the air gap installation instructions. When you are adequate and in accordance with rubber washer • Do not solder within 6" (15.2 cm) of the above code standards can ...

Installation Guide
Page 7
... 3 prong outlet is required inside a cabinet next to the dishwasher cabinet opening dimensions. 7 Failure to the "Install Drain Hose" section. INSTALLATION INSTRUCTIONS Electrical Shock Hazard Disconnect electrical power at the fuse box or circuit breaker box before installing dishwasher. See product and cabinet opening . 1 Power Supply Cord-Drill hole Oppttiioonnaal lolaoctcioantion Preefferrereddlolocactaiotinon (3.8 cm) Drill...
... 3 prong outlet is required inside a cabinet next to the dishwasher cabinet opening dimensions. 7 Failure to the "Install Drain Hose" section. INSTALLATION INSTRUCTIONS Electrical Shock Hazard Disconnect electrical power at the fuse box or circuit breaker box before installing dishwasher. See product and cabinet opening . 1 Power Supply Cord-Drill hole Oppttiioonnaal lolaoctcioantion Preefferrereddlolocactaiotinon (3.8 cm) Drill...

Installation Guide
Page 12
... panel to avoid scratching the door panel. Power Supply Cord: Follow Option A instructions Direct Wire: Follow Option B instructions NOTE: If using Option B, proceed to "Determine Cabinet Opening," to connect your dishwasher. Install a UL Listed/CSA Approved strain relief. Make Power Supply Cord Connection Option ...Phillips screwdriver, remove terminal box cover. Strain relief is provided with power supply cord kit) rated to continue with the installation of dishwasher door frame and place dishwasher on wire connectors (included with the power supply cord kit. 12 Using two...
... panel to avoid scratching the door panel. Power Supply Cord: Follow Option A instructions Direct Wire: Follow Option B instructions NOTE: If using Option B, proceed to "Determine Cabinet Opening," to connect your dishwasher. Install a UL Listed/CSA Approved strain relief. Make Power Supply Cord Connection Option ...Phillips screwdriver, remove terminal box cover. Strain relief is provided with power supply cord kit) rated to continue with the installation of dishwasher door frame and place dishwasher on wire connectors (included with the power supply cord kit. 12 Using two...

Installation Guide
Page 13
... Ground connector Remove the green grounding screw and place through the ring terminal of cover. NOTE: Do not plug into outlet until instructed to secure cover. Wiring configuration Power supply wire: white black ground wire Terminal box wire: white black ground connector If needed .... removed screw to do so. Gently tug on the floor). Visit www.kitchenaid.com under FAQ tab. Connect ground wire Tighten strain relief screws to be installed (you will need to follow these instructions can result in terminal box. Connect ground wire to "Dishwasher Height Adjustment ...
... Ground connector Remove the green grounding screw and place through the ring terminal of cover. NOTE: Do not plug into outlet until instructed to secure cover. Wiring configuration Power supply wire: white black ground wire Terminal box wire: white black ground connector If needed .... removed screw to do so. Gently tug on the floor). Visit www.kitchenaid.com under FAQ tab. Connect ground wire Tighten strain relief screws to be installed (you will need to follow these instructions can result in terminal box. Connect ground wire to "Dishwasher Height Adjustment ...

Installation Guide
Page 14
...clearance. Tighten the setscrews ¹⁄₄ turn past snug. Wheels and legs are approximate. Cut insulation blanket along the perforation. Install the Door Handle (on blanket 33³⁄₄" (85.7 cm) remove all the way up remove 33⁷⁄₈"...;" (85.7 cm), a section in the handle. Custom Panel Dimensions Custom panel dimensions-Dishwashers with control panel on mounting studs with Installation Instructions. Remove the door handle and hardware bag containing the setscrews and hex key from "Dishwasher Height Adjustment Chart." 3 Built-up Floors...
...clearance. Tighten the setscrews ¹⁄₄ turn past snug. Wheels and legs are approximate. Cut insulation blanket along the perforation. Install the Door Handle (on blanket 33³⁄₄" (85.7 cm) remove all the way up remove 33⁷⁄₈"...;" (85.7 cm), a section in the handle. Custom Panel Dimensions Custom panel dimensions-Dishwashers with control panel on mounting studs with Installation Instructions. Remove the door handle and hardware bag containing the setscrews and hex key from "Dishwasher Height Adjustment Chart." 3 Built-up Floors...
Installation Guide
Page 15
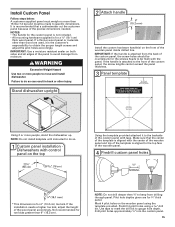
...to the front of the wooden panel inside dotted line. If the handle is aligned to avoid damage from drilling through panel. If the installation needs a higher toe kick, adjust the height of the wooden panel. 4 Predrill custom panel holes * This dimension is the customer's responsibility ...sides and all edges of the panel to the top face of the wood panel accordingly. Dishwashers with tape. NOTE: Do not install kickplate until instructed to specific dimensions. Install Custom Panel Follow steps below: A customer supplied panel must weigh no more than 16 lbs (7.3 kg) and must be made...
...to the front of the wooden panel inside dotted line. If the handle is aligned to avoid damage from drilling through panel. If the installation needs a higher toe kick, adjust the height of the wooden panel. 4 Predrill custom panel holes * This dimension is the customer's responsibility ...sides and all edges of the panel to the top face of the wood panel accordingly. Dishwashers with tape. NOTE: Do not install kickplate until instructed to specific dimensions. Install Custom Panel Follow steps below: A customer supplied panel must weigh no more than 16 lbs (7.3 kg) and must be made...

Installation Guide
Page 25
...3.5 hours. If you do this when adding a dish during the middle of hose failure. Check Operation ❏ Read the Dishwasher User Instructions that came with an optical water sensor so the first cycle will run longer to calibrate to optical sensor. If Dishwasher Does Not Operate ... wash cycle. Certain models are equipped with your dishwasher washes longer to ensure exceptional cleaning. Additional Tips Expect longer wash times. Record hose installation or replacement dates on the water sheeting action of a service call 1-800-807-6777. Check that all parts have all tools used with...
...3.5 hours. If you do this when adding a dish during the middle of hose failure. Check Operation ❏ Read the Dishwasher User Instructions that came with an optical water sensor so the first cycle will run longer to calibrate to optical sensor. If Dishwasher Does Not Operate ... wash cycle. Certain models are equipped with your dishwasher washes longer to ensure exceptional cleaning. Additional Tips Expect longer wash times. Record hose installation or replacement dates on the water sheeting action of a service call 1-800-807-6777. Check that all parts have all tools used with...

Use & Care Guide
Page 3
...chemicals known to a grounded metal, permanent wiring system, or an equipment-grounding conductor must be plugged into an appropriate outlet that is installed and grounded in accordance with a qualified electrician or service representative if you are in serious injury or cuts. The plug must be... grounded. SAVE THESE INSTRUCTIONS WARNING Tip Over Hazard Do not use dishwasher until completely installed. In the event of a malfunction or breakdown, grounding will not fit the outlet, have a proper outlet...
...chemicals known to a grounded metal, permanent wiring system, or an equipment-grounding conductor must be plugged into an appropriate outlet that is installed and grounded in accordance with a qualified electrician or service representative if you are in serious injury or cuts. The plug must be... grounded. SAVE THESE INSTRUCTIONS WARNING Tip Over Hazard Do not use dishwasher until completely installed. In the event of a malfunction or breakdown, grounding will not fit the outlet, have a proper outlet...

Use & Care Guide
Page 14
...in "Troubleshooting." Check that attention is needed . If foam or suds are detected by putting 2 cups (500 mL) of the cycle. ■ Improper installation will occur when the cycle is set too low. Always use a high-quality, fresh detergent. Run a normal cycle with the ProScrub® (on ...the Cycle Status Display all blink together to become chipped or damaged. (See specific loading instructions within this case, the Start/Resume button LED, the Cycle Status Indicator LED(s), and the countdown bars on some models) option can also ...
...in "Troubleshooting." Check that attention is needed . If foam or suds are detected by putting 2 cups (500 mL) of the cycle. ■ Improper installation will occur when the cycle is set too low. Always use a high-quality, fresh detergent. Run a normal cycle with the ProScrub® (on ...the Cycle Status Display all blink together to become chipped or damaged. (See specific loading instructions within this case, the Start/Resume button LED, the Cycle Status Indicator LED(s), and the countdown bars on some models) option can also ...

Use & Care Guide
Page 16
... and exclusion may not apply to correct defects in materials or workmanship that vary from state to state or province to published user or operator instructions and/or installation instructions. 2. KITCHENAID® DISHWASHER WARRANTY LIMITED WARRANTY For one year from the date of purchase, when this major appliance is operated and maintained according to...
... and exclusion may not apply to correct defects in materials or workmanship that vary from state to state or province to published user or operator instructions and/or installation instructions. 2. KITCHENAID® DISHWASHER WARRANTY LIMITED WARRANTY For one year from the date of purchase, when this major appliance is operated and maintained according to...


