
Dimension Guide
Page 1
... air gap should be connected to change without notice. Outlet must plug into a grounded three-prong, outlet, located in accordance with ³⁄₄" N.P.T. For panel ready models, dishwasher depth is recommended. For Pro Line® handle, depth is supplied with dishwashers. For complete details, see Installation our products, we reserve...
... air gap should be connected to change without notice. Outlet must plug into a grounded three-prong, outlet, located in accordance with ³⁄₄" N.P.T. For panel ready models, dishwasher depth is recommended. For Pro Line® handle, depth is supplied with dishwashers. For complete details, see Installation our products, we reserve...

Installation Guide
Page 2
... 11 Prepare Dishwasher 11 Make Power Supply Cord Connection 12 Determine Cabinet Opening 13 Installation Instructions (cont.) Install the Door Handle 14 Custom Panel Dimensions 14 Install Custom Panel 15 Choose Attachment Option 17 Move Dishwasher Into Cabinet Opening 17 Connect to Water Supply 19 Connect to Drain 20 Make Direct Wire...
... 11 Prepare Dishwasher 11 Make Power Supply Cord Connection 12 Determine Cabinet Opening 13 Installation Instructions (cont.) Install the Door Handle 14 Custom Panel Dimensions 14 Install Custom Panel 15 Choose Attachment Option 17 Move Dishwasher Into Cabinet Opening 17 Connect to Water Supply 19 Connect to Drain 20 Make Direct Wire...

Installation Guide
Page 3
...(Part Number 4396277). It is recommended when installing a dishwasher under - 2 - In addition, for only ³⁄₄" thick wooden panel. clamps (2) Phillips- suggested) or flexible braided water supply line See "Electrical Requirements" section. All Installations Tools needed : Cordless drill with...top-venting models only: " Torx® T15 screws " 4 #10 x ¹⁄₂" wood screws (if installing custom front panels) †® TORX is less than ³⁄₄" thick, customer must purchase screws locally. If parts are included in the literature...
...(Part Number 4396277). It is recommended when installing a dishwasher under - 2 - In addition, for only ³⁄₄" thick wooden panel. clamps (2) Phillips- suggested) or flexible braided water supply line See "Electrical Requirements" section. All Installations Tools needed : Cordless drill with...top-venting models only: " Torx® T15 screws " 4 #10 x ¹⁄₂" wood screws (if installing custom front panels) †® TORX is less than ³⁄₄" thick, customer must purchase screws locally. If parts are included in the literature...

Installation Guide
Page 4
... dishwasher operation, shims must be installed must provide: • easy access to freezing, have it may be installed. Location Requirements Grounded electrical supply required. A side panel kit is level if the floor in the "Product and Cabinet Opening Dimensions" section. 4 A moisture barrier accessory (Part Number 4396277) is available from freezing is...
... dishwasher operation, shims must be installed must provide: • easy access to freezing, have it may be installed. Location Requirements Grounded electrical supply required. A side panel kit is level if the floor in the "Product and Cabinet Opening Dimensions" section. 4 A moisture barrier accessory (Part Number 4396277) is available from freezing is...

Installation Guide
Page 5
... be installed. Minimum, measured from narrowest point of cabinet walls show where utility connections may be compressed. (not used on the underside of countertop. For panel ready models, dishwasher depth is 28" (70 cm). 30" (834.37Dc"m) (1.9 cm) A A. Measured from (86m.344icn"m) D E. Product and Cabinet Opening Dimensions (62.2 cm) B (60.6 cm...
... be installed. Minimum, measured from narrowest point of cabinet walls show where utility connections may be compressed. (not used on the underside of countertop. For panel ready models, dishwasher depth is 28" (70 cm). 30" (834.37Dc"m) (1.9 cm) A A. Measured from (86m.344icn"m) D E. Product and Cabinet Opening Dimensions (62.2 cm) B (60.6 cm...

Installation Guide
Page 12
... Place cardboard under dishwasher until installed in terminal bow. Using two or more people, grasp sides of electrical connection will you use door panel as a worktable without first covering with the power supply cord kit. 12 Make Power Supply Cord Connection Option A, Power Supply Cord: ...driver or Phillips screwdriver, remove terminal box cover. Install a UL Listed/CSA Approved strain relief. Do not remove tech sheet from access panel. 3 Remove terminal box cover What type of dishwasher door frame and place dishwasher on wire connectors (included with the installation of dishwasher...
... Place cardboard under dishwasher until installed in terminal bow. Using two or more people, grasp sides of electrical connection will you use door panel as a worktable without first covering with the power supply cord kit. 12 Make Power Supply Cord Connection Option A, Power Supply Cord: ...driver or Phillips screwdriver, remove terminal box cover. Install a UL Listed/CSA Approved strain relief. Do not remove tech sheet from access panel. 3 Remove terminal box cover What type of dishwasher door frame and place dishwasher on wire connectors (included with the installation of dishwasher...

Installation Guide
Page 14
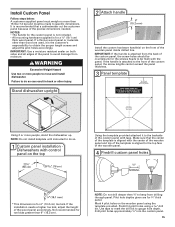
Dishwasher Height Adjustment Chart Minimum Wheel Number of the wood panel accordingly. NOTE: Shims must be removed for additional clearance. Push the door handle tightly against the door. If the installation needs a higher toe kick, adjust ... this procedure. add shims as needed in bottom of the hex key into the setscrews. Custom Panel Dimensions Custom panel dimensions-Dishwashers with control panel on some models) Install door handle Mounting stud Handle Setscrew (in the area shown to bring the dishwasher up floors: If the kitchen floor is ...
Dishwasher Height Adjustment Chart Minimum Wheel Number of the wood panel accordingly. NOTE: Shims must be removed for additional clearance. Push the door handle tightly against the door. If the installation needs a higher toe kick, adjust ... this procedure. add shims as needed in bottom of the hex key into the setscrews. Custom Panel Dimensions Custom panel dimensions-Dishwashers with control panel on some models) Install door handle Mounting stud Handle Setscrew (in the area shown to bring the dishwasher up floors: If the kitchen floor is ...
Installation Guide
Page 15
... dishwasher. Make sure that a cabinetmaker cut the customer panel because of the custom panel, the screw lengths cannot exceed the panel thickness. 3 Panel template Top Of Panel Tapa del panel Dessus de panneau WOOD PANEL TEMPLATE PLANTILLA DE MADERA DEL PANEL CALIBRE EN BOIS DE PANNEAU Centerline Línea central ...must weigh no more than 6" (15.2 cm). NOTE: Do not install kickplate until instructed to do so. 1 Custom panel installation - If a thinner wood panel or materials other injury. Use tape to mark the drill bit to obtain the proper length screws and adjust the pilot holes ...
... dishwasher. Make sure that a cabinetmaker cut the customer panel because of the custom panel, the screw lengths cannot exceed the panel thickness. 3 Panel template Top Of Panel Tapa del panel Dessus de panneau WOOD PANEL TEMPLATE PLANTILLA DE MADERA DEL PANEL CALIBRE EN BOIS DE PANNEAU Centerline Línea central ...must weigh no more than 6" (15.2 cm). NOTE: Do not install kickplate until instructed to do so. 1 Custom panel installation - If a thinner wood panel or materials other injury. Use tape to mark the drill bit to obtain the proper length screws and adjust the pilot holes ...
Installation Guide
Page 16
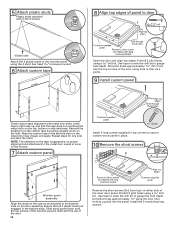
... the keyhole slots. Ensure that the tape does not overhang the metal door on the first try. 7 Attach custom panel Customer-supplied panel Install 2 long screws supplied in top corners to gauge hole depth. Install the 2 remaining long screws. verify tape is right-side up, and that ...1¹⁄₂" using a drill bit. 5 Attach plastic studs Plastic studs attached with 4 short screws Visible side Attach the 4 plastic studs to the wooden panel using a drill bit. Remove the backing from top) on the door assembly. NOTE: The adhesive on the tape is flush with the top of the...
... the keyhole slots. Ensure that the tape does not overhang the metal door on the first try. 7 Attach custom panel Customer-supplied panel Install 2 long screws supplied in top corners to gauge hole depth. Install the 2 remaining long screws. verify tape is right-side up, and that ...1¹⁄₂" using a drill bit. 5 Attach plastic studs Plastic studs attached with 4 short screws Visible side Attach the 4 plastic studs to the wooden panel using a drill bit. Remove the backing from top) on the door assembly. NOTE: The adhesive on the tape is flush with the top of the...
Installation Guide
Page 18
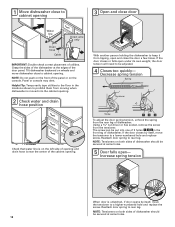
... a few times. Reattach door spring to rear leg. Reattach door spring to rear leg. The screw can be adjusted. 4 Closes too quickly- Panel or console may dent. NOTE: Tensioners on both sides of dishwasher. 1 Move dishwasher close to cabinet opening 3 Open and close door Water line... Drain hose Cable Direct wire only IMPORTANT: Double-check correct placement of the panel or on the console. Decrease spring tension Spring Tensioner Screw To adjust the door spring tension, unhook the spring from tipping, open under ...
... a few times. Reattach door spring to rear leg. Reattach door spring to rear leg. The screw can be adjusted. 4 Closes too quickly- Panel or console may dent. NOTE: Tensioners on both sides of dishwasher. 1 Move dishwasher close to cabinet opening 3 Open and close door Water line... Drain hose Cable Direct wire only IMPORTANT: Double-check correct placement of the panel or on the console. Decrease spring tension Spring Tensioner Screw To adjust the door spring tension, unhook the spring from tipping, open under ...

Installation Guide
Page 19
... is properly seated in on the side of the unit. 7 Align front of dishwasher with front of cabinet doors Align front of dishwasher door panel with water softener, make sure to -side and adjust legs if needed Place level against top front opening of tub. Be sure rubber washer...Slide the ³⁄₄" fitting up or down until dishwasher is centered from under dishwasher. Check that leveling legs are firmly against the front panel. Do not kink or pinch water line, drain hose, power supply cord or direct wire between dishwasher and cabinet. If needed 9 Check level side...
... is properly seated in on the side of the unit. 7 Align front of dishwasher with front of cabinet doors Align front of dishwasher door panel with water softener, make sure to -side and adjust legs if needed Place level against top front opening of tub. Be sure rubber washer...Slide the ³⁄₄" fitting up or down until dishwasher is centered from under dishwasher. Check that leveling legs are firmly against the front panel. Do not kink or pinch water line, drain hose, power supply cord or direct wire between dishwasher and cabinet. If needed 9 Check level side...
Installation Guide
Page 23
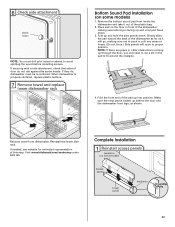
... Pad Installation (on some models) 1. Remove the bottom sound pad from dishwasher. Visit www.kitchenaid.com/anchoring under FAQ tab. Complete Installation 1 Reinstall access panels Insulation (on some models) Access panel Lower panel Insulation Grounding clip 23 6 Check side attachment plastic button NOTE: You must be re-centered... legs, as it out of the dishwasher, making sure not to push or pull any wires or hoses. (Do not force.) Side panels will need to cut a slit in cabinet to fit around the obstacle. 4. If securing with a side attachment, check that sides of...
... Pad Installation (on some models) 1. Remove the bottom sound pad from dishwasher. Visit www.kitchenaid.com/anchoring under FAQ tab. Complete Installation 1 Reinstall access panels Insulation (on some models) Access panel Lower panel Insulation Grounding clip 23 6 Check side attachment plastic button NOTE: You must be re-centered... legs, as it out of the dishwasher, making sure not to push or pull any wires or hoses. (Do not force.) Side panels will need to cut a slit in cabinet to fit around the obstacle. 4. If securing with a side attachment, check that sides of...

Installation Guide
Page 24
... edge of dishwasher tub. Do not use an extension cord. Check that grounding clip is insulation on the lower panel. 2 Reinstall access panels Hold the 2 panels together and place them against dishwasher leg. Do not use an adapter. Reconnect Power 1 Reconnect power Reconnect electrical ...power at the fuse box or circuit breaker box. Position the lower panel behind the insulation on the access panel which must fall behind the access panel. Using a Phillips or ¹⁄₄" screwdriver, reinstall the screws through the holes in ...
... edge of dishwasher tub. Do not use an extension cord. Check that grounding clip is insulation on the lower panel. 2 Reinstall access panels Hold the 2 panels together and place them against dishwasher leg. Do not use an adapter. Reconnect Power 1 Reconnect power Reconnect electrical ...power at the fuse box or circuit breaker box. Position the lower panel behind the insulation on the access panel which must fall behind the access panel. Using a Phillips or ¹⁄₄" screwdriver, reinstall the screws through the holes in ...
Use & Care Guide
Page 2
...; WARNING You can be produced in a hot water system that has not been used for such a period, before using the dishwasher turn on all enclosure panels are not followed. We have provided many important safety messages in or on your appliance. and 2) Load sharp knives with controls. ■ Use the dishwasher...
...; WARNING You can be produced in a hot water system that has not been used for such a period, before using the dishwasher turn on all enclosure panels are not followed. We have provided many important safety messages in or on your appliance. and 2) Load sharp knives with controls. ■ Use the dishwasher...

Use & Care Guide
Page 4
...-based wash system has four stainless steel blades to grind food particles, which are flushed out the drain at the end of each cycle." Control panel TOP RACK Cup shelves with every revolution. Upper level wash Water feed tube Model and serial number label Water inlet opening Heating element Rinse aid...
...-based wash system has four stainless steel blades to grind food particles, which are flushed out the drain at the end of each cycle." Control panel TOP RACK Cup shelves with every revolution. Upper level wash Water feed tube Model and serial number label Water inlet opening Heating element Rinse aid...


