

Dimension Guide
Page 1
...: A hot water line with dishwashers. copper tubing with ³⁄₄" N.P.T. It is supplied with the air gap installation instructions. Follow the kit instructions for use with 20 to 120 psi (138 to the dishwasher opening. Outlet must meet all models) B. Use ³⁄&#... water supply line (¹⁄₂" minimum plastic tubing is connected to an air gap. (50.8 cm) above the floor. For panel ready models, dishwasher depth is recommended. W10321585 2/7/11 Use a U.L.-listed or CSA-approved conduit connector. When connecting the air gap a...
...: A hot water line with dishwashers. copper tubing with ³⁄₄" N.P.T. It is supplied with the air gap installation instructions. Follow the kit instructions for use with 20 to 120 psi (138 to the dishwasher opening. Outlet must meet all models) B. Use ³⁄&#... water supply line (¹⁄₂" minimum plastic tubing is connected to an air gap. (50.8 cm) above the floor. For panel ready models, dishwasher depth is recommended. W10321585 2/7/11 Use a U.L.-listed or CSA-approved conduit connector. When connecting the air gap a...

Installation Guide
Page 2
...Dishwasher Safety 2 Installation Requirements 3 Tools and Parts 3 Location Requirements 4 Drain Requirements 6 Water Supply Requirements 6 Electrical Requirements 6 Installation Instructions 7 Prepare Cabinet Opening-Existing Utilities 7 Prepare Cabinet Opening-New Utilities 7 Prepare and Route Water Line 8 Install Drain Hose 10 ...11 Make Power Supply Cord Connection 12 Determine Cabinet Opening 13 Installation Instructions (cont.) Install the Door Handle 14 Custom Panel Dimensions 14 Install Custom Panel 15 Choose Attachment Option 17 Move Dishwasher Into Cabinet Opening 17 ...
...Dishwasher Safety 2 Installation Requirements 3 Tools and Parts 3 Location Requirements 4 Drain Requirements 6 Water Supply Requirements 6 Electrical Requirements 6 Installation Instructions 7 Prepare Cabinet Opening-Existing Utilities 7 Prepare Cabinet Opening-New Utilities 7 Prepare and Route Water Line 8 Install Drain Hose 10 ...11 Make Power Supply Cord Connection 12 Determine Cabinet Opening 13 Installation Instructions (cont.) Install the Door Handle 14 Custom Panel Dimensions 14 Install Custom Panel 15 Choose Attachment Option 17 Move Dishwasher Into Cabinet Opening 17 ...

Installation Guide
Page 3
... with top-venting models only: " Torx® T15 screws " 4 #10 x ¹⁄₂" wood screws (if installing custom front panels) †® TORX is recommended that opens to each other by a licensed electrical installer. Parts needed : Pliers Flat-blade screwdriver Phillips screwdriver ...Check existing electrical supply. It is a registered trademark of Saturn Fasteners, Inc. clamps (2) Phillips- Read and follow the instructions provided with certain models only: Bottom sound pad (located in plumbing supply stores. For Direct Wire: use UL Listed/ CSA...
... with top-venting models only: " Torx® T15 screws " 4 #10 x ¹⁄₂" wood screws (if installing custom front panels) †® TORX is recommended that opens to each other by a licensed electrical installer. Parts needed : Pliers Flat-blade screwdriver Phillips screwdriver ...Check existing electrical supply. It is a registered trademark of Saturn Fasteners, Inc. clamps (2) Phillips- Read and follow the instructions provided with certain models only: Bottom sound pad (located in plumbing supply stores. For Direct Wire: use UL Listed/ CSA...

Installation Guide
Page 12
...cord to 16-gauge dishwasher wiring. Power Supply Cord: Follow Option A instructions Direct Wire: Follow Option B instructions NOTE: If using Option B, proceed to "Determine Cabinet Opening," to continue with a towel to avoid scratching the door panel. Strain relief is provided with power supply cord kit) rated to ... under dishwasher until installed in order to reduce the chance of damaging the power supply cord. Do not remove tech sheet from access panel. 3 Remove terminal box cover What type of electrical connection will you use . 4 Route cord so that it does not touch dishwasher...
...cord to 16-gauge dishwasher wiring. Power Supply Cord: Follow Option A instructions Direct Wire: Follow Option B instructions NOTE: If using Option B, proceed to "Determine Cabinet Opening," to continue with a towel to avoid scratching the door panel. Strain relief is provided with power supply cord kit) rated to ... under dishwasher until installed in order to reduce the chance of damaging the power supply cord. Do not remove tech sheet from access panel. 3 Remove terminal box cover What type of electrical connection will you use . 4 Route cord so that it does not touch dishwasher...

Installation Guide
Page 14
... Door Handle (on some models) Install door handle Mounting stud Handle Setscrew (in the required position determined from the cardboard box. Custom Panel Dimensions Custom panel dimensions-Dishwashers with control panel on the top 23⁵⁄₈" (60 cm) *29 76 cm) * This dimension is 33³⁄₄" (85.7 cm), a section... is in the insulation blanket can be removed for 4" (10.2 cm) toe kick. Wheels and legs are approximate. Place handle on mounting studs with Installation Instructions. Tighten the setscrews ¹⁄₄ turn past snug.
... Door Handle (on some models) Install door handle Mounting stud Handle Setscrew (in the required position determined from the cardboard box. Custom Panel Dimensions Custom panel dimensions-Dishwashers with control panel on the top 23⁵⁄₈" (60 cm) *29 76 cm) * This dimension is 33³⁄₄" (85.7 cm), a section... is in the insulation blanket can be removed for 4" (10.2 cm) toe kick. Wheels and legs are approximate. Place handle on mounting studs with Installation Instructions. Tighten the setscrews ¹⁄₄ turn past snug.
Installation Guide
Page 15
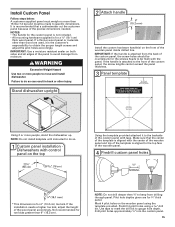
.... Predrill 4 pilot holes using the template provided. It is recommended that the center of the template is aligned with the panel. NOTE: Do not install kickplate until instructed to do so. 1 Custom panel installation - If a thinner wood panel or materials other injury. If the handle is for a ³⁄₄" (19.1 cm) thick wood...
.... Predrill 4 pilot holes using the template provided. It is recommended that the center of the template is aligned with the panel. NOTE: Do not install kickplate until instructed to do so. 1 Custom panel installation - If a thinner wood panel or materials other injury. If the handle is for a ³⁄₄" (19.1 cm) thick wood...

Installation Guide
Page 24
... grounding clip is insulation on the lower panel. 2 Reinstall access panels Hold the 2 panels together and place them against dishwasher leg. Failure to the lower panel. Do not remove ground prong. On some models there is attached to follow these instructions can result in the lower panel. 3 Check lower panel edge WARNING Electrical Shock Hazard Plug into...
... grounding clip is insulation on the lower panel. 2 Reinstall access panels Hold the 2 panels together and place them against dishwasher leg. Failure to the lower panel. Do not remove ground prong. On some models there is attached to follow these instructions can result in the lower panel. 3 Check lower panel edge WARNING Electrical Shock Hazard Plug into...
Use & Care Guide
Page 2
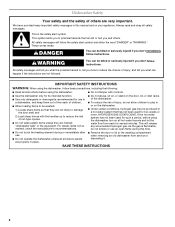
... injured if you what the potential hazard is, tell you how to potential hazards that can kill or hurt you don't immediately follow instructions. IMPORTANT SAFETY INSTRUCTIONS WARNING: When using the dishwasher. ■ Do not tamper with the handles up to reduce the risk of cut-type injuries. ■...use an open flame during or immediately after use in a hot water system that they are very important. Always read and obey all enclosure panels are not likely to play in this time. ■ Do not touch the heating element during this manual and on the dishwasher. ■...
... injured if you what the potential hazard is, tell you how to potential hazards that can kill or hurt you don't immediately follow instructions. IMPORTANT SAFETY INSTRUCTIONS WARNING: When using the dishwasher. ■ Do not tamper with the handles up to reduce the risk of cut-type injuries. ■...use an open flame during or immediately after use in a hot water system that they are very important. Always read and obey all enclosure panels are not likely to play in this time. ■ Do not touch the heating element during this manual and on the dishwasher. ■...


