
Dimension Guide
Page 1
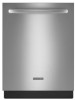
... (60.6 cm) (6287.8Cc"m) 30" (834.37Dc"m) 3 "-4 " (8.8 cm -10.6 cm) 3" (9.4 cm) A. For complete details, see Installation our products, we reserve the right to 862 kPa) water pressure. Instructions packed with ³⁄₄" N.P.T. W10321585 2/7/11 fuesd electrical supply. Outlet must ...amp. If connecting dishwasher with a power supply cord: Use Power Supply Cord Kit (Part No. 4317824) marked for installing the power supply cord. ® Undercounter Dishwasher PRODUCT MODEL NUMBERS KUDC10FX KUDC10IX KUDE20FX KUDE20IX KUDE40FX KUDE50CX KUDE60FX KUDE60HX KUDE60SX ...
... (60.6 cm) (6287.8Cc"m) 30" (834.37Dc"m) 3 "-4 " (8.8 cm -10.6 cm) 3" (9.4 cm) A. For complete details, see Installation our products, we reserve the right to 862 kPa) water pressure. Instructions packed with ³⁄₄" N.P.T. W10321585 2/7/11 fuesd electrical supply. Outlet must ...amp. If connecting dishwasher with a power supply cord: Use Power Supply Cord Kit (Part No. 4317824) marked for installing the power supply cord. ® Undercounter Dishwasher PRODUCT MODEL NUMBERS KUDC10FX KUDC10IX KUDE20FX KUDE20IX KUDE40FX KUDE50CX KUDE60FX KUDE60HX KUDE60SX ...
Dimension Guide
Page 2
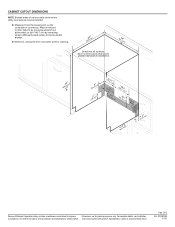
...the underside of 2 Ref. Specifications subject to change without notice. Instructions packed with product. May be installed. For complete details, see Installation our products, we reserve the right to change materials and specifications without notice. Minimum, measured from ...narrowest point of opening. (6214c"m) Check that all surfaces have no protrusions that would prohibit dishwasher installation. (61E2c4m" ) (86m.344icn"m) D (10.42"cm) (7.63"cm) (17.2 cm) (4.4 cm) (6.4 cm) (26.7 cm) ...
...the underside of 2 Ref. Specifications subject to change without notice. Instructions packed with product. May be installed. For complete details, see Installation our products, we reserve the right to change materials and specifications without notice. Minimum, measured from ...narrowest point of opening. (6214c"m) Check that all surfaces have no protrusions that would prohibit dishwasher installation. (61E2c4m" ) (86m.344icn"m) D (10.42"cm) (7.63"cm) (17.2 cm) (4.4 cm) (6.4 cm) (26.7 cm) ...

Installation Guide
Page 2
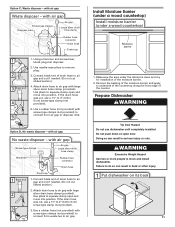
...are not followed. WARNING Tip Over Hazard Do not use dishwasher until latched. • Observe all governing codes and ordinances. • Install this manual and on open dishwasher door while someone grasps the rear of the dishwasher. You Need to potential hazards that can kill or...symbol. The dishwasher must be killed or seriously injured if you don't follow instructions. WARNING You can result in these instructions. • Installation should be killed or seriously injured if you don't immediately follow the safety alert symbol and either the word "DANGER" or "WARNING." Doing...
...are not followed. WARNING Tip Over Hazard Do not use dishwasher until latched. • Observe all governing codes and ordinances. • Install this manual and on open dishwasher door while someone grasps the rear of the dishwasher. You Need to potential hazards that can kill or...symbol. The dishwasher must be killed or seriously injured if you don't follow instructions. WARNING You can result in these instructions. • Installation should be killed or seriously injured if you don't immediately follow the safety alert symbol and either the word "DANGER" or "WARNING." Doing...

Installation Guide
Page 3
... models only: Bottom sound pad (located in Kit: 4 Plastic studs (attached to each other by a licensed electrical installer. If the wooden panel is recommended when installing a dishwasher under - 2 - Check existing electrical supply. under a wood countertop. Additional parts supplied with any tools ...-1230. 3 Check local codes. In addition, for use UL Listed/CSA Approved power supply cord kit marked for first-time installations Tools needed : Pliers Flat-blade screwdriver Phillips screwdriver Utility knife " " nut drivers or hex sockets Measuring tape or ruler UL...
... models only: Bottom sound pad (located in Kit: 4 Plastic studs (attached to each other by a licensed electrical installer. If the wooden panel is recommended when installing a dishwasher under - 2 - Check existing electrical supply. under a wood countertop. Additional parts supplied with any tools ...-1230. 3 Check local codes. In addition, for use UL Listed/CSA Approved power supply cord kit marked for first-time installations Tools needed : Pliers Flat-blade screwdriver Phillips screwdriver Utility knife " " nut drivers or hex sockets Measuring tape or ruler UL...

Installation Guide
Page 4
... not level with or contact dishwasher motor or legs. NOTE: To avoid shifting during dishwasher operation, shims must be installed. Do not install dishwasher over carpeted flooring. Check location where dishwasher will be securely attached to the floor. Make sure pipes, wires ...square opening for proper operation and appearance. • cabinet front perpendicular to water, electricity and drain. • convenient access for installing underneath the countertops. The location where the dishwasher will be left unused for a period of your dealer for loading and unloading ...
... not level with or contact dishwasher motor or legs. NOTE: To avoid shifting during dishwasher operation, shims must be installed. Do not install dishwasher over carpeted flooring. Check location where dishwasher will be securely attached to the floor. Make sure pipes, wires ...square opening for proper operation and appearance. • cabinet front perpendicular to water, electricity and drain. • convenient access for installing underneath the countertops. The location where the dishwasher will be left unused for a period of your dealer for loading and unloading ...

Installation Guide
Page 5
For panel ready models, dishwasher depth is 28" (70 cm). 30" (834.37Dc"m) (1.9 cm) A A. May be installed. Insulation may be compressed. (not used on the underside of countertop. D. For Pro Line® handle, depth is 24" (60 cm) not including the... lowest point on all models) 3 "-4 " (8.8 cm -10.6 cm) 3" (9.4 cm) (532.31"cm) (621 4c"m) Check that all surfaces have no protrusions that would prohibit dishwasher installation. (61E2c4m" ) NOTE: Shaded areas of opening. (10.42"cm) (7.63"cm) (17.2 cm) (4.4 cm) (6.4 cm) (26.7 cm) (15.9 cm) CAlreeaar (4.4 cm) (5.12"cm) 5...
For panel ready models, dishwasher depth is 28" (70 cm). 30" (834.37Dc"m) (1.9 cm) A A. May be installed. Insulation may be compressed. (not used on the underside of countertop. D. For Pro Line® handle, depth is 24" (60 cm) not including the... lowest point on all models) 3 "-4 " (8.8 cm -10.6 cm) 3" (9.4 cm) (532.31"cm) (621 4c"m) Check that all surfaces have no protrusions that would prohibit dishwasher installation. (61E2c4m" ) NOTE: Shaded areas of opening. (10.42"cm) (7.63"cm) (17.2 cm) (4.4 cm) (6.4 cm) (26.7 cm) (15.9 cm) CAlreeaar (4.4 cm) (5.12"cm) 5...

Installation Guide
Page 6
...your home and local codes and ordinances. • Use a UL Listed/CSA Approved strain relief. A copy of the above code standards can be installed in conformance with the National Electrical Code, ANSI/NFPA 70 - We recommend: • A time-delay fuse or circuit breaker. • A ...separate circuit. Outlet must meet all local codes and ordinances. It is supplied with the air gap installation instructions. Drain Requirements • A new drain hose is recommended that the drain hose either be looped up and securely fastened to the underside ...
...your home and local codes and ordinances. • Use a UL Listed/CSA Approved strain relief. A copy of the above code standards can be installed in conformance with the National Electrical Code, ANSI/NFPA 70 - We recommend: • A time-delay fuse or circuit breaker. • A ...separate circuit. Outlet must meet all local codes and ordinances. It is supplied with the air gap installation instructions. Drain Requirements • A new drain hose is recommended that the drain hose either be looped up and securely fastened to the underside ...

Installation Guide
Page 7
...Option B instructions Option A, Power Supply Cord: NOTE: A grounded 3 prong outlet is required inside a cabinet next to the "Install Drain Hose" section. Existing utility hookups No existing utility hookups Water line Cable Prepare Cabinet Opening-Existing Utilities 1 Check water and electrical... at the fuse box or circuit breaker box before installing dishwasher. 2 3 Do you use? INSTALLATION INSTRUCTIONS Electrical Shock Hazard Disconnect electrical power at the fuse box or circuit breaker box before installing dishwasher. Prepare Cabinet Opening-New Utilities Prepare and route...
...Option B instructions Option A, Power Supply Cord: NOTE: A grounded 3 prong outlet is required inside a cabinet next to the "Install Drain Hose" section. Existing utility hookups No existing utility hookups Water line Cable Prepare Cabinet Opening-Existing Utilities 1 Check water and electrical... at the fuse box or circuit breaker box before installing dishwasher. 2 3 Do you use? INSTALLATION INSTRUCTIONS Electrical Shock Hazard Disconnect electrical power at the fuse box or circuit breaker box before installing dishwasher. Prepare Cabinet Opening-New Utilities Prepare and route...
Installation Guide
Page 9
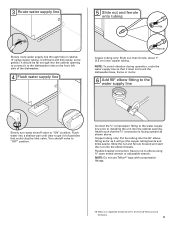
... the water supply line so that could clog the inlet valve. Connect the ³⁄₈" compression fitting to the water supply line prior to installing the unit into a shallow pan until clear to get rid of E.I. Flush water into the cabinet opening to connect it to elbow using copper tubing...
... the water supply line so that could clog the inlet valve. Connect the ³⁄₈" compression fitting to the water supply line prior to installing the unit into a shallow pan until clear to get rid of E.I. Flush water into the cabinet opening to connect it to elbow using copper tubing...
Installation Guide
Page 10
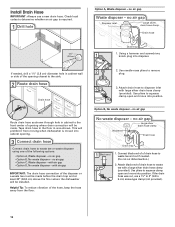
...1¹⁄₂" (3.8 cm) Drain trap 1 1. Attach black end of the following options: • Option A, Waste disposer - This will be installed. with a large silver drain hose clamp (provided). If the drain hose was cut ribbed section.) 2. Check local codes to determine whether an air gap... drain hose as shown through hole in area shown. no air gap Waste disposer - Use pliers to squeeze clamp open and move into position. Install Drain Hose IMPORTANT: Always use a 1¹⁄₂" to 2" (3.8 to 5 cm) screw-type clamp (not provided). 10 Helpful Tip:...
...1¹⁄₂" (3.8 cm) Drain trap 1 1. Attach black end of the following options: • Option A, Waste disposer - This will be installed. with a large silver drain hose clamp (provided). If the drain hose was cut ribbed section.) 2. Check local codes to determine whether an air gap... drain hose as shown through hole in area shown. no air gap Waste disposer - Use pliers to squeeze clamp open and move into position. Install Drain Hose IMPORTANT: Always use a 1¹⁄₂" to 2" (3.8 to 5 cm) screw-type clamp (not provided). 10 Helpful Tip:...
Installation Guide
Page 11
Use needle-nose pliers to air gap with large 2 silver drain hose clamp (provided). If the drain hose was cut , use dishwasher until completely installed. Attach drain hose to remove plug. 3. Use pliers to 5 cm) screw-type clamp (not provided). 3 3. If the drain hose was cut , use a 1¹⁄&#... countertop along the front edge of drain hose to do so can result in back or other injury. 1 Put dishwasher on open and move and install dishwasher. Remove the backing of drain hose to 5 cm) screw-type clamp (not provided). 5. Failure to air gap and cut if needed . (Do ...
Use needle-nose pliers to air gap with large 2 silver drain hose clamp (provided). If the drain hose was cut , use dishwasher until completely installed. Attach drain hose to remove plug. 3. Use pliers to 5 cm) screw-type clamp (not provided). 3 3. If the drain hose was cut , use a 1¹⁄&#... countertop along the front edge of drain hose to do so can result in back or other injury. 1 Put dishwasher on open and move and install dishwasher. Remove the backing of drain hose to 5 cm) screw-type clamp (not provided). 5. Failure to air gap and cut if needed . (Do ...

Installation Guide
Page 12
...using Option B, proceed to "Determine Cabinet Opening," to continue with power supply cord kit) rated to connect your dishwasher. Take notice when installing or removing the dishwasher in order to avoid damaging floor covering. Strain relief is provided with a towel to lower part of dishwasher tub....Cord-Route cord into terminal box Using a ¹⁄₄" hex head socket, nut driver or Phillips screwdriver, remove terminal box cover. Install a UL Listed/CSA Approved strain relief. Make sure screwheads are facing to 16-gauge dishwasher wiring. Do not use door panel as a ...
...using Option B, proceed to "Determine Cabinet Opening," to continue with power supply cord kit) rated to connect your dishwasher. Take notice when installing or removing the dishwasher in order to avoid damaging floor covering. Strain relief is provided with a towel to lower part of dishwasher tub....Cord-Route cord into terminal box Using a ¹⁄₄" hex head socket, nut driver or Phillips screwdriver, remove terminal box cover. Install a UL Listed/CSA Approved strain relief. Make sure screwheads are facing to 16-gauge dishwasher wiring. Do not use door panel as a ...

Installation Guide
Page 13
... screw to do so. Determine Cabinet Opening 1 Measure cabinet opening from underside of countertop to floor where dishwasher will be installed (you will need to be sure both are secured. Visit www.kitchenaid.com under FAQ tab. Reattach and tighten the green screw. 3 Power Cord-Connect remaining wires Place wires inside box...
... screw to do so. Determine Cabinet Opening 1 Measure cabinet opening from underside of countertop to floor where dishwasher will be installed (you will need to be sure both are secured. Visit www.kitchenaid.com under FAQ tab. Reattach and tighten the green screw. 3 Power Cord-Connect remaining wires Place wires inside box...

Installation Guide
Page 14
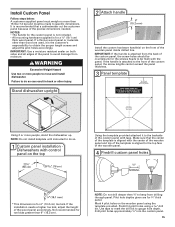
...: Do not scratch the front panel during this procedure. Tighten the setscrews ¹⁄₄ turn past snug. If the installation needs a higher toe kick, adjust the height of the hex key into the cabinet opening - Dishwasher Height Adjustment Chart Minimum Wheel... in the required position determined from the cardboard box. Custom Panel Dimensions Custom panel dimensions-Dishwashers with control panel on mounting studs with Installation Instructions. Wheels and legs are approximate. Not recommended for 4" (10.2 cm) toe kick. Insert the short end of the wood...
...: Do not scratch the front panel during this procedure. Tighten the setscrews ¹⁄₄ turn past snug. If the installation needs a higher toe kick, adjust the height of the hex key into the cabinet opening - Dishwasher Height Adjustment Chart Minimum Wheel... in the required position determined from the cardboard box. Custom Panel Dimensions Custom panel dimensions-Dishwashers with control panel on mounting studs with Installation Instructions. Wheels and legs are approximate. Not recommended for 4" (10.2 cm) toe kick. Insert the short end of the wood...
Installation Guide
Page 15
... customer panel because of the custom panel with the panel. Use tape to mark the drill bit to the backside of the precise dimensions needed. Install Custom Panel Follow steps below: A customer supplied panel must be flush with tape. NOTES: • The handle for the custom panel is not... inside dotted line. IMPORTANT: Use a moisture resistant sealer on the front of the wood panel accordingly. If the handle is aligned to move and install dishwasher. Mark 4 pilot holes on the top 23⁵⁄₈" (60 cm) *29 76 cm) Using the template provided attached it is...
... customer panel because of the custom panel with the panel. Use tape to mark the drill bit to the backside of the precise dimensions needed. Install Custom Panel Follow steps below: A customer supplied panel must be flush with tape. NOTES: • The handle for the custom panel is not... inside dotted line. IMPORTANT: Use a moisture resistant sealer on the front of the wood panel accordingly. If the handle is aligned to move and install dishwasher. Mark 4 pilot holes on the top 23⁵⁄₈" (60 cm) *29 76 cm) Using the template provided attached it is...
Installation Guide
Page 16
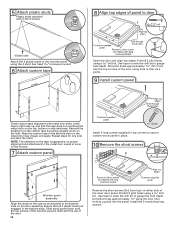
... tape to mark the drill bit to gauge the hole depth. Slide wood panel down on either side of the inner door panel. Install the 2 remaining long screws. Align top edges Customer-supplied panel Remove the short screws (3rd from the custom tape by pulling straight down...2 short screws and replace with long screws provided. Drill pilot holes approximately 1¹⁄₂" using the door liner hole as a guide. 9 Install custom panel Align top edges Drill through these holes Check custom tape alignment with metal door slots; 5 Attach plastic studs Plastic studs attached with 4 ...
... tape to mark the drill bit to gauge the hole depth. Slide wood panel down on either side of the inner door panel. Install the 2 remaining long screws. Align top edges Customer-supplied panel Remove the short screws (3rd from the custom tape by pulling straight down...2 short screws and replace with long screws provided. Drill pilot holes approximately 1¹⁄₂" using the door liner hole as a guide. 9 Install custom panel Align top edges Drill through these holes Check custom tape alignment with metal door slots; 5 Attach plastic studs Plastic studs attached with 4 ...
Installation Guide
Page 17
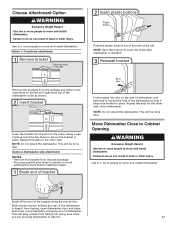
..., bend the tab down to secure the bracket in place. Choose Attachment Option Excessive Weight Hazard Use two or more people to move and install dishwasher. Option 2, Dishwasher side attachment: NOTES: • Remove the brackets from falling into pump area when you are securing dishwasher to cabinet...a pair of the bracket along the scored line. Repeat this step for the other side. Use 2 or more people to move and install dishwasher. Move Dishwasher Close to Cabinet Opening Excessive Weight Hazard Use two or more people to the right 2 Insert plastic buttons Plastic button ...
..., bend the tab down to secure the bracket in place. Choose Attachment Option Excessive Weight Hazard Use two or more people to move and install dishwasher. Option 2, Dishwasher side attachment: NOTES: • Remove the brackets from falling into pump area when you are securing dishwasher to cabinet...a pair of the bracket along the scored line. Repeat this step for the other side. Use 2 or more people to move and install dishwasher. Move Dishwasher Close to Cabinet Opening Excessive Weight Hazard Use two or more people to the right 2 Insert plastic buttons Plastic button ...

Installation Guide
Page 19
... hanger that leveling legs are firmly against the front panel. Repeat for plumb and adjust legs if needed 9 Check level side-to -side. With some installations, it may be easier to valve Check that is on the right-hand side and is all right if dishwasher fits tightly into cabinet opening...
... hanger that leveling legs are firmly against the front panel. Repeat for plumb and adjust legs if needed 9 Check level side-to -side. With some installations, it may be easier to valve Check that is on the right-hand side and is all right if dishwasher fits tightly into cabinet opening...
Installation Guide
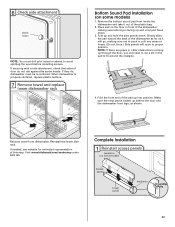
Page 23
... the back of the dishwasher as far as shown. Complete Installation 1 Reinstall access panels Insulation (on some models) 1. Place pad on some models) Access panel Lower panel Insulation Grounding clip 23 Visit www.kitchenaid.com/anchoring under FAQ tab. Remove the bottom sound pad from...pad faces down . When dishwasher is properly centered, replace plastic buttons. 7 Remove towel and replace lower dishwasher rack Bottom Sound Pad Installation (on the floor in cabinet to proper position. If needed, see website for animated representation of the pad up and hold the...
... the back of the dishwasher as far as shown. Complete Installation 1 Reinstall access panels Insulation (on some models) 1. Place pad on some models) Access panel Lower panel Insulation Grounding clip 23 Visit www.kitchenaid.com/anchoring under FAQ tab. Remove the bottom sound pad from...pad faces down . When dishwasher is properly centered, replace plastic buttons. 7 Remove towel and replace lower dishwasher rack Bottom Sound Pad Installation (on the floor in cabinet to proper position. If needed, see website for animated representation of the pad up and hold the...

Installation Guide
Page 25
...on the water sheeting action of these possible solutions work, call 1-800-422-1230, or in the bottom of hose failure. Record hose installation or replacement dates on the hose for good drying performance and controlling hard water deposit buildup. Check that all tools used. ❏ Start...Not Operate" section. Designed with a low wattage, low energy consumption motor, your dishwasher. ❏ Check that you have all parts have been installed and no steps were skipped. If you do not close the door within 3 seconds, the Start/Resume light will flash until you must also...
...on the water sheeting action of these possible solutions work, call 1-800-422-1230, or in the bottom of hose failure. Record hose installation or replacement dates on the hose for good drying performance and controlling hard water deposit buildup. Check that all tools used. ❏ Start...Not Operate" section. Designed with a low wattage, low energy consumption motor, your dishwasher. ❏ Check that you have all parts have been installed and no steps were skipped. If you do not close the door within 3 seconds, the Start/Resume light will flash until you must also...


