
User Instructions
Page 12
KITCHENAID® DISHWASHER WARRANTY ONE YEAR LIMITED WARRANTY For one year from the date of purchase, when your major appliance is installed, operated and maintained according to instructions attached to or furnished with the product, KitchenAid will pay for factory specified parts and... it is installed in an inaccessible location or is designed to the appliance. 8. Repairs to KitchenAid with the product, KitchenAid will pay for factory specified parts for product service in materials or workmanship. IMPLIED WARRANTIES, INCLUDING WARRANTIES OF MERCHANTABILITY OR FITNESS FOR...
KITCHENAID® DISHWASHER WARRANTY ONE YEAR LIMITED WARRANTY For one year from the date of purchase, when your major appliance is installed, operated and maintained according to instructions attached to or furnished with the product, KitchenAid will pay for factory specified parts and... it is installed in an inaccessible location or is designed to the appliance. 8. Repairs to KitchenAid with the product, KitchenAid will pay for factory specified parts for product service in materials or workmanship. IMPLIED WARRANTIES, INCLUDING WARRANTIES OF MERCHANTABILITY OR FITNESS FOR...

Installation Instructions
Page 2
... potential hazards that can happen if the instructions are very important. Do not push down on your appliance. Close dishwasher door until completely installed. Table of Contents Dishwasher Safety 2 Installation Requirements 3 Tools and parts 3 Location Requirements 3 Drain Requirements 5 Water Supply Requirements 5 Electrical Requirements 5 Installation Instructions 6 Prepare cabinet opening using existing utility hookups 6 Prepare...
... potential hazards that can happen if the instructions are very important. Do not push down on your appliance. Close dishwasher door until completely installed. Table of Contents Dishwasher Safety 2 Installation Requirements 3 Tools and parts 3 Location Requirements 3 Drain Requirements 5 Water Supply Requirements 5 Electrical Requirements 5 Installation Instructions 6 Prepare cabinet opening using existing utility hookups 6 Prepare...

Installation Instructions
Page 3
...is a registered trademark of time or in leveling dishwasher. 3 drain hose A B C Additional parts supplied with top-venting models only D. 2 #8 x 1-3/8" TORX® T15 screws E. 4 #10 x 3/8" hex-head screws Additional part supplied with 3/8" N.P.T. See separate parts list for accessories available for a period of ... flashlight • shallow pan • 5/8" open-end wrench • bath towel • wood block Parts needed : • electric drill with or contact dishwasher motor or legs. Location Requirements Do not run drain lines, water lines or electrical wiring where they can...
...is a registered trademark of time or in leveling dishwasher. 3 drain hose A B C Additional parts supplied with top-venting models only D. 2 #8 x 1-3/8" TORX® T15 screws E. 4 #10 x 3/8" hex-head screws Additional part supplied with 3/8" N.P.T. See separate parts list for accessories available for a period of ... flashlight • shallow pan • 5/8" open-end wrench • bath towel • wood block Parts needed : • electric drill with or contact dishwasher motor or legs. Location Requirements Do not run drain lines, water lines or electrical wiring where they can...

Installation Instructions
Page 5
...; 120°F (49°C) water at dishwasher. • 3/8" O.D. air gap •...(2.5 cm) drain connector of the dishwasher. • Connect drain hose to... junction box. If direct wiring dishwasher: • Use flexible, armored... prong, grounded outlet, located in conformance with dishwashers. Outlet must have: • 120-volt,... qualified electrician. Part No. 302797 grommet Follow the kit instructions for your dishwasher. If this is... or be connected to the dishwasher opening. You must meet all...dishwasher with a power supply cord: • Use Power Supply Cord Kit (Part No. 4317824)...
...; 120°F (49°C) water at dishwasher. • 3/8" O.D. air gap •...(2.5 cm) drain connector of the dishwasher. • Connect drain hose to... junction box. If direct wiring dishwasher: • Use flexible, armored... prong, grounded outlet, located in conformance with dishwashers. Outlet must have: • 120-volt,... qualified electrician. Part No. 302797 grommet Follow the kit instructions for your dishwasher. If this is... or be connected to the dishwasher opening. You must meet all...dishwasher with a power supply cord: • Use Power Supply Cord Kit (Part No. 4317824)...

Installation Instructions
Page 6
..., proceed to the next section "Install the drain hose." Turn off water supply. Connect drain hose to the sink. drain hose * Parts available from the floor and the edge of opening using one of the opening closest to waste tee or waste disposer using existing utility hookups...: • Option 1, Waste disposer - Check that does not have hookups, follow the steps under "Prepare cabinet opening where there are installing the dishwasher in an existing cabinet opening where the water connection will be made . 6" (15.2 cm) If the water line and the direct wire reach ...
..., proceed to the next section "Install the drain hose." Turn off water supply. Connect drain hose to the sink. drain hose * Parts available from the floor and the edge of opening using one of the opening closest to waste tee or waste disposer using existing utility hookups...: • Option 1, Waste disposer - Check that does not have hookups, follow the steps under "Prepare cabinet opening where there are installing the dishwasher in an existing cabinet opening where the water connection will be made . 6" (15.2 cm) If the water line and the direct wire reach ...

Installation Instructions
Page 7
...-type clamp*. 3. Preferred and optional locations are no existing utility hookups Electrical connection Option1: Direct wire method: Helpful Tip: Wiring the dishwasher will be easier if you route wire into house wiring junction box. 4. optional preferred locations locations 2. cut ribbed section). 2. This ...is recommended that the drain hose be made . * Parts available from the right side. 1. Cable must be before the drain trap and at least 20" (50.8 cm) above the floor where dishwasher will be installed. Run wire into the cabinet opening where...
...-type clamp*. 3. Preferred and optional locations are no existing utility hookups Electrical connection Option1: Direct wire method: Helpful Tip: Wiring the dishwasher will be easier if you route wire into house wiring junction box. 4. optional preferred locations locations 2. cut ribbed section). 2. This ...is recommended that the drain hose be made . * Parts available from the right side. 1. Cable must be before the drain trap and at least 20" (50.8 cm) above the floor where dishwasher will be installed. Run wire into the cabinet opening where...

Installation Instructions
Page 8
... and optional locations are shown. optional preferred locations locations 2. Cut end of copper tubing required. cut in a cabinet next to the dishwasher opening will bend and kink easily, so be installed. preferred optional locations locations 2. Attach copper tubing to air gap with a manual ... 1-1/2" (3.8 cm) hole in the cabinet side, rear or floor. The copper tubing should be made. * Parts available from the floor and the edge of the hole where it to dishwasher inlet on the side of cabinet opening . 1. with air gap • Option 2, No waste disposer -...
... and optional locations are shown. optional preferred locations locations 2. Cut end of copper tubing required. cut in a cabinet next to the dishwasher opening will bend and kink easily, so be installed. preferred optional locations locations 2. Attach copper tubing to air gap with a manual ... 1-1/2" (3.8 cm) hole in the cabinet side, rear or floor. The copper tubing should be made. * Parts available from the floor and the edge of the hole where it to dishwasher inlet on the side of cabinet opening . 1. with air gap • Option 2, No waste disposer -...

Installation Instructions
Page 9
...waste tee drain trap 3. This connection must be before the drain trap and at least 20" (50.8 cm) above the floor where dishwasher will be looped up and securely fastened to the underside of the moisture barrier. 2. Insert drain hose through hole cut , use a ...hose 9 moisture barrier drain trap 3. Option 2: No waste disposer - Attach drain hose to 5 cm) screw-type clamp*. 3. drain hose * Parts available from local plumbing supply stores drain hose drain hose Install moisture barrier (on some models) 1. with air gap: 1. This connection must be before...
...waste tee drain trap 3. This connection must be before the drain trap and at least 20" (50.8 cm) above the floor where dishwasher will be looped up and securely fastened to the underside of the moisture barrier. 2. Insert drain hose through hole cut , use a ...hose 9 moisture barrier drain trap 3. Option 2: No waste disposer - Attach drain hose to 5 cm) screw-type clamp*. 3. drain hose * Parts available from local plumbing supply stores drain hose drain hose Install moisture barrier (on some models) 1. with air gap: 1. This connection must be before...

Installation Instructions
Page 16
...4. Check that leveling legs are : • direct wiring, use Option 1 • using direct wire, check that it does not touch dishwasher motor or lower part of the panel or on connector. Close and latch the door, and place level against top front opening . Check that...connectors to 16-gauge dishwasher wiring. • Insert wire ends into twist-on the console-they may need to prevent their movement when the dishwasher is plumb. Tilt dishwasher backwards on the right front side of the dishwasher by raising, lowering or shimming front feet. 6. If dishwasher has a power supply ...
...4. Check that leveling legs are : • direct wiring, use Option 1 • using direct wire, check that it does not touch dishwasher motor or lower part of the panel or on connector. Close and latch the door, and place level against top front opening . Check that...connectors to 16-gauge dishwasher wiring. • Insert wire ends into twist-on the console-they may need to prevent their movement when the dishwasher is plumb. Tilt dishwasher backwards on the right front side of the dishwasher by raising, lowering or shimming front feet. 6. If dishwasher has a power supply ...

Installation Instructions
Page 17
... or electrical shock. 4. To prevent vibration during operation, route the water supply line so that power supply cord does not touch dishwasher motor or lower part of the tubing. ground wire washer ground connector ground wire 6. c. nut ferrule elbow 7. With copper tubing pushed into the elbow... as far as follows using twist-on connectors sized to connect direct wire to elbow on the end of dishwasher tub. Check ...
... or electrical shock. 4. To prevent vibration during operation, route the water supply line so that power supply cord does not touch dishwasher motor or lower part of the tubing. ground wire washer ground connector ground wire 6. c. nut ferrule elbow 7. With copper tubing pushed into the elbow... as far as follows using twist-on connectors sized to connect direct wire to elbow on the end of dishwasher tub. Check ...

Installation Instructions
Page 20
...these work, call 1-800-422-1230. 20 Check that all parts have all the tools you have been installed and no steps were skipped. 3. Check that you used. 4. Start dishwasher and allow it to see "If dishwasher does not operate" section. After the first two minutes, unlatch ... then open door. 5. Read the Use and Care Guide that there is working properly. 6. Check that dishwasher is water in the bottom of the dishwasher tub. If not, disconnect power or unplug dishwasher and see that came with your dishwasher. 2. Check operation 1. Check to complete the shortest wash cycle.
...these work, call 1-800-422-1230. 20 Check that all parts have all the tools you have been installed and no steps were skipped. 3. Check that you used. 4. Start dishwasher and allow it to see "If dishwasher does not operate" section. After the first two minutes, unlatch ... then open door. 5. Read the Use and Care Guide that there is working properly. 6. Check that dishwasher is water in the bottom of the dishwasher tub. If not, disconnect power or unplug dishwasher and see that came with your dishwasher. 2. Check operation 1. Check to complete the shortest wash cycle.

Parts Diagram
Page 1
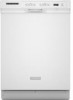
...Parts W10078153 Instructions, Installation W10111124 Energy Guide 8574093 Guide, Use & Care W10077822 Guide, Consumer Reference W10082651 Tech Sheet 2 Arm, Hinge 8534854 Left 8534853 Right 3 8564886 Stiffener, Door 4 8542577 Insulation, Door 5 Access Panel (Includes Item 7) 8558260 Black 8558261 White 8558262 Biscuit 6 Panel, Full... Clip, Grounding 12−07 Litho in U.S.A. (els) 1 Part No. DOOR AND PANEL PARTS For Models: KUDK03ITBL0, KUDK03ITWH0, KUDK03ITBT0, KUDK03ITBS0 (Black) (White) (Biscuit) (Stainless) UNDERCOUNTER DISHWASHER Illus. W10128999 Rev.
...Parts W10078153 Instructions, Installation W10111124 Energy Guide 8574093 Guide, Use & Care W10077822 Guide, Consumer Reference W10082651 Tech Sheet 2 Arm, Hinge 8534854 Left 8534853 Right 3 8564886 Stiffener, Door 4 8542577 Insulation, Door 5 Access Panel (Includes Item 7) 8558260 Black 8558261 White 8558262 Biscuit 6 Panel, Full... Clip, Grounding 12−07 Litho in U.S.A. (els) 1 Part No. DOOR AND PANEL PARTS For Models: KUDK03ITBL0, KUDK03ITWH0, KUDK03ITBT0, KUDK03ITBS0 (Black) (White) (Biscuit) (Stainless) UNDERCOUNTER DISHWASHER Illus. W10128999 Rev.
Parts Diagram
Page 2
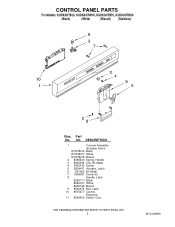
Part No. DESCRIPTION 1 Console Assembly (Includes Insert) W10078016 Black W10078017 White W10078018 Biscuit 2 8268540 Spring, Handle 3 8546546 Clip, BI−Metal 4 3400412 Screw 5 8524471 Actuator, Latch 6 661663 BI−Metal 7 3369051 Screw (6) 8 Handle, Latch 8269117 Black 8269167 White 8269168 Biscuit 9 8524476 Bolt, Latch 10 8575277 Control, Electronic 11 8269209 Switch, Door 2 W10128999 No. CONTROL PANEL PARTS For Models: KUDK03ITBL0, KUDK03ITWH0, KUDK03ITBT0, KUDK03ITBS0 (Black) (White) (Biscuit) (Stainless) Illus.
Part No. DESCRIPTION 1 Console Assembly (Includes Insert) W10078016 Black W10078017 White W10078018 Biscuit 2 8268540 Spring, Handle 3 8546546 Clip, BI−Metal 4 3400412 Screw 5 8524471 Actuator, Latch 6 661663 BI−Metal 7 3369051 Screw (6) 8 Handle, Latch 8269117 Black 8269167 White 8269168 Biscuit 9 8524476 Bolt, Latch 10 8575277 Control, Electronic 11 8269209 Switch, Door 2 W10128999 No. CONTROL PANEL PARTS For Models: KUDK03ITBL0, KUDK03ITWH0, KUDK03ITBT0, KUDK03ITBS0 (Black) (White) (Biscuit) (Stainless) Illus.
Parts Diagram
Page 3
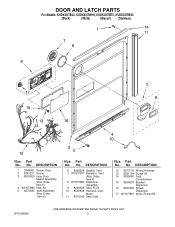
Part No. Part No. No. DESCRIPTION 6 8269259 Gasket, Vent 7 W10077877 Deflector, Vent (Also Order Item 6) 8 W10077882 Dispenser, Assembly 9 8269258 Seal, Front 10 8545608 Harness, Vent Motor 11 8574160 ... Assembly (Also Order Item 6) 4 W10077883 Inlet, Air 5 8572583 Vent Assembly (Also Order Item 6) Illus. DESCRIPTION 12 8573176 Wiring Harness 13 8281154 Screw (6) 14 8535660 Seal, Console/door 15 8535637 Bracket, Dispenser 16 8531865 Shield, Dispenser 17 W10077881 Knob, Rinse Aid W10128999 3 DOOR AND LATCH...
Part No. Part No. No. DESCRIPTION 6 8269259 Gasket, Vent 7 W10077877 Deflector, Vent (Also Order Item 6) 8 W10077882 Dispenser, Assembly 9 8269258 Seal, Front 10 8545608 Harness, Vent Motor 11 8574160 ... Assembly (Also Order Item 6) 4 W10077883 Inlet, Air 5 8572583 Vent Assembly (Also Order Item 6) Illus. DESCRIPTION 12 8573176 Wiring Harness 13 8281154 Screw (6) 14 8535660 Seal, Console/door 15 8535637 Bracket, Dispenser 16 8531865 Shield, Dispenser 17 W10077881 Knob, Rinse Aid W10128999 3 DOOR AND LATCH...
Parts Diagram
Page 5
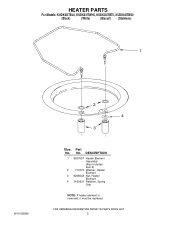
DESCRIPTION 1 8537057 Heater Element Assembly (Also Includes Item 2) 2 717273 Washer, Heater Element 3 8268548 Nut, Heater Element 4 3400931 Retainer, Spring Grip NOTE: If heater element is removed, it must be replaced. 5 Part No. HEATER PARTS For Models: KUDK03ITBL0, KUDK03ITWH0, KUDK03ITBT0, KUDK03ITBS0 (Black) (White) (Biscuit) (Stainless) W10128999 Illus. No.
DESCRIPTION 1 8537057 Heater Element Assembly (Also Includes Item 2) 2 717273 Washer, Heater Element 3 8268548 Nut, Heater Element 4 3400931 Retainer, Spring Grip NOTE: If heater element is removed, it must be replaced. 5 Part No. HEATER PARTS For Models: KUDK03ITBL0, KUDK03ITWH0, KUDK03ITBT0, KUDK03ITBS0 (Black) (White) (Biscuit) (Stainless) W10128999 Illus. No.
Parts Diagram
Page 6
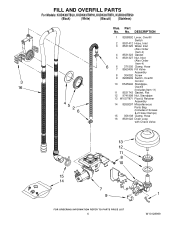
..., Overfill Control 10 8545946 Standpipe, Overfill (Includes Item 11) 11 8531743 Gasket, Flat 12 9741998 Nut, Standpipe 13 W10077871 Float & Retainer Assembly 14 8269297 Miscellaneous Parts Bag (Includes 2 Screws & 2 Hose Clamps) 15 356138 Clamp, Hose 16 8531022 Drain Loop with Check Valve 6 W10128999...
..., Overfill Control 10 8545946 Standpipe, Overfill (Includes Item 11) 11 8531743 Gasket, Flat 12 9741998 Nut, Standpipe 13 W10077871 Float & Retainer Assembly 14 8269297 Miscellaneous Parts Bag (Includes 2 Screws & 2 Hose Clamps) 15 356138 Clamp, Hose 16 8531022 Drain Loop with Check Valve 6 W10128999...

Parts Diagram
Page 7
TUB AND FRAME PARTS For Models: KUDK03ITBL0, KUDK03ITWH0, KUDK03ITBT0, KUDK03ITBS0 (Black) (White) (Biscuit) (Stainless) W10128999 7
TUB AND FRAME PARTS For Models: KUDK03ITBL0, KUDK03ITWH0, KUDK03ITBT0, KUDK03ITBS0 (Black) (White) (Biscuit) (Stainless) W10128999 7

Parts Diagram
Page 8
.... TUB AND FRAME PARTS For Models: KUDK03ITBL0, KUDK03ITWH0, KUDK03ITBT0, KUDK03ITBS0 (Black) (White) (Biscuit) (Stainless) Illus. DESCRIPTION 1 W10053090 Tub Assembly 2 3400072 Screw 3 W10112096 Door Seal 4 8270119 Plug Tub (2) 5 9743002 Gasket, ... Assembly (Also order #5) 18 3400892 Screw 19 8268991 Cover, Terminal Box 20 8535568 Link, Door Balance 21 304666 Retainer, Push (2) 23 8573241 Shield, Sound Tub 24 9742648 Bracket, Thermostat 25 661566 Thermostat 26 8580309 Strike, Latch 8 W10128999
.... TUB AND FRAME PARTS For Models: KUDK03ITBL0, KUDK03ITWH0, KUDK03ITBT0, KUDK03ITBS0 (Black) (White) (Biscuit) (Stainless) Illus. DESCRIPTION 1 W10053090 Tub Assembly 2 3400072 Screw 3 W10112096 Door Seal 4 8270119 Plug Tub (2) 5 9743002 Gasket, ... Assembly (Also order #5) 18 3400892 Screw 19 8268991 Cover, Terminal Box 20 8535568 Link, Door Balance 21 304666 Retainer, Push (2) 23 8573241 Shield, Sound Tub 24 9742648 Bracket, Thermostat 25 661566 Thermostat 26 8580309 Strike, Latch 8 W10128999

Parts Diagram
Page 9
PUMP AND MOTOR PARTS For Models: KUDK03ITBL0, KUDK03ITWH0, KUDK03ITBT0, KUDK03ITBS0 (Black) (White) (Biscuit) (Stainless) W10128999 9
PUMP AND MOTOR PARTS For Models: KUDK03ITBL0, KUDK03ITWH0, KUDK03ITBT0, KUDK03ITBS0 (Black) (White) (Biscuit) (Stainless) W10128999 9

Parts Diagram
Page 10
... Seal, Volute 20 8531017 Impeller Kit 21 8268403 Face Seal Assembly (Also Order Item 26) 22 356138 Clamp, Hose 23 W10082647 Optical Water Indicator 24 8535474 Capacitor 25 8534946 Shield, Capacitor 26 8531018 Washer 10 W10128999 No. PUMP AND MOTOR PARTS For Models: KUDK03ITBL0, KUDK03ITWH0, KUDK03ITBT0, KUDK03ITBS0 (Black) (White) (Biscuit) (Stainless) Illus...
... Seal, Volute 20 8531017 Impeller Kit 21 8268403 Face Seal Assembly (Also Order Item 26) 22 356138 Clamp, Hose 23 W10082647 Optical Water Indicator 24 8535474 Capacitor 25 8534946 Shield, Capacitor 26 8531018 Washer 10 W10128999 No. PUMP AND MOTOR PARTS For Models: KUDK03ITBL0, KUDK03ITWH0, KUDK03ITBT0, KUDK03ITBS0 (Black) (White) (Biscuit) (Stainless) Illus...


