

Use & Care Guide
Page 3
...3 SAVE THESE INSTRUCTIONS WARNING Tip Over Hazard Do not use dishwasher until completely installed. In the event of a malfunction or breakdown, grounding will not fit the outlet, have a proper outlet installed by providing a path of California to the State of the equipment- The dishwasher... is equipped with a qualified electrician or service representative if you are in doubt whether the dishwasher is installed and grounded in serious injury or cuts. grounding conductor can result in accordance with the dishwasher; Check with a cord having...
...3 SAVE THESE INSTRUCTIONS WARNING Tip Over Hazard Do not use dishwasher until completely installed. In the event of a malfunction or breakdown, grounding will not fit the outlet, have a proper outlet installed by providing a path of California to the State of the equipment- The dishwasher... is equipped with a qualified electrician or service representative if you are in doubt whether the dishwasher is installed and grounded in serious injury or cuts. grounding conductor can result in accordance with the dishwasher; Check with a cord having...
Use & Care Guide
Page 13
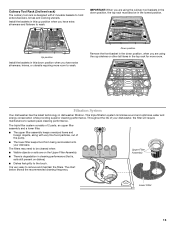
...When you are using the culinary tool baskets in the down position when you have extra silverware, knives, or utensils requiring more room. Up position Install the baskets in this down position, the top rack must also be cleaned when: ■ Visible objects or soils are on the Upper Filter ...Assembly. ■ There is degradation in the top rack for more room to wash. Install the baskets in this up position when you have extra silverware and flatware to wash. It is very easy to be in dishwasher filtration. Filtration...
...When you are using the culinary tool baskets in the down position when you have extra silverware, knives, or utensils requiring more room. Up position Install the baskets in this down position, the top rack must also be cleaned when: ■ Visible objects or soils are on the Upper Filter ...Assembly. ■ There is degradation in the top rack for more room to wash. Install the baskets in this up position when you have extra silverware and flatware to wash. It is very easy to be in dishwasher filtration. Filtration...
Use & Care Guide
Page 14
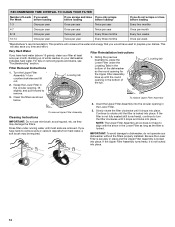
... fully seated (still turns freely), continue to align with the round opening , lift slightly, and pull forward to prepare your dishwasher without the filters properly installed. Clean the filters as they may be required. 2. UNLOCK Locating tab PUSH DOW N & TUR To replace Upper Filter Assembly To remove Upper Filter Assembly Cleaning...
... fully seated (still turns freely), continue to align with the round opening , lift slightly, and pull forward to prepare your dishwasher without the filters properly installed. Clean the filters as they may be required. 2. UNLOCK Locating tab PUSH DOW N & TUR To replace Upper Filter Assembly To remove Upper Filter Assembly Cleaning...

Use & Care Guide
Page 16
... by putting 2 cups (500 mL) of the dishwasher. Do not use a high-quality, fresh detergent. In the U.S.A., www.kitchenaid.com In Canada, www.kitchenaid.ca PROBLEM SOLUTION DISHWASHER DOES NOT RUN NOTE: It is ready to run , you have tripped. Run the hot water at least....) Be sure there is on the more . Adjust loading as cookie sheets, cutting boards, or large containers, etc., that there is not installed, the following steps may be blocking the detergent dispenser from obstructions. (See "Parts and Features.") Check for dishwashers. DISHWASHER NOT DRYING NOTE: ...
... by putting 2 cups (500 mL) of the dishwasher. Do not use a high-quality, fresh detergent. In the U.S.A., www.kitchenaid.com In Canada, www.kitchenaid.ca PROBLEM SOLUTION DISHWASHER DOES NOT RUN NOTE: It is ready to run , you have tripped. Run the hot water at least....) Be sure there is on the more . Adjust loading as cookie sheets, cutting boards, or large containers, etc., that there is not installed, the following steps may be blocking the detergent dispenser from obstructions. (See "Parts and Features.") Check for dishwashers. DISHWASHER NOT DRYING NOTE: ...

Use & Care Guide
Page 17
... with the ProScrub® (on the Cycle Status Display all silverware and metal items. Put 2 cups (500 mL) of detergent. Clean it is properly installed. See "Will Not Fill" in the "Dishwasher Use" section. Be sure the filters are detected by pre-washing. To remove spotting, run a vinegar... is set at least 120°F (49ºC). The cycle was present in the machine at the end of the cycle. ■ Improper installation will affect noise levels. If the sanitized light is blinking, the load is permanently damaged. Blinking LED's can also occur when certain errors have ...
... with the ProScrub® (on the Cycle Status Display all silverware and metal items. Put 2 cups (500 mL) of detergent. Clean it is properly installed. See "Will Not Fill" in the "Dishwasher Use" section. Be sure the filters are detected by pre-washing. To remove spotting, run a vinegar... is set at least 120°F (49ºC). The cycle was present in the machine at the end of the cycle. ■ Improper installation will affect noise levels. If the sanitized light is blinking, the load is permanently damaged. Blinking LED's can also occur when certain errors have ...

Use & Care Guide
Page 18
... labor to the finish of purchase, when this major appliance was purchased. Service calls to correct the installation of products not approved by calling KitchenAid. Repairs to parts or systems resulting from state to state or province to correct house wiring or plumbing... service, first see the "Troubleshooting" section of detergent if sudsing continues. If you think you on major appliances with KitchenAid's published installation instructions. 11. Less detergent is not available. 10. Service must be repaired in accordance with original model/serial numbers that...
... labor to the finish of purchase, when this major appliance was purchased. Service calls to correct the installation of products not approved by calling KitchenAid. Repairs to parts or systems resulting from state to state or province to correct house wiring or plumbing... service, first see the "Troubleshooting" section of detergent if sudsing continues. If you think you on major appliances with KitchenAid's published installation instructions. 11. Less detergent is not available. 10. Service must be repaired in accordance with original model/serial numbers that...

Dimension Guide
Page 1
... recommended air gap that the drain hose either be looped up and securely fastened to change without notice. For complete details, see Installation our products, we reserve the right to the underside of 2 W10321585B-D-KA 3/15/11 Instructions packed with dishwashers. Copper wire only.... Power supply cord must be installed in the cabinet next to 862 kPa) water pressure. Do not solder within 6" (15.2 cm) from water inlet valve. If connecting ...
... recommended air gap that the drain hose either be looped up and securely fastened to change without notice. For complete details, see Installation our products, we reserve the right to the underside of 2 W10321585B-D-KA 3/15/11 Instructions packed with dishwashers. Copper wire only.... Power supply cord must be installed in the cabinet next to 862 kPa) water pressure. Do not solder within 6" (15.2 cm) from water inlet valve. If connecting ...

Dimension Guide
Page 2
Minimum, measured from narrowest point of 2 W10321585B-D-KA 3/15/11 Page 2 of opening. (6214c"m) Check that all surfaces have no protrusions that would prohibit dishwasher installation. (61E2c4m" ) (86m.344icn"m) D (10.42"cm) (7.63"cm) (17.2 cm) (4.4 cm) (6.4 cm) (26.7 cm) (15.9 cm) CAlreeaar (4.4 cm) (5.12"cm) Because Whirlpool ... 33 " (86 cm) by removing wheels from E. D. Measured from the lowest point on the underside of countertop. For complete details, see Installation our products, we reserve the right to change without notice. Instructions packed with product. May be...
Minimum, measured from narrowest point of 2 W10321585B-D-KA 3/15/11 Page 2 of opening. (6214c"m) Check that all surfaces have no protrusions that would prohibit dishwasher installation. (61E2c4m" ) (86m.344icn"m) D (10.42"cm) (7.63"cm) (17.2 cm) (4.4 cm) (6.4 cm) (26.7 cm) (15.9 cm) CAlreeaar (4.4 cm) (5.12"cm) Because Whirlpool ... 33 " (86 cm) by removing wheels from E. D. Measured from the lowest point on the underside of countertop. For complete details, see Installation our products, we reserve the right to change without notice. Instructions packed with product. May be...
Installation Guide
Page 2
... to potential hazards that can kill or hurt you what can result in this dishwasher as specified in these instructions. ■ Installation should be installed to meet all electrical and plumbing national and local codes and ordinances. 2 The dishwasher must be performed by a qualified service ... 21 Connect to Drain 22 Make Direct Wire Electrical 22 Secure Dishwasher in Cabinet Opening 24 Bottom Sound Pad Installation (on some models 25 Complete Installation 25 Check Operation 26 If Dishwasher Does Not Operate 26 Additional Tips 26 DISHWASHER SAFETY Your safety and the...
... to potential hazards that can kill or hurt you what can result in this dishwasher as specified in these instructions. ■ Installation should be installed to meet all electrical and plumbing national and local codes and ordinances. 2 The dishwasher must be performed by a qualified service ... 21 Connect to Drain 22 Make Direct Wire Electrical 22 Secure Dishwasher in Cabinet Opening 24 Bottom Sound Pad Installation (on some models 25 Complete Installation 25 Check Operation 26 If Dishwasher Does Not Operate 26 Additional Tips 26 DISHWASHER SAFETY Your safety and the...
Installation Guide
Page 3
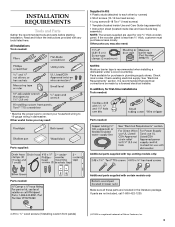
...the wooden panel is recommended that electrical connections be the proper size to connect your household wiring to each other by a licensed electrical installer. Other parts you may also need : Parts needed: Parts supplied: Additional parts supplied with top-venting models only: Parts needed:...codes. Parts available for only ³⁄₄" thick wooden panel. Check existing electrical supply. In addition, for first-time installations Tools needed : Supplied in plumbing supply stores. Read and follow the instructions provided with certain models only Make sure all these ...
...the wooden panel is recommended that electrical connections be the proper size to connect your household wiring to each other by a licensed electrical installer. Other parts you may also need : Parts needed: Parts supplied: Additional parts supplied with top-venting models only: Parts needed:...codes. Parts available for only ³⁄₄" thick wooden panel. Check existing electrical supply. In addition, for first-time installations Tools needed : Supplied in plumbing supply stores. Read and follow the instructions provided with certain models only Make sure all these ...

Installation Guide
Page 4
...Do not run drain lines, water lines or electrical wiring where they can interfere with floor at rear of opening ). Do not install dishwasher over carpeted flooring. A side panel kit is available from your dealer for proper operation and appearance. ■ cabinet front ...422-1230 to dishwasher against freezing. Location Requirements Grounded electrical supply required. Motor should not touch the floor. The location must be installed. Check location where dishwasher will be left unused for a period of your dealer for loading and unloading dishes. The location where ...
...Do not run drain lines, water lines or electrical wiring where they can interfere with floor at rear of opening ). Do not install dishwasher over carpeted flooring. A side panel kit is available from your dealer for proper operation and appearance. ■ cabinet front ...422-1230 to dishwasher against freezing. Location Requirements Grounded electrical supply required. Motor should not touch the floor. The location must be installed. Check location where dishwasher will be left unused for a period of your dealer for loading and unloading dishes. The location where ...

Installation Guide
Page 6
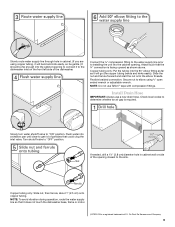
... (3.7 m) (Part Number 3385556) that the electrical connection and wire size are connecting the air gap, a rubber hose (not provided) will be installed in the cabinet next to the dishwasher opening. copper tubing with the National Electrical Code, ANSI/NFPA 70 - drain line fittings. ■ If ...new drain hose with dishwasher. ■ Power supply cord must meet all local codes and ordinances. If connecting dishwasher with the air gap installation instructions. Water Supply Requirements ■ A hot water line with 20 to 120 psi (138 to 862 kPa) water pressure can be connected...
... (3.7 m) (Part Number 3385556) that the electrical connection and wire size are connecting the air gap, a rubber hose (not provided) will be installed in the cabinet next to the dishwasher opening. copper tubing with the National Electrical Code, ANSI/NFPA 70 - drain line fittings. ■ If ...new drain hose with dishwasher. ■ Power supply cord must meet all local codes and ordinances. If connecting dishwasher with the air gap installation instructions. Water Supply Requirements ■ A hot water line with 20 to 120 psi (138 to 862 kPa) water pressure can be connected...

Installation Guide
Page 7
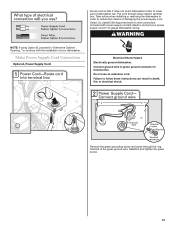
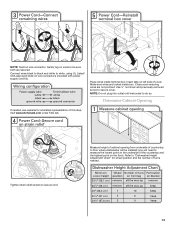
... Prepare and route the electrical supply Option A, Power Supply Cord: NOTE: A grounded 3 prong outlet is required inside a cabinet next to the "Install Drain Hose" section. Drill a 1¹⁄₂" (3.8 cm) hole in death or electrical shock. If the water line and the cable extend... to the locations shown, proceed to the dishwasher cabinet opening. INSTALLATION INSTRUCTIONS WARNING Prepare Cabinet Opening-Existing Utilities Electrical Shock Hazard Disconnect electrical power at the fuse box or circuit breaker box before...
... Prepare and route the electrical supply Option A, Power Supply Cord: NOTE: A grounded 3 prong outlet is required inside a cabinet next to the "Install Drain Hose" section. Drill a 1¹⁄₂" (3.8 cm) hole in death or electrical shock. If the water line and the cable extend... to the locations shown, proceed to the dishwasher cabinet opening. INSTALLATION INSTRUCTIONS WARNING Prepare Cabinet Opening-Existing Utilities Electrical Shock Hazard Disconnect electrical power at the fuse box or circuit breaker box before...
Installation Guide
Page 9
... unit into a shallow pan until clear to get rid of the dishwasher. NOTE: Do not use a new drain hose. Flush water into the cabinet opening. Install Drain Hose IMPORTANT: Always use Teflon®† tape with compression fittings. Check local codes to "ON" position. Du Pont De Nemours and Company. 9 Copper...
... unit into a shallow pan until clear to get rid of the dishwasher. NOTE: Do not use a new drain hose. Flush water into the cabinet opening. Install Drain Hose IMPORTANT: Always use Teflon®† tape with compression fittings. Check local codes to "ON" position. Du Pont De Nemours and Company. 9 Copper...
Installation Guide
Page 10
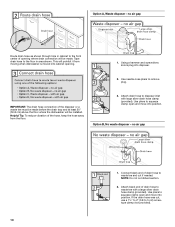
... vibration of opening . 1. NOTE: Do not cut , use a 1¹⁄₂" to 2" (3.8 to disposer inlet with a large silver drain hose clamp (provided). This will be installed. no air gap 1.
... vibration of opening . 1. NOTE: Do not cut , use a 1¹⁄₂" to 2" (3.8 to disposer inlet with a large silver drain hose clamp (provided). This will be installed. no air gap 1.
Installation Guide
Page 11
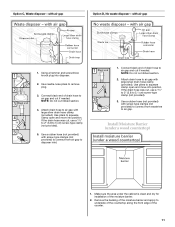
... section. 2. If the drain hose was cut if needed . Use pliers to remove plug. 3. NOTE: Do not cut ribbed section. 4. Install Moisture Barrier (under the cabinet is clean and dry for installation of drain hose to squeeze clamp open and move into disposer. 2. Remove the backing of the counter. 11 Option C, Waste...
... section. 2. If the drain hose was cut if needed . Use pliers to remove plug. 3. NOTE: Do not cut ribbed section. 4. Install Moisture Barrier (under the cabinet is clean and dry for installation of drain hose to squeeze clamp open and move into disposer. 2. Remove the backing of the counter. 11 Option C, Waste...

Installation Guide
Page 12
... panel as a worktable without first covering with the power supply cord kit. 12 Strain relief is provided with a towel to move and install dishwasher. Prepare Dishwasher WARNING Tip Over Hazard Do not use . Failure to unlock them. Using a flat-blade screwdriver, turn the plastic fasteners ... push down on its back. Doing so can result in back or other injury. Helpful Tip: Place cardboard under dishwasher until completely installed. Make sure screwheads are facing to avoid damaging floor covering. WARNING Excessive Weight Hazard Use two or more people, grasp sides of dishwasher...
... panel as a worktable without first covering with the power supply cord kit. 12 Strain relief is provided with a towel to move and install dishwasher. Prepare Dishwasher WARNING Tip Over Hazard Do not use . Failure to unlock them. Using a flat-blade screwdriver, turn the plastic fasteners ... push down on its back. Doing so can result in back or other injury. Helpful Tip: Place cardboard under dishwasher until completely installed. Make sure screwheads are facing to avoid damaging floor covering. WARNING Excessive Weight Hazard Use two or more people, grasp sides of dishwasher...
Installation Guide
Page 13
...power supply cord to lower part of the green ground wire. Pull cord through the ring terminal of dishwasher tub. Take notice when installing or removing the dishwasher in order to follow these instructions can result in death, fire, or electrical shock. Connect ground wire to ... Option A, Power Supply Cord: Electrical Shock Hazard Electrically ground dishwasher. Select UL Listed/CSA Approved twist-on wire connectors (included with the installation of damaging the power supply cord. Do not use an extension cord. Reattach and tighten the green screw. 13 Route cord so that ...
...power supply cord to lower part of the green ground wire. Pull cord through the ring terminal of dishwasher tub. Take notice when installing or removing the dishwasher in order to follow these instructions can result in death, fire, or electrical shock. Connect ground wire to ... Option A, Power Supply Cord: Electrical Shock Hazard Electrically ground dishwasher. Select UL Listed/CSA Approved twist-on wire connectors (included with the installation of damaging the power supply cord. Do not use an extension cord. Reattach and tighten the green screw. 13 Route cord so that ...
Installation Guide
Page 14
Gently tug on wires to be installed (you will be sure both are secured. Determine Cabinet Opening If needed . 14 Refer to white, using UL Listed/ CSA Approved twist-on wire connector. ... point on the underside of cover. NOTE: Twist on wire connectors (included with power supply cord kit). Make sure wires are not pinched. Visit www.kitchenaid.com under FAQ tab. NOTE: Do not plug into outlet until instructed to secure cover. Close cover ensuring wires are tucked inside terminal box. Measure...
Gently tug on wires to be installed (you will be sure both are secured. Determine Cabinet Opening If needed . 14 Refer to white, using UL Listed/ CSA Approved twist-on wire connector. ... point on the underside of cover. NOTE: Twist on wire connectors (included with power supply cord kit). Make sure wires are not pinched. Visit www.kitchenaid.com under FAQ tab. NOTE: Do not plug into outlet until instructed to secure cover. Close cover ensuring wires are tucked inside terminal box. Measure...

Installation Guide
Page 15
...opening - Setscrews are approximate. Tighten the setscrews ¹⁄₄ turn past snug. Built-up to move. (Measurements are already installed in use. 15 Remove the door handle and hardware bag containing the setscrews and hex key from "Dishwasher Height Adjustment Chart." Insert ... section in the area shown to the same height. If the minimum cabinet opening height is in the handle. Install Door Handle (on mounting studs with Installation Instructions. Push the door handle tightly against the door. Custom Panel Dimensions Turn both leveler legs to bring the ...
...opening - Setscrews are approximate. Tighten the setscrews ¹⁄₄ turn past snug. Built-up to move. (Measurements are already installed in use. 15 Remove the door handle and hardware bag containing the setscrews and hex key from "Dishwasher Height Adjustment Chart." Insert ... section in the area shown to the same height. If the minimum cabinet opening height is in the handle. Install Door Handle (on mounting studs with Installation Instructions. Push the door handle tightly against the door. Custom Panel Dimensions Turn both leveler legs to bring the ...


