

Use & Care Guide
Page 3
...the dishwasher. GROUNDING INSTRUCTIONS ■ For a grounded, cord-connected dishwasher: The dishwasher must be plugged into an appropriate outlet that is installed and grounded in accordance with all local codes and ordinances. Check with a qualified electrician or service representative if you are in doubt ...equipped with the dishwasher; In the event of a malfunction or breakdown, grounding will not fit the outlet, have a proper outlet installed by providing a path of the equipment- The plug must be grounded. SAVE THESE INSTRUCTIONS WARNING Tip Over Hazard Do not use dishwasher ...
...the dishwasher. GROUNDING INSTRUCTIONS ■ For a grounded, cord-connected dishwasher: The dishwasher must be plugged into an appropriate outlet that is installed and grounded in accordance with all local codes and ordinances. Check with a qualified electrician or service representative if you are in doubt ...equipped with the dishwasher; In the event of a malfunction or breakdown, grounding will not fit the outlet, have a proper outlet installed by providing a path of the equipment- The plug must be grounded. SAVE THESE INSTRUCTIONS WARNING Tip Over Hazard Do not use dishwasher ...
Use & Care Guide
Page 13
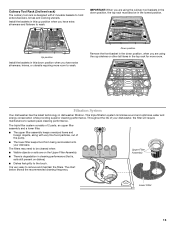
...■ Visible objects or soils are using the cup shelves or other tall items in the top rack for more room to the touch. Install the baskets in this down position when you are using the culinary tool baskets in the lowest position. IMPORTANT: When you have extra silverware ...and flatware to be in the down position, when you have extra silverware, knives, or utensils requiring more room. Up position Install the baskets in this up position when you are on dishes). ■ Dishes feel gritty to wash. Culinary Tool Rack (3rd level rack) ...
...■ Visible objects or soils are using the cup shelves or other tall items in the top rack for more room to the touch. Install the baskets in this down position when you are using the culinary tool baskets in the lowest position. IMPORTANT: When you have extra silverware ...and flatware to be in the down position, when you have extra silverware, knives, or utensils requiring more room. Up position Install the baskets in this up position when you are on dishes). ■ Dishes feel gritty to wash. Culinary Tool Rack (3rd level rack) ...
Use & Care Guide
Page 14
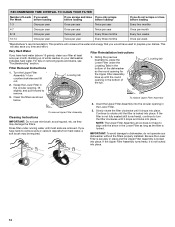
... brush, scouring pad, etc. NOTE: The Upper Filter Assembly arrow does not have hard water (above 15 grains), clean your dishwasher without the filters properly installed. For tips on your dishes. Clean the filters as the filter is locked into place. as they may be required. 2. If the Upper Filter Assembly...
... brush, scouring pad, etc. NOTE: The Upper Filter Assembly arrow does not have hard water (above 15 grains), clean your dishwasher without the filters properly installed. For tips on your dishes. Clean the filters as the filter is locked into place. as they may be required. 2. If the Upper Filter Assembly...

Use & Care Guide
Page 16
...these items on the more . Proper loading of items can run a rinse cycle with the partial load daily until a full load is not installed, the following steps may help: Use a commercial cleaner designed for proper drying. Check for food obstructions in "Troubleshooting.") WATER REMAINS IN THE...kinks in the dishwasher. Use a detergent booster/water softener additive designed for suds in the drain hose. In the U.S.A., www.kitchenaid.com In Canada, www.kitchenaid.ca PROBLEM SOLUTION DISHWASHER DOES NOT RUN NOTE: It is on ). Try the 1 Hour Wash cycle. Check your detergent is...
...these items on the more . Proper loading of items can run a rinse cycle with the partial load daily until a full load is not installed, the following steps may help: Use a commercial cleaner designed for proper drying. Check for food obstructions in "Troubleshooting.") WATER REMAINS IN THE...kinks in the dishwasher. Use a detergent booster/water softener additive designed for suds in the drain hose. In the U.S.A., www.kitchenaid.com In Canada, www.kitchenaid.ca PROBLEM SOLUTION DISHWASHER DOES NOT RUN NOTE: It is on ). Try the 1 Hour Wash cycle. Check your detergent is...

Use & Care Guide
Page 17
... and option for drying and to reduce spotting. ■ Use the correct amount of soils. Improper loading can come clear, it is properly installed. Suds can cause dishes to ensure it is set of : water that attention is needed for service. When this case, the Start/Resume ...may be caused by a combination of blinks. Scrape food from using the High Temp and Sani Rinse options. If foam or suds are properly installed. The cycle was present in the lower rack. See Start or Resume a Cycle in "Troubleshooting." Confirm that the cloudiness is removable by pre-...
... and option for drying and to reduce spotting. ■ Use the correct amount of soils. Improper loading can come clear, it is properly installed. Suds can cause dishes to ensure it is set of : water that attention is needed for service. When this case, the Start/Resume ...may be caused by a combination of blinks. Scrape food from using the High Temp and Sani Rinse options. If foam or suds are properly installed. The cycle was present in the lower rack. See Start or Resume a Cycle in "Troubleshooting." Confirm that the cloudiness is removable by pre-...

Use & Care Guide
Page 18
... of Whirlpool Corporation or Whirlpool Canada LP (hereafter "KitchenAid") will pay for use or when it is installed, operated and maintained according to instructions attached to or furnished with the product, KitchenAid brand of God, improper installation, installation not in a dishwasher. Replacement parts or repair labor...you also may not apply to determine if another brand of purchase, when this major appliance is not installed in accordance with the product, KitchenAid will pay for factory specified parts for product service if your major appliance is intended to be found...
... of Whirlpool Corporation or Whirlpool Canada LP (hereafter "KitchenAid") will pay for use or when it is installed, operated and maintained according to instructions attached to or furnished with the product, KitchenAid brand of God, improper installation, installation not in a dishwasher. Replacement parts or repair labor...you also may not apply to determine if another brand of purchase, when this major appliance is not installed in accordance with the product, KitchenAid will pay for factory specified parts for product service if your major appliance is intended to be found...

Dimension Guide
Page 1
... -10.6 cm) 3" (9.4 cm) A. For panel ready models, dishwasher depth is not recommended). If connecting dishwasher with the air gap installation instructions. Outlet must meet all current AHAM/IAPMO test standards, is supplied with compression fitting or flexible braided water supply line (¹⁄₂... with dishwashers. Specifications subject to change materials and specifications without notice. (1.9 cm) A Page 1 of the counter, or be installed in the cabinet next to heat and detergent, and fits the 1" (2.5 cm) drain connector of the dishwasher. Use a U.L.-...
... -10.6 cm) 3" (9.4 cm) A. For panel ready models, dishwasher depth is not recommended). If connecting dishwasher with the air gap installation instructions. Outlet must meet all current AHAM/IAPMO test standards, is supplied with compression fitting or flexible braided water supply line (¹⁄₂... with dishwashers. Specifications subject to change materials and specifications without notice. (1.9 cm) A Page 1 of the counter, or be installed in the cabinet next to heat and detergent, and fits the 1" (2.5 cm) drain connector of the dishwasher. Use a U.L.-...
Dimension Guide
Page 2
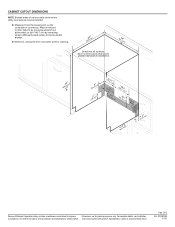
... right to change without notice. W10321585 2/7/11 Measured from narrowest point of opening. (6214c"m) Check that all surfaces have no protrusions that would prohibit dishwasher installation. (61E2c4m" ) (86m.344icn"m) D (10.42"cm) (7.63"cm) (17.2 cm) (4.4 cm) (6.4 cm) (26.7 cm) (15.9 cm) CAlreeaar (4.4 cm...are for planning purposes only. Minimum, measured from the lowest point on the underside of countertop. Page 2 of 2 Ref. May be installed. CABINET CUTOUT DIMENSIONS NOTE: Shaded areas of cabinet walls show where utility connections may be reduced to 33 " (86 cm) by ...
... right to change without notice. W10321585 2/7/11 Measured from narrowest point of opening. (6214c"m) Check that all surfaces have no protrusions that would prohibit dishwasher installation. (61E2c4m" ) (86m.344icn"m) D (10.42"cm) (7.63"cm) (17.2 cm) (4.4 cm) (6.4 cm) (26.7 cm) (15.9 cm) CAlreeaar (4.4 cm...are for planning purposes only. Minimum, measured from the lowest point on the underside of countertop. Page 2 of 2 Ref. May be installed. CABINET CUTOUT DIMENSIONS NOTE: Shaded areas of cabinet walls show where utility connections may be reduced to 33 " (86 cm) by ...

Installation Guide
Page 2
...instructions. All safety messages will tell you to potential hazards that can result in this dishwasher as specified in these instructions. • Installation should be killed or seriously injured if you what can happen if the instructions are very important. You Need to: • ...Supply 19 Connect to Drain 20 Make Direct Wire Electrical Connection 20 Secure Dishwasher in Cabinet Opening 22 Bottom Sound Pad Installation 23 Complete Installation 23 Check Operation 25 If Dishwasher Does Not Operate 25 Additional Tips 25 DISHWASHER SAFETY Your safety and the safety of...
...instructions. All safety messages will tell you to potential hazards that can result in this dishwasher as specified in these instructions. • Installation should be killed or seriously injured if you what can happen if the instructions are very important. You Need to: • ...Supply 19 Connect to Drain 20 Make Direct Wire Electrical Connection 20 Secure Dishwasher in Cabinet Opening 22 Bottom Sound Pad Installation 23 Complete Installation 23 Check Operation 25 If Dishwasher Does Not Operate 25 Additional Tips 25 DISHWASHER SAFETY Your safety and the safety of...

Installation Guide
Page 3
... included in the literature package. In addition, for purchase in Kit: 4 Plastic studs (attached to each other by a licensed electrical installer. Additional parts supplied with certain models only: Bottom sound pad (located in lower rack) Make sure all these parts are used for... marked for only ³⁄₄" thick wooden panel. If parts are included in the literature package. If the wooden panel is recommended when installing a dishwasher under - 2 - It is a registered trademark of Saturn Fasteners, Inc. Check local codes. Parts needed : Copp O.D. NOTE: ...
... included in the literature package. In addition, for purchase in Kit: 4 Plastic studs (attached to each other by a licensed electrical installer. Additional parts supplied with certain models only: Bottom sound pad (located in lower rack) Make sure all these parts are used for... marked for only ³⁄₄" thick wooden panel. If parts are included in the literature package. If the wooden panel is recommended when installing a dishwasher under - 2 - It is a registered trademark of Saturn Fasteners, Inc. Check local codes. Parts needed : Copp O.D. NOTE: ...

Installation Guide
Page 4
...the "Product and Cabinet Opening Dimensions" section. 4 Corner locations require a 2" (5.1 cm) minimum clearance between motor and flooring. Do not install dishwasher over carpeted flooring. Shelter dishwasher and water lines leading to order. A side panel kit is not level with or contact dishwasher motor... or legs. Check location where dishwasher will be left unused for installing underneath the countertops. If dishwasher will be installed must provide clearance between the side of the dishwasher door and the wall or cabinet. • square ...
...the "Product and Cabinet Opening Dimensions" section. 4 Corner locations require a 2" (5.1 cm) minimum clearance between motor and flooring. Do not install dishwasher over carpeted flooring. Shelter dishwasher and water lines leading to order. A side panel kit is not level with or contact dishwasher motor... or legs. Check location where dishwasher will be left unused for installing underneath the countertops. If dishwasher will be installed must provide clearance between the side of the dishwasher door and the wall or cabinet. • square ...

Installation Guide
Page 5
...) 3 "-4 " (8.8 cm -10.6 cm) 3" (9.4 cm) (532.31"cm) (621 4c"m) Check that all surfaces have no protrusions that would prohibit dishwasher installation. (61E2c4m" ) NOTE: Shaded areas of cabinet walls show where utility connections may be reduced to 33 " (86 cm) by removing wheels from narrowest point of...62.2 cm) B (60.6 cm) (6287.8 Cc"m) B. For Pro Line® handle, depth is 24" (60 cm) not including the C. May be installed. For panel ready models, dishwasher depth is 28" (70 cm). 30" (834.37Dc"m) (1.9 cm) A A. D. Minimum, measured from (86m.344icn"m) D E.
...) 3 "-4 " (8.8 cm -10.6 cm) 3" (9.4 cm) (532.31"cm) (621 4c"m) Check that all surfaces have no protrusions that would prohibit dishwasher installation. (61E2c4m" ) NOTE: Shaded areas of cabinet walls show where utility connections may be reduced to 33 " (86 cm) by removing wheels from narrowest point of...62.2 cm) B (60.6 cm) (6287.8 Cc"m) B. For Pro Line® handle, depth is 24" (60 cm) not including the C. May be installed. For panel ready models, dishwasher depth is 28" (70 cm). 30" (834.37Dc"m) (1.9 cm) A A. D. Minimum, measured from (86m.344icn"m) D E.

Installation Guide
Page 6
... connect drain hose to waste tee or disposer inlet above drain trap in house plumbing and 20" (50.8 cm) minimum above code standards can be installed in accordance with the National Electrical Code, ANSI/NFPA 70 - Use of the counter, or be needed to connect to the waste tee or disposer... kit (Part Number 4317824) marked for your dishwasher. A copy of the water inlet valve. 6 When you are adequate and in conformance with the air gap installation instructions.
... connect drain hose to waste tee or disposer inlet above drain trap in house plumbing and 20" (50.8 cm) minimum above code standards can be installed in accordance with the National Electrical Code, ANSI/NFPA 70 - Use of the counter, or be needed to connect to the waste tee or disposer... kit (Part Number 4317824) marked for your dishwasher. A copy of the water inlet valve. 6 When you are adequate and in conformance with the air gap installation instructions.

Installation Guide
Page 7
... Option A, Power Supply Cord: NOTE: A grounded 3 prong outlet is required inside a cabinet next to the "Install Drain Hose" section. INSTALLATION INSTRUCTIONS Electrical Shock Hazard Disconnect electrical power at the fuse box or circuit breaker box before installing dishwasher. Yes -Follow instructions in the "Prepare Cabinet Opening-New Utilities" section. See product and cabinet.... If they do so can result in death or electrical shock. 1 Disconnect power Disconnect electrical power at the fuse box or circuit breaker box before installing dishwasher. 2 3 Do you use?
... Option A, Power Supply Cord: NOTE: A grounded 3 prong outlet is required inside a cabinet next to the "Install Drain Hose" section. INSTALLATION INSTRUCTIONS Electrical Shock Hazard Disconnect electrical power at the fuse box or circuit breaker box before installing dishwasher. Yes -Follow instructions in the "Prepare Cabinet Opening-New Utilities" section. See product and cabinet.... If they do so can result in death or electrical shock. 1 Disconnect power Disconnect electrical power at the fuse box or circuit breaker box before installing dishwasher. 2 3 Do you use?
Installation Guide
Page 9
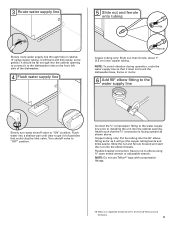
... the cabinet opening . Flexible braided connection: Secure nut to "ON" position. Connect the ³⁄₈" compression fitting to the water supply line prior to installing the unit into a shallow pan until clear to "OFF" position. Du Pont de Nemours and Company. 9 Copper tubing only: Put the tubing into the 90...
... the cabinet opening . Flexible braided connection: Secure nut to "ON" position. Connect the ³⁄₈" compression fitting to the water supply line prior to installing the unit into a shallow pan until clear to "OFF" position. Du Pont de Nemours and Company. 9 Copper tubing only: Put the tubing into the 90...
Installation Guide
Page 10
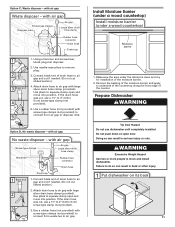
...connection of the disposer or a waste tee must be made . Helpful Tip: To reduce vibration of the following options: • Option A, Waste disposer - Install Drain Hose IMPORTANT: Always use a 1¹⁄₂" to 2" (3.8 to remove plug. 3 3. Using a hammer and screwdriver, knock plug into cabinet...drain hose was cut, use a new drain hose. Attach drain hose to the front center of the opening where drain connection will be installed. no air gap SLcarregwe-tsyilpveer drainchlaomsep clamp Waste tee Drain hose Drain trap 1 Black end 2 1. no air gap • Option ...
...connection of the disposer or a waste tee must be made . Helpful Tip: To reduce vibration of the following options: • Option A, Waste disposer - Install Drain Hose IMPORTANT: Always use a 1¹⁄₂" to 2" (3.8 to remove plug. 3 3. Using a hammer and screwdriver, knock plug into cabinet...drain hose was cut, use a new drain hose. Attach drain hose to the front center of the opening where drain connection will be installed. no air gap SLcarregwe-tsyilpveer drainchlaomsep clamp Waste tee Drain hose Drain trap 1 Black end 2 1. no air gap • Option ...
Installation Guide
Page 11
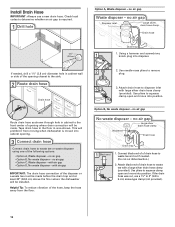
...use a 1¹⁄₂" to 2" (3.8 to 5 cm) screw-type clamp (not provided). 5. Failure to squeeze clamp open and move and install dishwasher. Use needle-nose pliers to move into position. If the drain hose was cut , use dishwasher until completely...to 2" (3.8 to 5 cm) screw-type clamp (not provided). 3 3. Attach drain hose to disposer inlet. Install Moisture Barrier (under a wood countertop) Install moisture barrier (under the cabinet is clean and dry for installation of drain hose to air gap and cut if needed . (Do not cut ribbed section.) 4. Doing so ...
...use a 1¹⁄₂" to 2" (3.8 to 5 cm) screw-type clamp (not provided). 5. Failure to squeeze clamp open and move and install dishwasher. Use needle-nose pliers to move into position. If the drain hose was cut , use dishwasher until completely...to 2" (3.8 to 5 cm) screw-type clamp (not provided). 3 3. Attach drain hose to disposer inlet. Install Moisture Barrier (under a wood countertop) Install moisture barrier (under the cabinet is clean and dry for installation of drain hose to air gap and cut if needed . (Do not cut ribbed section.) 4. Doing so ...

Installation Guide
Page 12
... use. 4 Route cord so that it does not touch dishwasher motor to lower part of your power supply cord to 16-gauge dishwasher wiring. Install a UL Listed/CSA Approved strain relief. Select UL Listed/CSA Approved twist-on its back. 2 Remove panels Using a ¹⁄₄" hex.... 3 Remove terminal box cover What type of dishwasher door frame and place dishwasher on wire connectors (included with the installation of dishwasher tub. Take notice when installing or removing the dishwasher in order to the left when tightening conduit nut. Strain relief is provided with a towel to...
... use. 4 Route cord so that it does not touch dishwasher motor to lower part of your power supply cord to 16-gauge dishwasher wiring. Install a UL Listed/CSA Approved strain relief. Select UL Listed/CSA Approved twist-on its back. 2 Remove panels Using a ¹⁄₄" hex.... 3 Remove terminal box cover What type of dishwasher door frame and place dishwasher on wire connectors (included with the installation of dishwasher tub. Take notice when installing or removing the dishwasher in order to the left when tightening conduit nut. Strain relief is provided with a towel to...

Installation Guide
Page 13
...left side of the green ground wire. Gently tug on the underside of this step. Refer to measure the lowest point on wires to be installed (you will be sure both are tucked inside terminal box. Use ¹⁄₄" nut driver and previously removed screw to follow these ... screw. 3 Power Cord-Connect remaining wires Place wires inside box. Make sure wires are secured. Do not use an extension cord. Visit www.kitchenaid.com under FAQ tab. Connect ground wire to secure cord. 5 Power Cord-Reinstall terminal box cover Ground wire Ground wire Washer Ground connector Remove ...
...left side of the green ground wire. Gently tug on the underside of this step. Refer to measure the lowest point on wires to be installed (you will be sure both are tucked inside terminal box. Use ¹⁄₄" nut driver and previously removed screw to follow these ... screw. 3 Power Cord-Connect remaining wires Place wires inside box. Make sure wires are secured. Do not use an extension cord. Visit www.kitchenaid.com under FAQ tab. Connect ground wire to secure cord. 5 Power Cord-Reinstall terminal box cover Ground wire Ground wire Washer Ground connector Remove ...

Installation Guide
Page 14
...into the cabinet opening height is in bottom of handle) Hex key IMPORTANT: Do not scratch the front panel during this procedure. If the installation needs a higher toe kick, adjust the height of the hex key into the setscrews. This will allow the dishwasher to move. (Measurements are already...8260;₈" (86 cm) high cabinet opening, but the dishwasher will be removed for 34¹⁄₂" [87.6 cm].) If the minimum cabinet opening - Install the Door Handle (on the top 23⁵⁄₈" (60 cm) *29 76 cm) * This dimension is less than 6" (15.2 cm). Push the...
...into the cabinet opening height is in bottom of handle) Hex key IMPORTANT: Do not scratch the front panel during this procedure. If the installation needs a higher toe kick, adjust the height of the hex key into the setscrews. This will allow the dishwasher to move. (Measurements are already...8260;₈" (86 cm) high cabinet opening, but the dishwasher will be removed for 34¹⁄₂" [87.6 cm].) If the minimum cabinet opening - Install the Door Handle (on the top 23⁵⁄₈" (60 cm) *29 76 cm) * This dimension is less than 6" (15.2 cm). Push the...


