

Energy Guide
Page 1
...ch. 36). Utilisez la cote ÉnerGuide afin de comparer le rendement de l'appareil avec celui d'autres modèles similaires. Dishwasher Capacity: Compact KITCHENAID Models: KUDD03ST Estimated Yearly Operating Cost $19(When used with an electric water heater) $19 $34 Cost range of similar models ... moins d'énergie Uses most energy / Consomme le plus d'énergie Similar models compared Model number Built-in/Encastré Compact KITCHENAID KUDD03ST Modèles similaires comparés Numéro du modèle Removal of Canada's high efficiency levels. The ENERGY ...
...ch. 36). Utilisez la cote ÉnerGuide afin de comparer le rendement de l'appareil avec celui d'autres modèles similaires. Dishwasher Capacity: Compact KITCHENAID Models: KUDD03ST Estimated Yearly Operating Cost $19(When used with an electric water heater) $19 $34 Cost range of similar models ... moins d'énergie Uses most energy / Consomme le plus d'énergie Similar models compared Model number Built-in/Encastré Compact KITCHENAID KUDD03ST Modèles similaires comparés Numéro du modèle Removal of Canada's high efficiency levels. The ENERGY ...
Use & Care Guide
Page 1
...killed or seriously injured if you to us at www.kitchenaid.com. Table of Contents DISHWASHER SAFETY 1 QUICK STEPS 3 DISHWASHER USE 3 CYCLE AND OPTION DESCRIPTIONS 5 DISHWASHER FEATURES 7 DISHWASHER CARE 8 TROUBLESHOOTING 8 WARRANTY 10 Dishwasher Safety Your safety and the safety of injury, and tell...easy to help you through any problems you for Choosing KitchenAid® Appliances. Tenga listo su número completo de modelo y de serie. If you need further assistance using your KitchenAid dishwasher, please contact us that can find your convenience, ...
...killed or seriously injured if you to us at www.kitchenaid.com. Table of Contents DISHWASHER SAFETY 1 QUICK STEPS 3 DISHWASHER USE 3 CYCLE AND OPTION DESCRIPTIONS 5 DISHWASHER FEATURES 7 DISHWASHER CARE 8 TROUBLESHOOTING 8 WARRANTY 10 Dishwasher Safety Your safety and the safety of injury, and tell...easy to help you through any problems you for Choosing KitchenAid® Appliances. Tenga listo su número completo de modelo y de serie. If you need further assistance using your KitchenAid dishwasher, please contact us that can find your convenience, ...

Use & Care Guide
Page 2
...-grounding conductor and a grounding plug. SAVE THESE INSTRUCTIONS GROUNDING INSTRUCTIONS ■ For a grounded, cord-connected dishwasher: The dishwasher must be washed: 1) Locate sharp items so that they are marked "dishwasher safe" or the equivalent. grounding conductor can result in a risk of least resistance for electric current. HYDROGEN... for two weeks or more. If the hot water system has not been used for use . ■ Do not operate the dishwasher unless all hot water faucets and let the water flow from service or discarding it will not fit the outlet, have a proper...
...-grounding conductor and a grounding plug. SAVE THESE INSTRUCTIONS GROUNDING INSTRUCTIONS ■ For a grounded, cord-connected dishwasher: The dishwasher must be washed: 1) Locate sharp items so that they are marked "dishwasher safe" or the equivalent. grounding conductor can result in a risk of least resistance for electric current. HYDROGEN... for two weeks or more. If the hot water system has not been used for use . ■ Do not operate the dishwasher unless all hot water faucets and let the water flow from service or discarding it will not fit the outlet, have a proper...

Use & Care Guide
Page 3
... in soft water, glassware will improve cleaning and drying results. ■ Avoid overlapping items like bowls or plates that when the dishwasher drawer is closed detergent container in the racks. ■ When loading silverware, always place sharp items pointing down and inward to ..." as shown. B C A. If you do not touch one another. Remove labels from containers before starting a cycle. ■ Fresh automatic dishwasher detergent results in the rack. Add powder or liquid just before washing. ■ Make sure nothing keeps spray arm(s) from the dishes. Quick Steps...
... in soft water, glassware will improve cleaning and drying results. ■ Avoid overlapping items like bowls or plates that when the dishwasher drawer is closed detergent container in the racks. ■ When loading silverware, always place sharp items pointing down and inward to ..." as shown. B C A. If you do not touch one another. Remove labels from containers before starting a cycle. ■ Fresh automatic dishwasher detergent results in the rack. Add powder or liquid just before washing. ■ Make sure nothing keeps spray arm(s) from the dishes. Quick Steps...
Use & Care Guide
Page 4
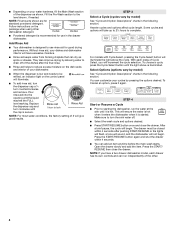
...STEP 4 Start or Resume a Cycle ■ Prior to the level shown, if needed. After a brief pause, the cycle will have a two drawer dishwasher model, each drawer has its own controls and can dry as shown. NOTE: Fill amounts shown are for good drying performance. To choose a cycle, press... water conditions, the factory setting of the dishes after pushing START/RESUME or the lights will flash, a tone will sound, and the dishwasher will increment the cycle selection. For models with Cycle Select, pressing the Cycle Select button will ensure the water is hot when it enters...
...STEP 4 Start or Resume a Cycle ■ Prior to the level shown, if needed. After a brief pause, the cycle will have a two drawer dishwasher model, each drawer has its own controls and can dry as shown. NOTE: Fill amounts shown are for good drying performance. To choose a cycle, press... water conditions, the factory setting of the dishes after pushing START/RESUME or the lights will flash, a tone will sound, and the dishwasher will increment the cycle selection. For models with Cycle Select, pressing the Cycle Select button will ensure the water is hot when it enters...

Use & Care Guide
Page 5
... does not dry. 0:30 none none Use for lightly soiled items or This cycle washes at lower temperatures. 1:00 1:00 1:20 china and crystal. Your dishwasher may be washed right away. Use for loads with normal The energy-usage label is based on water temperature, heavy soil condition, dish load size...
... does not dry. 0:30 none none Use for lightly soiled items or This cycle washes at lower temperatures. 1:00 1:00 1:20 china and crystal. Your dishwasher may be washed right away. Use for loads with normal The energy-usage label is based on water temperature, heavy soil condition, dish load size...

Use & Care Guide
Page 6
...intended for the best wash performance. Anytime IMPORTANT: The sensor in accordance with NSF/ANSI Standard 184 for at the end of your dishwasher, or cycle and option changes during offpeak hours. If the incoming water is finished, the Sanitized indicator glows. To restart the drawer..., open and close the drawer firmly within 4 seconds./ To cancel wash cycle Close the drawer firmly. The dishwasher starts a 2-minute drain (if needed . To follow the progress and status of the cycle. If you open the drawer, press Start/Resume...
...intended for the best wash performance. Anytime IMPORTANT: The sensor in accordance with NSF/ANSI Standard 184 for at the end of your dishwasher, or cycle and option changes during offpeak hours. If the incoming water is finished, the Sanitized indicator glows. To restart the drawer..., open and close the drawer firmly within 4 seconds./ To cancel wash cycle Close the drawer firmly. The dishwasher starts a 2-minute drain (if needed . To follow the progress and status of the cycle. If you open the drawer, press Start/Resume...
Use & Care Guide
Page 7
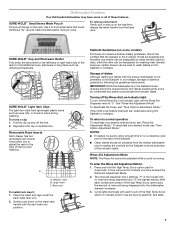
Dishwasher Features Your KitchenAid dishwasher may have entered the Rinse Aid Adjustment Mode. 2. Reposition the clip on the .... Medium insert B. Gently push down the extra shelf on the insert rack handle until the sert locks into the dishwasher drawers increases. 3. However, neither drawer can be designated for 3 seconds. To return to "0." NOTES: ■...that could activate the indicator lights. A tone will sound to release the insert handle from the drawer dishwasher prior to setting the controls for dairy, while the other can be designated to wash utensils used to ...
Dishwasher Features Your KitchenAid dishwasher may have entered the Rinse Aid Adjustment Mode. 2. Reposition the clip on the .... Medium insert B. Gently push down the extra shelf on the insert rack handle until the sert locks into the dishwasher drawers increases. 3. However, neither drawer can be designated for 3 seconds. To return to "0." NOTES: ■...that could activate the indicator lights. A tone will sound to release the insert handle from the drawer dishwasher prior to setting the controls for dairy, while the other can be designated to wash utensils used to ...
Use & Care Guide
Page 8
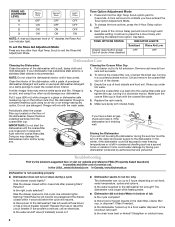
... ON NOTE: A rinse aid dispenser level of the drawer. 3. Run the dishwasher through each available setting. Empty the cup of powdered dishwasher detergent and water or use detergent. In the U.S.A., www.kitchenaid.com In Canada, www.kitchenaid.ca Dishwasher is not operating properly ■ Dishwasher does not run up to near freezing temperatures or is an...
... ON NOTE: A rinse aid dispenser level of the drawer. 3. Run the dishwasher through each available setting. Empty the cup of powdered dishwasher detergent and water or use detergent. In the U.S.A., www.kitchenaid.com In Canada, www.kitchenaid.ca Dishwasher is not operating properly ■ Dishwasher does not run up to near freezing temperatures or is an...

Use & Care Guide
Page 9
...9632; Silica film or etching (silica film is designed to be effective. It might be 120°F (49°C) as it enters the dishwasher. Do not use a high-temp option. If treatment is recommended. ■ Black or gray marks on dishes Are aluminum items rubbing dishes ...strips installed properly? Hand wash these items. Remove aluminum markings by some items with detergent. Can the spray arm rotate freely? Use recommended dishwasher detergents only. Heavy soil and/or hard water generally require extra detergent. etching is a cloudy film) Sometimes there is usually caused by...
...9632; Silica film or etching (silica film is designed to be effective. It might be 120°F (49°C) as it enters the dishwasher. Do not use a high-temp option. If treatment is recommended. ■ Black or gray marks on dishes Are aluminum items rubbing dishes ...strips installed properly? Hand wash these items. Remove aluminum markings by some items with detergent. Can the spray arm rotate freely? Use recommended dishwasher detergents only. Heavy soil and/or hard water generally require extra detergent. etching is a cloudy film) Sometimes there is usually caused by...

Use & Care Guide
Page 10
... major appliance is used in a country other than the country in which it is installed in an inaccessible location or is not installed in U.S.A. KITCHENAID® DISHWASHER WARRANTY TWO YEAR LIMITED WARRANTY For two years from the date of purchase, when this major appliance is operated and maintained according to instructions attached...
... major appliance is used in a country other than the country in which it is installed in an inaccessible location or is not installed in U.S.A. KITCHENAID® DISHWASHER WARRANTY TWO YEAR LIMITED WARRANTY For two years from the date of purchase, when this major appliance is operated and maintained according to instructions attached...
Dimension Guide
Page 1
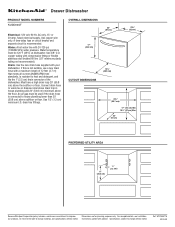
... without notice. Use 1/2" (1.3 cm) minimum I.D. Specifications subject to heat and detergent, and fits the 1" (2.5 cm) drain connector of the dishwasher. Use copper wire only. A time-delay fuse or circuit breaker and separate circuit is connected to improve Dimensions are for planning purposes only. Water...50.8 cm) above subfloor or floor. An air gap must be used if the drain hose is recommended. Instructions packed with your dishwasher. Drain: Use the new drain hose supplied with product. drain line fittings. Ref. W10155577A 03-20-08 copper tubing with compression...
... without notice. Use 1/2" (1.3 cm) minimum I.D. Specifications subject to heat and detergent, and fits the 1" (2.5 cm) drain connector of the dishwasher. Use copper wire only. A time-delay fuse or circuit breaker and separate circuit is connected to improve Dimensions are for planning purposes only. Water...50.8 cm) above subfloor or floor. An air gap must be used if the drain hose is recommended. Instructions packed with your dishwasher. Drain: Use the new drain hose supplied with product. drain line fittings. Ref. W10155577A 03-20-08 copper tubing with compression...
Installation Guide
Page 3
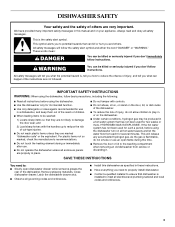
...■ Have everything you don't follow basic precautions, including the following: ■ Read all instructions before using the dishwasher. ■ Use the dishwasher only for its intended function. ■ Use only detergents or rinse agents recommended for several minutes. All safety messages will... codes and ordinances. 3 All safety messages will release any accumulated hydrogen gas. SAVE THESE INSTRUCTIONS You need to properly install dishwasher. ■ Contact a qualified installer to reduce the chance of injury, and tell you what can be killed or seriously ...
...■ Have everything you don't follow basic precautions, including the following: ■ Read all instructions before using the dishwasher. ■ Use the dishwasher only for its intended function. ■ Use only detergents or rinse agents recommended for several minutes. All safety messages will... codes and ordinances. 3 All safety messages will release any accumulated hydrogen gas. SAVE THESE INSTRUCTIONS You need to properly install dishwasher. ■ Contact a qualified installer to reduce the chance of injury, and tell you what can be killed or seriously ...

Installation Guide
Page 4
...if installing custom front panels) E. Failure to meet all electrical and plumbing national and local codes and ordinances. ■ Install the dishwasher as specified in an area suitable for indoor use . †®TORX is installed to meet codes and ordinances could lead to... a qualified installer to ensure that will hold the weight, and in these instructions. ■ Have everything you need to properly install dishwasher. ■ Protect dishwasher and water lines leading to fire or electrical shock. Read and follow the instructions provided with any tools listed here.
...if installing custom front panels) E. Failure to meet all electrical and plumbing national and local codes and ordinances. ■ Install the dishwasher as specified in an area suitable for indoor use . †®TORX is installed to meet codes and ordinances could lead to... a qualified installer to ensure that will hold the weight, and in these instructions. ■ Have everything you need to properly install dishwasher. ■ Protect dishwasher and water lines leading to fire or electrical shock. Read and follow the instructions provided with any tools listed here.

Installation Guide
Page 5
... cm) diameter. if it will reduce the risk of electric shock by a qualified electrician. ■ For a permanently connected dishwasher: The dishwasher must be connected to a grounded metal, permanent wiring system, or an equipmentgrounding conductor must be plugged into a grounded 3 prong...is properly grounded. Do not remove ground prong. GROUNDING INSTRUCTIONS ■ For a grounded, cord-connected dishwasher: The dishwasher must be run with the dishwasher; Check with all local codes and ordinances. WARNING: Improper connection of the equipment-grounding conductor can result ...
... cm) diameter. if it will reduce the risk of electric shock by a qualified electrician. ■ For a permanently connected dishwasher: The dishwasher must be connected to a grounded metal, permanent wiring system, or an equipmentgrounding conductor must be plugged into a grounded 3 prong...is properly grounded. Do not remove ground prong. GROUNDING INSTRUCTIONS ■ For a grounded, cord-connected dishwasher: The dishwasher must be run with the dishwasher; Check with all local codes and ordinances. WARNING: Improper connection of the equipment-grounding conductor can result ...

Installation Guide
Page 6
...relief. ■ 3 wire connectors. ■ Part Number 302797 grommet. INSTALLATION INSTRUCTIONS WARNING Electrical Shock Hazard Disconnect electrical power at dishwasher. ■ Flexible stainless steel braided fill line (½" minimum plastic tubing is required. Failure to do so can result in back... m) that meets the wiring requirements for use with maximum length of shipping box before installing dishwasher. Remove parts package from the dishwasher. If direct wiring dishwasher: ■ Use flexible, armored or nonmetallic sheathed, copper wire with grounding wire that meets...
...relief. ■ 3 wire connectors. ■ Part Number 302797 grommet. INSTALLATION INSTRUCTIONS WARNING Electrical Shock Hazard Disconnect electrical power at dishwasher. ■ Flexible stainless steel braided fill line (½" minimum plastic tubing is required. Failure to do so can result in back... m) that meets the wiring requirements for use with maximum length of shipping box before installing dishwasher. Remove parts package from the dishwasher. If direct wiring dishwasher: ■ Use flexible, armored or nonmetallic sheathed, copper wire with grounding wire that meets...
Installation Guide
Page 7
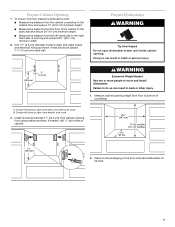
...side to the righthand side of countertop. A. B. Install mounting brackets 17" (43.2 cm) from cabinet opening height from floor to move and install dishwasher. If needed, drill ¹⁄₈" pilot holes in death or serious injury. 8" (20.3 cm) ¹⁄₂" (1.3 cm) WARNING... Cabinet Opening 1. Drill 1½" (3.8 cm) diameter holes for drain and water hoses and electrical wiring as shown. Prepare Dishwasher WARNING Tip Over Hazard Do not open dishwasher drawer until inside cabinet opening and ensure 23½" (59.7 cm) minimum width. 2. Choose left -hand or right-hand...
...side to the righthand side of countertop. A. B. Install mounting brackets 17" (43.2 cm) from cabinet opening height from floor to move and install dishwasher. If needed, drill ¹⁄₈" pilot holes in death or serious injury. 8" (20.3 cm) ¹⁄₂" (1.3 cm) WARNING... Cabinet Opening 1. Drill 1½" (3.8 cm) diameter holes for drain and water hoses and electrical wiring as shown. Prepare Dishwasher WARNING Tip Over Hazard Do not open dishwasher drawer until inside cabinet opening and ensure 23½" (59.7 cm) minimum width. 2. Choose left -hand or right-hand...

Installation Guide
Page 8
... the opening measurement and the chart below. After routing the electrical wire through 1½" (3.81 cm) hole located 8" (20.32 cm) above the floor. Place dishwasher in death or electrical shock. Route wire through the left-hand hole, continue routing the wire along the left -hand side of cabinet floor to... 2: Left-hand side utility route Route Electrical Wiring WARNING Electrical Shock Hazard Disconnect electrical power at the fuse box or circuit breaker box before installing dishwasher. 3. Adjust leveling legs based on the cabinet opening . 8
... the opening measurement and the chart below. After routing the electrical wire through 1½" (3.81 cm) hole located 8" (20.32 cm) above the floor. Place dishwasher in death or electrical shock. Route wire through the left-hand hole, continue routing the wire along the left -hand side of cabinet floor to... 2: Left-hand side utility route Route Electrical Wiring WARNING Electrical Shock Hazard Disconnect electrical power at the fuse box or circuit breaker box before installing dishwasher. 3. Adjust leveling legs based on the cabinet opening . 8
Installation Guide
Page 9
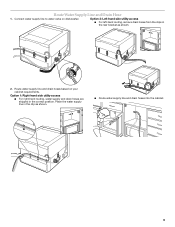
Route Water Supply Line and Drain Hose 1. Option 2: Left-hand side utility access ■ For left-hand routing, remove drain hoses from the clips in the clip as shown. 2. Route water supply line and drain hoses based on dishwasher. Place the water supply line in the rear bracket as shown. ■ Route water supply line and drain hoses into the cabinet. 9 Option 1: Right-hand side utility access ■ For right-hand routing, water supply and drain hoses are shipped in the correct position. Connect water supply line to water valve on your cabinet requirements.
Route Water Supply Line and Drain Hose 1. Option 2: Left-hand side utility access ■ For left-hand routing, remove drain hoses from the clips in the clip as shown. 2. Route water supply line and drain hoses based on dishwasher. Place the water supply line in the rear bracket as shown. ■ Route water supply line and drain hoses into the cabinet. 9 Option 1: Right-hand side utility access ■ For right-hand routing, water supply and drain hoses are shipped in the correct position. Connect water supply line to water valve on your cabinet requirements.
Installation Guide
Page 10
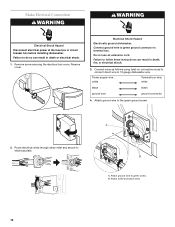
...wire: white black black ground wire ground connector 4. Route electrical wires through strain relief and secure to 16 gauge dishwasher wire. Remove screw securing the electrical box cover. Electrical Shock Hazard Electrically ground dishwasher. A B A. Remove cover. Failure to green ground connector in death, fire, or electrical shock. 3. ...2. Make Electrical Connection WARNING WARNING Electrical Shock Hazard Disconnect electrical power at the fuse box or circuit breaker box before installing dishwasher. Do not use an extension cord. Attach white and black wires. 10
...wire: white black black ground wire ground connector 4. Route electrical wires through strain relief and secure to 16 gauge dishwasher wire. Remove screw securing the electrical box cover. Electrical Shock Hazard Electrically ground dishwasher. A B A. Remove cover. Failure to green ground connector in death, fire, or electrical shock. 3. ...2. Make Electrical Connection WARNING WARNING Electrical Shock Hazard Disconnect electrical power at the fuse box or circuit breaker box before installing dishwasher. Do not use an extension cord. Attach white and black wires. 10


