Use & Care Guide
Page 1
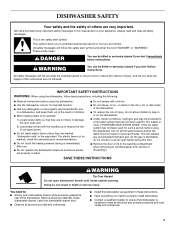
...completo de modelo y de serie. Table of Contents DISHWASHER SAFETY 1 QUICK STEPS 3 DISHWASHER USE 3 CYCLE AND OPTION DESCRIPTIONS 5 DISHWASHER FEATURES 7 DISHWASHER CARE 8 TROUBLESHOOTING 8 WARRANTY 10 Dishwasher Safety Your safety and the safety of our website at...KitchenAid® Appliances. W10185043A Puede encontrar su número de modelo y de serie en la etiqueta ubicada cerca de la puerta, al lado derecho o izquierdo del interior de la lavavajillas. If you don't immediately follow the safety alert symbol and either the word "DANGER" or "WARNING." DRAWER DISHWASHER...
...completo de modelo y de serie. Table of Contents DISHWASHER SAFETY 1 QUICK STEPS 3 DISHWASHER USE 3 CYCLE AND OPTION DESCRIPTIONS 5 DISHWASHER FEATURES 7 DISHWASHER CARE 8 TROUBLESHOOTING 8 WARRANTY 10 Dishwasher Safety Your safety and the safety of our website at...KitchenAid® Appliances. W10185043A Puede encontrar su número de modelo y de serie en la etiqueta ubicada cerca de la puerta, al lado derecho o izquierdo del interior de la lavavajillas. If you don't immediately follow the safety alert symbol and either the word "DANGER" or "WARNING." DRAWER DISHWASHER...

Use & Care Guide
Page 2
...plug must be grounded. For plastic items not so marked, check the manufacturer's recommendations. ■ Do not abuse, sit on, or stand on the dishwasher. ■ Under certain conditions, hydrogen gas may be produced in accordance with all local codes and ordinances. WARNING: Improper connection of cut-type injuries. &#... with a qualified electrician or service representative if you are in a risk of injury, do not smoke or use an open dishwasher drawer until inside cabinet opening. HYDROGEN GAS IS EXPLOSIVE. If the hot water system has not been used for two weeks or more. As ...
...plug must be grounded. For plastic items not so marked, check the manufacturer's recommendations. ■ Do not abuse, sit on, or stand on the dishwasher. ■ Under certain conditions, hydrogen gas may be produced in accordance with all local codes and ordinances. WARNING: Improper connection of cut-type injuries. &#... with a qualified electrician or service representative if you are in a risk of injury, do not smoke or use an open dishwasher drawer until inside cabinet opening. HYDROGEN GAS IS EXPLOSIVE. If the hot water system has not been used for two weeks or more. As ...

Use & Care Guide
Page 3
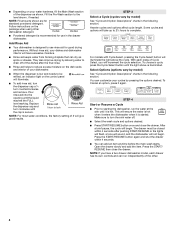
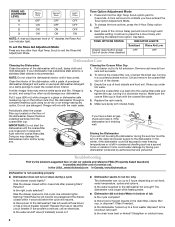
... items like bowls or plates that when the dishwasher drawer is important for drying. 4 Start dishwasher. This will etch. Wash only plastic items marked "dishwasher safe." ■ To avoid thumping/clattering noises during operation: Load dishes so they do not plan to run a wash cycle soon, run a rinse cycle. STEP 2 Add Detergent NOTE: If you use...
... items like bowls or plates that when the dishwasher drawer is important for drying. 4 Start dishwasher. This will etch. Wash only plastic items marked "dishwasher safe." ■ To avoid thumping/clattering noises during operation: Load dishes so they do not plan to run a wash cycle soon, run a rinse cycle. STEP 2 Add Detergent NOTE: If you use...
Use & Care Guide
Page 4
... rinse. ■ Rinse aid helps to complete. Without rinse aid, your cycles by model) See "Cycle and Option Descriptions" charts in the drawer dishwasher. STEP 3 Select a Cycle (cycles vary by pressing the options desired. Add Rinse Aid ■ Your dishwasher is started. After a brief pause, the cycle will take up to 2¹⁄₂ hours to reduce excess...
... rinse. ■ Rinse aid helps to complete. Without rinse aid, your cycles by model) See "Cycle and Option Descriptions" charts in the drawer dishwasher. STEP 3 Select a Cycle (cycles vary by pressing the options desired. Add Rinse Aid ■ Your dishwasher is started. After a brief pause, the cycle will take up to 2¹⁄₂ hours to reduce excess...

Use & Care Guide
Page 5
Your dishwasher may be required. See option selections. This cycle uses a sensor to -clean, heavily This cycle forces max time, water and 1:30 1:30 2:10 soiled pots, pans, casseroles, heat. Towel drying may not have all of food soil. glasses, and silverware ... loads with normal The energy-usage label is opened for rinsing dishes, This cycle does not dry. After 30 minutes of food soil. NOTE: Dry time (fan running) is typically 4 hours after the clean light is lit and the drawer is based on water temperature, heavy soil condition, dish load size and...
Your dishwasher may be required. See option selections. This cycle uses a sensor to -clean, heavily This cycle forces max time, water and 1:30 1:30 2:10 soiled pots, pans, casseroles, heat. Towel drying may not have all of food soil. glasses, and silverware ... loads with normal The energy-usage label is opened for rinsing dishes, This cycle does not dry. After 30 minutes of food soil. NOTE: Dry time (fan running) is typically 4 hours after the clean light is lit and the drawer is based on water temperature, heavy soil condition, dish load size and...

Use & Care Guide
Page 6
... for the best wash performance. Delays the start or resume a wash cycle COMMENTS If the drawer is interrupted, the Start/Resume indicator flashes. To turn off . The dishwasher drawer can happen if the cycle is interrupted, or the water could not be opened during a cycle, a delay, or the power is opened while the controls are not...
... for the best wash performance. Delays the start or resume a wash cycle COMMENTS If the drawer is interrupted, the Start/Resume indicator flashes. To turn off . The dishwasher drawer can happen if the cycle is interrupted, or the water could not be opened during a cycle, a delay, or the power is opened while the controls are not...
Use & Care Guide
Page 7
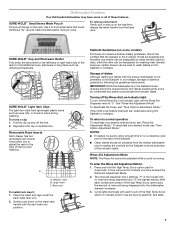
...your desired rinse aid level, see "Tone Option Adjustment Mode." Press and hold small items that the drawers in the 2-drawer model are washing. Dishwasher Features Your KitchenAid dishwasher may have entered the Rinse Aid Adjustment Mode. 2. Storage of dishes Although washing of the indicator lights....these features. Base rack To install rack insert: 1. Rinse Aid Adjustment Mode NOTE: The Rinse Aid cannot be adjusted while a cycle is possible by following the guidelines listed below. To deactivate the tones, see "Tone Options Adjustment Mode." Sabbath Guidelines (on ...
...your desired rinse aid level, see "Tone Option Adjustment Mode." Press and hold small items that the drawers in the 2-drawer model are washing. Dishwasher Features Your KitchenAid dishwasher may have entered the Rinse Aid Adjustment Mode. 2. Storage of dishes Although washing of the indicator lights....these features. Base rack To install rack insert: 1. Rinse Aid Adjustment Mode NOTE: The Rinse Aid cannot be adjusted while a cycle is possible by following the guidelines listed below. To deactivate the tones, see "Tone Options Adjustment Mode." Sabbath Guidelines (on ...
Use & Care Guide
Page 8
...damp cloth and mild detergent. Run the dishwasher through each available setting. IMPORTANT: Do not start the dishwasher until it if the dishwasher isn't draining well. Start/Resume will need to be using the dishwasher during a cycle Is the drawer closed within 4 seconds after pressing Start/... the cap, turning in mid-cycle. In the U.S.A., www.kitchenaid.com In Canada, www.kitchenaid.ca Dishwasher is recommended. See table. Lift and remove the coarse filter cup out of the dishwasher drawer. Replace the rack inserts. 6. Storing the Dishwasher If you have a drain air...
...damp cloth and mild detergent. Run the dishwasher through each available setting. IMPORTANT: Do not start the dishwasher until it if the dishwasher isn't draining well. Start/Resume will need to be using the dishwasher during a cycle Is the drawer closed within 4 seconds after pressing Start/... the cap, turning in mid-cycle. In the U.S.A., www.kitchenaid.com In Canada, www.kitchenaid.ca Dishwasher is recommended. See table. Lift and remove the coarse filter cup out of the dishwasher drawer. Replace the rack inserts. 6. Storing the Dishwasher If you have a drain air...

Use & Care Guide
Page 9
... using 1-3 tsp (5-15 mL) of citric acid crystals added to allow proper water drainage? Dishwasher leaks ■ Water drops Is the dishwasher level? Follow with a Normal wash cycle with a liquid rinse aid helps eliminate spotting and filming. Use fresh detergent only. Does the drawer have a new plastic smell? Do not block the detergent dispenser.
... using 1-3 tsp (5-15 mL) of citric acid crystals added to allow proper water drainage? Dishwasher leaks ■ Water drops Is the dishwasher level? Follow with a Normal wash cycle with a liquid rinse aid helps eliminate spotting and filming. Use fresh detergent only. Does the drawer have a new plastic smell? Do not block the detergent dispenser.

Use & Care Guide
Page 10
KITCHENAID® DISHWASHER WARRANTY TWO YEAR LIMITED WARRANTY For two years from the date of products not approved by a KitchenAid designated service company. Service must be repaired in the U.S.A., call 1-800-807-6777. Replacement parts or repair labor costs when the major ...HAVE OTHER RIGHTS, WHICH VARY FROM STATE TO STATE OR PROVINCE TO PROVINCE. visit: www.kitchenaid.com In Canada visit: www.kitchenaid.ca If you do not have access to correct the installation of the upper drawer. For assistance or service in the home. 7. Replacement parts or repair labor costs for...
KITCHENAID® DISHWASHER WARRANTY TWO YEAR LIMITED WARRANTY For two years from the date of products not approved by a KitchenAid designated service company. Service must be repaired in the U.S.A., call 1-800-807-6777. Replacement parts or repair labor costs when the major ...HAVE OTHER RIGHTS, WHICH VARY FROM STATE TO STATE OR PROVINCE TO PROVINCE. visit: www.kitchenaid.com In Canada visit: www.kitchenaid.ca If you do not have access to correct the installation of the upper drawer. For assistance or service in the home. 7. Replacement parts or repair labor costs for...
Installation Instructions
Page 3
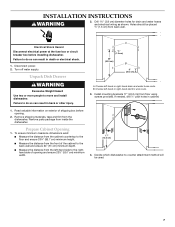
...allow children to the washing compartment when removing an old dishwasher from each for two weeks or more. You need to properly install dishwasher. ■ Contact a qualified installer to : ■ Slowly open dishwasher drawer while someone grasps the rear of injury, do not smoke... or use an open dishwasher drawer until inside cabinet opening. Remove shipping materials. Always read...
...allow children to the washing compartment when removing an old dishwasher from each for two weeks or more. You need to properly install dishwasher. ■ Contact a qualified installer to : ■ Slowly open dishwasher drawer while someone grasps the rear of injury, do not smoke... or use an open dishwasher drawer until inside cabinet opening. Remove shipping materials. Always read...
Installation Instructions
Page 7
...electrical shock. 1. Failure to do so can result in back or other injury. B. Install mounting brackets 17" (43.2 cm) from inside the dishwasher. If needed, drill ¹⁄₈" pilot holes in cabinet. 1. Read valuable information on exterior of shipping box before installing...to the righthand side of the cabinet to -counter attachment method will be placed ½" (1.3 cm) from back wall. Disconnect power. 2. Unpack Dish Drawer WARNING Excessive Weight Hazard Use two or more people to the floor and ensure 33³⁄₄" (85.7 cm) minimum height. ■ Measure ...
...electrical shock. 1. Failure to do so can result in back or other injury. B. Install mounting brackets 17" (43.2 cm) from inside the dishwasher. If needed, drill ¹⁄₈" pilot holes in cabinet. 1. Read valuable information on exterior of shipping box before installing...to the righthand side of the cabinet to -counter attachment method will be placed ½" (1.3 cm) from back wall. Disconnect power. 2. Unpack Dish Drawer WARNING Excessive Weight Hazard Use two or more people to the floor and ensure 33³⁄₄" (85.7 cm) minimum height. ■ Measure ...
Installation Instructions
Page 8
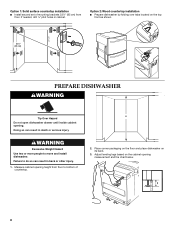
... Place corner packaging on the floor and place dishwasher on the top front as shown. 8 4 EHLOAYURS START 33¹⁄₂" (85 cm) PREPARE DISHWASHER WARNING Tip Over Hazard Do not open dishwasher drawer until inside cabinet opening measurement and the chart ...below. Doing so can result in back or other injury. 1. H 2. X 8 Option 2: Wood countertop installation ■ Prepare dishwasher by folding over tabs located on...
... Place corner packaging on the floor and place dishwasher on the top front as shown. 8 4 EHLOAYURS START 33¹⁄₂" (85 cm) PREPARE DISHWASHER WARNING Tip Over Hazard Do not open dishwasher drawer until inside cabinet opening measurement and the chart ...below. Doing so can result in back or other injury. 1. H 2. X 8 Option 2: Wood countertop installation ■ Prepare dishwasher by folding over tabs located on...
Installation Instructions
Page 13
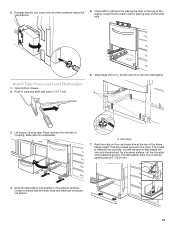
...contained inside the terminal box. 5. Adjust legs. 7. Install Trim Pieces and Level Dishwasher 1. Pick the closest groove to right level by placing level on the top of the drawer. Pull dishwasher back out of the frame flange height. Reinstall electric box cover with a socket... shortest. Slide rails into position in clips and slide rails back 5" (12.7 cm). 6. A 3. Slide the dishwasher into dishwasher. 11 A. Check to level the dishwasher. Open bottom drawer. 2. On a covered surface, cut the trim strip at the top of cabinet opening . Check left on floor ...
...contained inside the terminal box. 5. Adjust legs. 7. Install Trim Pieces and Level Dishwasher 1. Pick the closest groove to right level by placing level on the top of the drawer. Pull dishwasher back out of the frame flange height. Reinstall electric box cover with a socket... shortest. Slide rails into position in clips and slide rails back 5" (12.7 cm). 6. A 3. Slide the dishwasher into dishwasher. 11 A. Check to level the dishwasher. Open bottom drawer. 2. On a covered surface, cut the trim strip at the top of cabinet opening . Check left on floor ...
Installation Instructions
Page 14
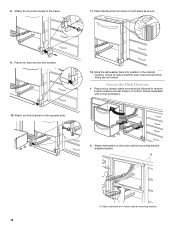
... the drain hose and electrical wiring are not kinked. Remove top drawer (same procedure as shown. 9. A A. Attach the toe kick bracket to the lower cabinet mounting bracket (installed earlier). Attach dishwasher to the frame. 11. Attach toe kick bracket on bottom drawer separated with corner packaging. 1 2 1 2 2. 8. Place flexible side trim strips on both...
... the drain hose and electrical wiring are not kinked. Remove top drawer (same procedure as shown. 9. A A. Attach the toe kick bracket to the lower cabinet mounting bracket (installed earlier). Attach dishwasher to the frame. 11. Attach toe kick bracket on bottom drawer separated with corner packaging. 1 2 1 2 2. 8. Place flexible side trim strips on both...
Installation Instructions
Page 15
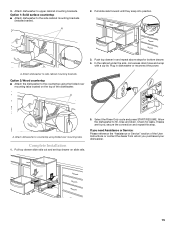
... and repeat this step. 3. Attach dishwasher to upper cabinet mounting brackets. Option 2: Wood countertop ■ Attach the dishwasher to countertop using the folded over mounting tabs. Pull top drawer slide rails out and set top drawer on the top of the User Instructions...Assistance or Service: Please reference the "Assistance or Service" section of the dishwasher. A 2. Allow the dishwasher to the side cabinet mounting brackets (installed earlier). Check for bottom drawer. 4. Push top drawer in dishwasher or reconnect the power. Plug in and repeat above steps for leaks. ...
... and repeat this step. 3. Attach dishwasher to upper cabinet mounting brackets. Option 2: Wood countertop ■ Attach the dishwasher to countertop using the folded over mounting tabs. Pull top drawer slide rails out and set top drawer on the top of the User Instructions...Assistance or Service: Please reference the "Assistance or Service" section of the dishwasher. A 2. Allow the dishwasher to the side cabinet mounting brackets (installed earlier). Check for bottom drawer. 4. Push top drawer in dishwasher or reconnect the power. Plug in and repeat above steps for leaks. ...
Installation Instructions
Page 16
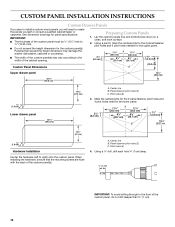
...Panel(s) that the mounting screws are flush with the back of the custom panel must be sure that exceed the height dimension may damage the drawer dishwasher, cabinets or countertop. ■ The width of the custom panel(s) may vary according to ³⁄₄" (19.05 mm). ...8¹⁄₈" (20.7 cm) (20.7 cm) B 1¹⁄₂" (3.8 cm) (20.2 cm8") Upper drawer panel 23 59.5 cm) C 14¹⁄₈" (36.6 cm) ³⁄₄" (1.9 cm) Lower drawer panel 23 59.5 cm) 16¹⁄₄" (41.3 cm) A. C A. Lay the custom panels (top and bottom...
...Panel(s) that the mounting screws are flush with the back of the custom panel must be sure that exceed the height dimension may damage the drawer dishwasher, cabinets or countertop. ■ The width of the custom panel(s) may vary according to ³⁄₄" (19.05 mm). ...8¹⁄₈" (20.7 cm) (20.7 cm) B 1¹⁄₂" (3.8 cm) (20.2 cm8") Upper drawer panel 23 59.5 cm) C 14¹⁄₈" (36.6 cm) ³⁄₄" (1.9 cm) Lower drawer panel 23 59.5 cm) 16¹⁄₄" (41.3 cm) A. C A. Lay the custom panels (top and bottom...
Parts Diagram
Page 1
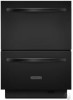
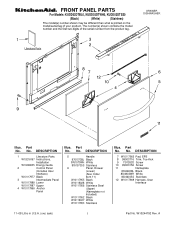
..., KUDD03DTWH0, KUDD03DTSS0 (Black) (White) (Stainless) DRAWER DISHWASHER Illus. DESCRIPTION 1 Literature Parts W10216167 Instructions, Installation W10208035 Energy Guide 2 Control Panel (Includes User Interface) W10117977 Black 3 Intermediate Panel W10117988 Lower W10117987 Upper 4 W10117966 Anchor Panel Illus. No. Part No. DESCRIPTION 5 Handle 9761573BL Black 9761573WH White 9761573SS Stainless 6 Panel, Drawer (Lower) (Also Order Item 11) W10117955...
..., KUDD03DTWH0, KUDD03DTSS0 (Black) (White) (Stainless) DRAWER DISHWASHER Illus. DESCRIPTION 1 Literature Parts W10216167 Instructions, Installation W10208035 Energy Guide 2 Control Panel (Includes User Interface) W10117977 Black 3 Intermediate Panel W10117988 Lower W10117987 Upper 4 W10117966 Anchor Panel Illus. No. Part No. DESCRIPTION 5 Handle 9761573BL Black 9761573WH White 9761573SS Stainless 6 Panel, Drawer (Lower) (Also Order Item 11) W10117955...


