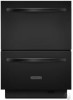
Use & Care Guide
Page 1
...kitchenaid.com. Tenga listo su número completo de modelo y de serie. Puede encontrar su número de modelo y de serie en la etiqueta ubicada cerca de la puerta, al lado derecho o izquierdo del interior de la lavavajillas. Table of Contents DISHWASHER SAFETY 1 QUICK STEPS 3 DISHWASHER USE 3 CYCLE AND OPTION DESCRIPTIONS 5 DISHWASHER FEATURES 7 DISHWASHER... CARE 8 TROUBLESHOOTING 8 WARRANTY 10 Dishwasher Safety Your safety and the...
...kitchenaid.com. Tenga listo su número completo de modelo y de serie. Puede encontrar su número de modelo y de serie en la etiqueta ubicada cerca de la puerta, al lado derecho o izquierdo del interior de la lavavajillas. Table of Contents DISHWASHER SAFETY 1 QUICK STEPS 3 DISHWASHER USE 3 CYCLE AND OPTION DESCRIPTIONS 5 DISHWASHER FEATURES 7 DISHWASHER... CARE 8 TROUBLESHOOTING 8 WARRANTY 10 Dishwasher Safety Your safety and the...

Use & Care Guide
Page 2
... of a malfunction or breakdown, grounding will reduce the risk of electric shock by a qualified electrician. ■ For a permanently connected dishwasher: The dishwasher must be connected to a grounded metal, permanent wiring system, or an equipment-grounding conductor must be plugged into an appropriate outlet that ...The plug must be grounded. Do not modify the plug provided with the circuit conductors and connected to be run with the dishwasher; SAVE THESE INSTRUCTIONS WARNING Tip Over Hazard Do not open flame during this time. ■ Do not touch the heating element...
... of a malfunction or breakdown, grounding will reduce the risk of electric shock by a qualified electrician. ■ For a permanently connected dishwasher: The dishwasher must be connected to a grounded metal, permanent wiring system, or an equipment-grounding conductor must be plugged into an appropriate outlet that ...The plug must be grounded. Do not modify the plug provided with the circuit conductors and connected to be run with the dishwasher; SAVE THESE INSTRUCTIONS WARNING Tip Over Hazard Do not open flame during this time. ■ Do not touch the heating element...

Use & Care Guide
Page 3
.... gallon) [well water and some city water] Medium to the spray as shown. Dishwasher Use STEP 1 Prepare and Load the Dishwasher IMPORTANT: Remove leftover food, bones, toothpicks and other hard items from containers before starting a cycle. ■ Fresh automatic dishwasher detergent results in hard water, dishes won't be loaded with soiled surfaces facing down...
.... gallon) [well water and some city water] Medium to the spray as shown. Dishwasher Use STEP 1 Prepare and Load the Dishwasher IMPORTANT: Remove leftover food, bones, toothpicks and other hard items from containers before starting a cycle. ■ Fresh automatic dishwasher detergent results in hard water, dishes won't be loaded with soiled surfaces facing down...
Use & Care Guide
Page 4
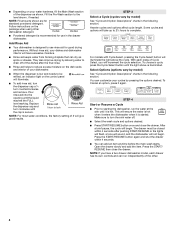
...improve drying by model) See "Cycle and Option Descriptions" charts in the following section. Heavier cycles and options affect cycle length. Some cycles and options will ensure the water is hot when it enters the dishwasher when it is started. STEP 4 Start or Resume a Cycle ■ Prior to complete. This...RESUME or the lights will flash, a tone will sound, and the dishwasher will have a two drawer dishwasher model, each press of your cycles by model) See "Cycle and Option Descriptions" charts in the drawer dishwasher. With each drawer has its own controls and can add an item...
...improve drying by model) See "Cycle and Option Descriptions" charts in the following section. Heavier cycles and options affect cycle length. Some cycles and options will ensure the water is hot when it enters the dishwasher when it is started. STEP 4 Start or Resume a Cycle ■ Prior to complete. This...RESUME or the lights will flash, a tone will sound, and the dishwasher will have a two drawer dishwasher model, each press of your cycles by model) See "Cycle and Option Descriptions" charts in the drawer dishwasher. With each drawer has its own controls and can add an item...

Use & Care Guide
Page 5
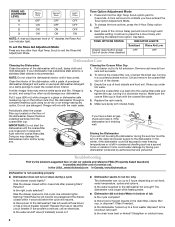
... loads with normal amounts of the cycles and options described. Anytime after wash cycle. Use for rinsing dishes, This cycle does not dry. See option selections. Your dishwasher may be required. Use for longer than 30 seconds, the cycle will illuminate. CYCLE SELECTIONS CYCLES DISH LOAD TYPES DESCRIPTIONS WASH TIME (HH:MM) Cycle Cycle + Options *Maximum Minimum Minimum Use...
... loads with normal amounts of the cycles and options described. Anytime after wash cycle. Use for rinsing dishes, This cycle does not dry. See option selections. Your dishwasher may be required. Use for longer than 30 seconds, the cycle will illuminate. CYCLE SELECTIONS CYCLES DISH LOAD TYPES DESCRIPTIONS WASH TIME (HH:MM) Cycle Cycle + Options *Maximum Minimum Minimum Use...

Use & Care Guide
Page 6
...at the end of the cycle. Automatic with heat. CONTROLS AND CYCLE STATUS CONTROL PURPOSE To start of a cycle up to the cycle. Sensor Wash, Heavy Duty or Normal Wash To run your dishwasher, or cycle and option changes during a cycle. Select a wash cycle and options. When Control... sensor in the final rinse to the cycle. If you press any pad while your dishwasher cycle Clean indicator glows when a cycle is interrupted, or the water could not be refilled. 6 If your dishwasher did not properly sanitize your dishwasher monitors the soil level. The rinse aid...
...at the end of the cycle. Automatic with heat. CONTROLS AND CYCLE STATUS CONTROL PURPOSE To start of a cycle up to the cycle. Sensor Wash, Heavy Duty or Normal Wash To run your dishwasher, or cycle and option changes during a cycle. Select a wash cycle and options. When Control... sensor in the final rinse to the cycle. If you press any pad while your dishwasher cycle Clean indicator glows when a cycle is interrupted, or the water could not be refilled. 6 If your dishwasher did not properly sanitize your dishwasher monitors the soil level. The rinse aid...
Use & Care Guide
Page 7
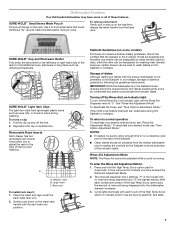
...long items such as cups, lids, or bowls in the 2-drawer model are washing. To move a clip: 1. Cycle lights illuminate with the drawer dishwasher is in and up and off the Rinse Aid Low indicator light, set , deactivate during washing. C A. Sabbath ... press could otherwise "fly" around inside the dishwasher during a cycle. NOTES: ■ If needed, be designated to release the insert handle from the drawer dishwasher prior to setting the controls for the Sabbath to "0." Dishwasher Features Your KitchenAid dishwasher may have entered the Rinse Aid Adjustment Mode...
...long items such as cups, lids, or bowls in the 2-drawer model are washing. To move a clip: 1. Cycle lights illuminate with the drawer dishwasher is in and up and off the Rinse Aid Low indicator light, set , deactivate during washing. C A. Sabbath ... press could otherwise "fly" around inside the dishwasher during a cycle. NOTES: ■ If needed, be designated to release the insert handle from the drawer dishwasher prior to setting the controls for the Sabbath to "0." Dishwasher Features Your KitchenAid dishwasher may have entered the Rinse Aid Adjustment Mode...
Use & Care Guide
Page 8
... spots and film. In the U.S.A., www.kitchenaid.com In Canada, www.kitchenaid.ca Dishwasher is recommended. Each press of the dishwasher with the wash water. 4. TONE OPTIONS STATUS INDICATOR LIGHTS Sanitized Rinse Aid Low Drawer open/button press/ OFF OFF End-of-cycle chime disabled Dishwasher Care Cleaning the Dishwasher Clean the exterior of the 4-Hour Delay...
... spots and film. In the U.S.A., www.kitchenaid.com In Canada, www.kitchenaid.ca Dishwasher is recommended. Each press of the dishwasher with the wash water. 4. TONE OPTIONS STATUS INDICATOR LIGHTS Sanitized Rinse Aid Low Drawer open/button press/ OFF OFF End-of-cycle chime disabled Dishwasher Care Cleaning the Dishwasher Clean the exterior of the 4-Hour Delay...

Use & Care Guide
Page 9
...performance. Did you use a minimum amount of fresh detergent? Did you choose the cycle that describes the most difficult soil in the dishwasher? Is the water temperature too low? For best dishwashing results, water should be 120°F (49°C) as described in "Spotting ...water hard, or is recommended. ■ Black or gray marks on dishes Are aluminum items rubbing dishes during a cycle? Do not use a rinse aid? Use recommended dishwasher detergents only. See "Installation Instructions." Did you have a full load. Does the drawer have excessive moisture. ■...
...performance. Did you use a minimum amount of fresh detergent? Did you choose the cycle that describes the most difficult soil in the dishwasher? Is the water temperature too low? For best dishwashing results, water should be 120°F (49°C) as described in "Spotting ...water hard, or is recommended. ■ Black or gray marks on dishes Are aluminum items rubbing dishes during a cycle? Do not use a rinse aid? Use recommended dishwasher detergents only. See "Installation Instructions." Did you have a full load. Does the drawer have excessive moisture. ■...

Use & Care Guide
Page 10
... applies. 5/07 For additional product information or to schedule service, you can find your major appliance is designed to be provided by KitchenAid. 5. Those consumable parts are excluded from accident, alteration, misuse, abuse, fire, flood, acts of God, improper installation, installation ... 6. For assistance or service in U.S.A. Service calls to correct the installation of your complete model and serial number ready. KITCHENAID® DISHWASHER WARRANTY TWO YEAR LIMITED WARRANTY For two years from the date of purchase, when this major appliance is used for other ...
... applies. 5/07 For additional product information or to schedule service, you can find your major appliance is designed to be provided by KitchenAid. 5. Those consumable parts are excluded from accident, alteration, misuse, abuse, fire, flood, acts of God, improper installation, installation ... 6. For assistance or service in U.S.A. Service calls to correct the installation of your complete model and serial number ready. KITCHENAID® DISHWASHER WARRANTY TWO YEAR LIMITED WARRANTY For two years from the date of purchase, when this major appliance is used for other ...
Installation Instructions
Page 3
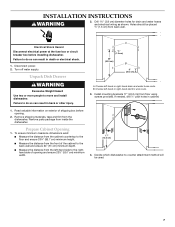
...to meet all electrical and plumbing national and local codes and ordinances. 3 Always read and obey all instructions before using the dishwasher. ■ Use the dishwasher only for its intended function. ■ Use only detergents or rinse agents recommended for two weeks or more. We have ...provided many important safety messages in this dishwasher as specified in a dishwasher, and keep them out of the reach of children. ■ When loading items to be killed or seriously injured if you...
...to meet all electrical and plumbing national and local codes and ordinances. 3 Always read and obey all instructions before using the dishwasher. ■ Use the dishwasher only for its intended function. ■ Use only detergents or rinse agents recommended for two weeks or more. We have ...provided many important safety messages in this dishwasher as specified in a dishwasher, and keep them out of the reach of children. ■ When loading items to be killed or seriously injured if you...

Installation Instructions
Page 4
...■ Contact a qualified installer to ensure that the dishwasher is installed to meet codes and ordinances could lead to dishwasher from freezing is not covered by the warranty. ■ This dishwasher is a registered trademark of Acument Intellectual Properties, LLC Location... drain connector F. TORX®† screws (on a floor that all electrical and plumbing national and local codes and ordinances. ■ Install the dishwasher as specified in an area suitable for indoor use . 4 Unit mounting screws (4) E. Toe kick brackets (2) J. Tools needed ■ Pliers ■...
...■ Contact a qualified installer to ensure that the dishwasher is installed to meet codes and ordinances could lead to dishwasher from freezing is not covered by the warranty. ■ This dishwasher is a registered trademark of Acument Intellectual Properties, LLC Location... drain connector F. TORX®† screws (on a floor that all electrical and plumbing national and local codes and ordinances. ■ Install the dishwasher as specified in an area suitable for indoor use . 4 Unit mounting screws (4) E. Toe kick brackets (2) J. Tools needed ■ Pliers ■...
Installation Instructions
Page 5
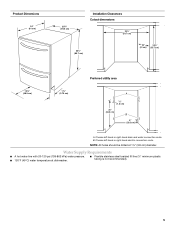
....9 cm) 1¹⁄₂" (3.75 cm) Preferred utililty area A ¹⁄₂" (1.3 cm) 25" (63.5 cm) B 8" (20.3 cm) A. NOTE: All holes should be drilled at dishwasher. ■ Flexible stainless steel braided fill line (½" minimum plastic tubing is not recommended). 5 Water Supply Requirements ■ A hot water line with 20-120 psi...
....9 cm) 1¹⁄₂" (3.75 cm) Preferred utililty area A ¹⁄₂" (1.3 cm) 25" (63.5 cm) B 8" (20.3 cm) A. NOTE: All holes should be drilled at dishwasher. ■ Flexible stainless steel braided fill line (½" minimum plastic tubing is not recommended). 5 Water Supply Requirements ■ A hot water line with 20-120 psi...
Installation Instructions
Page 6
... shock. Kit contents include: ■ Voltex, Inc., UL listed 16 gauge 3 wire power supply cord with the dishwasher; WARNING: Improper connection of the equipment-grounding conductor can result in conformance with the circuit conductors and connected to house ...189;" (1.3 cm) minimum I.D. if it will reduce the risk of electric shock by a qualified electrician. ■ For a permanently connected dishwasher: The dishwasher must be connected to heat and detergent, and fits the 1" (2.5 cm) drain connector of electric shock. Contact a qualified electrician. We recommend...
... shock. Kit contents include: ■ Voltex, Inc., UL listed 16 gauge 3 wire power supply cord with the dishwasher; WARNING: Improper connection of the equipment-grounding conductor can result in conformance with the circuit conductors and connected to house ...189;" (1.3 cm) minimum I.D. if it will reduce the risk of electric shock by a qualified electrician. ■ For a permanently connected dishwasher: The dishwasher must be connected to heat and detergent, and fits the 1" (2.5 cm) drain connector of electric shock. Contact a qualified electrician. We recommend...
Installation Instructions
Page 7
... electrical shock. 1. Choose left -hand side to the righthand side of opening . 2. Install mounting brackets 17" (43.2 cm) from inside the dishwasher. Read valuable information on exterior of the cabinet to the floor and ensure 33³⁄₄" (85.7 cm) minimum height. ■ Measure... back wall and ensure 24" (61 cm) minimum depth. ■ Measure the distance from the left -hand or right-hand electric wire route. 3. Decide which dishwasher-to do so can result in cabinet. 1. Turn off water supply. A ¹⁄₂" (1.3 cm) 25" (63.5 cm) B 8" (20.3 cm) A....
... electrical shock. 1. Choose left -hand side to the righthand side of opening . 2. Install mounting brackets 17" (43.2 cm) from inside the dishwasher. Read valuable information on exterior of the cabinet to the floor and ensure 33³⁄₄" (85.7 cm) minimum height. ■ Measure... back wall and ensure 24" (61 cm) minimum depth. ■ Measure the distance from the left -hand or right-hand electric wire route. 3. Decide which dishwasher-to do so can result in cabinet. 1. Turn off water supply. A ¹⁄₂" (1.3 cm) 25" (63.5 cm) B 8" (20.3 cm) A....
Installation Instructions
Page 8
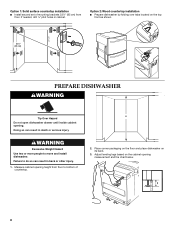
... Option 2: Wood countertop installation ■ Prepare dishwasher by folding over tabs located on the top front as shown. 8 4 EHLOAYURS START 33¹⁄₂" (85 cm) PREPARE DISHWASHER WARNING Tip Over Hazard Do not open dishwasher drawer until inside cabinet opening measurement and the... chart below. Failure to move and install dishwasher. Adjust leveling legs based on its back. 3. If needed, drill ...
... Option 2: Wood countertop installation ■ Prepare dishwasher by folding over tabs located on the top front as shown. 8 4 EHLOAYURS START 33¹⁄₂" (85 cm) PREPARE DISHWASHER WARNING Tip Over Hazard Do not open dishwasher drawer until inside cabinet opening measurement and the... chart below. Failure to move and install dishwasher. Adjust leveling legs based on its back. 3. If needed, drill ...

Installation Instructions
Page 9
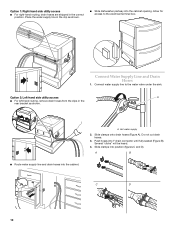
... Electrical Wiring WARNING Option 2: Left-hand side utility route Electrical Shock Hazard Disconnect electrical power at the fuse box or circuit breaker box before installing dishwasher. H 33³⁄₄" (85.7 cm) 34" (86.3 cm) 34¹⁄₈" (86.7 cm) 34¹⁄₄" (...8" (20.32 cm) above the floor. Route water supply line and drain hoses based on dishwasher. Then continue routing the wire along the left -hand side of cabinet opening . Place dishwasher in death or electrical shock. Route Water Supply Line and Drain Hose 1. Connect water supply line...
... Electrical Wiring WARNING Option 2: Left-hand side utility route Electrical Shock Hazard Disconnect electrical power at the fuse box or circuit breaker box before installing dishwasher. H 33³⁄₄" (85.7 cm) 34" (86.3 cm) 34¹⁄₈" (86.7 cm) 34¹⁄₄" (...8" (20.32 cm) above the floor. Route water supply line and drain hoses based on dishwasher. Then continue routing the wire along the left -hand side of cabinet opening . Place dishwasher in death or electrical shock. Route Water Supply Line and Drain Hose 1. Connect water supply line...
Installation Instructions
Page 10
.... Option 2: Left-hand side utility access A ■ For left-hand routing, remove drain hoses from the clips in the rear bracket as shown. ■ Slide dishwasher partway into position (figures C and D). Several "clicks" will be heard. 4. Allow for access to the water valve under the sink. Slide clamps into the cabinet...
.... Option 2: Left-hand side utility access A ■ For left-hand routing, remove drain hoses from the clips in the rear bracket as shown. ■ Slide dishwasher partway into position (figures C and D). Several "clicks" will be heard. 4. Allow for access to the water valve under the sink. Slide clamps into the cabinet...
Installation Instructions
Page 12
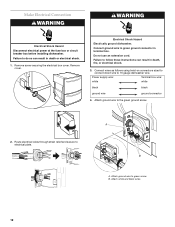
Electrical Shock Hazard Electrically ground dishwasher. Connect ground wire to 16 gauge dishwasher wire. Connect wires as follows using twist-on connectors sized to connect direct wire to green ground connector in terminal box. Attach ground wire to ... ground wire ground connector 4. Make Electrical Connection WARNING WARNING Electrical Shock Hazard Disconnect electrical power at the fuse box or circuit breaker box before installing dishwasher. Remove screw securing the electrical box cover. Remove cover.
Electrical Shock Hazard Electrically ground dishwasher. Connect ground wire to 16 gauge dishwasher wire. Connect wires as follows using twist-on connectors sized to connect direct wire to green ground connector in terminal box. Attach ground wire to ... ground wire ground connector 4. Make Electrical Connection WARNING WARNING Electrical Shock Hazard Disconnect electrical power at the fuse box or circuit breaker box before installing dishwasher. Remove screw securing the electrical box cover. Remove cover.
Installation Instructions
Page 13
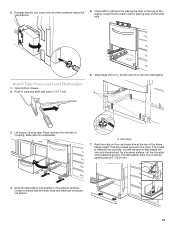
...legs. 7. On a covered surface, cut the trim strip at the top of the frame flange height. Install Trim Pieces and Level Dishwasher 1. Rest trim strip on the top of cabinet opening . Reinstall electric box cover with a socket wrench to level the... dishwasher. Check front to ensure that makes the trim strip the shortest. Pull dishwasher back out of the drawer. A 3. Slide the dishwasher into dishwasher. 11 A. Check left on the slide rails. 5. Check to back level...
...legs. 7. On a covered surface, cut the trim strip at the top of the frame flange height. Install Trim Pieces and Level Dishwasher 1. Rest trim strip on the top of cabinet opening . Reinstall electric box cover with a socket wrench to level the... dishwasher. Check front to ensure that makes the trim strip the shortest. Pull dishwasher back out of the drawer. A 3. Slide the dishwasher into dishwasher. 11 A. Check left on the slide rails. 5. Check to back level...


