
Use and Care Guide
Page 4
... E. Model and serial number label (on drawer top edge) L. PARTS AND FEATURES This manual covers several different models. Control panel (on your dishwasher may vary from those shown below. FLEXI-BASKET™ silverware basket I J K L M N O P A. The features on drawer front) Control Panels F. SURE-HOLD® medium rack insert B. WHISPER QUIET® sound system G. Drain filter N.
... E. Model and serial number label (on drawer top edge) L. PARTS AND FEATURES This manual covers several different models. Control panel (on your dishwasher may vary from those shown below. FLEXI-BASKET™ silverware basket I J K L M N O P A. The features on drawer front) Control Panels F. SURE-HOLD® medium rack insert B. WHISPER QUIET® sound system G. Drain filter N.

Use and Care Guide
Page 5
...the wash cycle in the drain filter area after the wash cycle is normal for dishwashers. NOTE: It is complete. 5 Each filling will automatically power up for good drying. Scrape large food soil and hard items (toothpicks or bones) from spinning freely. 7. Push drawer firmly closed. Read this...Guide. When the drawer is operating and a power failure occurs, it will start the wash cycle. 5. Do not use the dishwasher, it will continue to 2 months depending on the top of the wash cycle. Using Your New Dishwasher 1. At the end of energy. Check drain filter and spray ...
...the wash cycle in the drain filter area after the wash cycle is normal for dishwashers. NOTE: It is complete. 5 Each filling will automatically power up for good drying. Scrape large food soil and hard items (toothpicks or bones) from spinning freely. 7. Push drawer firmly closed. Read this...Guide. When the drawer is operating and a power failure occurs, it will start the wash cycle. 5. Do not use the dishwasher, it will continue to 2 months depending on the top of the wash cycle. Using Your New Dishwasher 1. At the end of energy. Check drain filter and spray ...
Use and Care Guide
Page 6
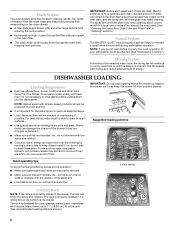
... you do not plan to run for evidence of food particles and clean. (A small amount of water will continue to wash them into the dishwasher. DISHWASHER LOADING Loading Suggestions s Remove leftover food, bones, toothpicks and other large objects from properly closing. To conserve water, energy and save time over... flat on the clean dishes. The rack is not necessary to 11" (28.38 cm), fit in the drain filter. The spray arm and filter plate may keep the drawer lid from entering the pump system. s Make sure pot lids and handles, etc., do not load dishes properly...
... you do not plan to run for evidence of food particles and clean. (A small amount of water will continue to wash them into the dishwasher. DISHWASHER LOADING Loading Suggestions s Remove leftover food, bones, toothpicks and other large objects from properly closing. To conserve water, energy and save time over... flat on the clean dishes. The rack is not necessary to 11" (28.38 cm), fit in the drain filter. The spray arm and filter plate may keep the drawer lid from entering the pump system. s Make sure pot lids and handles, etc., do not load dishes properly...
Use and Care Guide
Page 7
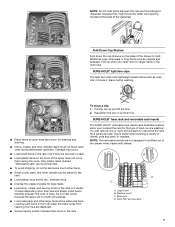
... between the rack and the detergent dispenser because they are recommended. s Load cake pans and other during the cycle. Damage may occur. Drain filter access panel 7 Do not nest bowls because the spray will not reach all surfaces. Large insert B. HEAVY NORMAL Fold-Down Cup ...Shelves Fold down in front can remove one or more of the drawer while loaded with dishes. To move them during dishwasher operation. s Load plastic items so the force of load you to hold lightweight plastic items such as utensils and...
... between the rack and the detergent dispenser because they are recommended. s Load cake pans and other during the cycle. Damage may occur. Drain filter access panel 7 Do not nest bowls because the spray will not reach all surfaces. Large insert B. HEAVY NORMAL Fold-Down Cup ...Shelves Fold down in front can remove one or more of the drawer while loaded with dishes. To move them during dishwasher operation. s Load plastic items so the force of load you to hold lightweight plastic items such as utensils and...

Use and Care Guide
Page 10
...can make some soils harder to remove and cause certain detergent ingredients not to drain off -peak hours. They improve drying by allowing water to function. The rinse aid dispenser is located on your dishwasher with its setting fixed at 5. (See "Option Selections and Adjustments" section.)... end of cold water in the "Loading Silverware Basket" section.) s Use a delay feature to wait until the dishwasher is running into the drawer. s If your dishwasher during off of the dishes during the regeneration of rinse aid. Hot water also dissolves grease on the thermometer as ...
...can make some soils harder to remove and cause certain detergent ingredients not to drain off -peak hours. They improve drying by allowing water to function. The rinse aid dispenser is located on your dishwasher with its setting fixed at 5. (See "Option Selections and Adjustments" section.)... end of cold water in the "Loading Silverware Basket" section.) s Use a delay feature to wait until the dishwasher is running into the drawer. s If your dishwasher during off of the dishes during the regeneration of rinse aid. Hot water also dissolves grease on the thermometer as ...

Use and Care Guide
Page 12
..., you can add an item anytime before the main wash starts. The drawer may not be filled properly for the drawer to suit your dishwasher. Close the drawer firmly. 4. You can also use or adjust some of the preset options available to drain. 2. See following descriptions. Press START/RESUME. To activate, press and hold the...
..., you can add an item anytime before the main wash starts. The drawer may not be filled properly for the drawer to suit your dishwasher. Close the drawer firmly. 4. You can also use or adjust some of the preset options available to drain. 2. See following descriptions. Press START/RESUME. To activate, press and hold the...

Use and Care Guide
Page 15
... with a clean, lint-free cloth. You may cause foaming or sudsing. 2. Lift and remove the drain filter out of the drawer. 5. To clean interior Make a paste with powdered dishwasher detergent on the inside surfaces. This will release the filter plate. Center ring F. Outer ring Correct locking... it lies flat in "Spotting and filming on the two rings align. (See illustration above.) 7. Empty the drain filter, rinse under the silverware basket. In the center of the drawer can cause a white film to move the filter plate. Spray arm B. Outer ring D. Impeller C A. Align...
... with a clean, lint-free cloth. You may cause foaming or sudsing. 2. Lift and remove the drain filter out of the drawer. 5. To clean interior Make a paste with powdered dishwasher detergent on the inside surfaces. This will release the filter plate. Center ring F. Outer ring Correct locking... it lies flat in "Spotting and filming on the two rings align. (See illustration above.) 7. Empty the drain filter, rinse under the silverware basket. In the center of the drawer can cause a white film to move the filter plate. Spray arm B. Outer ring D. Impeller C A. Align...

Use and Care Guide
Page 16
... summer Protect your designated service center and ask for any soil buildup. Unscrew the plastic cap. To order a drain air gap, call us or your dishwasher during the summer months by turning off the chrome cover. With most types, you lift off the water supply and... power supply to near the dishwasher. Winterizing your dishwasher Protect your dishwasher and home against water damage due to ensure proper drainage of your dishwasher. To clean the drain air gap Clean the drain air gap periodically to freezing water lines. Then check for ...
... summer Protect your designated service center and ask for any soil buildup. Unscrew the plastic cap. To order a drain air gap, call us or your dishwasher during the summer months by turning off the chrome cover. With most types, you lift off the water supply and... power supply to near the dishwasher. Winterizing your dishwasher Protect your dishwasher and home against water damage due to ensure proper drainage of your dishwasher. To clean the drain air gap Clean the drain air gap periodically to freezing water lines. Then check for ...

Use and Care Guide
Page 17
... to 120 psi (138 to be effective. Are high suds slowing the wash arm? Use recommended powdered dishwasher detergents only. A delay automatically occurs in a glass or dishwasher-safe measuring cup on dishes Is your drawer. 1. Are the drain filter and filter plate clean and installed correctly? Spots and stains on dishes s Spotting and filming...
... to 120 psi (138 to be effective. Are high suds slowing the wash arm? Use recommended powdered dishwasher detergents only. A delay automatically occurs in a glass or dishwasher-safe measuring cup on dishes Is your drawer. 1. Are the drain filter and filter plate clean and installed correctly? Spots and stains on dishes s Spotting and filming...

Use and Care Guide
Page 18
...filter plate and/or spray arm correctly placed? Water leaking s Is the drain hose disconnected from your drawer to the dishwasher. Make sure that the inlet hose is a milky, rainbowcolored deposit; Turn off . Close the drawer and press the Start/Resume button. Continuous beeping s A failure has ...remove stains from a waste pipe? Stains will not open the drawer. Turn Lock off water and power supplies to allow thorough rinsing. s Is there water in the dishwasher and cause marking. Reconnect the drain hose to "Option Selections and Adjustments." Dishes are damaged during...
...filter plate and/or spray arm correctly placed? Water leaking s Is the drain hose disconnected from your drawer to the dishwasher. Make sure that the inlet hose is a milky, rainbowcolored deposit; Turn off . Close the drawer and press the Start/Resume button. Continuous beeping s A failure has ...remove stains from a waste pipe? Stains will not open the drawer. Turn Lock off water and power supplies to allow thorough rinsing. s Is there water in the dishwasher and cause marking. Reconnect the drain hose to "Option Selections and Adjustments." Dishes are damaged during...

Installation Instructions
Page 2
... Requirements 4 Electrical Requirements 4 Installation Instructions 5 Prepare Cabinet Opening 5 Electrical Connection 5 If Installing Flexible Trim Pieces 8 Install Dishwasher 8 Install Drain Hose 10 Connect to Water Supply 11 Install Drawer Front Panels and Toe Panel 11 Complete Installation 15 DRAWER DISHWASHER SAFETY Your safety and the safety of injury, and tell you and others are not followed. 2
... Requirements 4 Electrical Requirements 4 Installation Instructions 5 Prepare Cabinet Opening 5 Electrical Connection 5 If Installing Flexible Trim Pieces 8 Install Dishwasher 8 Install Drain Hose 10 Connect to Water Supply 11 Install Drawer Front Panels and Toe Panel 11 Complete Installation 15 DRAWER DISHWASHER SAFETY Your safety and the safety of injury, and tell you and others are not followed. 2
Installation Instructions
Page 3
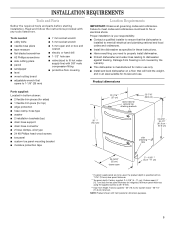
...before starting installation. Product dimensions Parts supplied: Located in these instructions. ■ Have everything you need to properly install dishwasher. ■ Protect dishwasher and water lines leading to fit hot water supply line) with an 11/16" (18 mm) door panel thickness... bottom drawer: ■ 2 flexible trim pieces (for sides) ■ 1 flexible trim piece (for top) ■ edge protection ■ hose clamp, hose type ■ washer ■ 2 installation brackets (top) ■ drain hose support ■ drain hose connector ■ 2 hose clamps, wire type ■ 24 #8 ...
...before starting installation. Product dimensions Parts supplied: Located in these instructions. ■ Have everything you need to properly install dishwasher. ■ Protect dishwasher and water lines leading to fit hot water supply line) with an 11/16" (18 mm) door panel thickness... bottom drawer: ■ 2 flexible trim pieces (for sides) ■ 1 flexible trim piece (for top) ■ edge protection ■ hose clamp, hose type ■ washer ■ 2 installation brackets (top) ■ drain hose support ■ drain hose connector ■ 2 hose clamps, wire type ■ 24 #8 ...

Installation Instructions
Page 6
...Open the strain relief. 4. Open the bottom drawer. 4. Lift the right edge of cabinet opening , slowly pull the inlet hose, drain hoses and power supply cord through the back of the dishwasher. 5. Slide the left -hand runner clip. Place the dishwasher on the protective cover. Press in back or ...other protective covering on the floor in front of the drawer off its side and place...
...Open the strain relief. 4. Open the bottom drawer. 4. Lift the right edge of cabinet opening , slowly pull the inlet hose, drain hoses and power supply cord through the back of the dishwasher. 5. Slide the left -hand runner clip. Place the dishwasher on the protective cover. Press in back or ...other protective covering on the floor in front of the drawer off its side and place...

Installation Instructions
Page 8
WARNING Tip Over Hazard Do not use dishwasher drawer until inside cabinet opening is being pushed into opening , slowly pull the inlet hose and drain hoses through the utility hole in the future. Center the flexible trim pieces. Remove trim ...pieces backing paper to expose the chassis trim. 2. Place cardboard or other protective covering on covering. 20. Install Dishwasher 1. Leave protective cover on the trim and press. 6. Open the bottom drawer. 3. As the dishwasher is 24...
WARNING Tip Over Hazard Do not use dishwasher drawer until inside cabinet opening is being pushed into opening , slowly pull the inlet hose and drain hoses through the utility hole in the future. Center the flexible trim pieces. Remove trim ...pieces backing paper to expose the chassis trim. 2. Place cardboard or other protective covering on covering. 20. Install Dishwasher 1. Leave protective cover on the trim and press. 6. Open the bottom drawer. 3. As the dishwasher is 24...

Installation Instructions
Page 10
...Keep hoses as fully extended as possible. Option 2: Top attachment 1. If the top attaching brackets are used, open the top drawer slightly. 2. Attach the drain hose connector to the underside of excess hose length. Screw the top attaching brackets to the waste tee using the supplied hose ...clamp. 6. Close the top drawer. drain hose support Option 2: Garbage disposal connection 1. If they do , trim them . 3. Position the wire clips between the two positioning ribs on the drain hose connector. Attach the drain hose connector to the cabinet with a #8 Phillips...
...Keep hoses as fully extended as possible. Option 2: Top attachment 1. If the top attaching brackets are used, open the top drawer slightly. 2. Attach the drain hose connector to the underside of excess hose length. Screw the top attaching brackets to the waste tee using the supplied hose ...clamp. 6. Close the top drawer. drain hose support Option 2: Garbage disposal connection 1. If they do , trim them . 3. Position the wire clips between the two positioning ribs on the drain hose connector. Attach the drain hose connector to the cabinet with a #8 Phillips...
Installation Instructions
Page 11
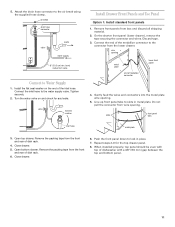
...the air break using the supplied hose clamp. Remove the packing tape from the front and rear of dishwasher with a 3/8" (9.5 mm) gap between the top and bottom panel. 11 Discard tape. 3. Close drawer. 6. Line up front panel tabs to lock in metal plate. 5. When installed properly, top panel... should be even with top of dish rack. 4. valve flat seal washer inlet hose Install Drawer Front Panels and Toe Panel Option 1: Install standard front panels 1. air break drain hose connector valve waste water supply 8" (20.3 cm) min.
...the air break using the supplied hose clamp. Remove the packing tape from the front and rear of dishwasher with a 3/8" (9.5 mm) gap between the top and bottom panel. 11 Discard tape. 3. Close drawer. 6. Line up front panel tabs to lock in metal plate. 5. When installed properly, top panel... should be even with top of dish rack. 4. valve flat seal washer inlet hose Install Drawer Front Panels and Toe Panel Option 1: Install standard front panels 1. air break drain hose connector valve waste water supply 8" (20.3 cm) min.


