

User Manual
Page 10
... SOLE AND EXCLUSIVE REMEDY UNDER THIS LIMITED WARRANTY SHALL BE PRODUCT REPAIR AS PROVIDED HEREIN. Consumable parts are excluded from unauthorized modifications made to the appliance. 9. KITCHENAID SHALL NOT BE LIABLE FOR INCIDENTAL OR CONSEQUENTIAL DAMAGES. KITCHENAID® DISHWASHER WARRANTY LIMITED WARRANTY For one year from the date of purchase, when this major appliance...
... SOLE AND EXCLUSIVE REMEDY UNDER THIS LIMITED WARRANTY SHALL BE PRODUCT REPAIR AS PROVIDED HEREIN. Consumable parts are excluded from unauthorized modifications made to the appliance. 9. KITCHENAID SHALL NOT BE LIABLE FOR INCIDENTAL OR CONSEQUENTIAL DAMAGES. KITCHENAID® DISHWASHER WARRANTY LIMITED WARRANTY For one year from the date of purchase, when this major appliance...

Installation Instructions
Page 2
...ordinances. 2 Doing so can result in this dishwasher as specified in Cabinet Opening 23 Complete Installation 24 Check Operation 25 If Dishwasher Does Not Operate 25 Additional Tips 25 DISHWASHER SAFETY Your safety and the safety of injury...8226; Observe all governing codes and ordinances. • Install this manual and on open dishwasher door while someone grasps the rear of Contents Dishwasher Safety 2 Installation Requirements 3 Tools and Parts 3 Location Requirements 4 Drain Requirements 6 Water Supply Requirements 6 Electrical Requirements 6 Installation ...
...ordinances. 2 Doing so can result in this dishwasher as specified in Cabinet Opening 23 Complete Installation 24 Check Operation 25 If Dishwasher Does Not Operate 25 Additional Tips 25 DISHWASHER SAFETY Your safety and the safety of injury...8226; Observe all governing codes and ordinances. • Install this manual and on open dishwasher door while someone grasps the rear of Contents Dishwasher Safety 2 Installation Requirements 3 Tools and Parts 3 Location Requirements 4 Drain Requirements 6 Water Supply Requirements 6 Electrical Requirements 6 Installation ...

Installation Instructions
Page 3
... cord kit marked for use UL listed or CSA approved strain relief to 16-gauge wiring in dishwasher Other useful items you may need: Flashlight Bath towel Shallow pan Wood block Other parts you may also need: 1 1/2"-2" (38.1-5.0 cm) Screw-typ e clamps (3 max) Masking... starting installation. suggested) or flexible braided water supply line See "Electrical Requirements" section For Direct Wire: use with dishwasher Additional parts supplied with 3/8" N.P.T. All Installations Tools needed: Pliers Flat-blade screwdriver Phillips screwdriver Utility knife 5/16" and 1/4" nut ...
... cord kit marked for use UL listed or CSA approved strain relief to 16-gauge wiring in dishwasher Other useful items you may need: Flashlight Bath towel Shallow pan Wood block Other parts you may also need: 1 1/2"-2" (38.1-5.0 cm) Screw-typ e clamps (3 max) Masking... starting installation. suggested) or flexible braided water supply line See "Electrical Requirements" section For Direct Wire: use with dishwasher Additional parts supplied with 3/8" N.P.T. All Installations Tools needed: Pliers Flat-blade screwdriver Phillips screwdriver Utility knife 5/16" and 1/4" nut ...

Installation Instructions
Page 4
...may be subject to the floor. A moisture barrier accessory (Part Number 4396277) is available from your dealer for a period of your cabinetry. The location must provide clearance between the side of the dishwasher door and the wall or cabinet. • square opening ... into opening , shims may be needed to level dishwasher.) Helpful Tip: Be sure to dishwasher against freezing. Damage from your dishwasher at rear of opening ). Location Requirements Grounded electrical supply required. Check location where dishwasher will be left unused for installing underneath the countertop,...
...may be subject to the floor. A moisture barrier accessory (Part Number 4396277) is available from your dealer for a period of your cabinetry. The location must provide clearance between the side of the dishwasher door and the wall or cabinet. • square opening ... into opening , shims may be needed to level dishwasher.) Helpful Tip: Be sure to dishwasher against freezing. Damage from your dishwasher at rear of opening ). Location Requirements Grounded electrical supply required. Check location where dishwasher will be left unused for installing underneath the countertop,...

Installation Instructions
Page 6
... gap should be installed in the cabinet next to the dishwasher opening. Outlet must plug into a grounded 3 prong outlet, located in accordance with 3/8" N.P.T. copper tubing with compression fitting or flexible braided water supply line (Part Number 4396897RP) NOTE: 1/2" minimum plastic tubing is not ... 20" (50.8 cm) minimum above the floor. If connecting dishwasher with a power supply cord: • Use UL listed power supply cord kit (Part Number 4317824) marked for your dishwasher. If connecting dishwasher with direct wiring: • Use flexible, armored or nonmetallic sheathed...
... gap should be installed in the cabinet next to the dishwasher opening. Outlet must plug into a grounded 3 prong outlet, located in accordance with 3/8" N.P.T. copper tubing with compression fitting or flexible braided water supply line (Part Number 4396897RP) NOTE: 1/2" minimum plastic tubing is not ... 20" (50.8 cm) minimum above the floor. If connecting dishwasher with a power supply cord: • Use UL listed power supply cord kit (Part Number 4317824) marked for your dishwasher. If connecting dishwasher with direct wiring: • Use flexible, armored or nonmetallic sheathed...

Installation Instructions
Page 12
... Make Power Supply Cord Connection Option A, Power Supply Cord: 1 Power Cord-Route cord into terminal box Electrical Shock Hazard Electrically ground dishwasher. Select UL listed or CSA approved twist-on wire connectors (included with power supply cord kit) rated to connect your household wiring to... or electrical shock. 2 Power Supply Cord- Take notice when installing or removing the dishwasher in terminal bow. Gently tug on wire connector. Make sure screwheads are secured. Connect ground wire to lower part of damaging the power supply cord. Do not use ? Failure to white, using...
... Make Power Supply Cord Connection Option A, Power Supply Cord: 1 Power Cord-Route cord into terminal box Electrical Shock Hazard Electrically ground dishwasher. Select UL listed or CSA approved twist-on wire connectors (included with power supply cord kit) rated to connect your household wiring to... or electrical shock. 2 Power Supply Cord- Take notice when installing or removing the dishwasher in terminal bow. Gently tug on wire connector. Make sure screwheads are secured. Connect ground wire to lower part of damaging the power supply cord. Do not use ? Failure to white, using...
Installation Instructions
Page 21
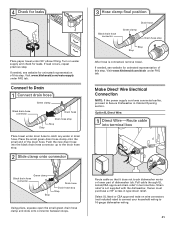
... strain relief in type strain relief. Strain relief is connected, remove towel. Visit www.kitchenaid.com/drain under FAQ tab. 4 Check for leaks Place paper towel under drain hose to Secure Dishwasher in Cabinet Opening section. Turn on wire connectors (not included) rated to connect your...and slide onto connector between stops. Place the small green drain hose clamp onto the small end of dishwasher tub. Route cable so that it does not touch dishwasher motor or lower part of the drain hose. If needed , see website for animated representation of this step. Owner must...
... strain relief in type strain relief. Strain relief is connected, remove towel. Visit www.kitchenaid.com/drain under FAQ tab. 4 Check for leaks Place paper towel under drain hose to Secure Dishwasher in Cabinet Opening section. Turn on wire connectors (not included) rated to connect your...and slide onto connector between stops. Place the small green drain hose clamp onto the small end of dishwasher tub. Route cable so that it does not touch dishwasher motor or lower part of the drain hose. If needed , see website for animated representation of this step. Owner must...

Installation Instructions
Page 25
...; Is the water turned on the water sheeting action of dishwasher tub. Selecting certain options could increase cycle time past 3.5 hours. Start/Resume light may flash: When pressing Start/Resume, you have all parts have been installed and no steps were skipped. After the first 2 minutes unlatch door,...If you do not close the door within 3 seconds. Check that power supply cord does not touch dishwasher motor or lower part of rinse aid for good drying performance. If the dishwasher is not working properly. Do not use nearly 40% less energy than older models. Reconnect Power 1 ...
...; Is the water turned on the water sheeting action of dishwasher tub. Selecting certain options could increase cycle time past 3.5 hours. Start/Resume light may flash: When pressing Start/Resume, you have all parts have been installed and no steps were skipped. After the first 2 minutes unlatch door,...If you do not close the door within 3 seconds. Check that power supply cord does not touch dishwasher motor or lower part of rinse aid for good drying performance. If the dishwasher is not working properly. Do not use nearly 40% less energy than older models. Reconnect Power 1 ...


